Background
Inspired by, and based upon, the Machines That Make Project. In MIT's How to Make (Almost) Anything class, we learn different digital fabrication skills each week. Towards the end of the course, these skills are integrated in a group project where we collaboratively build a machine based on the Modular Machines that Make Project developed by Nadya Peek. This is collaborative document from the CBA Section showing the machine we made and how we made it.
Concept – THE CAKE LIKING MACHINE
Technical Description
This is machine uses a new form of a novel semi-subtractive manufacturing method: Licking. The Cake Licker selectively removes and/or rearranges the frosting on a cake as a means of aesthetic manipulation. This can be used to render text or simple vector images on the top surface of the cake. The cutting tool is chosen not for accuracy, but rather the artistic merits of its dynamics. The desired aesthetic is one that clearly shows the manufacturing process.
Conceptual Description
We, the CNC [CBA Netizen Collective] are engineering a gestural interface between your biological tongue and a CNC [computerized numerically controlled] tongue. This is a project exploring the tension between virtuality and tangible longing. Through building a CNC robotic tongue that mimics the action of a remote participant’s tongue in real time, we experiment at the thresholds of mediated pleasure and synthetic satisfaction of virtual experiences.


Preparation
Before we had even decided what our machine would actually do, we needed to produce and assemble some of the machine components. Following these instructions, we broke into teams to tackle different components. Vera and Kim used the cold saw to cut machine shafts of the correct length. Caroline and Ali used the Modela to mill the driver board for the Gestalt nodes, and then went to the basement lab to stuff the board and construct ribbon cables. Dhruv, Yasmine, Raphael and Camille used the laser cutter to cut cardboard for the stages. Yasushi, Sands and Joshuah installed the PyGestalt software that will allow us to control our machine. Dan, Sooyeon, Camille and Vera used glue and plastic clips to assemble the laser-cut cardboard into the stages. Thanks to Nadya and Dan for instruction and oversight!


Kick-Off
We met on Wed 11/11 to decide on a project, form teams, and coordinate. We somehow decided on creating a cake licking machine 🎂👅. Participants were Daniel (heading up Toolhead), Yasushi, Harpreet (heading up Frame), Viirj, Jasmin, Andrew (heading up Software), Ali, Vera, Miguel, Eric (heading up Effector), and Raphael (heading up Coordination).
[Add description and sketches of cake liking machine here. What does it do? How does it do it? Why is it great?]
Tongue Team (Sooyeon, Camille, Ani, Joshuah, Daniel L)
Initial Meeting: Saturday 11/14
Sooyeon, Camille, Ani, Joshua, Daniel L and Caroline met to discuss and explore the design concepts for the toolhead.
Interaction Design Concept
Camille proposed to create a gestural interface between your tongue and a CNC controlled tongue. The machine will be used to gain psycho-sensory satisfaction by virtually licking a cake while seeing a robotic tongue effect the cake. There will be 4 degrees of freedom for the tongue's expressivity: x, y, z and theta. The z axis motion can be accomplished either by moving the toolhead up and down or by moving the cake up and down. The theta motion can be accomplished by installing a servo at the base of the tongue for rotation or by installing a pneumatic actuation. The toolpath is generated by tracking the motion of the user’s own tongue movements. The x, y movements of the user's tongue will be mapped to x, y movements of the CNC tongue or of the cake pan. Ideally, this would be accomplished through computer vision, potentially by adding a white dot at the end of the user's tongue for easier tracking purpose. Alternatively, an iPad or iPhone application can be created to obtain haptic sensor data through the touch screen. The team tested this idea by licking the phone screens. It worked just as well as swiping with fingers. The tongue can be connected to the actuators by screws or forks. The effector team will decide.
Toolhead Design Exploration
- Interchangeable Toolhead There could be various types of toolhead forms. Solid tongues can be cast in different forms, which would allow variety of frosting manipulation capabilities: resting tongue, clover tongue, scoop tongue, stippling tongue. The team will also test different tongue textures. The user's tongue will control the effector tongue. The 4 DOFs will include x (tongue translation), y(tongue translation), z (tongue translation or cake translation) and theta (tongue rotation)
- Pneumatically Actuated Toolhead The pneumatically actuated tongue makes scooping motion by curling upwards when charged with air. An example actuation can be found here: http://biodesign.seas.harvard.edu/soft-robotics. 4 DOFs include x (tongue translation), y (tongue translation), z (tongue translation or cake translation) and upward licking curl (actuated based on air pressure inside the tongue)
Material Exploration
The tongue can be made by casting gelatin or silicone; by 3D printing; or by creating a pneumatics actuator. The tongue will be tested with materials with various levels hardness.
Task Distribution
Ani will make conceptual drawings. Ani and Daniel L. will explore pneumatic robotic actuation. Ani will test casting techniques for pneumatic actuators. Daniel L. will explore 3D printing elastic materials that have different levels of hardness and elasticity. Joshua Jest will design 3D models of different tongue forms and tongue textures. Sooyeon will update the group document based on the meeting note. Camille and Sooyeon will cast the prototype static tongues. Caroline and Ani will liason between the effector group and the toolhead group.
3D Modeling... a Tongue
The task of modeling a tongue fell on Joshuah. He designed the tongue using Rhino. Sectional cuts of a tongue were eyeballed in 2D from a sketch. These sectional contours were then used to define a 3D form using Rhino's loft command (which takes some finessing). The more sections the better the outcome. Once the form had been generated, the dimensions could be fine tuned; first to the true scale of a tongue, and then stretched to approximate different tongue shapes (pointed, normal, flat). Eventually the normal tongue was selected to be milled and cast. For the prototype and potential variety in different end effectors (tongue shapes) tongues in oomoo, drystone and clay were casted/molded. Camille cast a drystone tongue so that there was a model that could be used for Ani's pneumatic tongue casting. Furthermore, many clay tongues were molded to potentially have different shaped tongue end effectors. We wanted to play with the variety of tongue shape in order to give the user more options for potential cake decorating/licking. We thought about options such as a clover shaped tongue, or a rolled tongue to see if this could give a different quality of cake licking. We also casted the tongue with Dragon Skin silicone rubber. We fixated a screw inside the cast to be attached to the actuator.
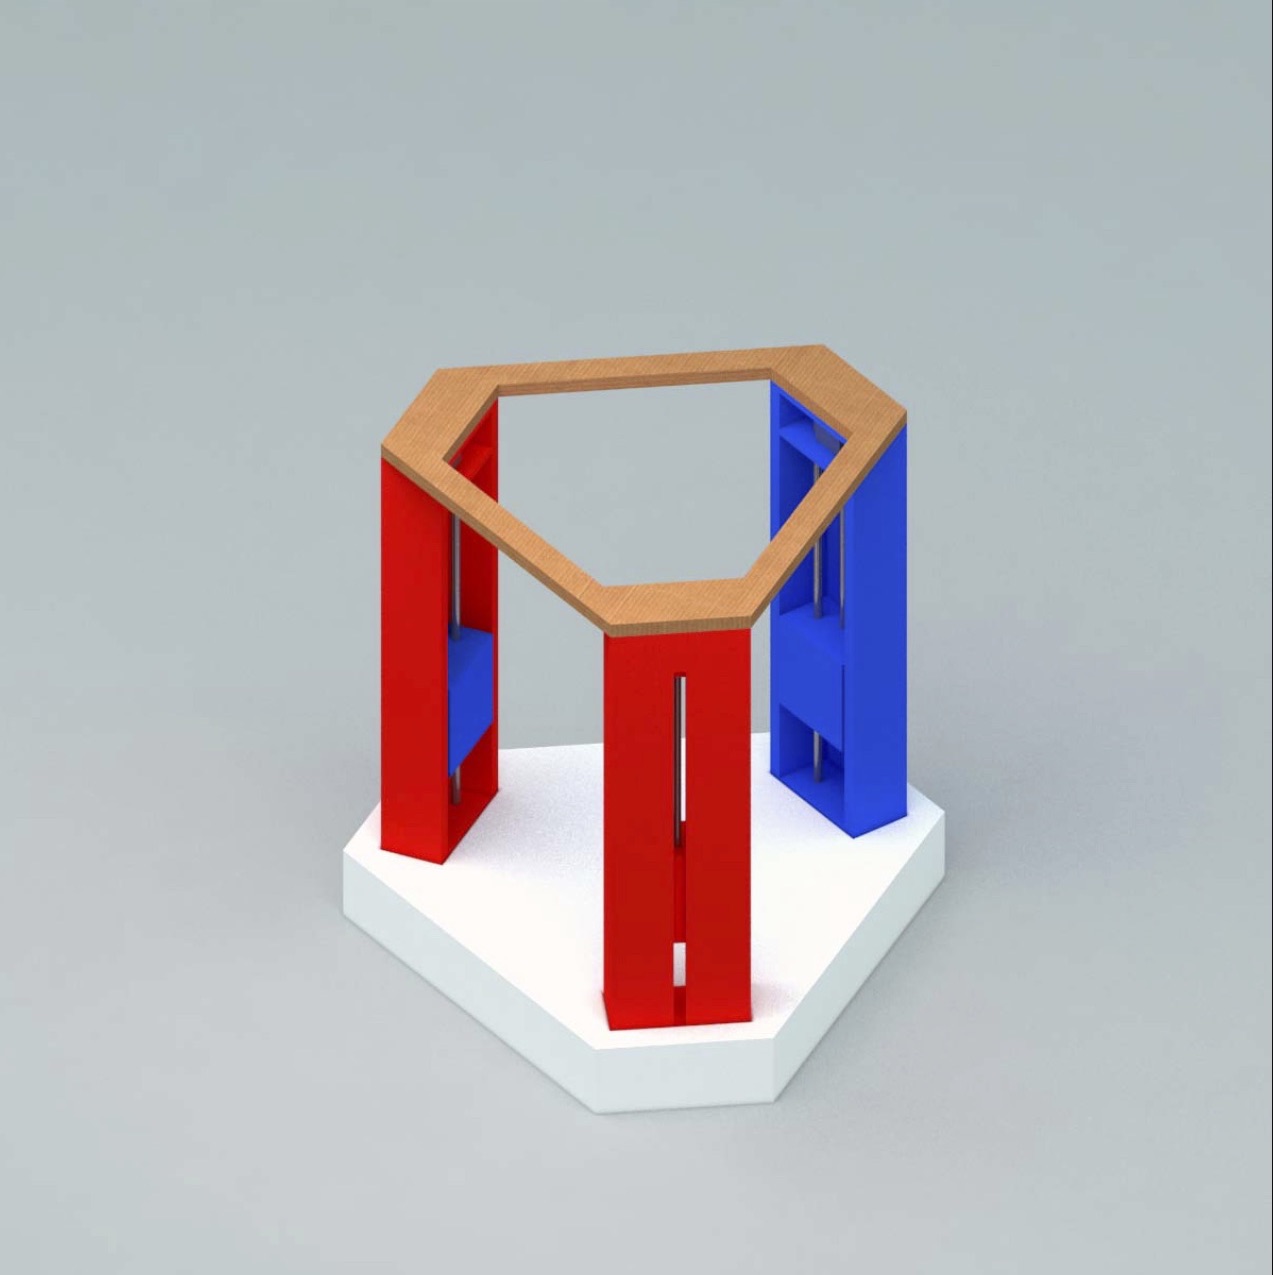
Ani explored pneumatic actuation for the tongue mold, and tongue-like molds. This is a test casting with two chambers as "proof of concept." Kim, Vera, Harpreet, Raphael, Ali met to discuss design of the frame. After a test assembly the frame was modeled in Rhino. The main components are the three stages in a vertical “Delta Bot configuration”. They’re held in place on a bottom platform in slots and by a top cover. The platform was casted out of hydrostone and the top laser cut from cardboard. The detailed plans show the measurements that were important for the math of the whole mechanism. The dimensions are chosen so that we can fit a cake in the center that serves the whole group. The mold was milled out of foam using the shopbot. Three layers of foam were glued together using gorilla glue and clamped over night.
The mold was sealed with gesso and paste wax was applied as a release agent. Hydrostone was used to cast the base of the machine.
The Arm Team went through several nomenclature iterations (first Toolhead Team, eventually Arm Team). We met several times during the course of the project. In our first meeting (with Caroline, Eric, Andy K and Ani as a liason for the Tongue Team), we came up with idea to make our machine a Delta Bot, which uses the combined motions of three vertical axes to effect motion in the x, y and z planes, and looks roughly like the following image. We posited this idea to the rest of the group, who received it graciously. Our task was to build the linkage system that interfaces with the cardboard stages (from the Frame Team) and the tongue (from the Tongue/ End Effector Team). We coordinated among ourselves to carry out the following subtasks: Here are some pictures of our process in progress and the assembled frame: The cake licking machine requires real time communication between a touch screen and the machine itself. After discussing and examining different solutions for the implementation the software team decided on the following architecture: Phone client > Websockets Server (HTML) > Python server > Gestalt. We divided responsibilities: The code we wrote can be found in this git repository. The app that sends "licks" to the server and then to the machine is available at lickr.herokuapp.com (Assuming only one user on this page when operating the machine.) When integrating the software with the machine we ran into a few obstacles - malfunctioning power cable, uneven behavior of motors and more. Some pictures from our meetings and the work on integrating the software with the machine:
Creating the mold was fairly straight forward. The tongue form was rotated so that the two-part mold would cut the tongue axially, minimizing hangover overhang in each half, and creating shallow molds which would later help with silicon compositing. The tongue was then boolean differenced out of the two blocks to form the negative mold. As the tongue geometry was fairly complex, this didn't work on the first try. Rhino is notorious for boolean fails. If geometry is ill-defined, or misaligned by any non-zero value, you're screwed. There are plenty of work-arounds, and sometimes even rotating the geometry by 90 degrees in any direction can solve the issue. In this case Rhino's explode command (typing this command can also be cathartic when dealing with a failed boolean for too long) was able to isolate the surface of each of the tongue halves, around which the wax cube could be reconstructed with simple surfaces. All surfaces were then combined using the join command to create a solid - a closed geometry essential for both boolean commands and for milling.
Milling went smoothly, and the results can be seen below.
Casting Prototype Static Tongues


Casting and Prototyping Pneumatic tongues
And here is a video with a larger prototye complete with a "simulated" cake:
This is an in process image of the tongue being cast with pneumatic chambers:


Frame Team (Kim, Vera, Harpreet, Raphael, Yasushi, Ali, Dhurv)
Initial Meeting: Saturday 11/16


Milling and Casting


Arm Team (Caroline, Andy K, Eric, Dhruv)


Software Team (Andy S, Miguel, Mike, Sands, Jasmin, Yasushi, Viirj)


