Objective
This week we are building our own webpages to document our progress and we are also creating a press-fit kit from cardboard using a laser cutter.
Webpage
I have never build a webpage in my life and started completely clueless. My first idea was to use some kind of template and work from there. I searched the web and found html5 up!. Unfortunately, the html files that are available from that website are very complicated and due to my non-existant html-skills I could not modify them efficiently wihtout breaking them.
Using youtube tutorials from the LearnCode.academy (specifically, 1, 2, 3 and 4) and lots of googling. I created an aditional style file (main.css) and a html file for every week of the course, that I will probably modify during the whole semester. Some of my style elements are taken from Bootstrap. The text editor I am using for this is notepad++. I created the flavicon in inkscape.
To Do:
- make nicer coverpicture
- about me section
- figure out nicer picture placement
- spell checker?
Press-fit kit
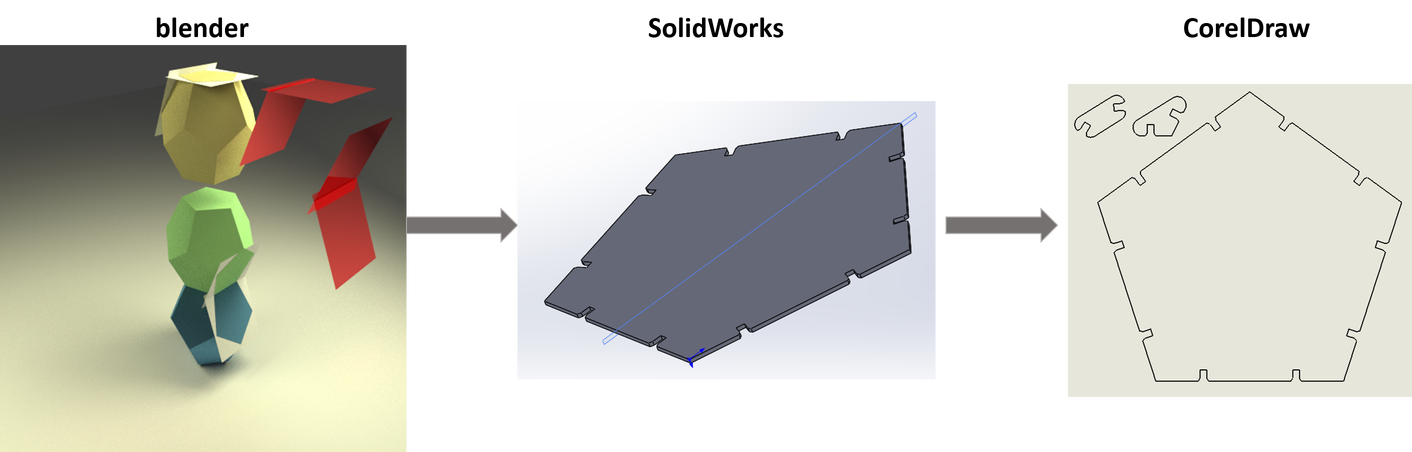
I wanted to build my press-fit kit around quasicrystals, materials with five- or ten-fold symmetry but without translational repeat units. Quasicrystals have repeating elements but don't repeat on a larger scale. Unfortunately, I coildn't come up with a use for a quasicrystal pattern. Instead, I decided to make a press-fit kit that could be used to build tunnels based on the shape of a dodecahedron. I decided to go with pentagonal tiles that can be connected with small connector pieces. I started with making a quick model in blender (the only 3D program I have any expierience in), and then it took me an embarrassingly long time to make the pentagonal tile in SolidWorks 2015. I decided to include two joints per side for stability (edit: the dodecahedron is very stable even with only one connector per side). For cutting, I imported the shapes into CorelDraw(linethickness: hairline). The laser cutting itself went suprisingly well (vector only, power=75%, speed=30%). The biggest problem that came up was the slight curvature of the cardboard which caused parts of the sheet to be out of focus.
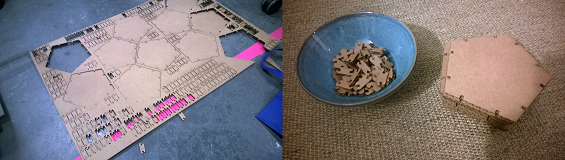
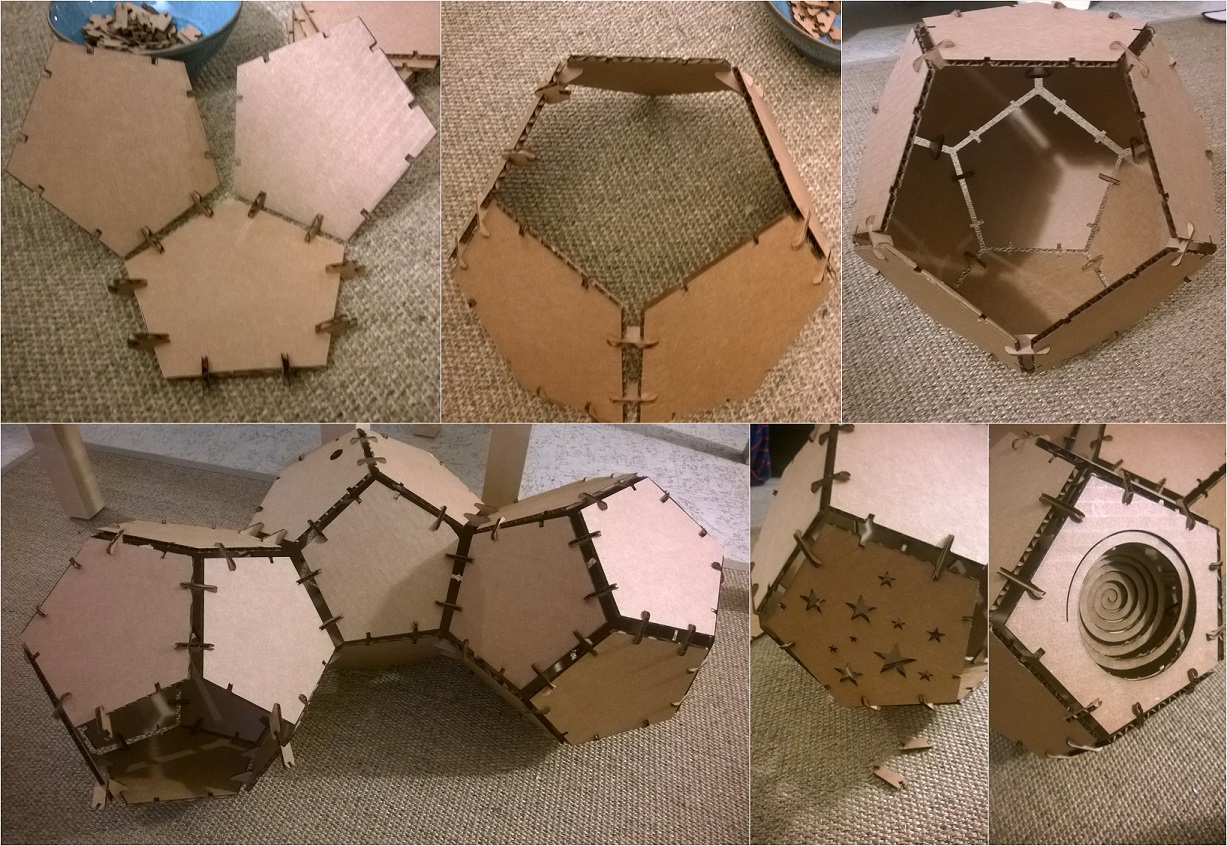
I started with cutting tiles for one dodecahedron. While putting it together, I noticed that the angle between the joints of the inter-dodecahedral connector is a bit too small. To solve this, I went back to my Solidworks file, changed the angle (no problem, as it is parametric) and cut new inter-dodecahedral connectors. With this change, I was able to build a tunnel of connected dodecahedra. After making the basic tiles I had also started to make a few special cat-toy tiles and tiles with windows. Putting the dodecahedra together is pretty time consuming and getting the last tiles in requires some patience. Maybe I could change the connector design somehow to make the assembly easier?
Vinyl cutting
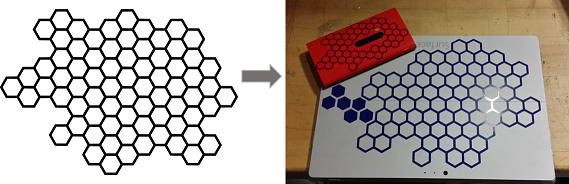
I also made a decal for my surface on the Roland vinyl cutter. I found a jpg file with a honeycomb pattern online, cleaned it up in inkscape and then made final adjustments (size = get from machine, linethickness = hairline) in CorelDraw. I used a force of 140g on the Roland vinyl cutter and a speed of 7cm/s. After cutting, I used tweezers to peel everything I did not want to transfer off of the vinyl sheet. Then I transfered the vinyl onto transfer-paper and peeled back the vinyl backing. The last transfer is from the transfer-paper onto the phone/Surface (carfeull about bubbles, push them from the inside to the outside). The most important thing I learned was to take my time with the transfer and to utilize the trace-logo option in Coreldraw to get nice outlines.
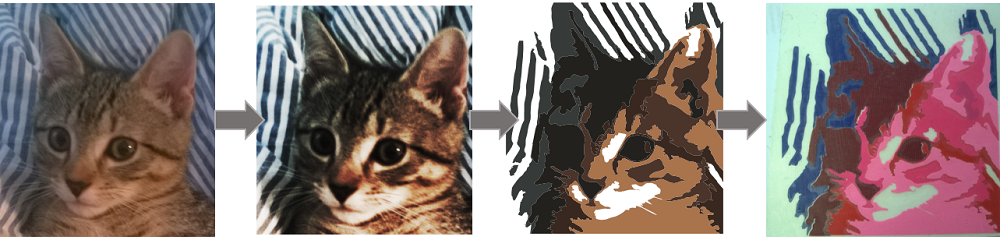
I also wanted to try and make a multicolored vinyl decal. I started with a picture I took with my phone and imported it in CorelDraw. Under bitmaps-image adjustment lab I increased the contrast and brightness of the image. Then I separeted it into layers with bitmap-outline trace-detailed logo (number of colors=5). I increased smoothing to 50 and decreased the details (look at the number of nodes, it should go down quite a bit). After exiting the POWERtrace window I ungrouped the different colors and cut them one by one from different colors of vinyl. To put the different vinyl cuts together, I aligned the features of one detail in the middle of the image and then pressed outwards. If I woudl do it again, I woudl start with a picture with a clean background (even though I really like the stripes in the final vinyl) and higher contrast.
Final project - proposal
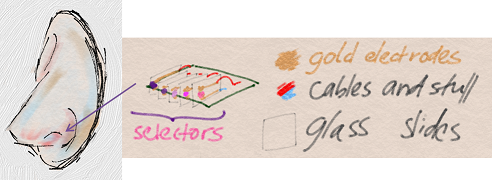
For my final project I would love to build an electric nose that detects smell.
The selector will be based on carbon nanotubes that are connected to electrodes and should be
selective towards several volatile odorants. I need to measure the conductivity/resistivity as a function of time.
A change in conductivity would then indicate the presence of "smell". I want the nose to have several different channels that it can monitor, each corresponding to a different selector.
Additionally, it should be able to communicate wirelessly, maybe via blootooth. If I have time I would like to make a nose-shaped housing for the sensor (maybe 3D printed?).
I am sure that my plans for the final project will change dramatically over the semester. But this is where I want to start! I made a few scetches of the design and functionalty on my Surface and I also made a very crude model of a nose in blender.