I was so, so excited for molding and casting week, partly because of my love for tactile materials and for watching them melt and solidify, partly because of the prospect of working on fine detail with my hands once again. When Neil mentioned that this method of fabrication was well suited for replication (make one mold and you can make any number of identical objects), I immediately thought that chess pieces would be a fun project and would employ this characteristic (replicability) well.
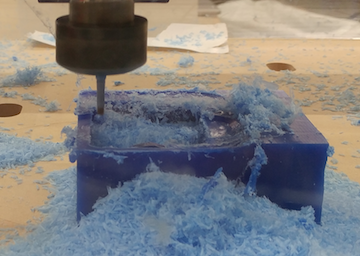
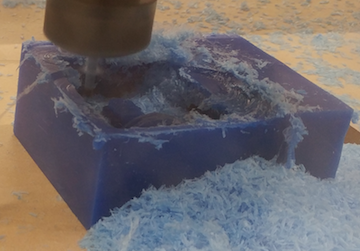
Because I wanted to spend more time on process than on design this week, I used a 3D model from GrabCad of a simple geometric pawn. Using this model and keeping the dimensions of my millable wax block (roughly 3"x3"x1.5") in mind, I created a toolpath in Vcarve Pro. Because this piece is radially symmetric, it can use two identical mold halves as a two-part mold, so I only needed to mill the mold-for-the-mold once. I set the depth of the half-piece to be 0.8" and set the piece 0.2" below the surface of the wax: this would leave space for the mold to cover the entire milled piece with nothing poking through. I used a rough pass ("2.5 D") and two smoothing passes, one at a 0 degree raster angle and one at a 45 degree raster angle. Though the piece could have used more smoothing, I ended up really liking the look of the shallow grooves on the not-quite-smooth piece. I secured the block of wax to the bed of out desktop ShopBot and zeroed the tool's axes at the block's corner. Thankfully, the wax block did not become detatched from the bed of the ShopBot during milling.
One fairly serious oversight that became apparent during milling was my failure to consider the toolpaths' depth in relation to the length of the cutting head I used. As the tool cut to the bottom of the pocket, it rubbed against the top edge of the wax block, melting it topically and slowing it down slightly. This did not really have a functional impact on my piece but is probably ultimately harmful to the ShopBot. I could have avoided this problem by securing the tool bit farther down its shaft, allowing it to cut to a greater depth before its housing comes in contact with the wax, or I could have used a longer 1/8" bit and secured it more strongly. Either of these would have worked, since we weren't using forceful enough cuts that the bit needed to be secured very high up. I also could have made the entire model smaller, which would have reduced the overall cut depth in each toolpath.
 The cutting head at an acceptable depth....
 ...and too close, melting the wax.
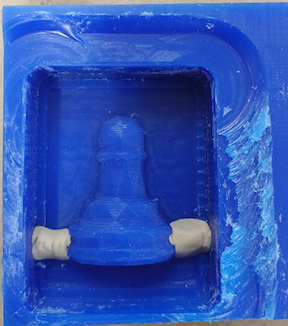
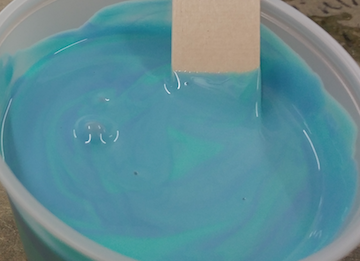
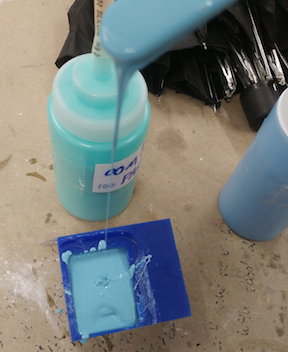
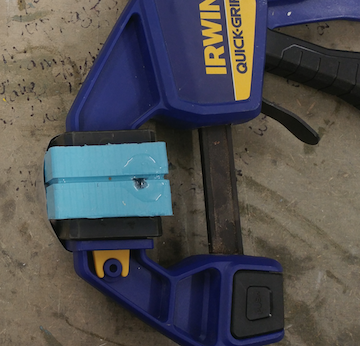
Once the shopbot had finished cutting all three toolpaths, I took my wax block out of the machine and took out paterials for casting Oomoo, a silicone molding product that is easy to mix and can be used with high-temperature molding materials such as Cerrotru. Because I had not included raised negatives of a pouring hole or air vent in my cutting pattern, I formed these negatives out of clay and stuck them into the bottom of the wax. These areas would become holes in the Oomoo molds. Oomoo comes separated into two parts, A and B, that are to be mixed in a 10:13 ratio by weight. I mixed them in a paper cup on our lab's desktop kitchen scale and used a wooden stick to gently agitate the mixture until it was a uniform color (parts A and B of the mixture are differently colored). I poured the wet Oomoo into the mold pocket of the wax block in a thin stream so that the fewest possible air bubbles would be transferred from the mixing cup. Oomoo takes about 75 minutes to set; I waited overnight and came back the next day to remove it from the mold. It was fully cured and retained the shape of the wax exactly, even the striations from the ShopBot's milling tip. I poured a second mold, this time without the clay pieces, and came back at the end of the day to remove it. I did not modify the mold to include position registers because the wax mold had unintentionally included a lip around its bottom exterior edge that I planned to visually align during casting with the two-part mold. I realized I had placed the clay pieces in inopportune spots for pouring and ventilation - they were on opposite sides of the model negative, so anything poured would leak out of the ventilation hole. I decided to scrap the Oomoo mold with holes and made a fresh, solid one that I cut holes out of with an X-acto knife, this time on the same side as the model.
I tried casting a hard white silicone in the oomoo mold but it never fully hardened, probably because of the lack of ventilation in the mold.
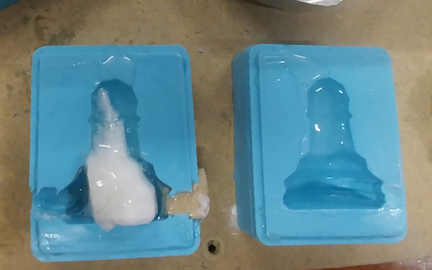
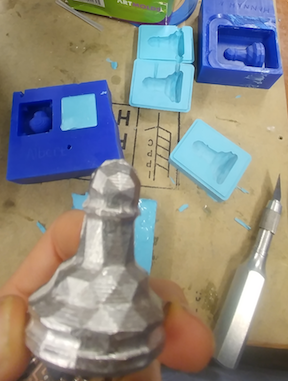
Casting in metal (Cerrotru) went much more smoothly, especially since it hardens in the mold in a matter of minutes, making it much easier to do more troubleshooting in a short amount of time. Our lab is equipped with a toaster, in which we melted Cerrotru in a measuring cup and poured directly into our molds - I did the pour over an aliminum plate to catch any stray drips. I coated the inside of the mold with baby powder before pouring after being shown the difference it could make - pieces cast without the powder displayed very rough surfaces, while pieces cast in powder coated molds had very smooth edges. The cast metal pawn came out with smooth sides and relatively few imperfections - the biggest was that I hadn't put enough care into indexing the two sides to line up with each other, so a seam is visible on the piece where the shapes on the sides are discontinuous. Because I ultimately want to make chess pieces out of a lighter plastic, I didn't worry too much about re-casting the metal piece to look perfect.