Real Time Tracking Progress and Notes
The Final Push
Learning about circular rather than linear development was huge. It was a 'wow' moment for me and has changed how I will approach projects in the future. If I get everything done it will be becasue of that shift in thinking.
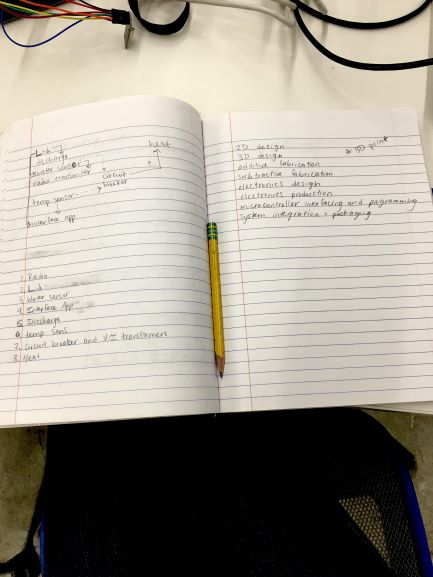
Overview: The temperature sensor I made a few weeks ago broke and for simplification I am going to cut that out now because the water level sensor is more important. Also, for networking week I did BLE was it was really hard to get working so I am switching to nRF24L01 radios from the class inventory because I have simple information being communicated and I also want it to be more real time than the Bluetooth. I made a box out of sheet metal in Wildcard Week that will house the heating element. On the to-do list is the lid and condensation discharge system, actually getting the radios working, finalizing what the heat source will be, and finally, integration.
Saturday: #1 source of stress currently is that the heating element I ordered last week hasn't come in yet so I'm not sure what I will do for a heat source. I have a few contingency plans: 1. make my own heating coil- dangerous and doing DIY with things that are high voltage and high current makes me nervous 2. Waiting til Monday for the heating element and I'll pull a Hail Mary integrating 3. Using a small flame source or another external heat source 4. The heat tape in the lab- Chances I use this are super slim because I hate it. It would require significant amounts of interfacing (temperature control, current control, etc) and also, the tape we have cannot be used on a conductive surface and I was planning on using the metal frame I made last week as a heat conductor. Lastly, it's the least freaking ergonomic thing in the entire world and near impossible to keep in place. For now though I am going to focus on all the other parts of this project. I've made my list of priorities and flow chart of what depends on each other and a checklist of requirements to make sure I don't leave something out somehow.
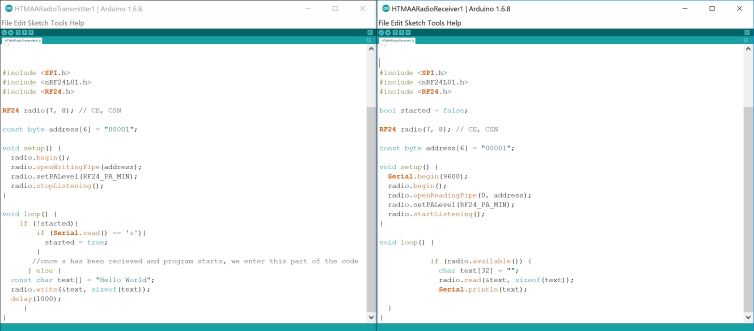
First on the to-do is the radio connection. It is pretty integral and I think it'll be the hardest because I have no base for it because for networking week I made a Bluetooth board. I found a pretty solid tutorial on how to get started here On the transmitter side I am basing my design off the HTMAA website design but I don't want a FTDI so I'm going to make holes in the board for programming and then add a 3V battery after programming is done. I wont need a V converter either because the battery will be 3V instead of 5. Also, I'm adding a 'sanity check LED' and will be using the interrupt pin. One lead of the water sensor will be connected to power and the other to the interrupt. If there is water the leads will be connected and the IRQ pin will be high.
Sunday morning updates: I got the radios to talk via Arduino.
I also spent an inordinate amount of time creating the schematic for them though because I was tired and productivity exponentially decays when you're tired. I realized while creating the schematic that 1. I was still going to have to include the voltage converter because I had to program the chip with an FTDI initially even if I didn't want the FTDI on my board permanently 2. I decided to keep the FTDI because holes were not being translated in my schematic and several other people couldn't figure it out either and having FTDI isn't the end of the world. I also have my distiller lid in the 3D printer. The Ultimaker 2+ wasn't working for me but there dont seem to be any red flags in the CAD design so I am trying another machine. It's a long print though so if something goes wrong again I think I'm going to have to switch to molding or something else. The next big thing to tackle is the relay switch.
Monday morning updates: None of the 3D printers in the lab were functional this weekend. Rob, the savior that he is, helped fix them when he came in, in the morning and printing is under way for the 5th time on the lid. At the same time that I was trying to do 3D printing, I was also alternating with milling boards for the nFT240L01 radio. I accidentally messed up the circuit board ratio and milled some wayy too large boards that were ~2x too big for the ATtiny so that took a lot of extra time. I set the ratio at dpi 1200 initially. I actually needed dpi of 2295 to get width=38mm, height=35mm.
Tuesday morning updates: For some reason the 3D printing would not go past the base layer on my lid. At some point when I had tried everything on the machines, I changed the design to be as simple as possible and that still didn't help. Then randomly one of the 3DWox machines started working again and I put in my simple lid design because I didn't have room for error anymore. My lid printed through the night, which is cutting it uncomfortably close to the presentation. Also, the heat element came in yesterday but at that point it was too late to integrate that properly and interface with it so it isn't dangerous. Thankfully, I could use the relay switch to control a pre-made burner found in the lab. At this point all the important parts work independently. However, my idea for attaching the water level sensor to the ATmega circuit didn't work so the system isn't well integrated. I decided through the night to use Arduino boards to get a demo working for the presentation.
Presentation: On my way to MIT I really thought that I was going to have a live demo working for the final presentation and would be able to demonstrate that I understood everything necessary with a video. I'm not saying it was going to be pretty, it was definitely going to be a ratchet set up, but I did think that it would work and I'd have appropriate examples of everything. However, problem 1 was that I needed two computers to be able to communicate with the radios separately. Everthing worked great on the lab computers but when I borrowed a laptop at MIT the code wouldn't run. I tried three different laptops and they all had problems with it for different reasons. Adding to the problems, the radio demo video that I thought was playing on loop, was not actually playing on loop and I ended up showing the wrong video. At that point I was too tired and flustered to talk about the the lid, insulation, heat housing, or greatest hits.
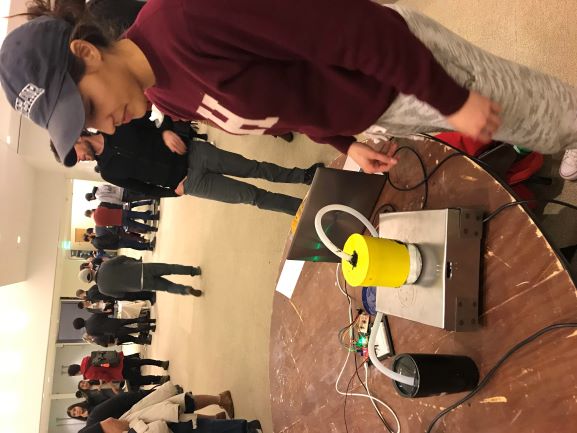
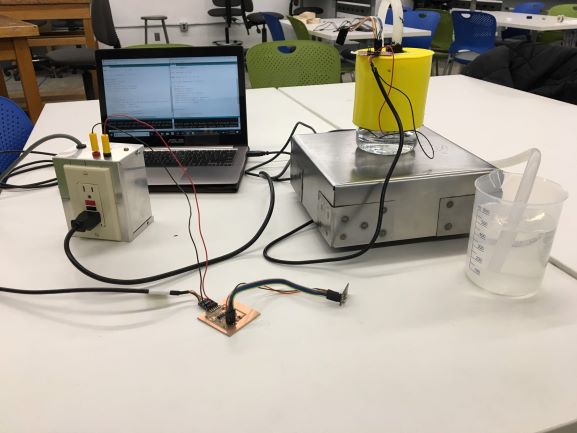
Recap: This distiller project was a classic case of not leaving enough time for integration. I knew, or thought I knew, what needed to get done and how to get it done going into the final week. I figured I could just finish production in a few days and then take my time over a couple days putting it together. Wrong. I should have known better because with my second concussion this semester I've been struggling with memory and I made so many careless errors with the circuit design and production, not to mention sometimes I'd forget what I was doing. After the fair I went back to the lab to do a final good version of the setup without Arduinos for documentation. Here is the best version of the distiller I ended up with at the end of this semester.
I would have loved to make a cone shaped lid with extra time and nail the circuit integration. Other than that I'm relatively satisfied with how things turned out. Yes, it can always be prettier, better, have more features. But the circuit integration and lid shape I ended up with were the parts I liked the least and felt like the weakest links. Overall, I have learned so much through the semester though and I will definitely continue to build upon this base. Thank you Prof. Gershenfeld for the opportunity, and thank you to Rob from Harvard and Sara from the CBA lab for your help in this project.