Heat Control
The heat source, including how to control and house it, was definitely the most fraught part of this project. I was nervous about how to make things safe enough to have high voltage and/or high current running through them and then also how to deal with things going wrong with really hot components. I originally tried the heating tape that we have in the lab. But that heats up astoundingly fast and started smoking when I tried using it. I also considered making my own heating coil, as explained in the 'Early Distiller' section. Choosing what to do with the heat was a roller coaster where every time I thought I had a plan and solution, an obstable came up and I had to redesign. This happened right down to the last day, literally, which wasn't great.
After I decided not to DIY a heat coil, Rob suggested using a heat tape from the lab. It was really hard to secure and also was not easy to control. Since I got my second concussion while working on this distiller I decided eventually I wanted to make this as safe and easy as possible. Then I chose a commercial heating element for a stove. This was set except that it didn't come until the Monday before the project was due and then I had to come up with something else. I ended up using an electric burner that we had in the lab and the significance of the heat became its connection to the relay switch and how that was being controlled. Below is the a photo of how the heat element connected to the relay switch.
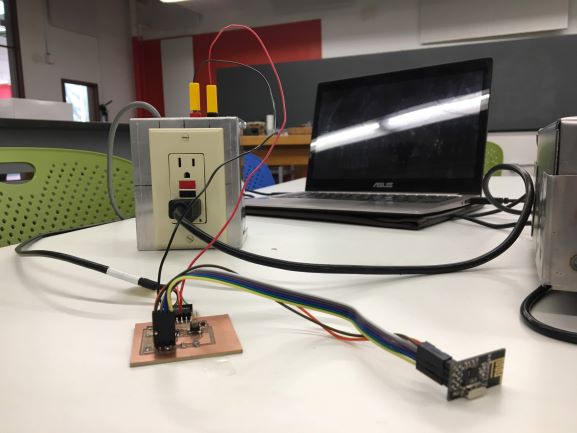
The outlet box has a relay switch in it which was being controlled by an ATmega. When there was water in the distller the relay switch would be signaled on and whatever you plug into the outlet box would get power to it. In this case I plugged in an electric burner but testing was done with my phone charger. The outlet box was also connected to a regular outlet, which is where it drew its power from.