Assignment
-work through a git tutorial
-build a personal site in the class archive describing you and your final project
-characterize your lasercutter, making test part(s) that vary cutting settings and dimensions
-cut something on the vinylcutter
-design, lasercut, and document a parametric press-fit construction kit, accounting for the lasercutter kerf, which can be assembled in multiple ways
Goal
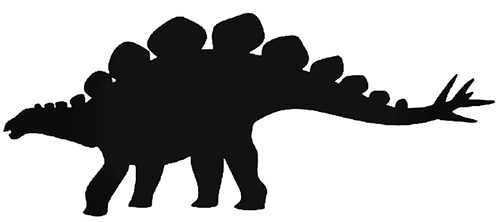
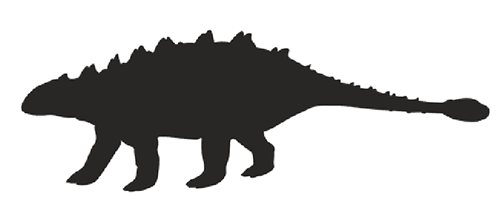
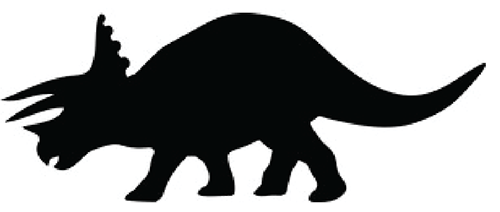
Use my Illustrator drawings of triceratops, ankylosaurus, stegosaurus, and brachiosaurus from last week to create stickers on the vinyl cutter. For the press-fit construction kit, create a base dinosaur with interchangeable head/tail/spikes. I will start in cardboard, but completing this in a flexible plastic would make for a cool product. Also, make a website :)BRANCH ONE
Steps - Git Tutorial and Personal Site
1. Mostly new to Git and Gitlab I started on the GitLab website under the Git Newbies section with “Git-ing started with Git,” “GitLab Flow,” and “Example: Updating GitLab website with Git.” I also watched “GitLab Web IDE” as I started my website on this interface. I want to create a remote copy/version so I can work offline, but one step at a time.2. I started with a very simple “Kate Page” via Web IDE, but also started googling template examples. There are no shortage of examples, but they definitely all need some modification.
Struggles
The Git Tutorials thus far are not encouraging, I’m feeling more overwhelmed than informed. I tried a ton of different YouTubes, but it’s going to take some time. I am also frustrated by the time I spent on the site and with how simple it looks and how much doesn’t work!Tools
GitLabWeb IDE
YouTube
Source Files
Link to Git NewbiesBRANCH TWO
Steps - Vinyl Cutting
1. In order to vinyl cut my favorite dinosaurs (triceratops, ankylosaurus, stegosaurus, and brachiosaurus) into useable stickers I ensured my Illustrator files were a solid #000000 silhouette with a transparent background.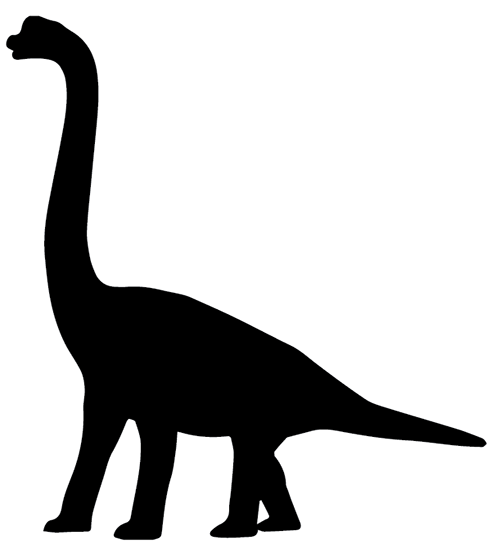
2. I started with the triceratops by plugging the .png export from Illustrator into the mods visual programmer. My first print on the GX-24 went well, but then it all went downhill. Some of the silhouettes were cropped at the very edge during printing and resulted in an incomplete cut. I imported a variety of dinos into Illustrator, thinking the file was the problem, and reset the boundaries, cleaned up the outline and then exported as .png. Back on the GX-24, the cuts were being laterally limited. Further investigation revealed the roll feeder wheel is a safety mechanism and must be at the far outer edge of your material or the cut area will be restricted.
3. Utilizing the mods visual programmer with the GX-24 I found a Force of 100 and Speed of 2 worked best for the vinyl material. I made a variety of dinosaurs in a variety of size by cheating and adjusting the DPI. I also found it useful to adjust the Vector Fit and used between 1-5 for achieving different effects in the shape. Increased Vector Fit made the image more rudimentary and less detailed based on the total number of vectors in the file. At the end I had four types of dinos in a wide range of sizes and colors and got to share them with all of my friends!
4. GSD definitely prefers the black dino sticker, with type varying. I returned to print more, all in black, in order to meet the demand!
Struggles
Flipping through the GX-24 tutorial book did not help in figuring out why the cuts were being limited laterally, it was only through hours of toil, multiple people having similar issues, and an annoying number of failures that we were able to deduce what was causing the failure.Tools
IllustratorMODS
GX-24
Source Files
Link to Illustrator Dino SilhouettesBRANCH THREE
Steps - Parametric Press-Fit Construction Kit
1. With interchangeable heads and tails I began work on the parametric design in Rhino and Grasshopper. I wanted to minimize the kit part count, with a goal of 15 parts for four dinosaur forms.
2. I used the previous Illustrator drawings and initial three dimensional construction in Rhino and Grasshopper as the base for the parametric press-fit construction kit. Using Grasshopper I could adjust the parameters of the connections between parts, this was the secret to easy parametric design. Grasshopper isn’t immediately intuitive, but YouTube and friends make it possible. I had to adjust the alignment of the tails and heads to not overlap with the sections of the body in which there was already a parametric cut. This was discovered through iteration. Lastly I added the armor or spikes to the body which required some angling and tilting to achieve that ‘dino’ look as well as maintain symmetry (in hopes of keeping parts count low).
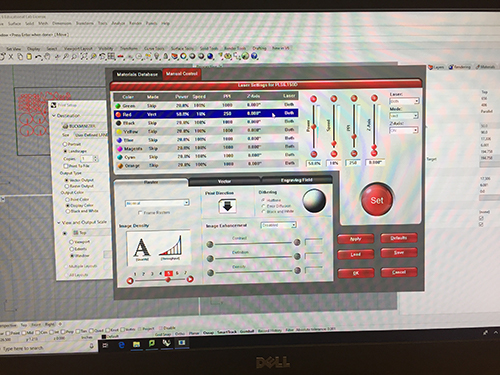
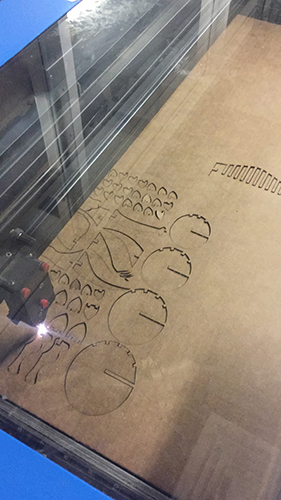
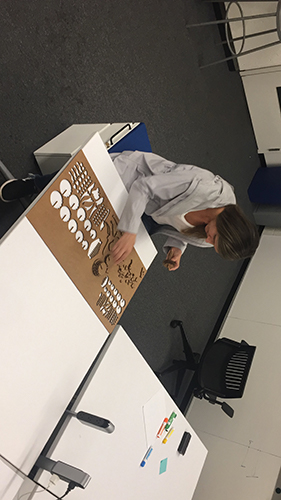
3. In Grasshopper I used the 'Region Slits’ component to generate the parametric slots. I started at 0.39cm, but adjusted it to 0.37cm after running a comb test cut. I ‘Baked’ the four images, ‘UnrollSrf’ the pieces, laid them out for cutting, and ‘Make2D’ in order to create an outline of the surfaces. I then exported in both .ai and .dwg in order to use the laser cutter.
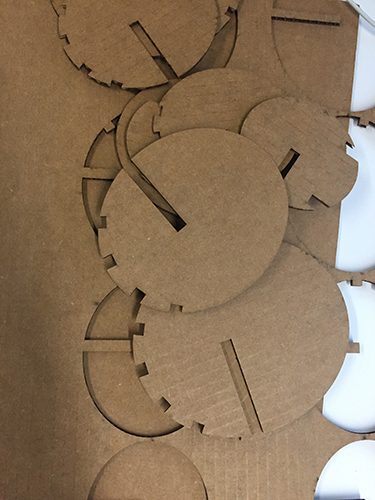
4. After exporting the .dwg, I tried to cut from a number of other programs available on the Science Center laser cutter computer (other than Rhino) and was struggling, so I tried to use the .ai Illustrator file and unfortunately had a crash. I moved to the basement of GSD to leverage Rhino and set up my first cut. I imported my .dwg file and in retrospect, believe I imported in inches a centimeter design. I printed the file and it was enormous and the slotting was about twice the width of the cardboard. I thought the issue was with the layout at the time, so I re-‘Baked’ and re-‘UnrollSrf’ and re-‘Make2D’ and re-saved the file. I went to print again, verified import in centimeters, double-checked a few distances within Rhino, and printed. The file seemed small when printing, and then it extremely difficult to fit pieces together. I at first thought 0.37 cm slots were the problem, but measured and realized my slots were at 0.20 cm. I found that during the print the file was converted from inches (which I had adjusted to easily match bed constraints) to centimeters. So third time is a charm, I checked all the files again, re-did the full ‘Bake, UnrollSrf, Make2D’ process, and then printed the final goldilocks version! I would like to figure out how to make the ‘Bake, UnrollSrf, Make2D’ more fluid or automatic because right now the time for those steps is prohibitive.

5. I assembled the dino in a variety of configurations (triceratops, ankylosaurus, stegosaurus, and brachiosaurus) and photographed them in their natural environment!
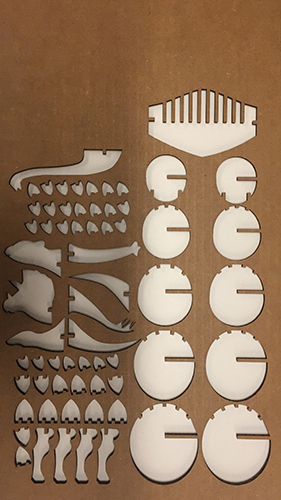
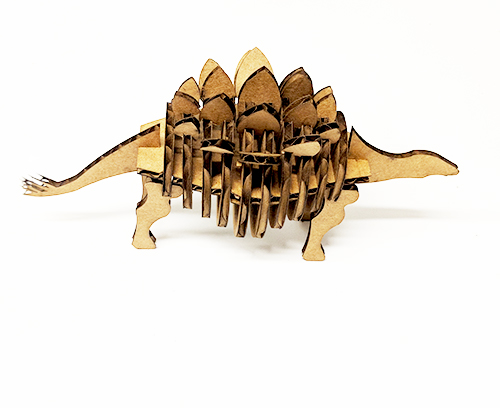
6. My goal was 15 unique parts and I was able to get to 19 unique parts:
Body - 1
Ribs - 5 (doubled to make the cage and all the same design, just scaled)
Head/Tail - 8 (4 sets)
Legs - 2 (I thought one would be possible, but the parametric notch and spacing didn’t work in this iteration)
Armor - 3 (same design, just scaled)
I think I could get the legs down to 1 and in theory I could change the slotting on the armor to go down to only one type. Also, two of the tails are super similar, so I could go down to four heads and three tails. These changes would put me at 15 pieces in order to make 4 unique dinosaurs!

Struggles
I believe what happened with the conversions is Rhino asks on import about the file and you can select inches or centimeters (or other). On the first go I just said yes and inadvertently imported a centimeter file into inches (i.e. 20 cm became 20 inches). When you go to print the program expects inches, so it printed to scale. On the second go, I imported in centimeters (i.e. 20 cm is 20 cm), I then converted in Rhino to inches (i.e. 20 cm to 7.87 in), but then when I went to print I printed in cm (i.e. 7.87 in to 7.87 cm).Tools
IllustratorRhino 5
Grasshopper
120W 18”x32” Laser Cutter
Source Files
Link to Parametric Dino Press-Fit Construction Kit