
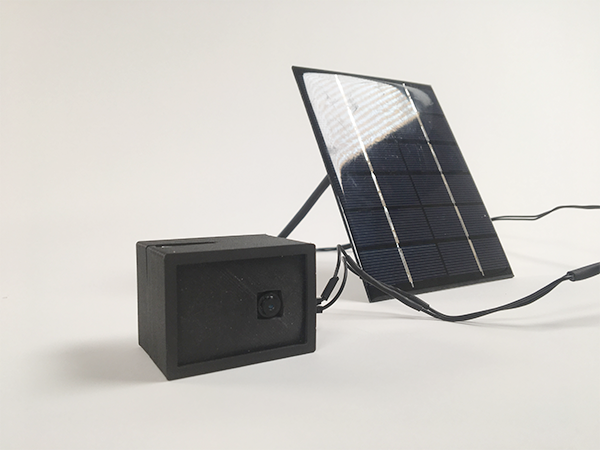
The Desert Streaming Camera is not like any other action camera you know.
It was specially designed to fit the hard conditions in the desert: without any
electricity or Wi Fi connection - and livestream directly to the server. To get the camera working, you don't need any charger
or electricity connection - it is sollar powered! And it's also much cheaper and compact
than most of the cameras that are out there.
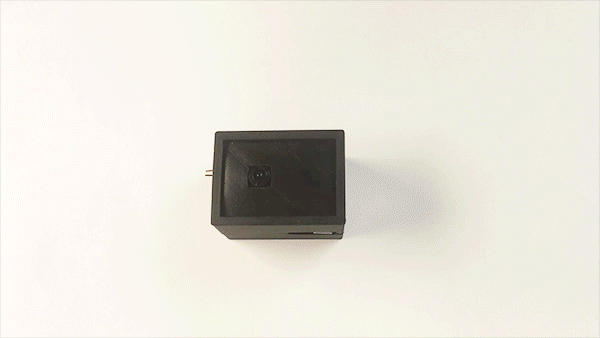
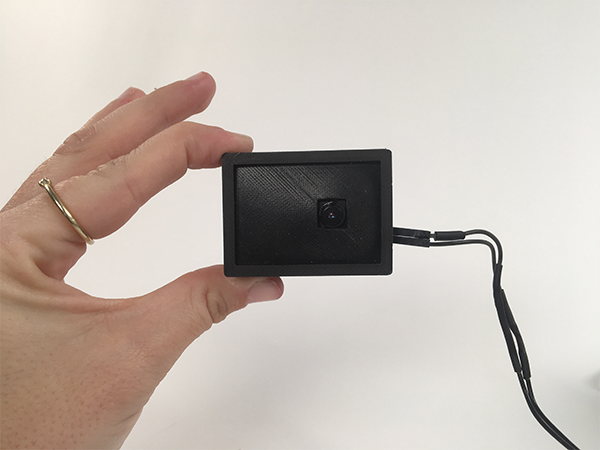
The camera comes in a rubber and plastic package, what makes it more resistance to the dusty conditions
of the desert. It will also won't break easily in case someone demolish you house.
Thanks to the solar energy, the Desert Camera will live stream during all day long, so you can
watch what's going on in the desert whenever you want - you only need to connect it to your hotspot, or to a wifi
If you do have a computer next to you, you can also charge the camera using a usb port.
Actions Cameras are pretty common thing now, but they are still not cheap.
There are some cameras that are sollar powered, mostly for security stuff
but they cost between 90-100 dollar. The cheapest camera I found was TENKER 4K Action Camera
that costs 29 dollars, and has no sollar energy so you have to charge the battery after few
hours.
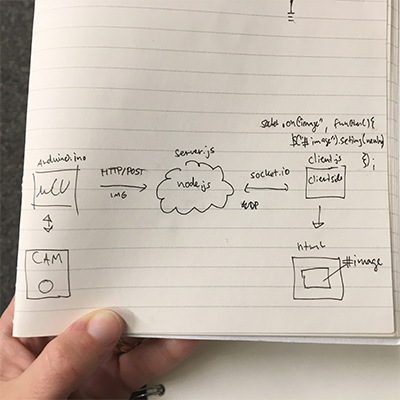
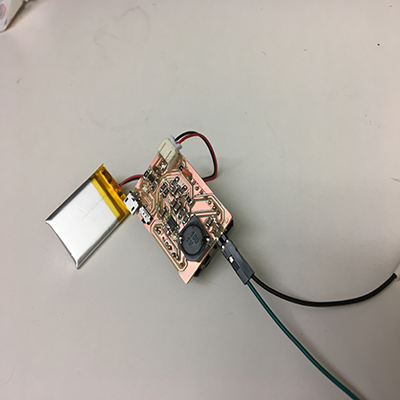
I used ESP32 with a camera, and designed a board that will connect
the camera to a sollar panel, a lipo battery charger and a lipo battery.
I programmed it to connect to my hotsopt and than designed an interface
that connect to a server (google clouds) that gets live stream photos,
fast enough to creat a video, I also designed the case for the camera
made out of rubber and plastic. Unfurtunatley, I didn't make the solar panel by myself.
ESP32 - ArchShop + Amazon | 4 dollars
Lithium Battery 3.7V 400MAH - DigiKey | 4.95 dollars
IC BATTERY CHARGER - DigiKey | 3.16 dollars
Inductor - Tomas Vegga from CBA gave it to me | FREE or around 1 dollar
Sollar Panel 2w 6v - Amazon | 7.82 dollars
Zener diode, Resistors, Capacitors, Copper, LED, Mini USB port, Slide switch, rubber - EESC shop | free
Silicon + pigment - IDC shop | free
Board designing: Eagle
Board Millimg: Roland
Soldering
Begging for Anthony
Programming: Arduino, Node.js, google clouds
3D Printing: Markforged
Casting
First, this assigment really helped me connect the dots from the
semester, and my learning curve was really high in the last few
weeks. I know much more about electronics after this task, which was
my goal for this class. more spesific machines questions:
How to use small sollar panels to run the camera?
How much power the camera needs?
What to do if the battery is too charged?
How to make the camera communicating with a website?
How to make the smallest camera possible?
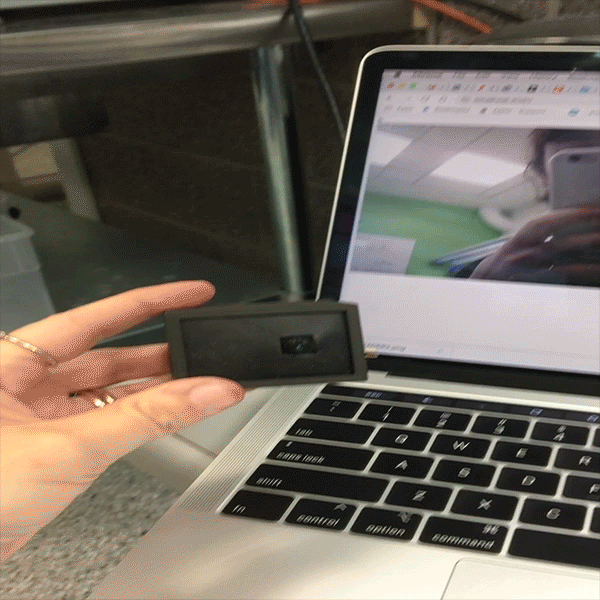
The Camera was able to live stream to a server, in good quality and preety fast.
The battery was fully charged using the usb port, and charged by the solar panel
when a strong light was poined at it. The camera with all the components were
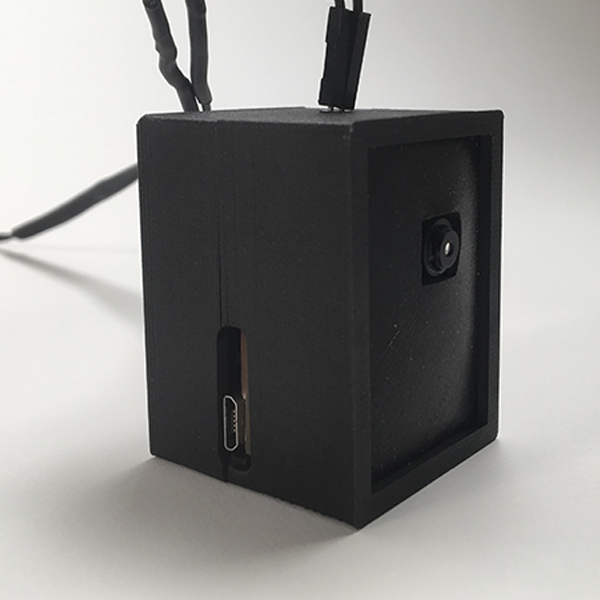
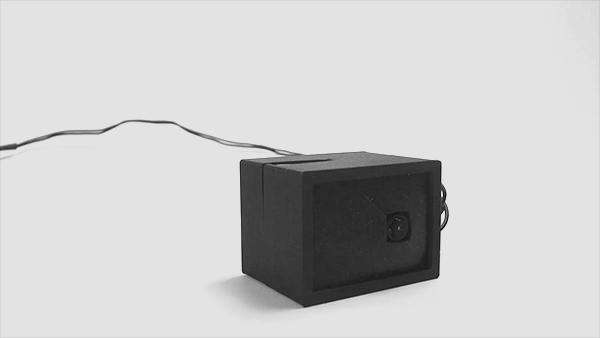
fitted in a 5cm by 4cm by 3cm package.

The purpose of the project it to place camera in the Bedouin village Al Araqib
and to live stream the demolitions from there. It can also be used as a Lithium battery charger.
When I just started to take that class, I was thinking about doing some cool parties stuff like LED shoe laces.
but as long as my thesis is the computation group at the architecture departemnt started to shape,
I realized that I can do stuff here that can really help my thesis to be more interesting. about my thesis:
In my thesis I'm working with the bedouin unrecognized villages in Israel, and espcially wuth the village Al Araqib
which has become a symbol of the unrecognized villages struggle in the state policy. To make long story short: the
state wants to relocate the Bedouins to designated towns, the bedouin object the attempts to disposses them
from their lands. Because the state claims that they don't own the land, every new building they build considered illegal.
Since 2010 the police has demolished the village 167 times, every three weeks, which left the residents almost without
any permanent structure. The state does not issue demolition warrants for new buildings, and takes advantage of the law
that states that a new building can be demolished without a warrant 30 days after its construction.
last summer I led an MIT workshop there with the bedouin community. We worked in one of the
FabLabs in Tel Aviv to build a temporary structure that can be folded easily when the police arrive.
We used portable CNC machine (carbide 3d) and designed a scissors machanism for their tent.
The residents of the unrecognized villages take advantage of technology in order to overcome the multitude
of obstacles that they face. Their status as unrecognized denies them access to State run electricity and water grids.
Instead, most of the unrecognized villages are solar powered, and residents install and maintain the necessary panels
themselves. The Bedouins regularly recycle their water, and use it for the irrigation of the villages. Some of
the unrecognized villages managed to install internet themselves, by using antennas from the nearby Bedouin towns.
I'm going to do all kind of things with this community, but one of the things I wanted to make is a live
streaming of the demolitions from a very close view. Now, the people of the village document the demolitions with
Iphones, and than send it to a big group of people through Whatssapp. So I want to use the small cheap cameras
to live stream the demolitioms and maybe even send notification that a demolition is about to happen.
another thing I was thinking to do is to use the face recognition in order to make something happen on the
site when a demolition happenes. One option is to scan the faces of the village residents, and than when someone
else is coming, to make an alarm or something with lights that can scare the policemen a little bit.
another thought was to screen the policeman face on the tent, so he will bulldozed himself.
*see also networking and communicating week*
I started to work on this project on the networing and communication week, and since then I have learned so much!
The first stage for me was to even understand how this camera works and what excatly not working
in the very simple example I found.
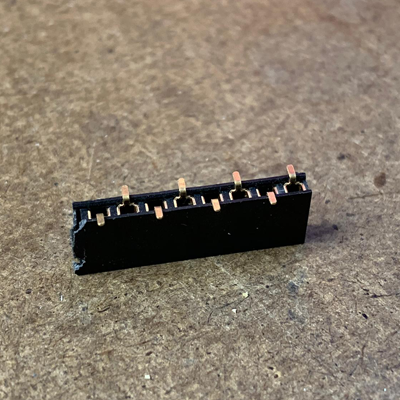
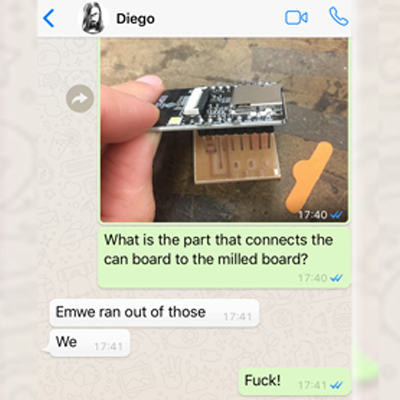
First I milled Neil's board, which was extremly simple. The very not fun part was to find missing parts:
I was looking for the SMT female headers in the arch shop for hours. at first I thought I just don't know
how it's called, but after asking Diego I realized that it was missing. I went to X shop and find the pieces there (the last two!!!).
The morning after I solder the board and followed tutorials to try to programm it using Arduino - but couldn't
really program my board, it just didn't worked (like almost anything). I talked with Diego and he told me that it doesn't
work on MIT SECURE network, and we managed to programm the board on MIT GUEST but only on his computer and after a
tons of attempts.
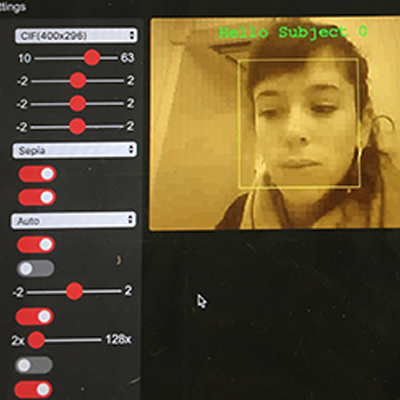
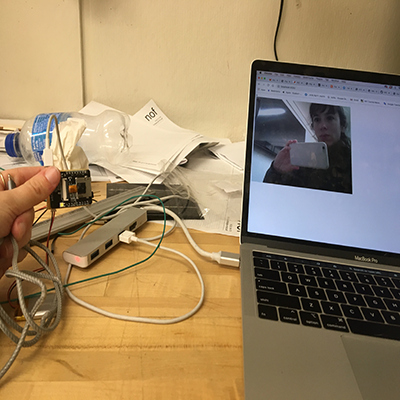
We basically used those toturials, that were super helpful during the whole time
and we managed to get an IP address and see the streaming of the camera's interface only on this network.
I know that I want to creat a way that this camera will stream to a server, a global website, that can be seen
from anywhere, but I didn't know excatly how.
*see also interface and application programming week*
In this point, because working on my final project, all the definitions of the specific work is kind of blair.
Now, everything is already about programming, networking, fabrication and communicating. This week I wanted to
manage to do two things: to finally program the board on my computer, making it connect to my phone's hotspot
so I won't be dependant on the slow MIT wifi - and also because in the desert it can be super useful to connect to the hotspot.
I was lucky to get to sit with Eyal, that knows a lot about websites programming and interfaces.
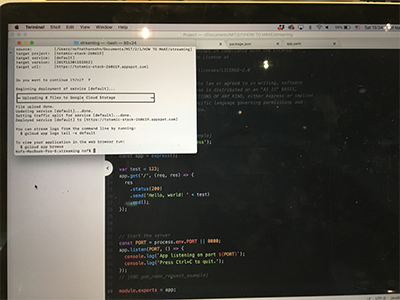
To manage to do that, I subscribed to google clouds, so be able to get a server that can communicate with the camera.
We talked about it a lot, and thought that the best way will be to use Node.js and to program the camera to take a photo
every 0.5 seconds and send it to the server. This was my way to not get raspberry pi to stream from the camera.
But before I could be able to get photos from the camera, We tried to just get anything from the camera.
Eyal showed me how to use node.js, it was hard, as someone without any coding background, but I got the basics.
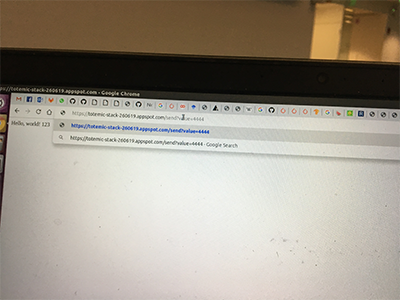
So I got a lousy website address: http://totemic-stack-260619.appspot.com/ and I coded it to communicate with the ESP32.
I used Arduino and node.js, so everytime I pressed the reset botton on the board, the website would get a string
added to the hello world.
I hope evantually to succeed in sending videos there too!
Few days after, I tried again, this time to actually live stream a video and not just strings of text.
First, one very happy thing was that I managed to program the board and finally understood what was the problem:
apparantly, that was a matter of timing: you should press the reset botton and not let go, and just than upload the arduino code,
and stop pressing the botton when it's starts blink. it took me three weeks to get that!
To do the live stream, I used this tutorial,
and this code that Eyal found online.
following this wasn't so hard. Tomas from CBA stopped by to talk about my future board, and we could live stream our talk for the first time!


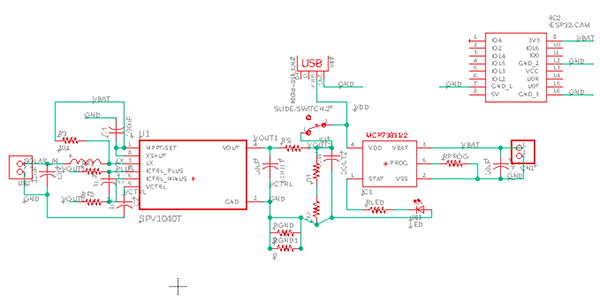
Before designing the schematic, I set doen with Ben and Anthony and they explained to me
how the solar power thing is actually working. I realised that I would need a charger (IC battery charger), so
I ordered SPV1040T from digikey, and also a lithium battery. We looked at the data sheet of the SPV1040T
to understand better how to design the schematic. It had one simplified scheme and one more detailed.
I started to design the schematic, but in some point I got stuck because I didn't know anything about the
inductor... I asked Tomás from CBA to help, and he explained everything and also gave me the inductor I needed.
He also offered that I will add a micro usb componenet to charge the battery if there's no sun, so I added
the usb connection, an LED light that will show when the battery is fully charged, and also a slide switch
to charge the battery from the usb connection.
After this point I understood much better how to read the datasheet
and how to use it to design a schematic. I showed Anthony the schematic before milling and soldering, and he
said it might be hard to make the camera work by the siolar power, because when to battery will be fully charged (4.2 v)
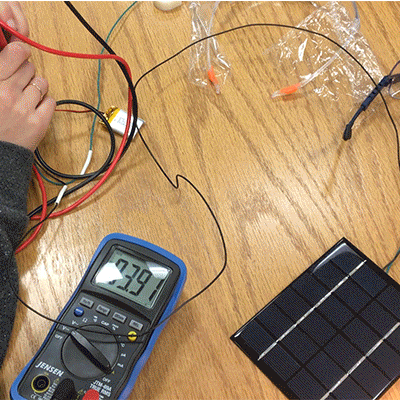
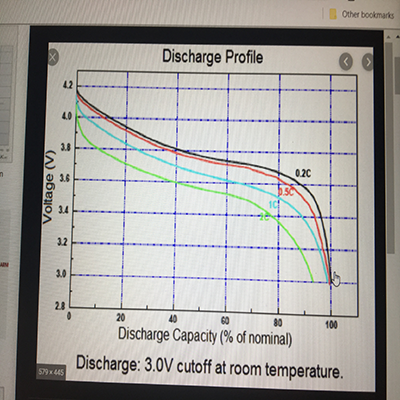
it will be too much for the camera (3.3v). I tested what is the range that the battery could take, by giving it power
and cheaking the maximun and minimum that it can take. The camera worked just fine in the range of 2.8v-3.7v.
Anthony said that I should take the reisk and just try to waste some v from the battery before the demo. Spoiler:
we soled it on the next day.
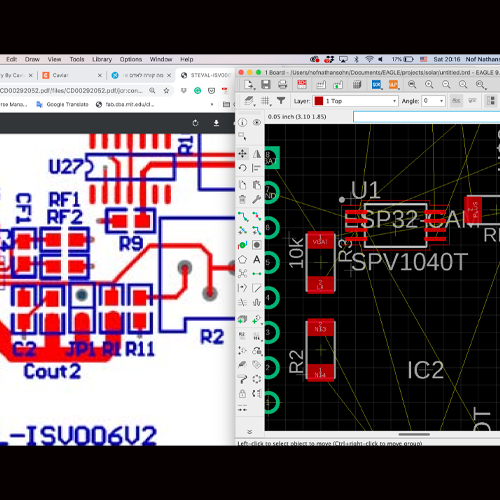
That was maybe one of the most dificult stuff I have done in this project.
I struggled for a while trying to arrange the board properly, because I wanted it
to fit on a copper board that would be as tiny as possible. after few hours of trying,
Tomas came to my help and showed me the way to do it: he found a similar board diagram
and we tried to design it in a similar way. I needed to add some 0 v resistors, but not too much.
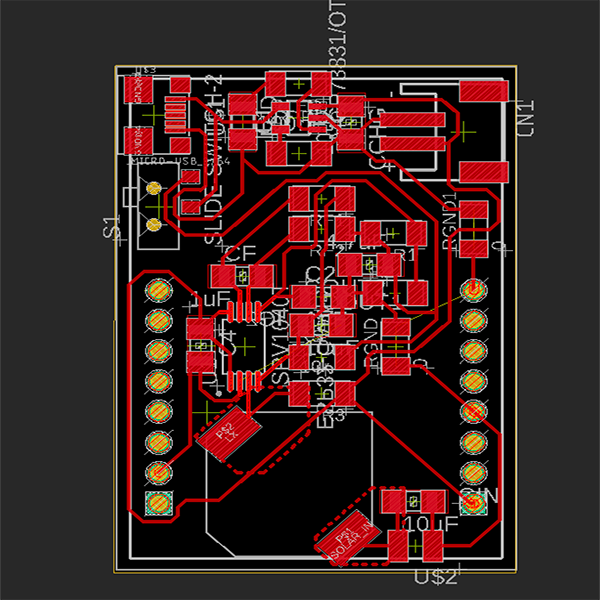

Milling this board needed some time. The first time I tried, the board moved from its place
because I defined it in a way that the holes will be milled last, after the outline - a mistake!
The second time I decided to seperate the outline and the holes to two seperate png's, and to
cut the holes last. That was a mistake as well, since the holes, from some resone were not alligned.
The third time I used the same png for both the outline and the holes, but this time I changed the order
of toolpath in Mods - and it worked!
Soldering wasn't too hard except the IC battery charger, that was so tiny.
after I soldered everything, Anthony suggested that I will add a Zener diode to decrease the v going to the
camera, so if the battery will be fully charged the camera will still work. He helped me solder the diode
and I tested the solar panel to see if it really charges the battery - and it did!
in this point i tested iof the camera works as well, charged the battery, and fixed a lot of shorts.
I also needed to cut the copper by hand with a knife around the holes, since I forgot to make a seperation
between them on eagle. When the battery was fully charged, the LED light turned on
To make everything stronger, I've put epoxy on top of some of the parts.


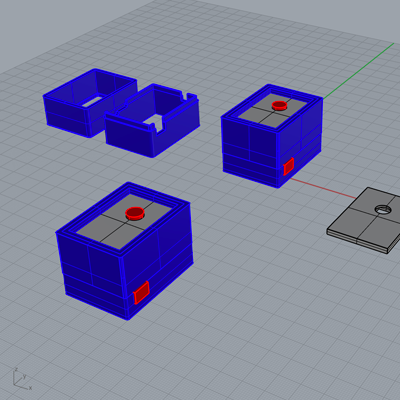
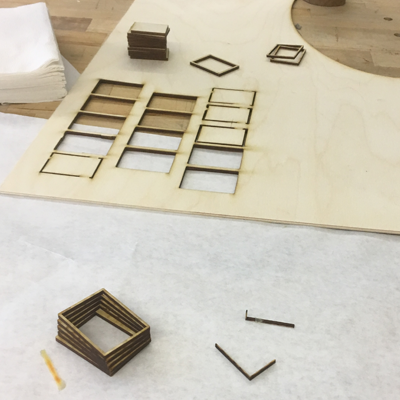
I designed the package in Rhino, and decided to make it out of wood and silicon
.
First I 3d printed a mold for the silicon in a Perusa. then I laser cutted the wood part
and glued it together. It turned out to be ugly and not persice, so I decided to make it out of
plastic. I changed some stuff in the design and sent it to the perusa. meantime I casted silicon
to the mold. when the 3d printed box was ready I tried to assamble everything and realized that
the box is too fragile and the silicon is too soft. I casted the silicon again, this time with thickener
and put it on a hot plate to make it cured faster. I also 3d printed the boc again, this time in the Markforged
at the IDC and it turned out to be great!
I am very pleased about my package - it's tiny and beautigul, just like I wanted it to be.

It maybe seems easy from this page, but actually it was so hard and everything
that could have gone wrong, went wrong, and everything took forever.
I want to thank a lot to Anthony Pennes, Tomás Vega and Eyal Perry that helped me a lot
during the last few weeks. I hope to test the desert camera soon in the desert.