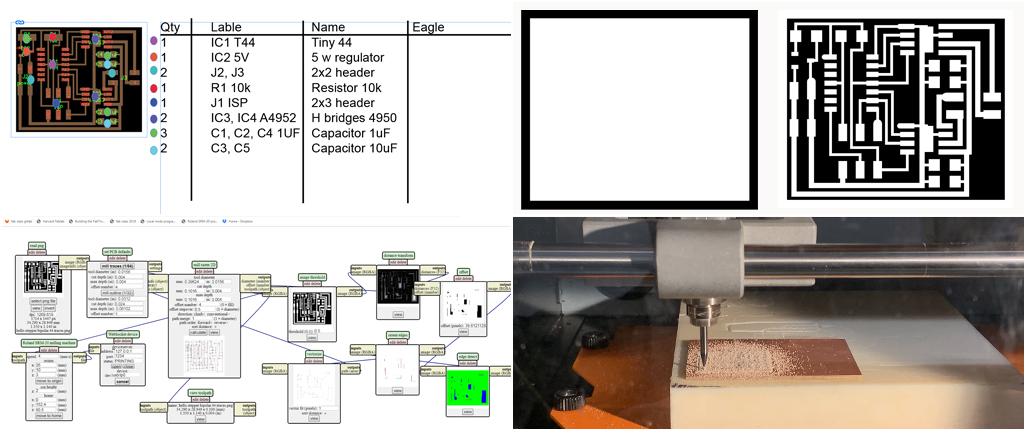
The project for this week was to design, mill, code a microcontroller and to adding an output device. Since my final project uses a stepper motor, I decided to work on this. I started by studying the stepper bipolar 44 board. I used InDesign to analyze the different traces and interconnectivity between the components. I then made a list of the components : Tiny 44, Capacitor, 5 w regulator, 2x2 header, Resistor 10k, 2x3 header, H bridges 4950, Capacitor 1uF, Capacitor 10uF, 2x2 header. Selected them physically to visualize their footprint as I design the electronic using Eagle, but the moment I looked for the parts in Eagle’s library, it was difficult for me to find the components. To avoid wasting time, I decided to use the board available in cba site. I went through both the milling and soldering processes twice as the normal mistakes were made. During the following lab hours, I spoke to Brian about my impossibility to find the components in Eagle. He explained to me that I needed to look into FAB library. I had indeed looked all over expect in this library. It will be much easier for me to design future boards.
coding and uploading
We looked online for the Arduino code to use a stepper motor, as well as ATinny 44 data sheet to identify the correct pins. We modified the code to meet our needs:
/*
Stepper Motor Control - speed control
This program drives a unipolar or bipolar stepper motor.
The motor is attached to digital pins 8 - 11 of the Arduino.
A potentiometer is connected to analog input 0.
The motor will rotate in a clockwise direction. The higher the potentiometer value,
the faster the motor speed. Because setSpeed() sets the delay between steps,
you may notice the motor is less responsive to changes in the sensor value at
low speeds.
Created 30 Nov. 2009
Modified 28 Oct 2010
by Tom Igoe
*/
#include
const int stepsPerRevolution = 200; // change this to fit the number of steps per revolution
// for your motor
// initialize the stepper library on pins 8 through 11:
Stepper myStepper(stepsPerRevolution, 4, 3, 1, 0);
int stepCount = 0; // number of steps the motor has taken
void setup() {
// nothing to do inside the setup
}
void loop() {
// map it to a range from 0 to 100:
int motorSpeed = 500;
// set the motor speed:
if (motorSpeed > 0) {
myStepper.setSpeed(motorSpeed);
// step 1/100 of a revolution:
myStepper.step(stepsPerRevolution / 100);
}
}
In Arduino Tools, I selected Board and Processor ATinny 44, Clock Internal 8 Htz and burn bootloader. The moment we got ready to compile a series of errors:
Fork/exec /Applications/Arduino.app/Contents/Java/hardware/tools/avr/bin/avr-g++: bad CPU type in executable
Error compiling for board ATiny24/44/84
We tried to compline a standard blink code and also the bi-polar stepper motor C-code available in cba site. And the same error persisted. At this point, I remembered I had updated my macOS system to Catalina. Robb recommended to delete Arduino application and to downloaded again. After I did this, compling and uploaded was successful. We tried the motor with a battery and it workd, I need soldered a 12V plug.
