This week's assignment was: model (raster, vector, 2D, 3D, render, animate, simulate, ...) a possible final project, compress your images and videos, and post it on your class page.
I wanted to come up with a great, original, and doable idea before I tried to start modeling. But, then a few days passed and I still
wasn't sure exactly what I wanted my final project to be. I decided to take one of the ideas I had and try to model it in Fusion 360.
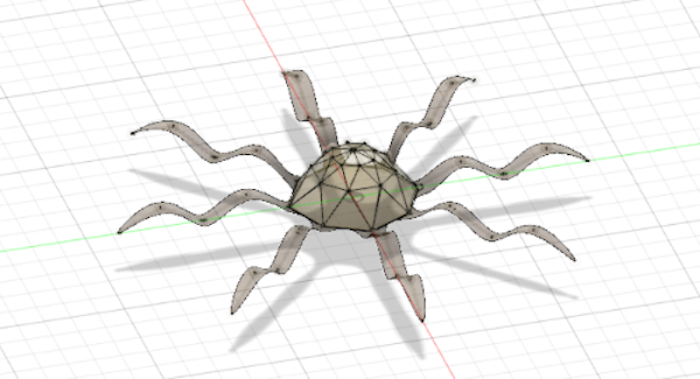
Here is what I ended up coming up with:
One of my favorite subsets of materials science is biomimicry materials. It is so incredible to me how capable octopi are at blending in with
their surroundings. I thought it would be interesting to create something that could respond to changes in its environment and make appropriate decisions
to hide or camouflage itself.
Throughout this design process I became a bit more familiar with the Fusion 360 interface. I wanted to create a simulation of my idea (it seems to be very easy to go between a model/render/animation/etc in Fusion), but I wasn't able to move the parts I wanted to without moving everything. This is when
I learned that you have to be careful about what components you keep in the same sketch and which ones you make into a new sketch.
I'm not sure this is the idea I'll end up going with, but some other ones I have are: a wearable item that can respond/react to external stimuli (such as light), a 3D printer that can combine multiple materials to create objects that are softer in some areas and harder in others with no sharp interfaces, an LED strip that can attach to your guitar and light up to show a desired chord given some switch flipping (since I really want to learn), shoes that give you directions, etc.
Hello! It's been a while since updating this page. Since then, I've decided to go in a different direction for my final project. I'm now planning on making an acoustic guitar with an attachable fret board addition that gives it self-teaching ability. I've decided to go in this direction because this is something that I would really love to have myself and can see myself using a lot! My first steps were searching through prior projects documentation, as a lot of people have had past guitar related projects. I'm not super familiar with guitars. I have one around, but don't really know how to use it, so I'm expecting to learn a lot about guitars over the next few months. I have found this page to be extremely useful already!
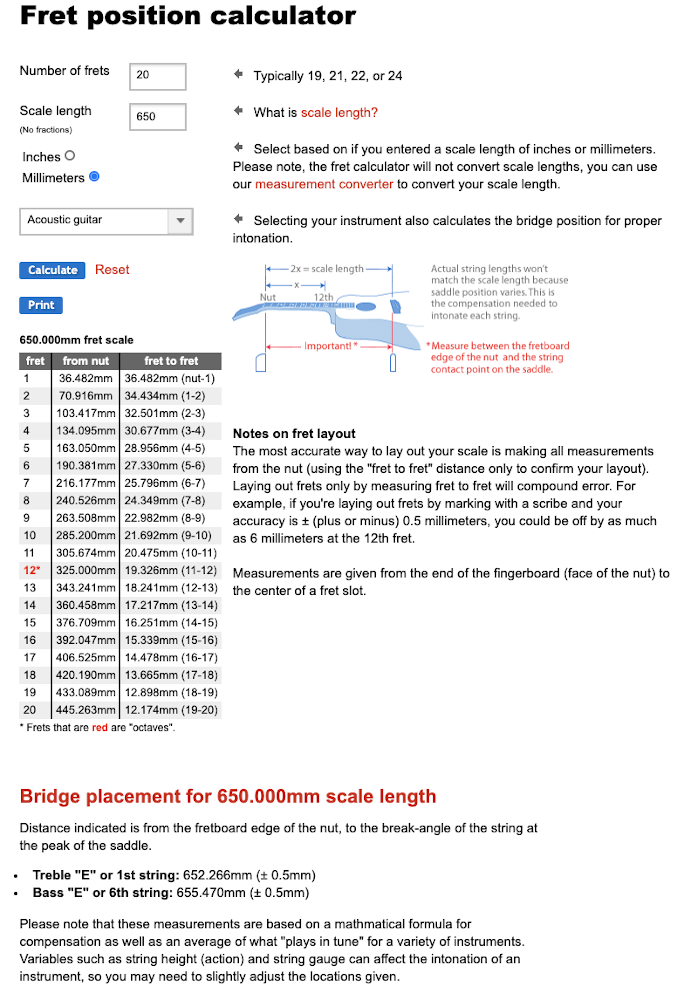
The first thing I did was make my fret board following along with the advice mentioned in the link above. I used this page on StewMac to decide what scale length I wanted to use for my guitar. I decided to go with the one that resembled the guitar I already had so I could double check my measurements. I also want to make an acoustic guitar, so I chose a different scale length and number of frets than the person who did the other guitar project (they made an electric guitar). I chose the Classical Short Guitar measurements, so 20 frets and a scale length of 650mm. This photo explains exactly what the scale length measurement is on a guitar and why it's important:
I also used this fret calculator from StewMac to determine the distance between each frets and the bridge placement. I double checked these on the guitar I own, and they seem to line up. Here's the measurements I'll be using:
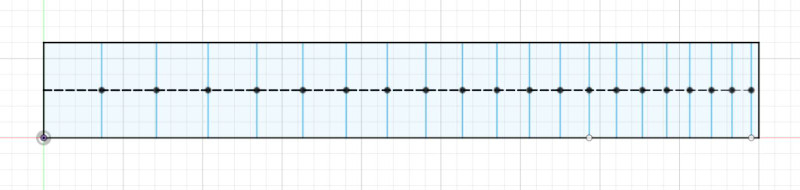
I modeled the fret board in 2D using Fusion 360. I marked out the frets according to the measurements. I made the total legth of the board 450mm and the width 60mm since these measurements seemed to resemble that of the guitar I own. Here's the fret board modeled:
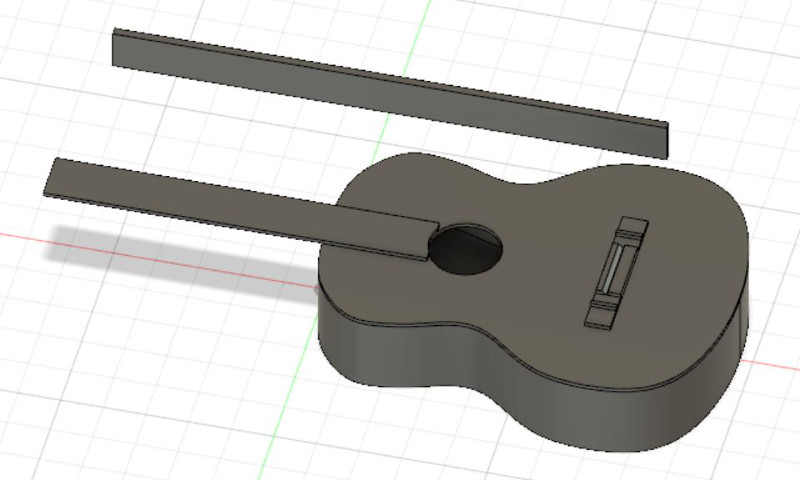
I then moved on to modeling more components for the guitar in 3D using Fusion 360. Here's what I have so far:
The last thing I need to make is just the neck. You can also see in the image that scale length looks right.
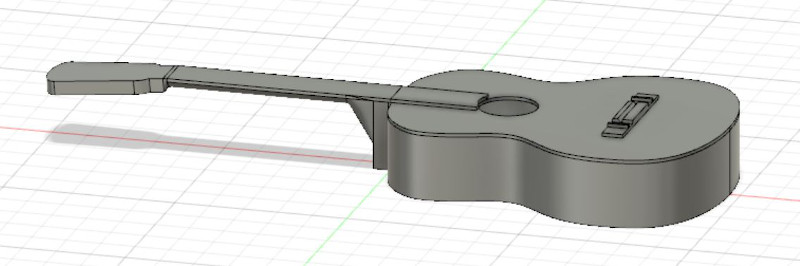
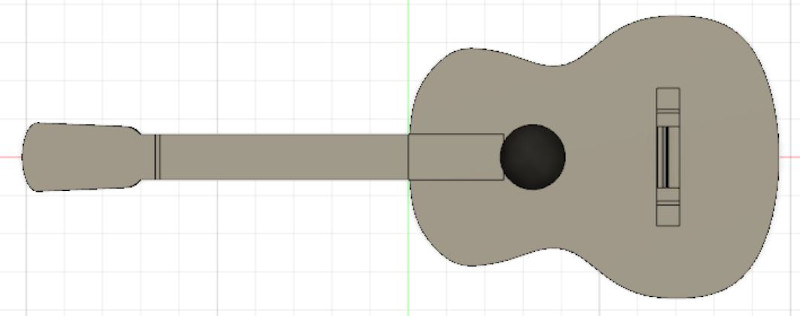
I made the neck! Here's the updated model:
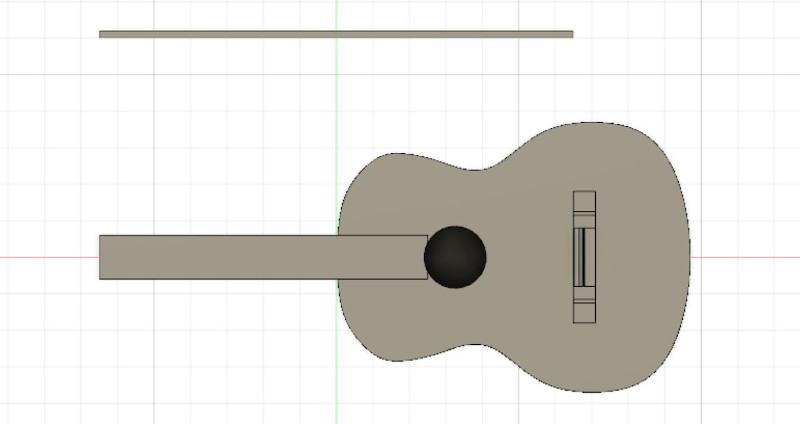
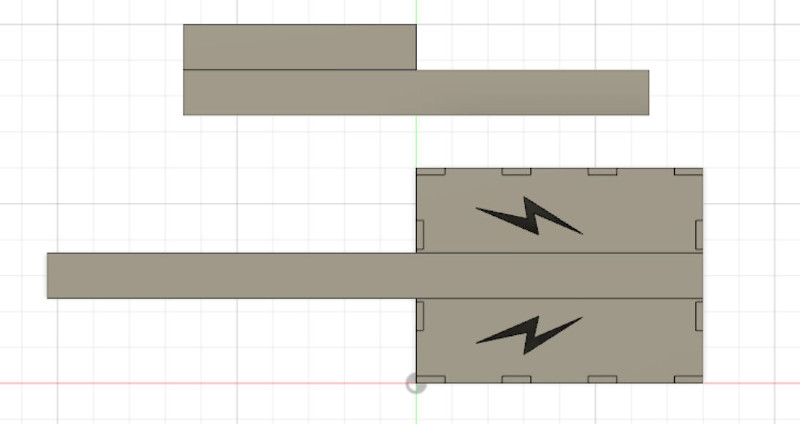
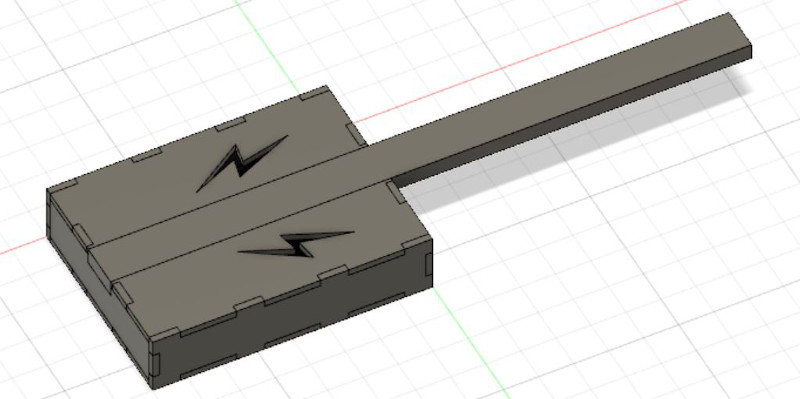
After talking with Jen about the project, I decided that simplifying the body shape to be more rectangular would save me some time. I saw this cool youtube video for a DIY cigar box acoustic guitar, and I think I will change my neck to be modeled more after the one he made. This will make connecting the neck and body a lot easier! He also gave a lot of really cool tips about how to replicate guitar parts (like the bone, bridge, tuners) out of hardware store pieces. I might have to try out some of his ideas! Here's my updated design:
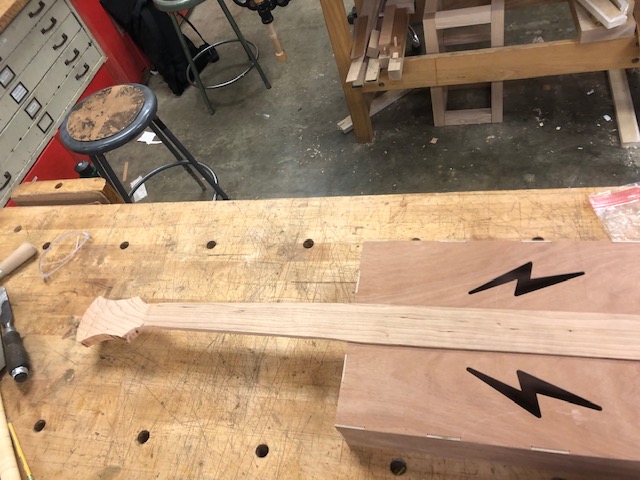
In the first image the smaller rectangle above the guitar shows the distance between the end of the fret board (where the bone will be) and the 12th fret. The larger rectangle shows the scale length. I can now just drill/glue the neck to the body. I'm planning to laser cut the body pieces and then press fit them together (I will also add glue). I will saw the neck. I will order tuners and strings online. I will attach the strings to the body by water-jetting a metal piece and folding it over kind of like a hinge. I will use tips from the linked youtube video to make the bone and bridge (I will also try to 3D print and screw them on, but I'm not sure if this will work well enough). For the electronics, my design will be based somewhat off of fret zealot I plan to have strips of LEDs for each fret and one for each string. I will have switches for each chord, and when one's switched it will light up all the ways to play that chord on the neck of the guitar. My goal by the end of the semester is to also program at least one song to really give self teaching ability. I will use the song's time signature and chord order to light the LEDs for each chord along with the song. I will also have options to play the song at 1/2 speed and 1/4 speed so that you can increase to full speed as you practice. The LED strip attachments will be removable so that I can use them on both this box guitar and my actual guitar! I plan to do this by casting silicone housing for the strips and possibly vinyl cutting copper to create the leads.
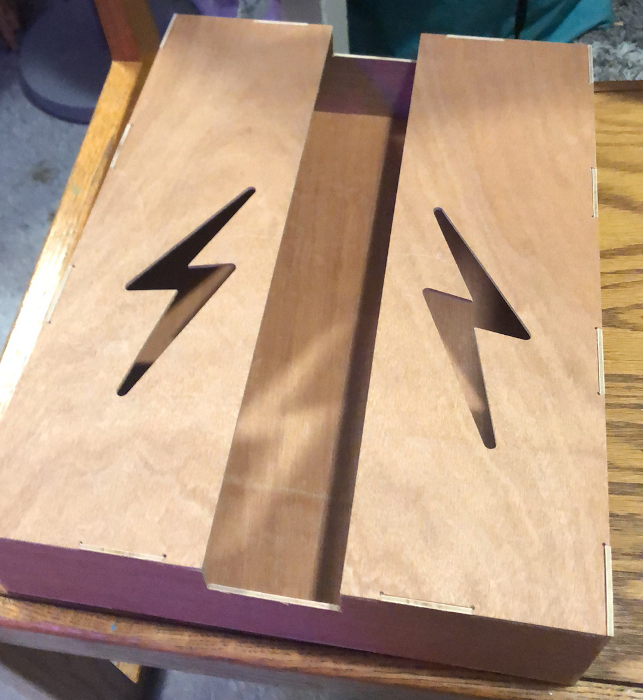
I met with Zain this week in N51 to work on cutting out the body! I ended up using a cherry stained plywood that was a little under 3mm thick. We created a tool path and set up the onsrud by measuring and adding some smaller bits into the inventory. The measured thickness of the board was about 2.6mm, and I ended up using 2.9mm as the input thickness into my CAD design. After cutting out and doing a little bit of sanding with sandpaper, the press fit turned out to be even better than I thought it might considering how thin the material was. The 2.9mm thickness used also ended up working pretty well and helped account for any warping in the material. Here's the body assembled before gluing:
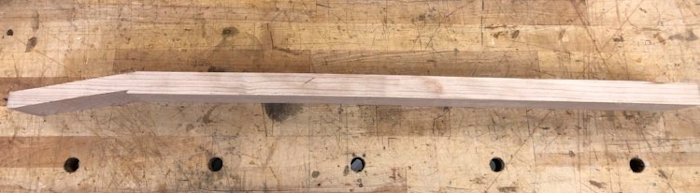
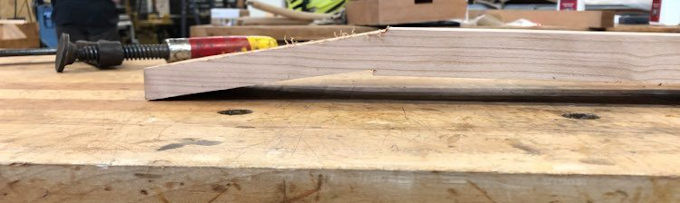
I also met with Chris this week to pick out some wood for the neck and start shaping it. We ended up going with cherry, both since it's a hardwood (which is preferable for the neck since the strings pull on it a lot) and since it matched the body. The cherry is about $5 a foot, which wasn't too bad considering I only needed 3 ft. We cut the length we needed, flattened the sides out, then cut down to the max width I'd need. Then, I used a band saw to create the slant for the top of the neck/head. Here's what it looked like after this step:
We then started cutting out the top shape of the neck so that it fit into the body. Yay! I also spent a lot of time on the band saw, using files, and sanding to create the proper shape of the neck. I shaped the top to resemble an acoustic guitar design, and I tapered in the neck from the bottom to the top. I made sure the back was rounded and comfortable to hold. Here's the final neck shape and how it fits into the body:
I then marked the spacing for the frets and used a really thin saw to cut holes and hammer in the frets:
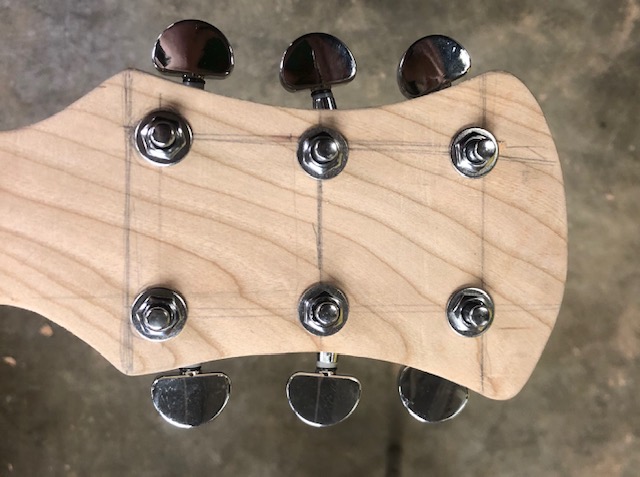
I used a drill press to make holes for the tuners and screwed them in:
I also cut holes in the neck for the bone and the bridge. I used a bolt that I cut to size for the bridge and a bone that I got from amazon. I also took a shot at designing the bridge in Fusion360 and 3D printing it, and it came out great and really simliar to a real one. I was a little bit worried about its strength holding up, so I didn't end up using it in my final project, but it was a fun design exercise.
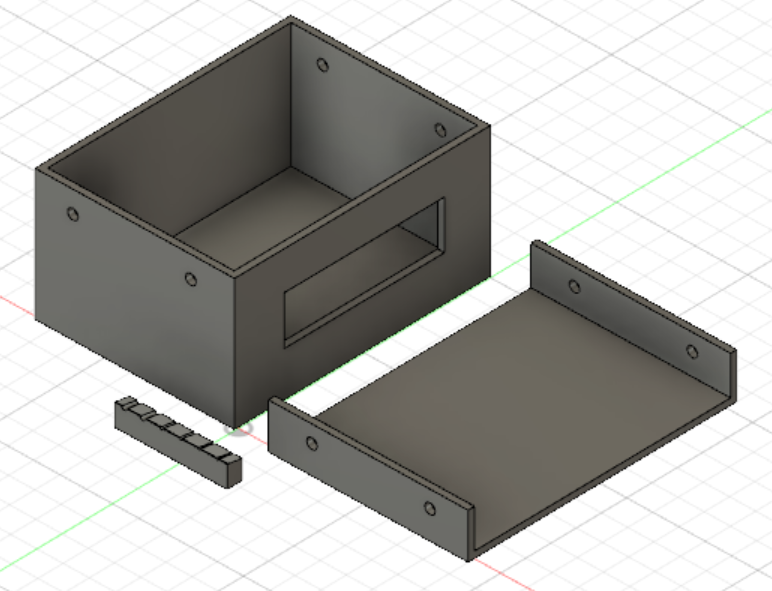
Here are the 3d prints I made for the project. The bone and electronics housing! I made the electronics housing a bit too big because I wasn't sure how large my electronics needed to be at this point, but it still ended up working out ok.
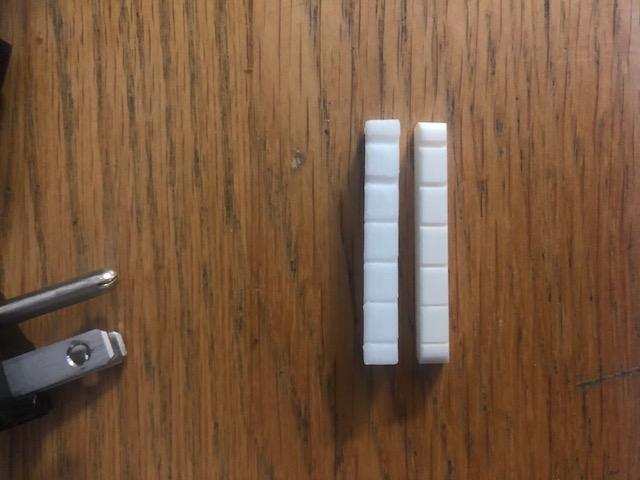
And here's a comparison of my 3d printed bone to the real one from amazon.
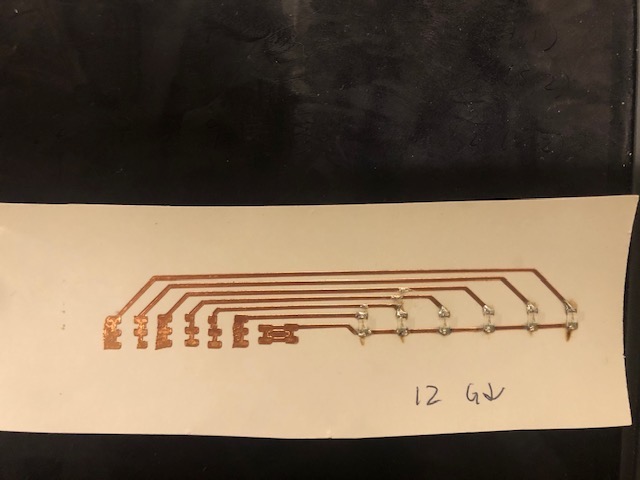
I spent a lot of time using the vinyl cutter and copper sheets to make my fretboard LED layout. Since my guitar neck tapered, I had a couple different designs with the LED spacing varied a bit. I also only made the LED strips up to the 14th fret since the spacing between frets after that was a bit too small and I couldn't fit all of the traces I needed within the space properly. Here's what the LED strips for each fret looked like:
And the wiring was done on the back of the neck of the guitar like this:
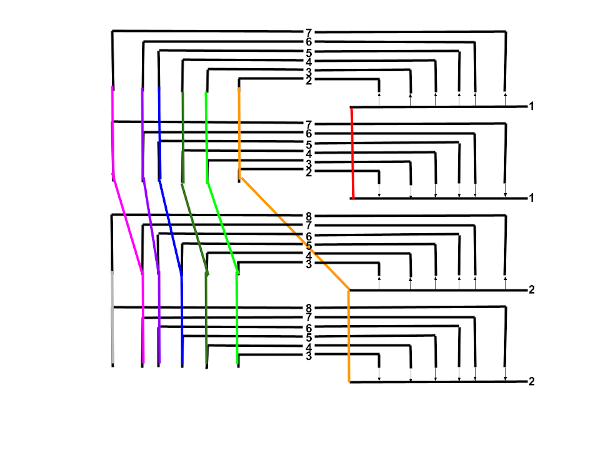
I cut and stripped some short wires to make the connections, and then realized using the copper sheet that I had left over from when I cutout my vinyl cut circuits was easier to use as connectors and the backing was enough of an insulator to just expose each end. I designed the LED fret board to require minimal IO pins while also being not too complicated to wire. This was the pattern I used to wire them:
I could use the same inputs two in a row by flipping the LEDs, then I shifted the inputs by one and added a new one. I repeated this pattern on the whole fretboard.
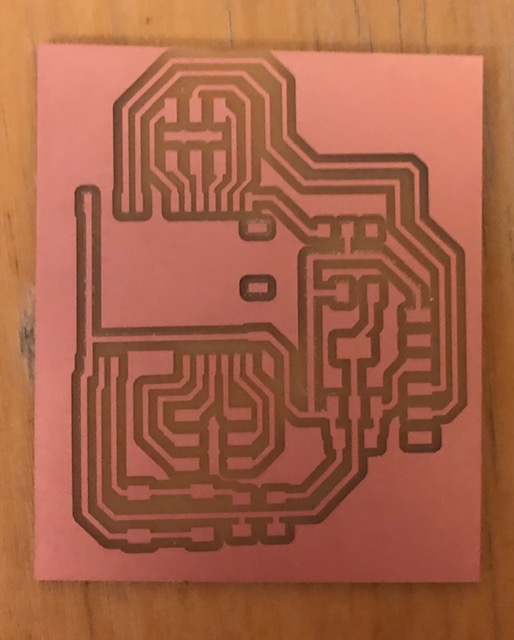
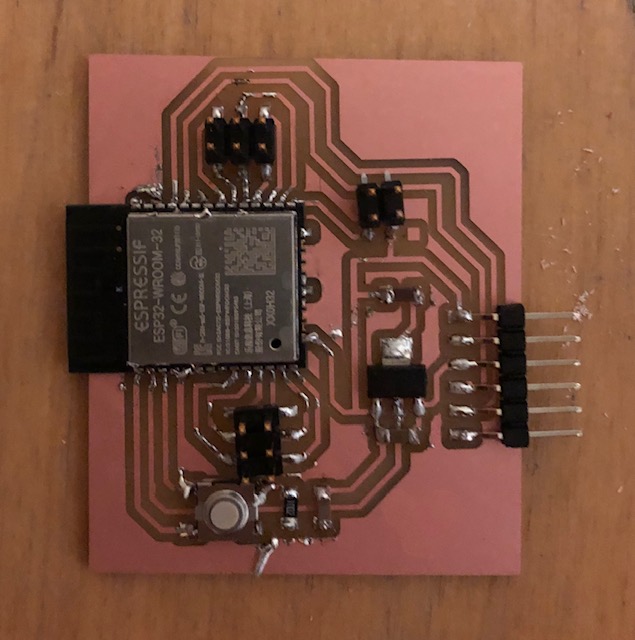
To power and control the fretboard LEDs, I used an esp32 board and a web interface.
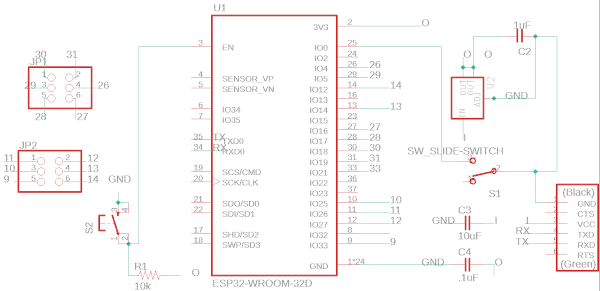
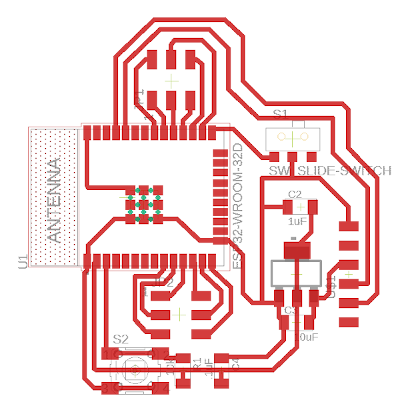
I designed my boards in Eagle. I based the esp32 board design off of Neil's, but added some headers to connect to the IO pins. I also replaced the switch with a 2x2 connector and was able to use the connector from serial adapter (for the 5v/3v) as the switch since one of my adapters broke earlier in the semester and I had two. I also had to edit the esp32 footprint traces a bit in inkscape to make the distance between them larger to be able to mill the board properly using clank. I also removed some of the extra footprints on the esp32 that I wasn't using. I used this soldering tutorial to solder the esp32. It worked really well! All of the pins on the esp32 that were connected to a wire were soldered down really easily. Some of the pins that didn't have any connections got a little lumpy and clumped together, but since I wasn't using them it wasn't a huge deal, but it did make the board look a little more messy. Overall, it worked! Here's the board making process:
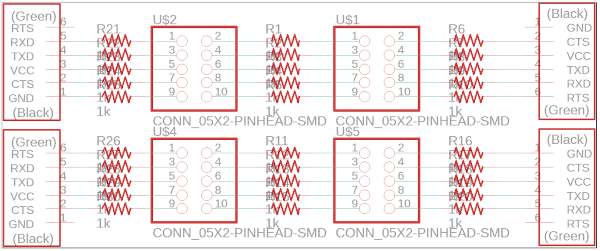
I also designed a breakout board with resistors so that I could wire the IO pins across these resistors and then to the LEDs on my final project.
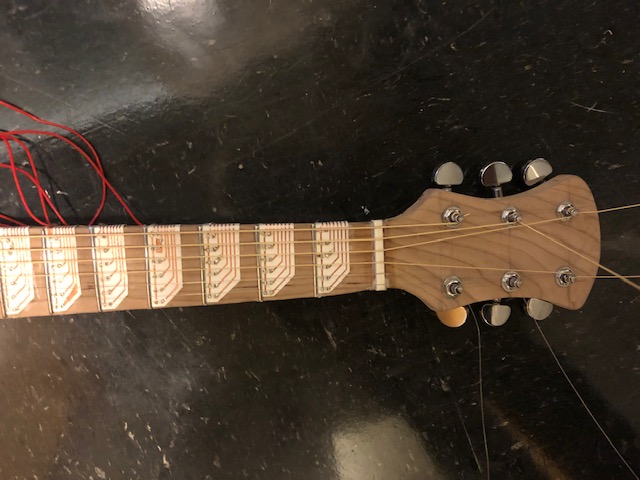
I then used hot glue to secure the LED boards, bone, and brige to the guitar neck. I drilled holes in the base of the neck and used nails to hold the strings in place and strung up the guitar.
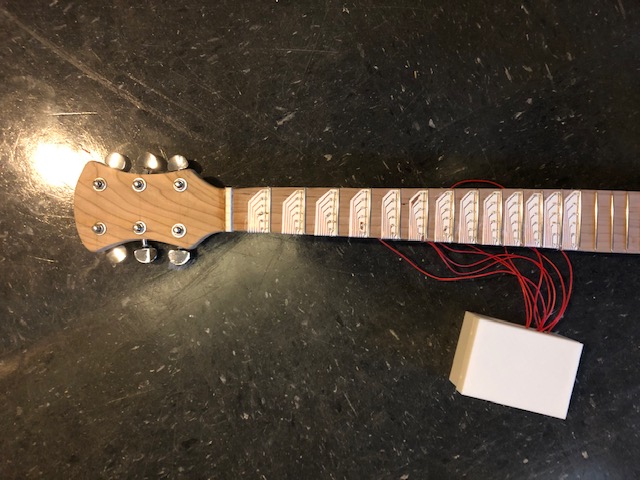
Here's what the neck looked like strung. I trimmed the strings a bit.
And here's the finished neck with the electronics housing and wiring completed:
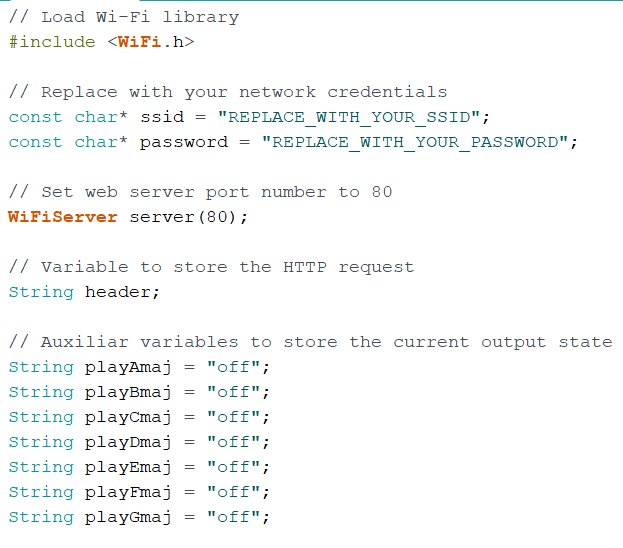
Then, I glued the finished neck into the body of the guitar, and it was finished! I tuned it, and it ended up working even better than I thought it might. In interface and application programming week, I made a web interface to interact with my guitar. I followed this tutorial to get my esp32 connected to wifi and to set up a webpage to interact with it. It does a really good job documenting the code, and I really recommend checking it out if you're setting up a web interface! I'll input some snippets of my code, but it's pretty long, so I'll link it at the end as well. I didn't change the code from the tutorial that set up the interface and wifi connection, just the style of the webpage, added more buttons, and changed what the buttons did! Here's the beginning, declaring what you'll need:
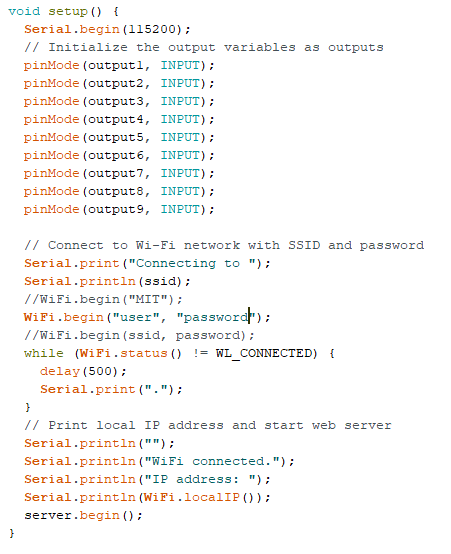
Then, the setup:
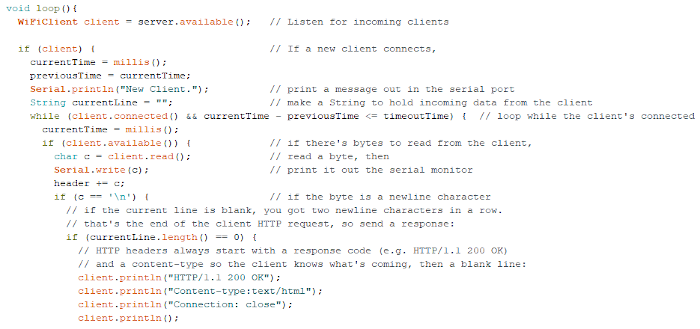
And the beginning of the loop:
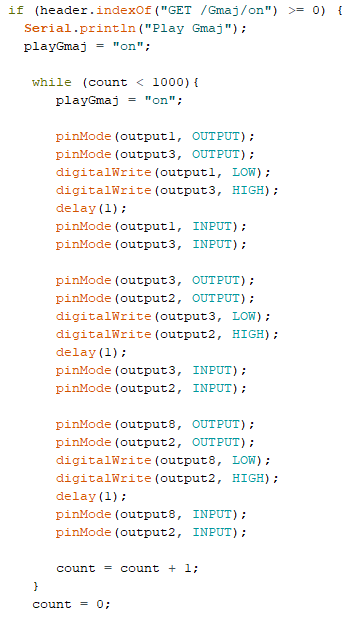
Here's an example of some changes I made. I checked if the message from the user in the web interface was to play a G major chord:
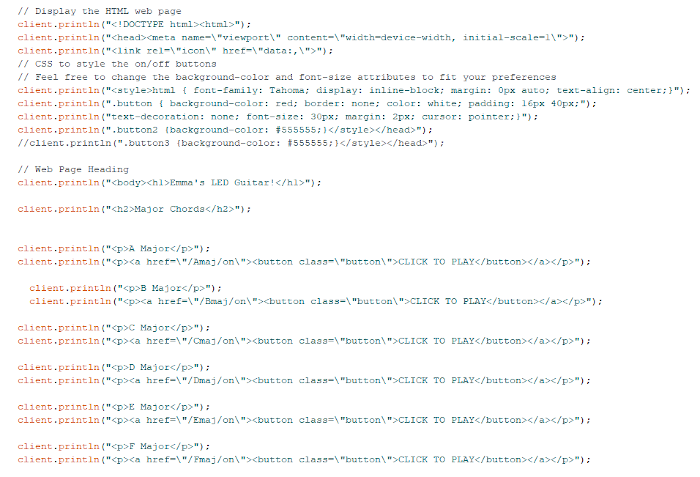
And setting up the web interface via the arduino code:
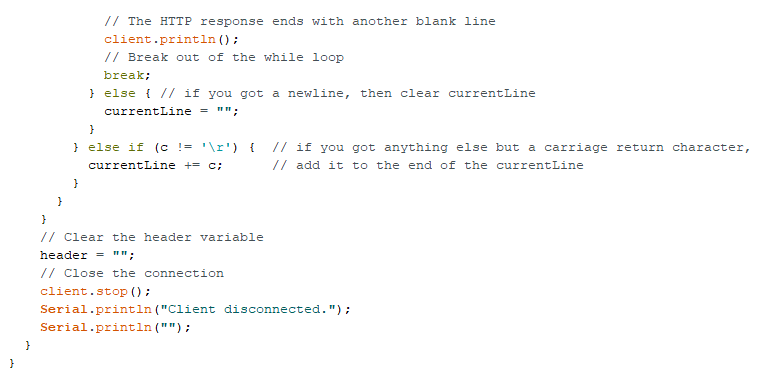
And the end of my code/loop:
After compiling and uploading the code onto my esp32, I could open the serial monitor to check what the webserver was and type it into my browser. Here's me controlling the guitar via a webpage on a phone:
Final Project Summary
What does it do?
I made a self teaching guitar! Using a web interface, a user can click different chords or songs, and LEDs on the guitar fretboard will light up under the appropriate strings at the appropriate fret so that the user knows what to hold down to play whatever they selected!
Who's done what beforehand?
My electronics design was partially inspired by Fret Zealot, which is an LED addition that you can stick to your guitar fretboard and helps you learn how to play. I thought this was really cool, and I wanted to improve my guitar skills so I thought I'd try to make my own cheaper version. My guitar design was inspired by the youtube tutorial linked above as well as cigarette box style guitars!
What did you design?
I designed the guitar itself: I used Fusion360 and 2D/3D design to make the guitar body, and I got some woodworking design experience to make the neck of the guitar. I also designed various 3D prints that were used in fusion such as the electronics housing, the bone, and some guitar picks. I also designed all of the electronics including an esp32 wroom board, a breakout resistor board, and all of the vinyl cut led fretboard strips to create the overall charlieplexed led array.
What materials and components were used/where were they from/how much did they cost?
1.) Cherry stained plywood for the body of the guitar that I got from the N51 woodshop for free, as it was scrap wood.
2.) Cherry hardwood for the neck of the guitar also from the N51 woodshop that was $15.
3.) Guitar tuners from Amazon that were $19 (but I got twice as many as I needed).
4.) Frets from Amazon for $12.
5.) Guitar bone from Amazon for $6.
6.) Guitar strings from Amazon for $14.
7.) ESP32 board - ESP32-wroom, 3 capacitors, 1 resistor, 1 2x2 connector, 2 2x3 connectors, 1 voltage converter, 1 button, 1 ftdi header all from the Arch shops.
8.) Breakout board - 15 resistors, 2 ftdi headers, 2 5x2 connectors all from the Arch shops.
9.) Fret board leds - 78 red LEDs, copper for vinyl cutting and wiring, wire all from Arch shops.
10.) 3D print material for electronics housing, bone, picks.
11.) Misc. - Bolt for bridge and small nails to hold strings in place (6) both about $1 each from Home Depot.
What parts and systems were made?
I made the guitar body and neck. I also made the electronics housing as well as all of the electronics boards. I also used the vinyl cutter to make all of the fretboard led additions and wired it all together.
What processes were used?
2D/3D design, electronics design, computer controlled machining (cnc routed body in N51), wood working, 3D printing, vinyl cutting, soldering, PCB milling.
What questions were answered?
I wasn't too sure how good the guitar would sound considering it's the first time I've ever made an instrument and the body was rectangular and made of plywood and the bridge was just a bolt. But, it ended up sounding even better than I thought it would, so I really learned about ways you can use what is available to make instruments!!
What worked? What didn't?
Everything that I have is currently working, but I do see ways for me to improve this project. I would like to make an app and improve the user interface. I would like to make it so that the user can select a chord progession through the app and a tempo and the guitar can play based on that input rather than needing songs to be prewritten into the interface. I'm super happy that I have everything working and the basic framework to write to and light any LED, so just improving the UI would be super cool!!
How was it evaluated?
My goal was to have a working guitar that could be tuned and played properly. I also wanted to have a user interface where the user could select and play chords as well as songs and have the LEDs on the fret board light accordingly. These goals were all accomplished! I'm also hoping using this tool will help me improve my guitar playing skills!