W10 - Networking and Communications
Assignments:
- Design, build, and connect wired or wireless node(s) with network or bus addresses.
- Send a message between two projects.
Designing the board
This week, I built a board that has RF communication enabled by an NRF240 module. The board is based on an ATTINY1614 MC, NTC resistors as temperature sensors, and includes a debugging and power LEDs. The goal for this week was to build a device that could communicate with another device. I chose to go wireless due to the fact that my final project will be based on wireless communication. I used EAGLE to deisgn my board.
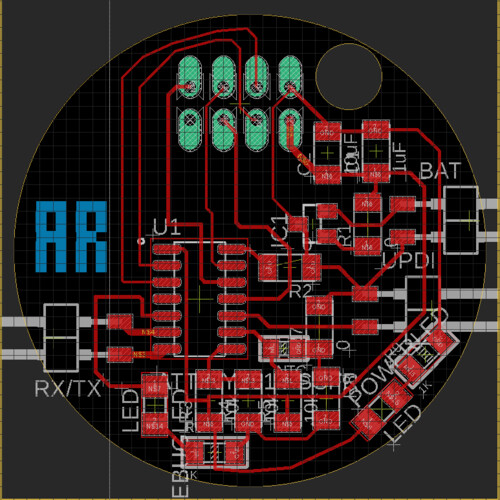
I did not run into any issues during design, milling and soldering except for some small surgeries that had to be done with small traces that come from the NRF module. I think my vcut is getting worn down so I'll get a new one for further board milling.
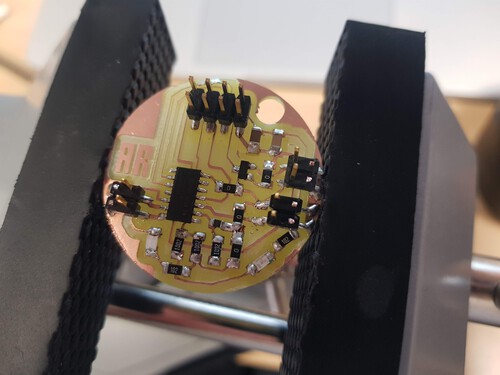
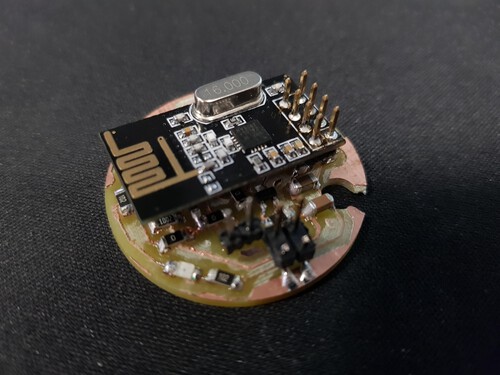
I made two identical boards so that one would be used as a transmitter and the other as the receiver. This is what they look like.
Programming my board...
This week I made separate codes for each one of my boards. One of the boards acts as a transmitter. It uses RF to send its unique ID along with the last temperature reading. The board blynks when it was succesfully sent a message. The receiver board listens on RF and prints the information that it receives through serial. It blynks when it receives a packet correctly.
Transmitter Code - Device uses NRF240 to transmit its unique ID along witht the current temperature reading.
      #include
      #include
      #include
      #include
      #include

      RF24 radio(1, 0);

      int refPin = 6;
      int ntcPin = 7;
      int ledPin = 3;

      const byte addresses [][6] = {"10911", "10917"}; // MSN, MSG

      const char myID[6] = "ID0000";

      void setup() {

        Serial.begin(115200);

        pinMode(refPin, INPUT);
        pinMode(ntcPin, INPUT);
        pinMode(ledPin, OUTPUT);

        Serial.println("Starting Up Radio!");
        radio.begin();
        radio.openWritingPipe(addresses[1]);
        radio.openReadingPipe(1, addresses[0]);
        radio.setPALevel(RF24_PA_MIN);
        radio.startListening();
        Serial.println("Radio has been started!");
        Serial.println("Ready to begin!");

      }

      void loop() {
        // put your main code here, to run repeatedly:
        Serial.print("Temperature is: ");
        Serial.println(read_temp());
        send_rf_data(read_temp());
        digitalWrite(ledPin, HIGH);
        delay(250);
        digitalWrite(ledPin, LOW);
        //send_ski("ER");
        Serial.println("Sent New Data!");

      }

      float read_temp() {

        float Vref = analogRead(refPin);  //Reference Voltage.
        float Vntc = analogRead(ntcPin);  //Tension on NTC.
        float Intc = ((2*Vref) - Vntc) / 10000;
        float Rntc = Vntc / Intc;  //NTC Resistance Calculation.
        float Tk = 1 / ((log(Rntc / 10000) / 3750) + (1 / 298.15)); //Scale resistance to temperature in kelvin.
        float Tc = Tk - 273.15;  //Convert from Kelvin to Celsius.

        return Tc;

      }

      void send_rf_data(float message) { //Function sends a command via radio. Takes string as argument and converts to char to send.

        //char mess[4] = "000";
        char temperatureValue[6];
        char fullmessage[14];
        strcpy(fullmessage, myID);
        strcat(fullmessage, ":");
        dtostrf(message, 6, 2, temperatureValue);
        strcat(fullmessage, temperatureValue);
        //strcpy(mess, message.c_str());
        Serial.println(fullmessage);
        radio.stopListening();
        radio.write(&fullmessage, sizeof(fullmessage));

      }
Receiver Code - Device uses NRF240 to receive and print information from transmitter.
      #include
      #include
      #include
      #include

      RF24 radio(1, 0);

      const byte addresses [][6] = {"10917" , "10911" }; // MSN, MSG Reversed from transmitters

      int refPin = 6;
      int ntcPin = 7;
      int ledPin = 3;

      void setup() {

      Serial.begin(115200);

        pinMode(refPin, INPUT);
        pinMode(ntcPin, INPUT);
        pinMode(ledPin, OUTPUT);

        Serial.println("Starting Up Radio!");
        radio.begin();
        radio.openWritingPipe(addresses[1]);
        radio.openReadingPipe(1, addresses[0]);
        radio.setPALevel(RF24_PA_MIN);
        radio.startListening();
        Serial.println("Radio has been started!");
        Serial.println("Ready to begin!");

      }

      void loop() {

        print_radio();

      }

      void print_radio() {

        radio.startListening();

        if (radio.available()) {                      //Looking for the data.{

            char incoming[14] = "";                      //Saving the incoming data
            radio.read(&incoming, sizeof(incoming));    //Reading the data
            Serial.println(incoming);
            digitalWrite(ledPin, HIGH);
            delay(250);
            digitalWrite(ledPin, LOW);
            delay(250);

          }
      }
And here is my Demo! Click to start video.