CNC for Bookshelf
Week 3
My room has all the furniture it needs, so the piece I would make would be a greed piece. I decided Im greedy about books. Design So, For my "make something big" assignment, I wanted to make a bookcase. It took me a while, but here is the design I came up with:

Here you can see images of the process of making the design. I am new to Fusion, so I followed a tutorial to get here. Fusion360 bookshelf tutorial


|
Tools: |
The Mill |
| Date: | 10.01.2020 |
The design is fully parametric, because we will be cutting this out of OSB. It is a pure press-fit design, and I hope it works fine even though OSB is a pretty bad material because it is basically left over woodchips glued together.

The next step is programming the CNC toolpath.
I took help from Chris at the Edgerton Center to put my pieces together. He and I struggled a lot with the rescaling the file. I CADed the design, but I think we messed up the holes on MasterCAM. And, the distances between them were not even. so it was in my best interest to wait for the following day when Zain would be available.
With Zain, things moved along more smoothly.
He imported the dxf of my arrangement into Rhino, and using Grasshopper set points at all the interior corners and at the interior slot cutout corners. In addition, the points were set to 3 layers:
1-points corresponding to the interior slot corners
2-points corresponding to interior corners on the exterior of each part (like the inside corners of the press-fit box joints)
3-points corresponding to the exterior corners
This was then imported into MasterCam to designate the tools and their respective paths.
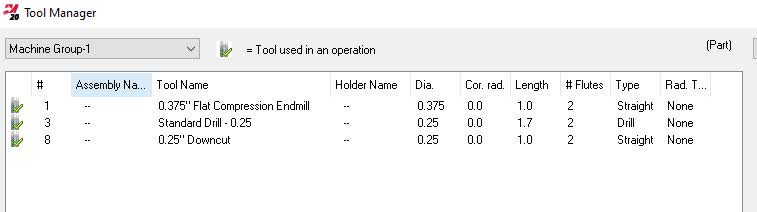
Here is the list of tools we set for the job:
The 1/4" drill was designated to drill the holes. The 1/4" downcut endmill was used to cutout the slot interiors. The 3/8" flat compression endmill was used to cut out the exteriors.
With that done, we load the g-code into the machine and we can get started with making this computer model into something physical!
`
I started with the big 8 ft x 4 ft OSB sheet. It was pretty warped. When setting it on the machine's table, it definitely did not lay flat at all. However, After turning on the table's vacuum, it sucked down the whole board and it held it pretty firmly. To be on the safe side, the board was taped along 3 edges to ensure it held in place while cutting, as shown here:


Once that was done, the pieces are removed from the table. As is clearly visible, the pieces of onion skin are still intact at every cut.
This is easily taken care of with a file. I say easily, but it takes a good amount of time. I spent about 2 hours filing away at every edge. Since this is something I will be using with my roommates, I don't want them getting splinters!

Alas, all the holes were slightly bigger than we needed to join in. Zain thought it would suffice if I put small quarter inch wooden dowels in each extra gap, so we cut out a lot of them and I headed home to assemble what I thought would be a bookself.

However, we were wrong. I spent a long time putting things together, however, the pieces were not listening to me and they wouldn't give. I knew then the problem was irreconcilable so I thought it best to assemble it in whaever way the pieces would let me. as you can see below.


So, now it's an art piece!