final project: refining
October 18, 2020
This past week, I met with Premila (our TA) and Anthony to discuss my final project and worked through next steps. We agreed that I should reduce the scope slightly in order to finish on time. So now my treat launcher will load and launch treats, make a sound to alert my dog, and connect to a remote that will have buttons to make sounds and launch. If time permits I will integrate a camera to view the room its in in realtime and I will make a web application to launch treats remotely.
It seemed that getting a camera on my device would be pretty straightforward, and since we have a good number of cameras laying around in the shop, I figured I should include it in my design so that I have the flexibility to use it or not.
We also discusseds using the esp32 microcontroller since it has built in wifi and bluetooth. It also supports a camera module (ESP32-CAM) which will be extremely helpful for my camera.
We then broke up the my device into three separate parts: the launching mechanism, treat storing/dropping mechanism, and housing.
However, one downside was being far away from my family. I’m able to keep in touch via facetime calls weekly, but I’m not able to interact with my dog as much.
launching mechanism
This was the most interesting and difficult part of my project. I needed to
find a way to successfully launch a treat. For my project, I didn’t care how
far the treat went, and also was fine with a constant launch distance. I first
thought we could use something like the
jugs machines, however after some discussion with Anthony, it didn’t seem like a great idea giving the long loading time and that the treat wasn’t flexible like a football and could break while being passed through the two motors. Another idea was to use a erosion spring and a motor to launch my treat. This would be helpful since the loading is passive, there is not much wind up. However it seemed infeasible to implement well, so we scratched that idea. Lastly we came up with a slingshot-like functionality. I would use a rack and pinion, with the rack connected to the end of the slingshot. I would use a motor to pullback the rack that is connected to the elastic and then would release to launch the treat. This was a good idea, and Anthony suggested that I can use a half gear which would cause the gear to lose connection with the rack. This would be helpful because that would mean the slingshot would launch.
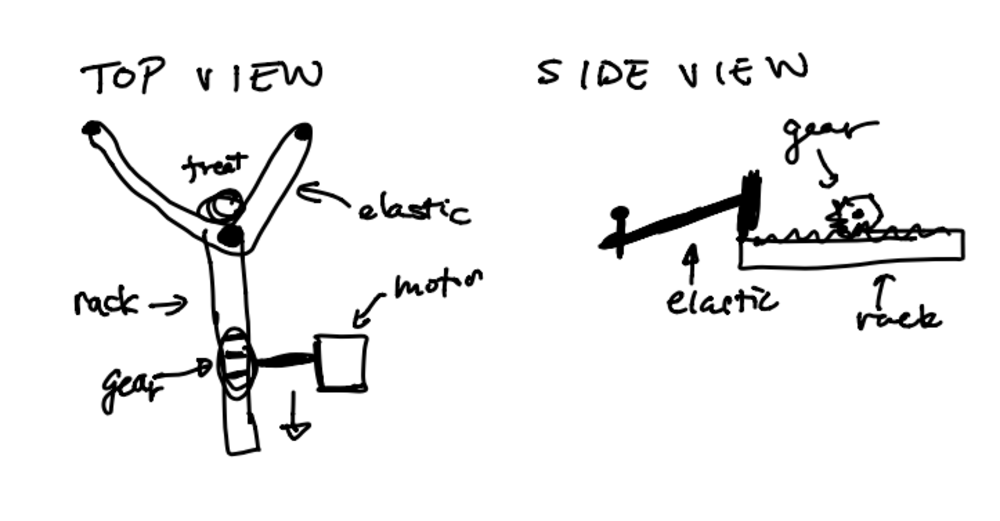
Sketch of the rack and pinion for my slingshot
The mechanism would look something like this.
This was a promising idea because I could 3d pring the rack and pinion and use a stepper with an H-bridge as my motor. Luckily we have lots of steppers in the shop for me to use.
This was a promising idea because I could 3d pring the rack and pinion and use a stepper with an H-bridge as my motor. Luckily we have lots of steppers in the shop for me to use.
After doing additional research, I found that another possible way to launch my treats. Using a belt could also be feasible, but I would just need to put some more thought into it. During the outputs week, I plan on working on the launcher.
storing/dropping mechanism
I also needed to add something that would hold many treats, but only drop one treat into the launcher at a time. I was thinking of using some type of tube to store the treats and then a motor that would open a flap to let only one treat down before I launched.
I also had the idea to put the treats in a tube on the bottom of my device, and every time I wanted to launch a treat, I would have the tube push one treat up at a time. This would be helpful because I could accurately ensure only one treat would be presented to the launcher, while the previous design would have to fight gravity and couldn’t guarantee that only one treat would be dropped.
This part is definitely a little more tricky and if it comes down to it, I may just have to load my device with a single treat before launching.
housing
As seen in the first page, the housing of my device would be pretty straightforward. This would likely be the last part that I work on since it needs to take into account the size of my internal mechanisms. However I can start CADing the housing parametrically whenever I have time.
It seemed that the best way to make my hollow housing would be to use a 3D printer due to the size and the functionality I need. I will need to be sure to include multiple copies of my housing before I go home in case someone breaks.
NEXT>
It seemed that the best way to make my hollow housing would be to use a 3D printer due to the size and the functionality I need. I will need to be sure to include multiple copies of my housing before I go home in case someone breaks.