Week 1
Project Management, Computer Controlled Cutting
Materials: Laser Cutter | Vinyl Cutter | Fusion 360 | Rhino 3D | 3/16ths corrugated cardboard | Vinyl Roll
Laser Cutting
Design: I wanted to make both an iPad and a phone stand to play around with different types of joints (press-fit and slide fit).
Functionally, I designed the iPad stand at a low angle relative to horizontal, ideal sitting activities such as PSETs and watching Netflix on planes.
I was inspired to create a phone stand because I’m easily distracted by the new iphone setting that requires an unlocked iphone to view messages. I would
find myself picking up my phone to see if a text was urgent, but then with my phone in my hands I was already off task. With an elevated and angled phone stand,
all I have to do is look in my phones direction for face identification to kick in and view my notifications without the need to pick up my device.
With both designs, I wanted to play around with scoring. To maintain a continuous theme across both stands, I added paws to the ipad stand and etched a raccoon face, paws, and belly on the iphone stand.


CAD: I have previous CAD experience from my ME summer internship, so I got to have fun with curves and drawing for aesthetic rather than function. Strangely enough, redesigning engine transmission components is as gratifying as sketching a cartoon raccoon.
Rhino: It was my first time using Rhino, so I greatly appreciated the command window autofill function. The scale, changelayer, trim, and extend commands proved very useful.
Laser: The cut settings were set to 30/12/500 speed-power-frequency, and I ran it twice because tiny flames started to appear at a setting of 30/15/500. The raccoon design was scored with a setting of 30/5/500 and the paws were scored at 30/3/500. There was a steep parabolic learning curve with the laser cutter. Initially, my group spent over an hour trying to learn from scratch how to laser-cut completely unsupervised. Luckily, the shop manager gave us a tutorial after seeing a group of students huddled around the laser cutter, and it went much more smoothly from that point onwards.


Vinyl Cutting
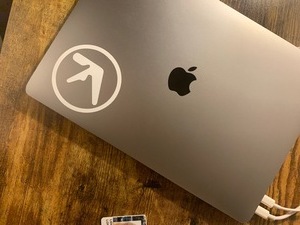
Aphex: My first foray into vinyl cutting was and Aphex Twin sticker for my sister (highly recommend their ambient music for working/studying, our favorite is Polynomial C). It went smoothly, and it was so rewarding watching her face light up.
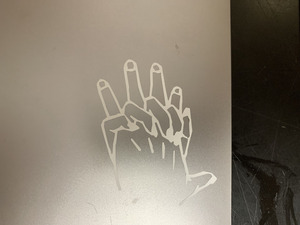
Holding Hands: Next, I wanted to experiment with vinyl cutter precision and fine lines. I created a minimalist recreation inspired by a photo of me holding my friend’s hand with matching painted nails. After playing with sticker size and vinyl cutter line identification, I had the exact sticker I had envisioned with my 2nd iteration.
Skateboarding Frog: To experiment with image manipulation, I vinyl cut a frog on a skateboard. In photoshop, I created a new object out of every component. In my print, I made the
entire sticker green, but because I made each component it's own png, one could print the frog using different colors for one cohesive sticker.


For a more complex example of 2D modelling and laser cutting, click here