Group Assignment: Compare as Many Tool Options as Possible
Our group compiled a large list of various tool options and their uses.
And here is a chart that briefly describes some of these tools:

Individual Assignment: Write an Application that Interfaces with a Device
Node - Arduino
For this week, I wanted to write a Node.js program that could communicate to my D21E dev board via serial communication, and have it control my servo motors. I am fairly comfortable with Node, but I did have to do some research into the correct packages to be using.
If you're not familiar, Node is an asynchronous event-driven JavaScript runtime, and it's designed to build scalable network applications.
Setting up Node Script
First, I had to install the following packages:
        $  npm install serialport // this package is for serial communication
        $  npm install readline // this package is for reading user input from a terminal
Here is what my final Node.js script looked like (called servo_control.js). I added comments to describe what each line/command is doing.
        // Import packages
        const SerialPort = require('serialport');
        const Readline = require('@serialport/parser-readline');
        var readline = require('readline');

        // Specify device location and baudRate (must match rate set in Arduino)
        const port = new SerialPort('/dev/cu.usbmodem142401', { baudRate: 9600 });
        const parser = port.pipe(new Readline({ delimiter: '\n' }));

        // Create interface to read commands from terminal
        var rl = readline.createInterface(process.stdin, process.stdout);

        // Set prompt text
        rl.setPrompt('cmd> ');

        // Once the port object establishes connection with the device
        port.on("open", () => {
            console.log('serial port open');
            rl.prompt();
        });

        // Read responses from device, and after response put forth another command prompt
        parser.on('data', data =>{
            console.log('got word from arduino:', data);
            rl.prompt();
            });

        // Read user command
        rl.on('line', function(line) {
            if (line === "quit") {
                rl.close();
            } else {
                // Write out command to device
                port.write(line+'\n', (err) => {
                    if (err) {
                        return console.log('Error on write: ', err.message);
                    }
                    });
            }
        }).on('close',function(){
            process.exit(0);
        });
To run this script, all you have to do is:
$ node servo_control.js
Arduino Sketch
Now that the Node.js script is setup, I now needed to set up an Arduino sketch that could read from Serial, parse the command, execute the command if it's valid (or do nothing if invalid), and write back out to Serial what occurred.
Here is what my sketch looked like. I again added comments to describe what's going on.
            #include <Servo.h>

            // Create servo objects:
            Servo servo1;
            Servo servo2;
            Servo servo3;
            Servo servo4;
            // Define the servo pins:
            #define servo1Pin 2
            #define servo2Pin 4
            #define servo3Pin 6
            #define servo4Pin 7

            void setup() {
                // attach servo objects to their pins
                servo1.attach(servo1Pin);
                servo2.attach(servo2Pin);
                servo3.attach(servo3Pin);
                servo4.attach(servo4Pin);
                // Starts the serial communication
                Serial.begin(9600);
            }

            void loop() {

                if(Serial.available() > 0) // Read from serial port
                {
                    String incomingString = Serial.readStringUntil('\n');
                    String servoStr = getValue(incomingString, ' ', 0); // parse out servo
                    String angleStr = getValue(incomingString, ' ', 1); // parse out angle

                    int servo = parseServoStr(servoStr); // convert servo str to servo int

                    // check to see if a valid command was entered
                    if (servo != -1) {
                    int angle = parseAngleStr(angleStr); // convert angle str to angle int
                    if (angle != -1) {
                        // Command is valid, execute it and write back to Serial
                        Serial.print("Moving Servo ");
                        Serial.print(servo);
                        Serial.print(" to ");
                        Serial.print(angle);
                        Serial.println(" degrees");
                        moveServo(servo, angle);
                    } else {
                        //  Invalid angle
                        Serial.println("Invalid cmd received");
                    }
                    } else {
                    // Invalid servo
                    Serial.println("Invalid cmd received");
                    }
                }
            }

            // move servo to angle
            void moveServo(int servo, int angle) {
                switch (servo) {
                case 1:
                    servo1.write(angle);
                    break;
                case 2:
                    servo2.write(angle);
                    break;
                case 3:
                    servo3.write(angle);
                    break;
                case 4:
                    servo4.write(angle);
                    break;
                default:
                    break;
                }
            }

            // convert servo str to servo int, and only return if it
            // is a valid servo idx. Otherwise return -1
            int parseServoStr(String servoStr) {
                int servo = servoStr.toInt();
                if ((servo < 1) || (servo > 4)) {
                return -1;
                }
                return servo;
            }

            // convert angle str to angle int, and only return if it
            // is a valid angle value. Otherwise return -1
            int parseAngleStr(String angleStr) {
                int angle = angleStr.toInt();
                if ((angle < 0) || (angle > 180)) {
                return -1;
                }
                return angle;
            }

            // for a given seperator, split data according to it,
            // and return the 'index' element of the split
            // for example:
            // getValue("This is a test", ' ', 2) -> "a"
            // getValue("This is a test", ' ', 0) -> "This"
            String getValue(String data, char separator, int index) {
                int found = 0;
                int strIndex[] = {0, -1};
                int maxIndex = data.length()-1;

                for(int i=0; i<=maxIndex && found<=index; i++){
                if(data.charAt(i)==separator || i==maxIndex){
                    found++;
                    strIndex[0] = strIndex[1]+1;
                    strIndex[1] = (i == maxIndex) ? i+1 : i;
                }
                }

                return found>index ? data.substring(strIndex[0], strIndex[1]) : "";
            }
I was able to successfully upload this sketch to D21E board!
Putting it all together
After uploaded the sketch, all that was left was to actually run the script! Firstly, here is what the setup looked like:

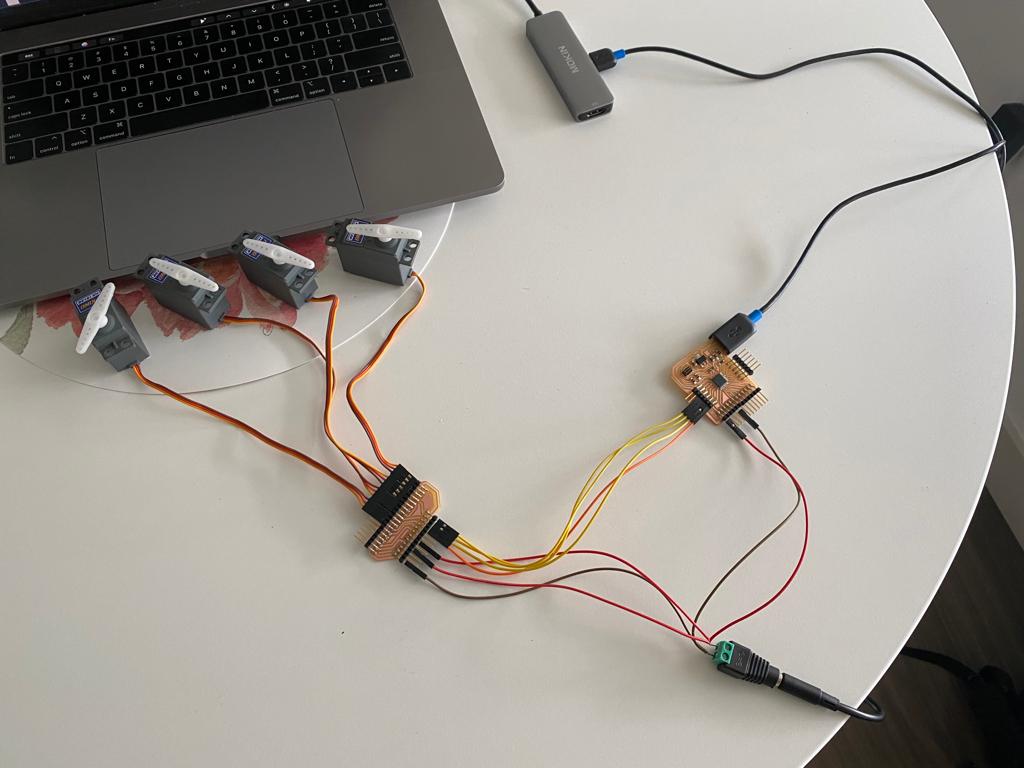
It's quite a jumble of cables. Essentially we have the 4 servo's plugging into the servo control board. From there, their signal wires (yellow and orange) plug into the analog pins on the D21E dev board. Lastly, from my DC power adapter I am providing 5V and common GND to both the servos and the dev board. This is a huge enhancement from what I was previously doing, which was trying to power multiple servos from my USB port.
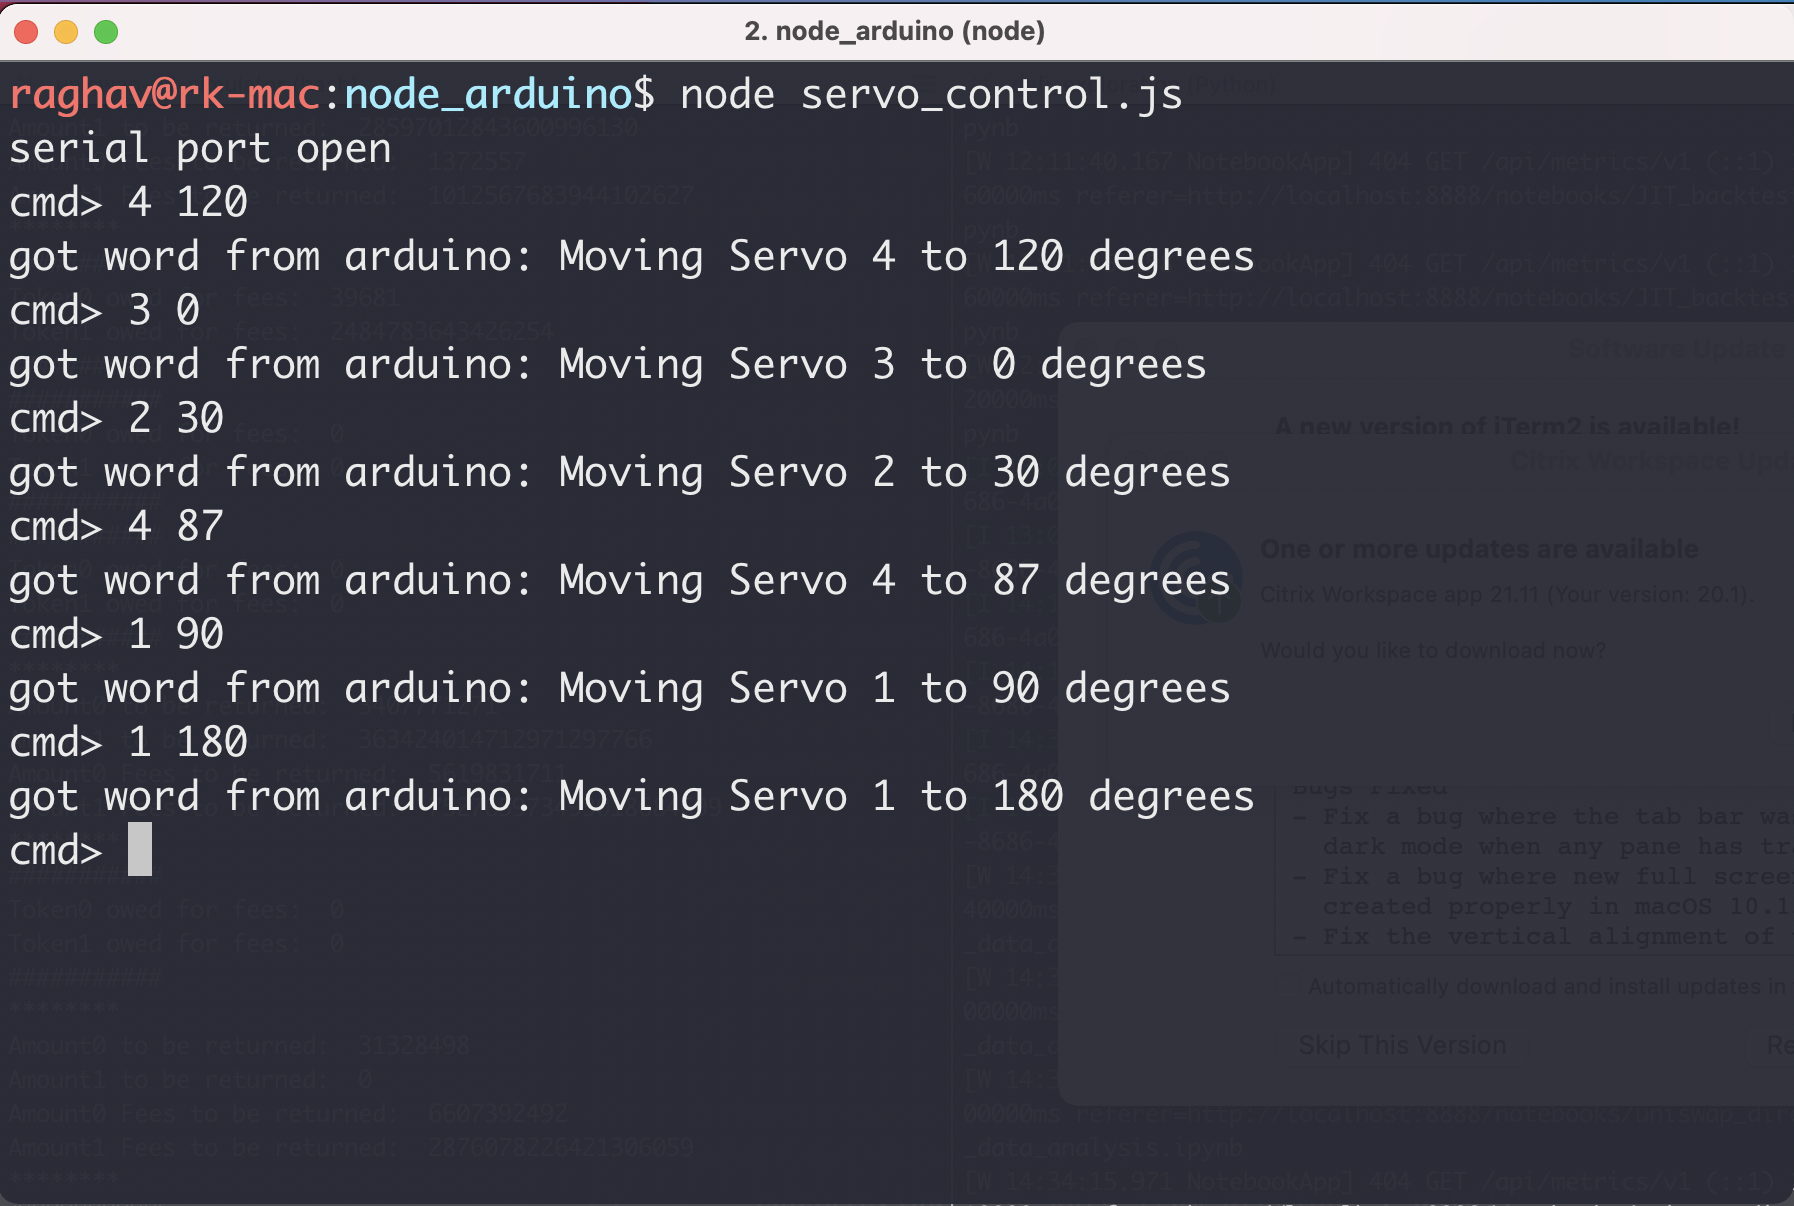
Finally, here is a demo of the interaction:
And here is a screenshot of the terminal commands:
Files
node_interface.ino (arduino sketch that reads command from Serial)servo_control.js (Node.js script that writes commands to Serial)