# How to run?: python real_time_object_detection.py --prototxt MobileNetSSD_deploy.prototxt.txt --model MobileNetSSD_deploy.caffemodel
# python real_time.py --prototxt MobileNetSSD_deploy.prototxt.txt --model MobileNetSSD_deploy.caffemodel
# import packages
from imutils.video import VideoStream
from imutils.video import FPS
import numpy as np
import argparse
import imutils
import time
import cv2
# construct the argument parse and parse the arguments
ap = argparse.ArgumentParser()
ap.add_argument("-p", "--prototxt", required=True,
help="path to Caffe 'deploy' prototxt file")
ap.add_argument("-m", "--model", required=True,
help="path to Caffe pre-trained model")
ap.add_argument("-c", "--confidence", type=float, default=0.2,
help="minimum probability to filter weak predictions")
args = vars(ap.parse_args())
# Arguments used here:
# prototxt = MobileNetSSD_deploy.prototxt.txt (required)
# model = MobileNetSSD_deploy.caffemodel (required)
# confidence = 0.2 (default)
# SSD (Single Shot MultiBox Detector) is a popular algorithm in object detection
# It has no delegated region proposal network and predicts the boundary boxes and the classes directly from feature maps in one single pass
# To improve accuracy, SSD introduces: small convolutional filters to predict object classes and offsets to default boundary boxes
# Mobilenet is a convolution neural network used to produce high-level features
# SSD is designed for object detection in real-time
# The SSD object detection composes of 2 parts: Extract feature maps, and apply convolution filters to detect objects
# Let's start by initialising the list of the 21 class labels MobileNet SSD was trained to.
# Each prediction composes of a boundary box and 21 scores for each class (one extra class for no object),
# and we pick the highest score as the class for the bounded object
CLASSES = ["aeroplane", "background", "bicycle", "bird", "boat",
"bottle", "bus", "car", "cat", "chair", "cow", "diningtable",
"dog", "horse", "motorbike", "person", "pottedplant", "sheep",
"sofa", "train", "tvmonitor"]
# Assigning random colors to each of the classes
COLORS = np.random.uniform(0, 255, size=(len(CLASSES), 3))
# COLORS: a list of 21 R,G,B values, like ['101.097383 172.34857188 111.84805346'] for each label
# length of COLORS = length of CLASSES = 21
# load our serialized model
# The model from Caffe: MobileNetSSD_deploy.prototxt.txt; MobileNetSSD_deploy.caffemodel;
print("[INFO] loading model...")
net = cv2.dnn.readNetFromCaffe(args["prototxt"], args["model"])
# print(net)
#
# initialize the video stream,
# and initialize the FPS counter
print("[INFO] starting video stream...")
vs = VideoStream(src=0).start()
# warm up the camera for a couple of seconds
time.sleep(2.0)
# FPS: used to compute the (approximate) frames per second
# Start the FPS timer
fps = FPS().start()
# OpenCV provides two functions to facilitate image preprocessing for deep learning classification: cv2.dnn.blobFromImage and cv2.dnn.blobFromImages. Here we will use cv2.dnn.blobFromImage
# These two functions perform: Mean subtraction, Scaling, and optionally channel swapping
# Mean subtraction is used to help combat illumination changes in the input images in our dataset. We can therefore view mean subtraction as a technique used to aid our Convolutional Neural Networks
# Before we even begin training our deep neural network, we first compute the average pixel intensity across all images in the training set for each of the Red, Green, and Blue channels.
# we end up with three variables: mu_R, mu_G, and mu_B (3-tuple consisting of the mean of the Red, Green, and Blue channels)
# For example, the mean values for the ImageNet training set are R=103.93, G=116.77, and B=123.68
# When we are ready to pass an image through our network (whether for training or testing), we subtract the mean, \mu, from each input channel of the input image:
# R = R - mu_R
# G = G - mu_G
# B = B - mu_B
# We may also have a scaling factor, \sigma, which adds in a normalization:
# R = (R - mu_R) / sigma
# G = (G - mu_G) / sigma
# B = (B - mu_B) / sigma
# The value of \sigma may be the standard deviation across the training set (thereby turning the preprocessing step into a standard score/z-score)
# sigma may also be manually set (versus calculated) to scale the input image space into a particular range — it really depends on the architecture, how the network was trained
# cv2.dnn.blobFromImage creates 4-dimensional blob from image. Optionally resizes and crops image from center, subtract mean values, scales values by scalefactor, swap Blue and Red channels
# a blob is just an image(s) with the same spatial dimensions (width and height), same depth (number of channels), that have all be preprocessed in the same manner
# Consider the video stream as a series of frames. We capture each frame based on a certain FPS, and loop over each frame
# loop over the frames from the video stream
while True:
# grab the frame from the threaded video stream and resize it to have a maximum width of 400 pixels
# vs is the VideoStream
frame = vs.read()
frame = imutils.resize(frame, width=400)
print(frame.shape) # (225, 400, 3)
# grab the frame dimensions and convert it to a blob
# First 2 values are the h and w of the frame. Here h = 225 and w = 400
(h, w) = frame.shape[:2]
# Resize each frame
resized_image = cv2.resize(frame, (300, 300))
# Creating the blob
# The function:
# blob = cv2.dnn.blobFromImage(image, scalefactor=1.0, size, mean, swapRB=True)
# image: the input image we want to preprocess before passing it through our deep neural network for classification
# mean:
# scalefactor: After we perform mean subtraction we can optionally scale our images by some factor. Default = 1.0
# scalefactor should be 1/sigma as we're actually multiplying the input channels (after mean subtraction) by scalefactor (Here 1/127.5)
# swapRB : OpenCV assumes images are in BGR channel order; however, the 'mean' value assumes we are using RGB order.
# To resolve this discrepancy we can swap the R and B channels in image by setting this value to 'True'
# By default OpenCV performs this channel swapping for us.
blob = cv2.dnn.blobFromImage(resized_image, (1/127.5), (300, 300), 127.5, swapRB=True)
# print(blob.shape) # (1, 3, 300, 300)
# pass the blob through the network and obtain the predictions and predictions
net.setInput(blob) # net = cv2.dnn.readNetFromCaffe(args["prototxt"], args["model"])
# Predictions:
predictions = net.forward()
# loop over the predictions
for i in np.arange(0, predictions.shape[2]):
# extract the confidence (i.e., probability) associated with the prediction
# predictions.shape[2] = 100 here
confidence = predictions[0, 0, i, 2]
# Filter out predictions lesser than the minimum confidence level
# Here, we set the default confidence as 0.2. Anything lesser than 0.2 will be filtered
if confidence > args["confidence"]:
# extract the index of the class label from the 'predictions'
# idx is the index of the class label
# E.g. for person, idx = 15, for chair, idx = 9, etc.
idx = int(predictions[0, 0, i, 1])
# then compute the (x, y)-coordinates of the bounding box for the object
box = predictions[0, 0, i, 3:7] * np.array([w, h, w, h])
# Example, box = [130.9669733 76.75442174 393.03834438 224.03566539]
# Convert them to integers: 130 76 393 224
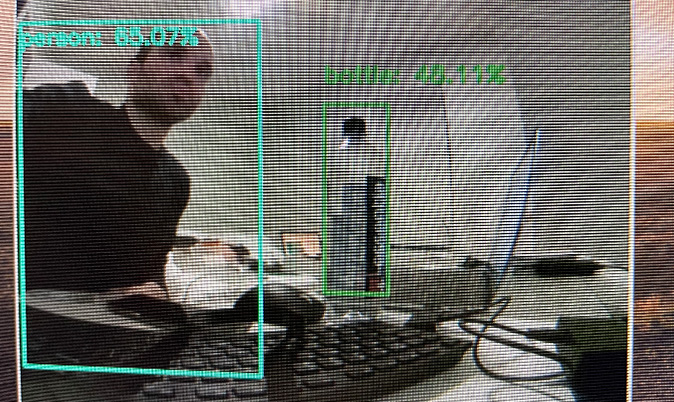
(startX, startY, endX, endY) = box.astype("int")
# Get the label with the confidence score
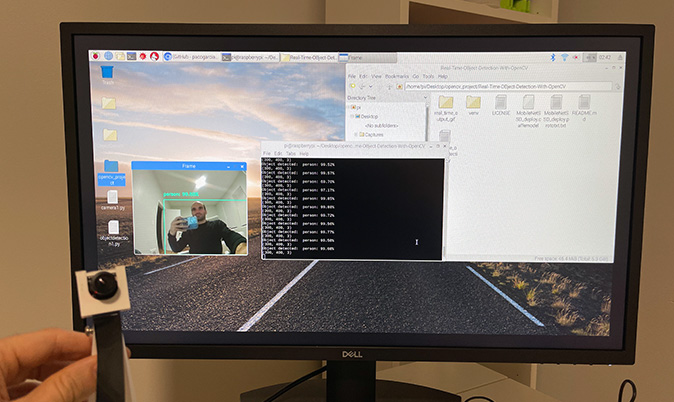
label = "{}: {:.2f}%".format(CLASSES[idx], confidence * 100)
print("Object detected: ", label)
# Draw a rectangle across the boundary of the object
cv2.rectangle(frame, (startX, startY), (endX, endY),
COLORS[idx], 2)
y = startY - 15 if startY - 15 > 15 else startY + 15
# Put a text outside the rectangular detection
# Choose the font of your choice: FONT_HERSHEY_SIMPLEX, FONT_HERSHEY_PLAIN, FONT_HERSHEY_DUPLEX, FONT_HERSHEY_COMPLEX, FONT_HERSHEY_SCRIPT_COMPLEX, FONT_ITALIC, etc.
cv2.putText(frame, label, (startX, y), cv2.FONT_HERSHEY_SIMPLEX, 0.5, COLORS[idx], 2)
# show the output frame
cv2.imshow("Frame", frame)
# HOW TO STOP THE VIDEOSTREAM?
# Using cv2.waitKey(1) & 0xFF
# The waitKey(0) function returns -1 when no input is made
# As soon an event occurs i.e. when a button is pressed, it returns a 32-bit integer
# 0xFF represents 11111111, an 8 bit binary
# since we only require 8 bits to represent a character we AND waitKey(0) to 0xFF, an integer below 255 is always obtained
# ord(char) returns the ASCII value of the character which would be again maximum 255
# by comparing the integer to the ord(char) value, we can check for a key pressed event and break the loop
# ord("q") is 113. So once 'q' is pressed, we can write the code to break the loop
# Case 1: When no button is pressed: cv2.waitKey(1) is -1; 0xFF = 255; So -1 & 255 gives 255
# Case 2: When 'q' is pressed: ord("q") is 113; 0xFF = 255; So 113 & 255 gives 113
# Explaining bitwise AND Operator ('&'):
# The & operator yields the bitwise AND of its arguments
# First you convert the numbers to binary and then do a bitwise AND operation
# For example, (113 & 255):
# Binary of 113: 01110001
# Binary of 255: 11111111
# 113 & 255 = 01110001 (From the left, 1&1 gives 1, 0&1 gives 0, 0&1 gives 0,... etc.)
# 01110001 is the decimal for 113, which will be the output
# So we will basically get the ord() of the key we press if we do a bitwise AND with 255.
# ord() returns the unicode code point of the character. For e.g., ord('a') = 97; ord('q') = 113
# Now, let's code this logic (just 3 lines, lol)
key = cv2.waitKey(1) & 0xFF
# Press 'q' key to break the loop
if key == ord("q"):
break
# update the FPS counter
fps.update()
# stop the timer
fps.stop()
# Display FPS Information: Total Elapsed time and an approximate FPS over the entire video stream
print("[INFO] Elapsed Time: {:.2f}".format(fps.elapsed()))
print("[INFO] Approximate FPS: {:.2f}".format(fps.fps()))
# Destroy windows and cleanup
cv2.destroyAllWindows()
# Stop the video stream
vs.stop()