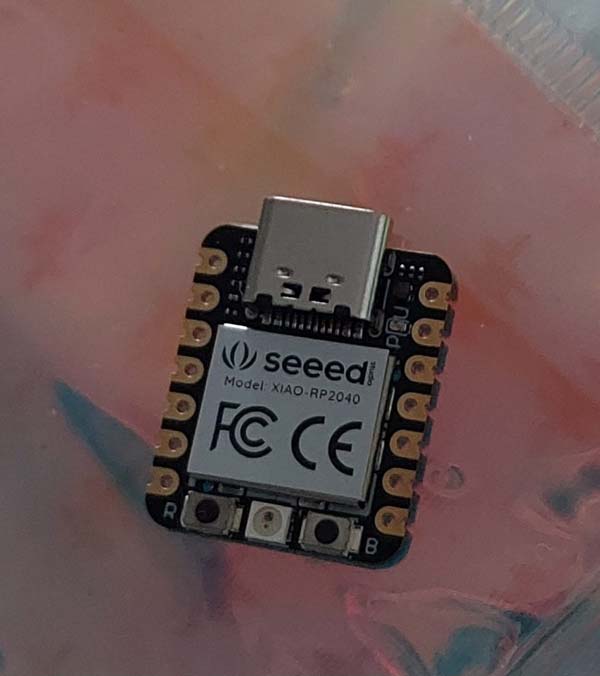
Home
About
Weekly Projects
Term-long Projects

Ekanem okeke
htmaa fall 2023

week 2: embedded programming


I entered this week with goal of making a bluetooth audio splitter; a device that could connect to one bluetooth audio source and duplicate the audio and send it to two separate sources. The unfortunate problem with not knowing much about electronics is that it was difficult for me to judge the scope of how difficult it would be to implement things. Upon meeting with TA Anthony Pennes, I learned that Bluetooth works by a set of rigid standards in terms of wireless communication between devices; to the best of my understanding, it seems to give devices a communal standard for how they communicate between each other. From that office hour, I was given a couple bits of advice; start with the simplest project, and ramp up from there. This was the overall theme of how I approached this week's project.

I chose the RP2040 as my microcontroller of choice as I was advised that it has pretty extensive documentation. As a beginner, I knew that would mean that it would be more feasible for me to problem-solve faster while working individually.
Then, I worked on being able to understand the datasheet of the microcontroller. Luckily, I had most of this explained to me by Anthony. The two most helpful diagrams to refer to whilst coding were this cheatsheet mapping the external pins of the microcontroller, and another diagram mapping all of the pins of the microcontroller. Quick note; when coding in Arduino, the pin number corresponds to the GPIO number.
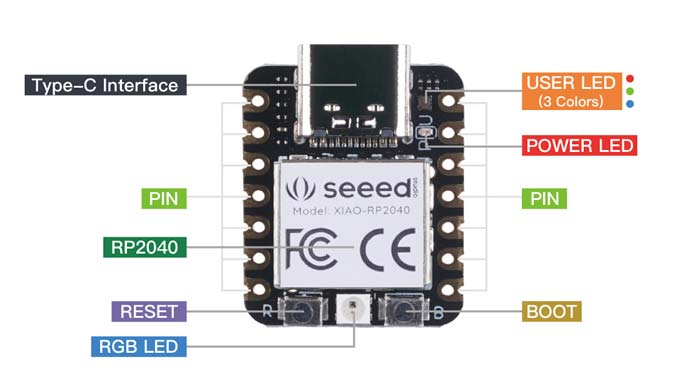
General Cheat Sheet Diagram
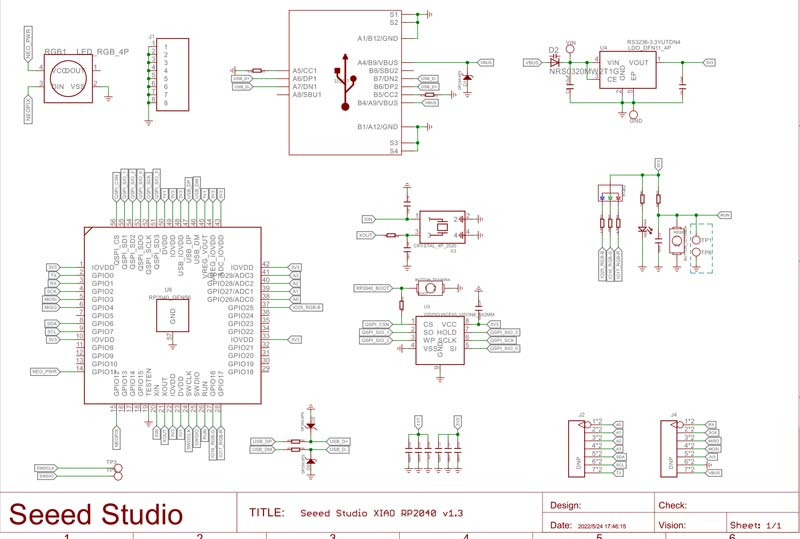
Full schematic - crucial for determining how each pin is used
I also chose to write my code in Arduino as I had a bit of previous experience coding in Arduino, and I knew that having to manage the syntax of coding would not be the most instructive for me, and would just mean that I would have to do a lot of troubleshooting and debugging. Again, choosing a microcontroller with a lot of documentation proved helpful, as I was able to refer to this website to find the extra packages necessary to work with the RP2040. The first miniproject I assigned to myself as a test of my understanding of the schematic was to run the sample light blinking code while specifying the pins specifically. This proved simple but instructive, as I realized that the pin number I would refer to is the number that comes after the IO on the schematic. Therefore, pin 25 refers to the blue channel in the User LED light. Another aspect of writing in Arduino that I always try to keep note of is that any time information is kept in thousandths of a second - so delay(1000) is a delay of 1 second.
LED blink demo
After getting the User LED to light, I set out to figure out how to use the nicer RGB LED. Thankfully there was also documentation for that process as well, so I downloaded a library for that specific kind of LED and ran that sample code to confirm that it worked. Thankfully, the Arduino code was pretty easy to parse, and so from there, I set out trying to make my own code. I also tried to make sense of different functions by reading the documentation for the library associated with the LED and just playing around. I quickly learned to turn down the brightness, as the LED was hurting my eyes. Inspired by the modes of common LED strips, I aimed to write code for the user to be able to select a color mode and then have the LED display it. The first color mode that I wanted to implement was making the light change color, slowly going through a smooth rainbow. Second, I would have the light blink at the user. After playing around with illustrator, I figured that the changing of color to match the rainbow was marked by transitioning through 6 states. If you start from red, State 1 is 255-0-0, State 2 (yellow) is 255-255-0, State 3 (green) is 0-255-0, State 4 (cyan) is 0-255-255, State 5 (blue) is 0-0-255 and the last state before returning back to red is purple at 255-0-255. I wrote out code to describe these transitions, as shown below, and after some debugging, it resulted in a rainbow mode.
Illustrator Rainbow Color Change Demo
Rainbow Color Change Code Demo on Xiao RP2040
Then, I began to work through making this code respond and interact with the user. As I didn't want to work with any external inputs for the sake of simplicity and time, I decided to utilize the serial monitor of the Arduino interface to do so. Of course, I had never used it before, so I began by looking up some sample code to get a sense for what the code actually does. This link was especially helpful for this, as it even exemplified how I could use a switch statement, which I had never used before. Then, I started merging all the different code together; the light modes and the serial monitor code. After implementing all of that, I still found that I had a bit of time left, so I added a bit more complexity by seeing if I could have the user choose and input the color for the blinking mode, and if I could have the light modes continue to loop until the user inputted data, rather than run for a set duration. Lastly, I added some comments to clarify how all the code worked. The result of all this work can be seen below!
Full Code Demonstration
In hindsight, there are definitely some ways I could simplify the code - rather than writing out all of the color transitions myself, I could have made an array with the different color channel variables in it and then have written a loop that iterates through controlling the different color channels by iterating through that array. I also forgot to specify that the RGB color inputs had to be integers as part of the user interface. I also wonder about the legibility of my code; I generally only write code with myself in mind, and even so I do not think about being able to read the code after I wrote it that day. There are also limitations with the code, as there are some colors the LED can't display, but the user could input these colours as RGB color codes.I couldn't figure out whether there was a logic to what colors the LED couldn't display, so unfortunately, preventing that will have to be the goal another day.