## Input devices week
### Previous work during Electronics Production
During the electronics production week, I made a board that would light up several LEDs based on input from a potentiometer. This is to simulate a progress bar with input from a potentiometer. Here is a video of the board in action:
From this time I learnt how to mill a board, solder different components and program the board in Micropython.
### Using a wind sensor to get wind direction
For this week, I decided to use a wind sensor to get the wind direction. During Office Hours, Jake discussed several different ways of accomplishing this task including using anemometers, building a part-mechanical system with potentiometers or using a contactless rotary encoders, etc to sense wind direction. This was super useful information and after some time struggling to find something in stock, I was able to get the following [anemometer](https://www.amazon.com/Yosooo-Anemometer-Transmitter-Transducer-Instruments/dp/B082YC65W2/ref=sr_1_2?crid=RFO5AAVB9WF&keywords=wind%2Bdirection%2Bsensor%2Banemometer%2B0-3V&qid=1700100437&sprefix=wind%2Bdirection%2Bsensor%2Banemometer%2B0-3v%2Caps%2C63&sr=8-2&ufe=app_do%3Aamzn1.fos.17d9e15d-4e43-4581-b373-0e5c1a776d5d&th=1).
I decided to use the anemometer to get the wind direction. The anemometer has 4 blades and each blade has a magnet attached to it. The anemometer also has a reed switch that is activated when the magnet passes by it. The reed switch is connected to a voltage divider circuit that outputs a voltage between 0-3V. The voltage is read by the ADC pin (GPIO28) on the Pico.
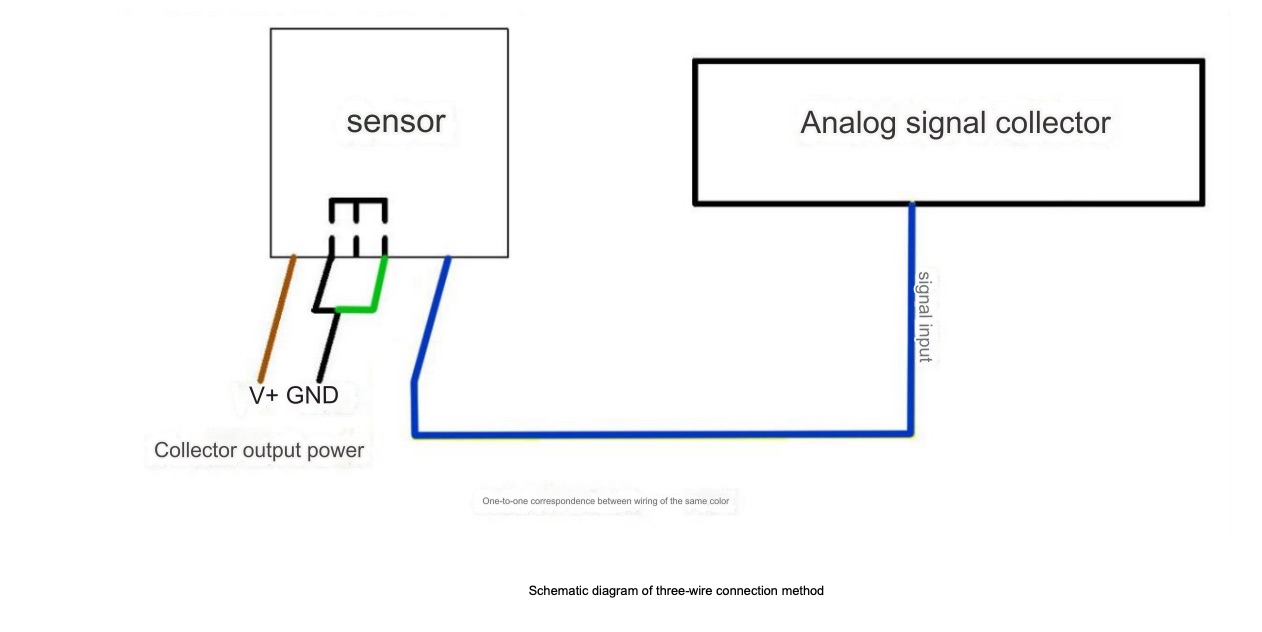
In order to understand the 4 terminal wires of the anemometer, I found the datasheet of the RS-FXJT05 which was in madarin. I then used Google Translate to translate the datasheet and found the following schematic diagram of the 3 pin connection method.

I then connected the anemometer to the Pico, connecting the specified wire to the ADC input of the Pico W. For this week, I tested this on a breadboard, soldering some header pins to the Pico W.
Next step, was to get the Pico to read the voltage from the anemometer. I used the following code to read the voltage from the ADC pin.
```
from time import sleep
import utime
from machine import ADC, Pin, I2C
# reading an analong value with ADC
wind = ADC(Pin(28))
while True:
digital_value = wind.read_u16()
print("ADC value =", digital_value)
# converting it to voltage
voltage_value = 3.3 * (digital_value/65536)
print("Voltage: {}V".format(voltage_value))
# converting that into wind direction in degrees
degrees = (voltage_value/3.1) * 360
print("Wind degree: {} degrees".format(degrees))
sleep(0.1)
```
In calculating the degrees I divided the voltage by 3.1 (instead of the claimed 3V) because the voltage divider circuit was giving me a voltage of ~3.1V when the anemometer was facing North. I am not quite sure why this might be happening but it could be that:
1. The ADC on the sensor or the Pico W is not reading the voltage correctly (or)
2. The sensor is out of spec
In any case, I take an approximation of the voltage to be 3.1V and use that to calculate the degrees.
Here is the video of wind sensor readings being outputted on a oled display:
This concludes reading the input from the wind sensor and calibrating it to give the ground wind direction readings, however, I would like to add a GPS module to this to get the wind vector produced the motion of the boat.
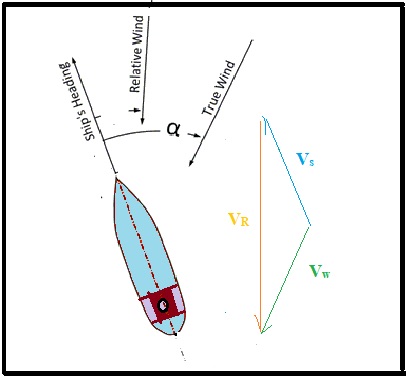
This is done to calculate the **True Wind direction and speed over water** by subtracting the boat's speed and direction from the apparent wind direction and speed.

Things to do next:
- Mill a PCB with the Pico W and relevant header pins / holes for oled display as output and anemometer and gps module as input.
- Test and calibrate the true wind direction and speed calculation after adding the GPS module.