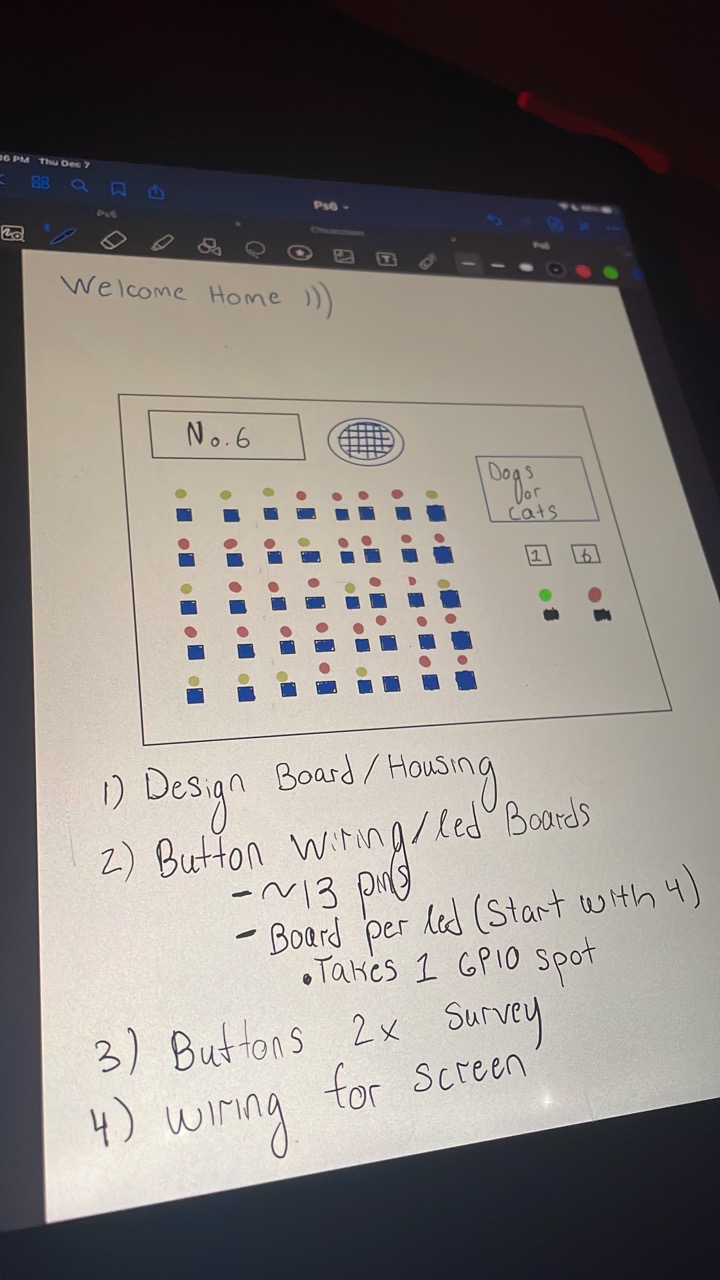
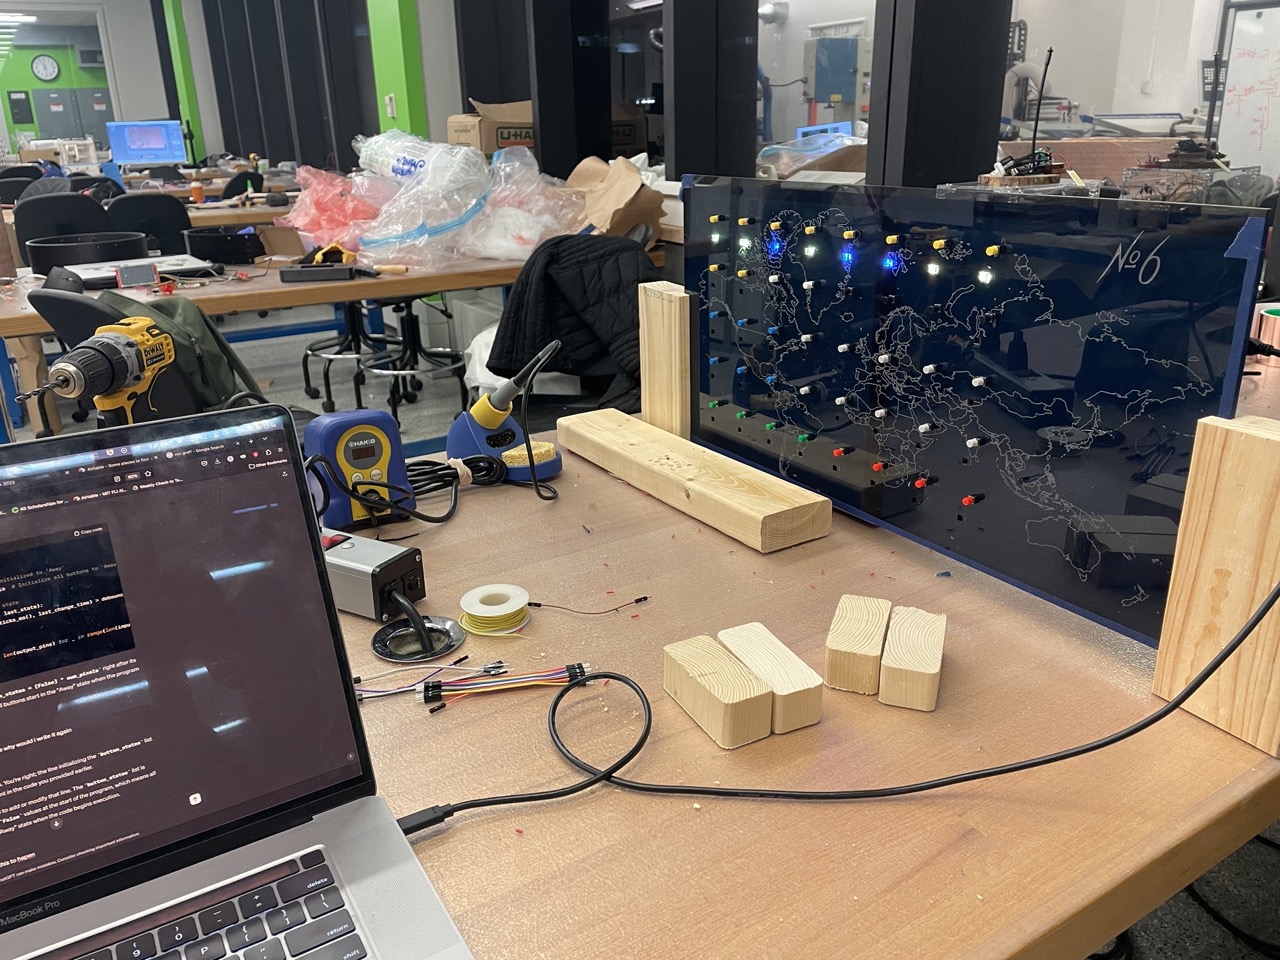
Goal: See who is in and away from the house when you get home. Yellow is for ‘Away’ and Blue is for ‘Home’
Components
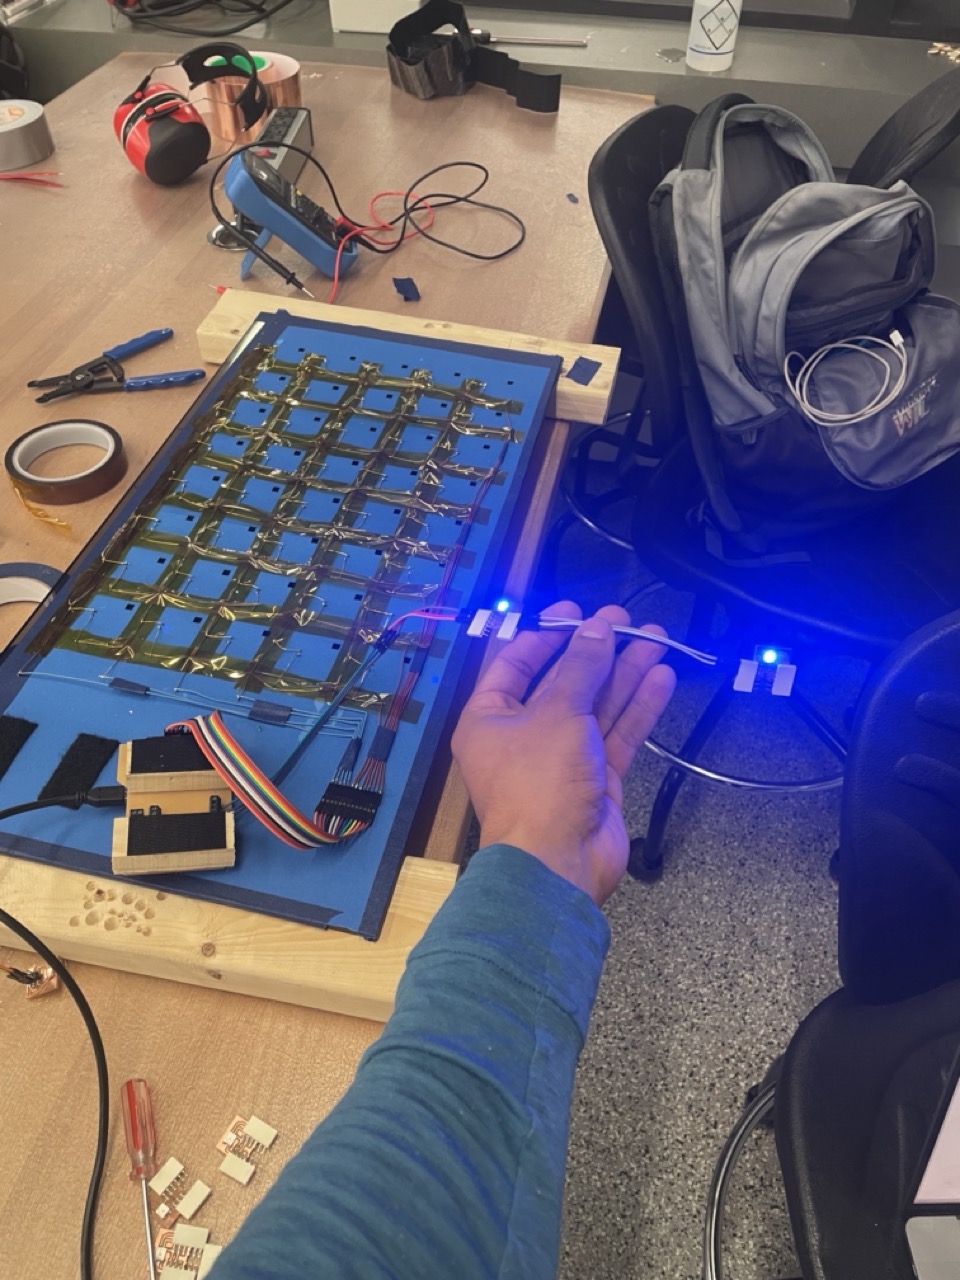
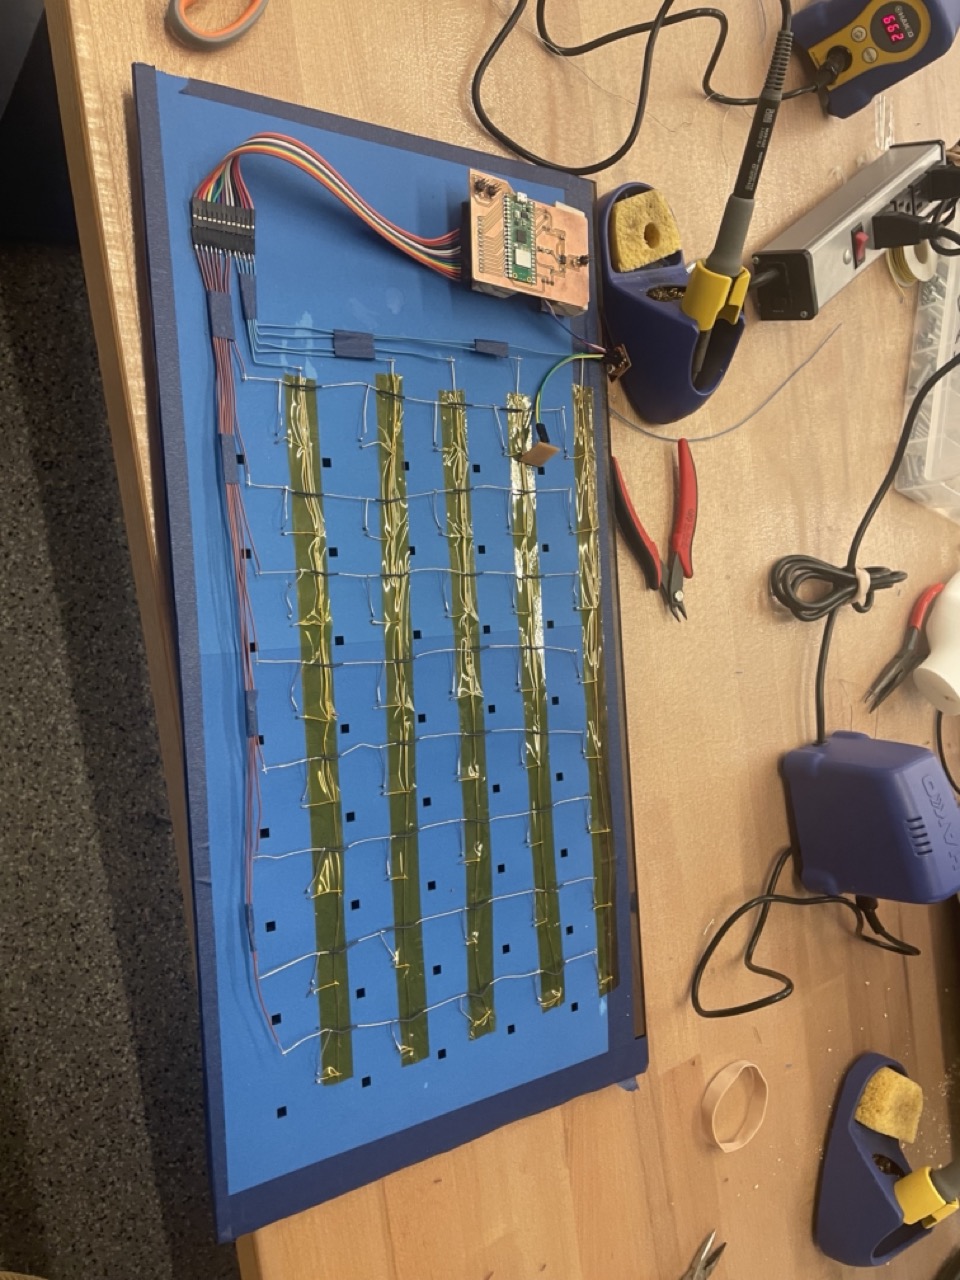
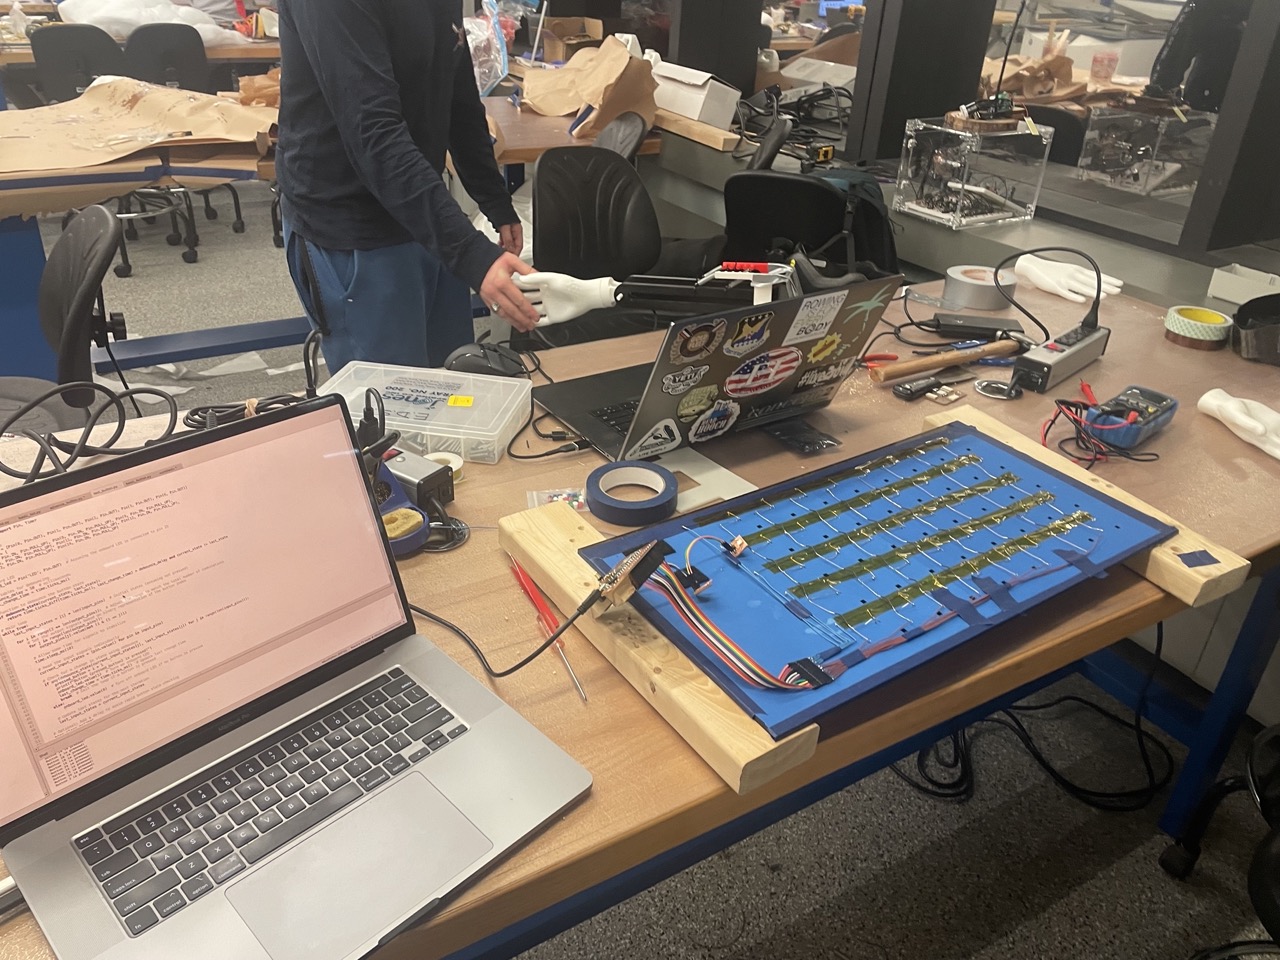
40 multiplexed buttons
40 leds in series ( 32 are WIP)
Speaker for audio cues
World map engraved for international community
Number 6 logo
5 Rows for floors
Goal
Get a board that works completely physically with some potential online modules that tracks who is home and who is not and welcomes people when coming home
Materials and software
PicoW
Acryllic
Wood 2x4
Wood glue
buttons
Jumper wires
pcb board
Micropython
Speaker
LM4871 Amplifier
Neopixel Led
Velcro
Construction Paper
Capcom Tape
wires
LaserCutter
Giant Drill Press with a flat end mill
Bandsaw
Hot glue
double sided tape
Ideation
I wanted to build something that my fraternity could use for a while
Originally thought of building a webserver with a screen that would get updated and also have phsycial modules
I figured that this would be too complicated to be maintained overtime
Needed a simpler lower tech solution that could potentially have more online modules but base level easy to maintain
I visited one of the other chapter of our fraternity and they had a really nice physical version with wooden keys that would get flipped
I thought it would be cool to do a similar thing but a bit more digitally
Outlining
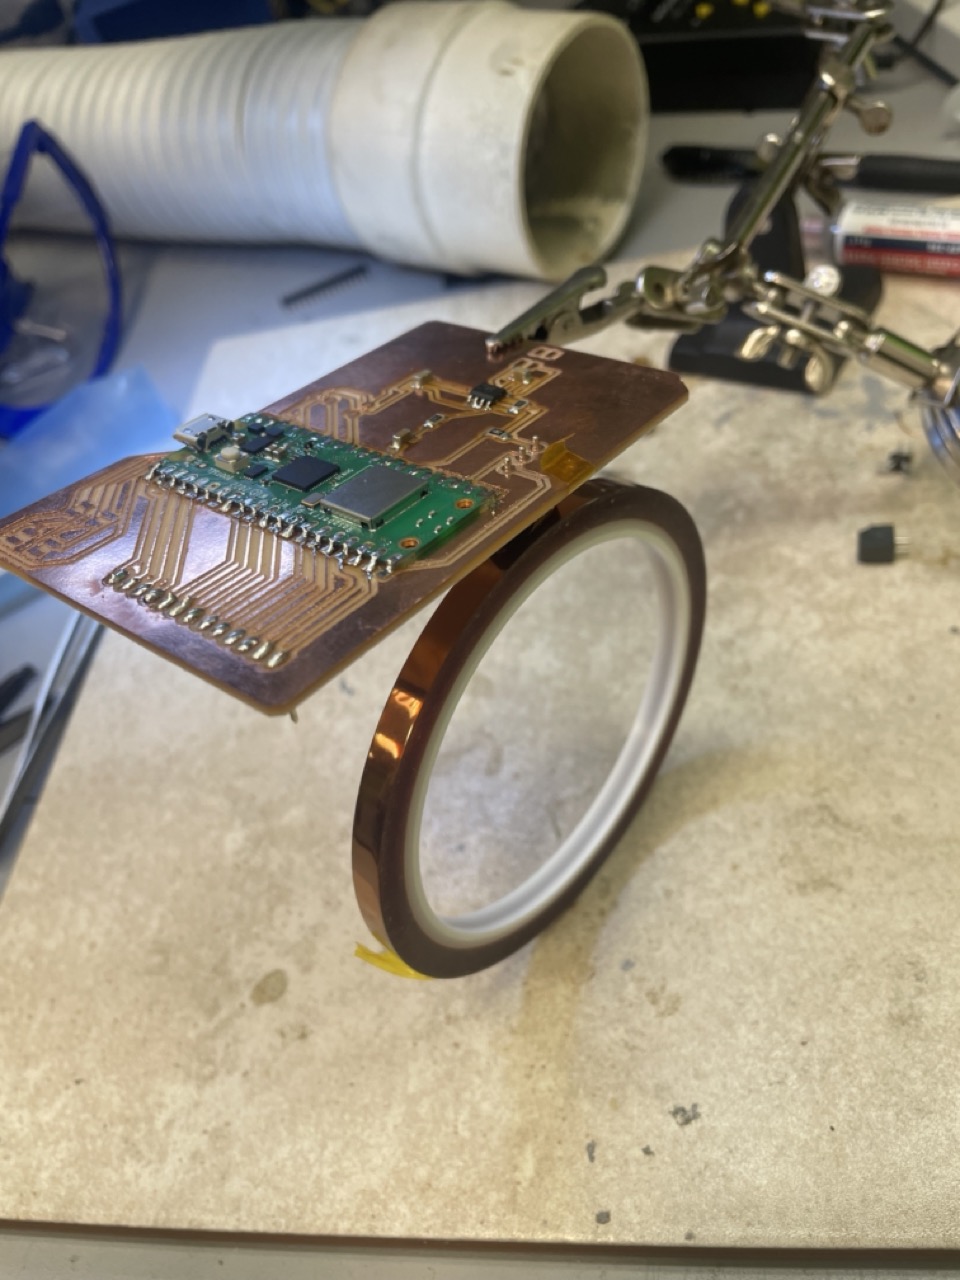
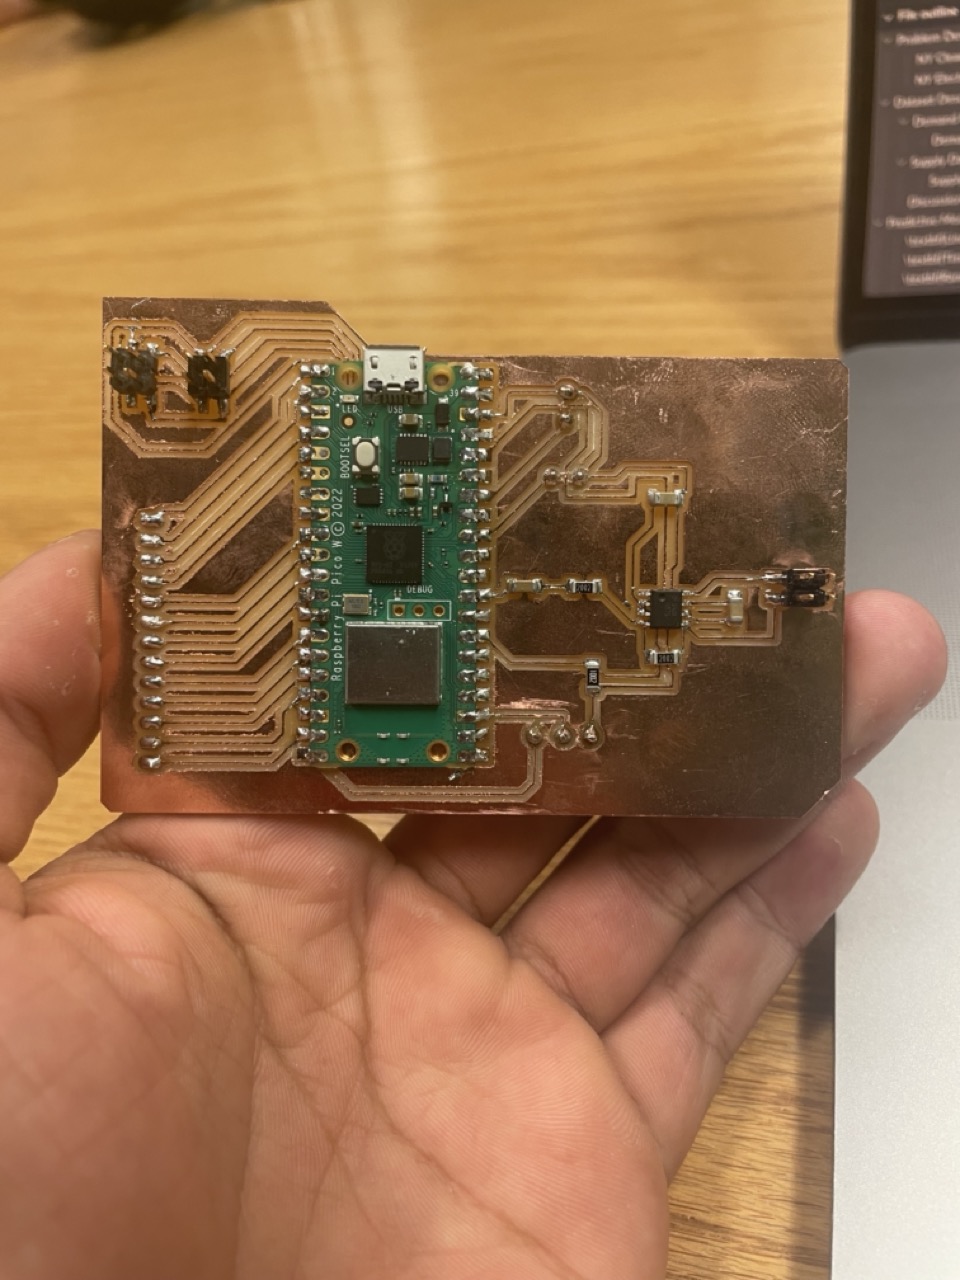
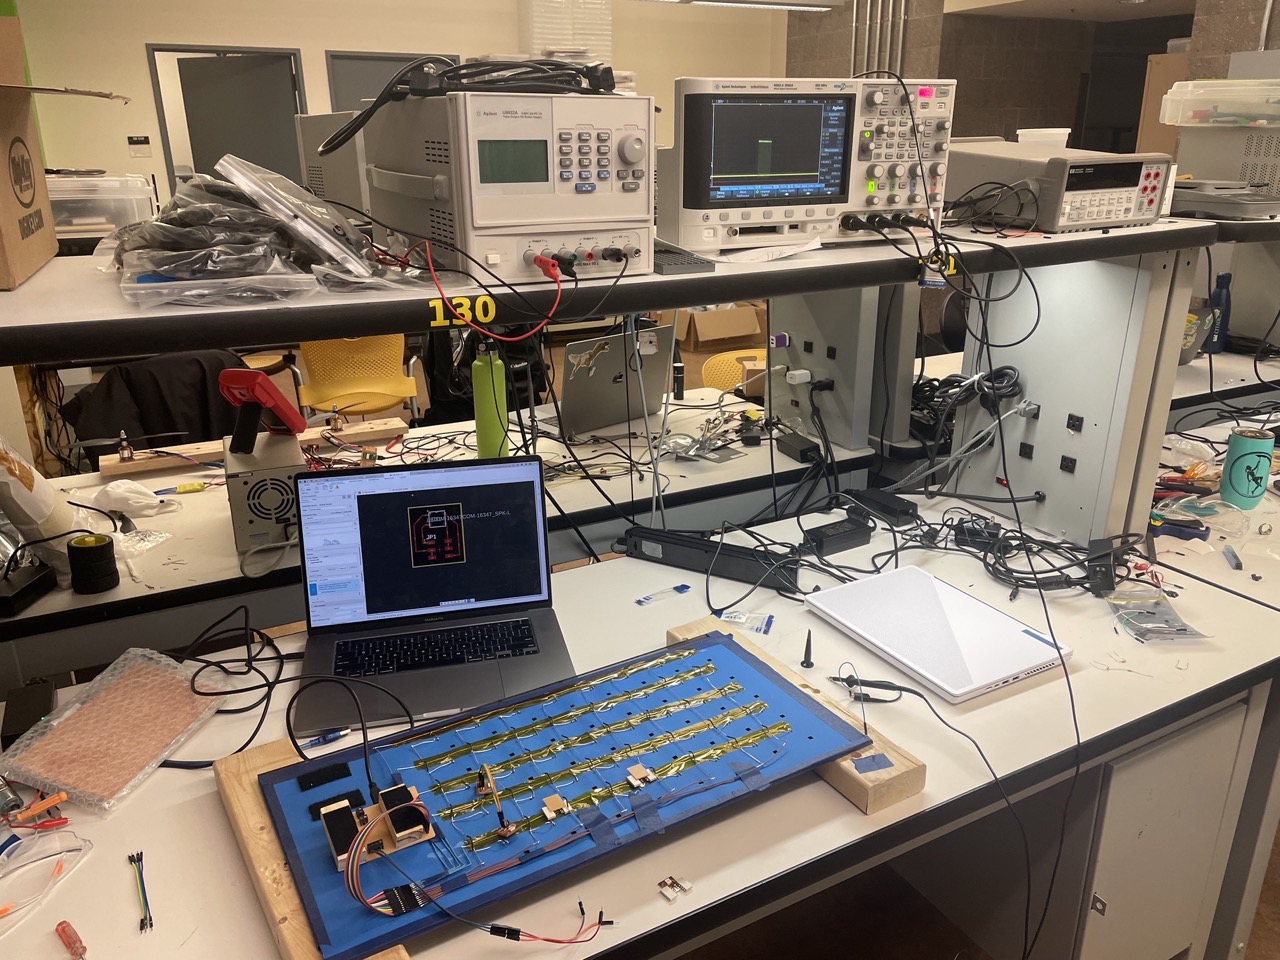
PCB Board
I was not completely certain on what would be used except that there would be 40 buttons and 40 leds and a Speaker but i added a couple other connectors for screens and more buttons just in case
My first board came out super nice except it had many broken traces so that was depressing
This was the first time I ever used through holes, but it was not on purpose I totally used the wrong footprints
Soldering Skills
Waiting for bantam
Sad Traces
Finally finished
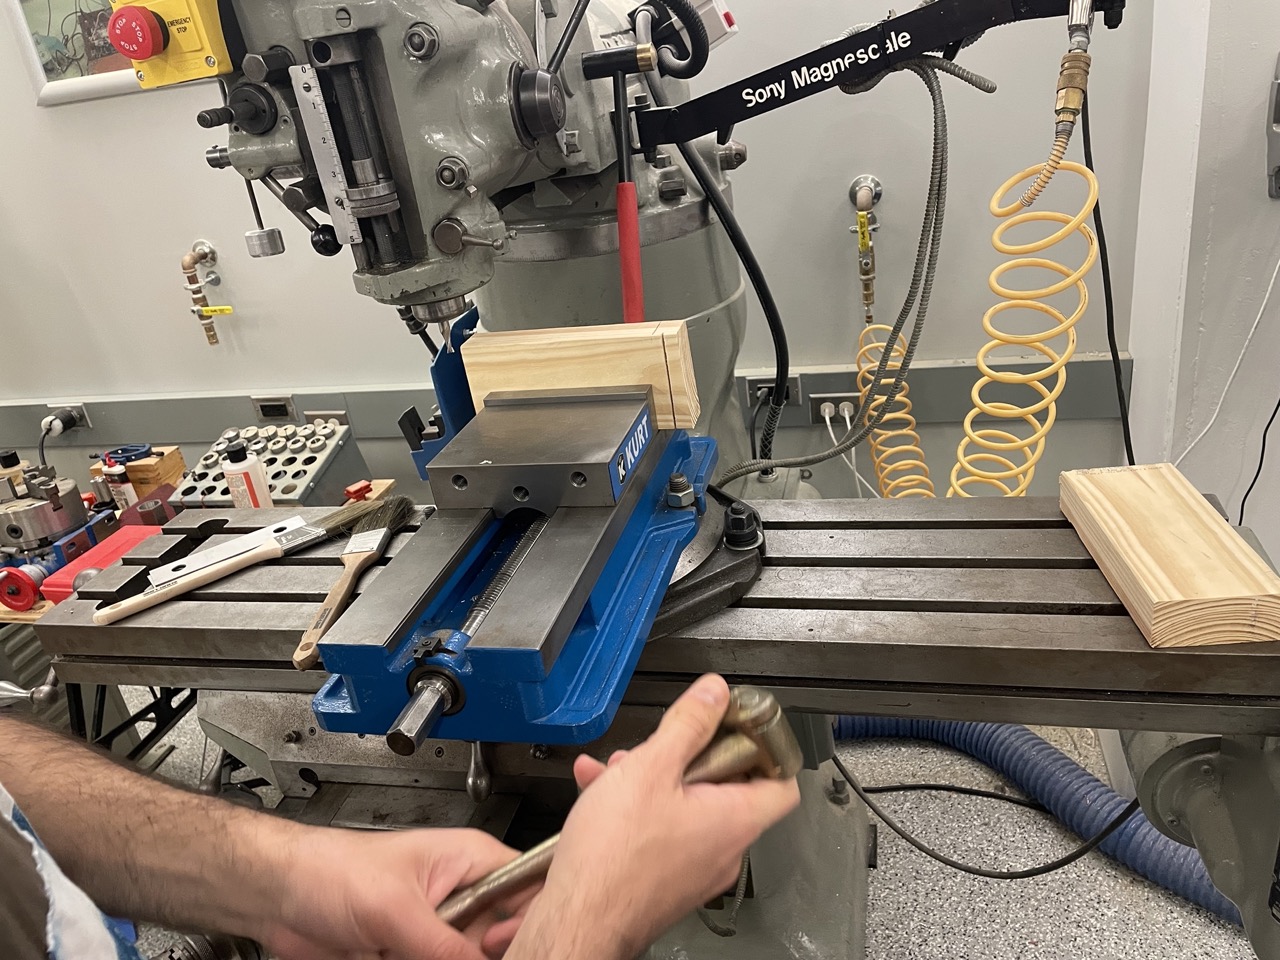
Laser Engraving and Wood Stand and velcro
Originally wanted this mounted to the wall but it would have been a feet trying to create a case so instead I thought of using a stand
Only needed like half the board in the stand because my board is in the way on the back
Used the bandsaw to cut wood to desired length - make sure to measure twice and cut knowing the bandsaw has a width
The giant drill press melted the wood the like butter and were able to go in about 3/4 in with the flat end mill
For the laser engraving I found a vector image that I was able to press some trace thing in the coral software
Used the laser cutter to also drill out the holes for the buttons and leds. I learned the hardway how to fusion circles without hitting the center point because center points have no dimensions and i probably spent an hour gaslighting about fusion
Also used the laser cutter on construction paper becasue the acryllic is transparent to cover it up. Used the same dxf file for cutting on construction paper and lined it up
For the microcontroller board i needed a good way to be able to take it on and off and i had to stands so i decided to connect it with double sided tape and velcro to take it on and off
New machine unlocked
Leds
This is masochism at its finest - or if you jsut like soldering for a thousand years that also works
I made a board for every single led I Used
After the first like 20 Anthony told me to change my design or putting it on the board will be impossible so i needed to restart
I also learned that if you plug in things the wrong way you will fry the led and because theyre all in series you have a christmas light problem
It was nice they could all be easily connected from one gpio pin though and the library was already written by adafruit
First Multi LED Success
Reading signals to debug
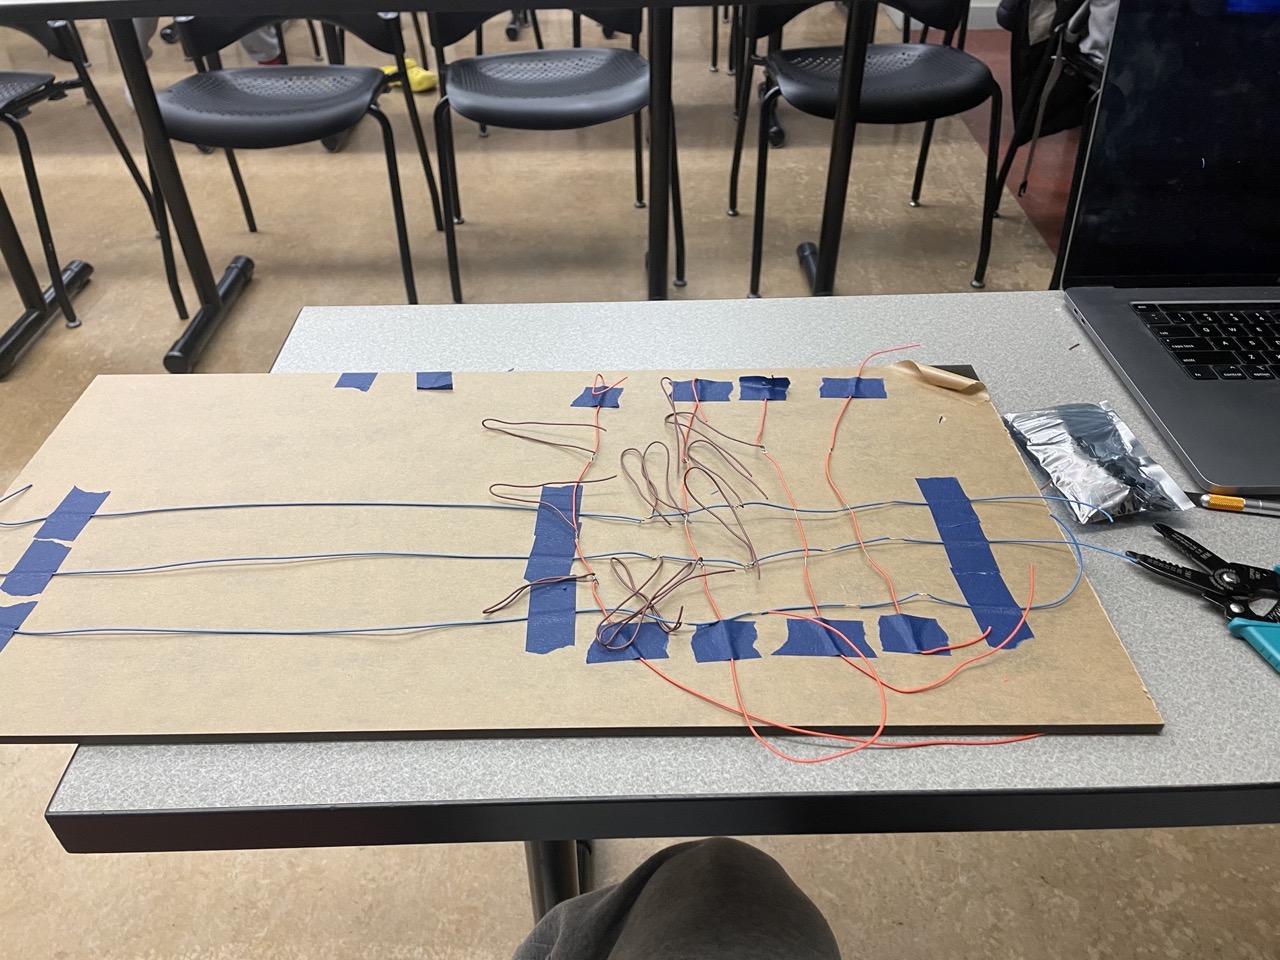
Wiring
If the leds were textbook masochism than the wiring was Dante's 8th gate of hell because this was just straight awful
I asked Anthony afterwards if this is what people do and he said absoltely not people just make large pcb panels
I first was going to cut out little slots into every wire and solder them together but then Alec said that would be the worst time of my life and honestly definitely would have
I tossed out my old design and started a new adventure
The new idea was to strip all the wires and protect from potential shorts with bends in wires and heat shrink
Anthony saw the finished product and said I needed tape so I added tape
This was an exercise in patience and soldering art/efficiency
Came out looking better than expected
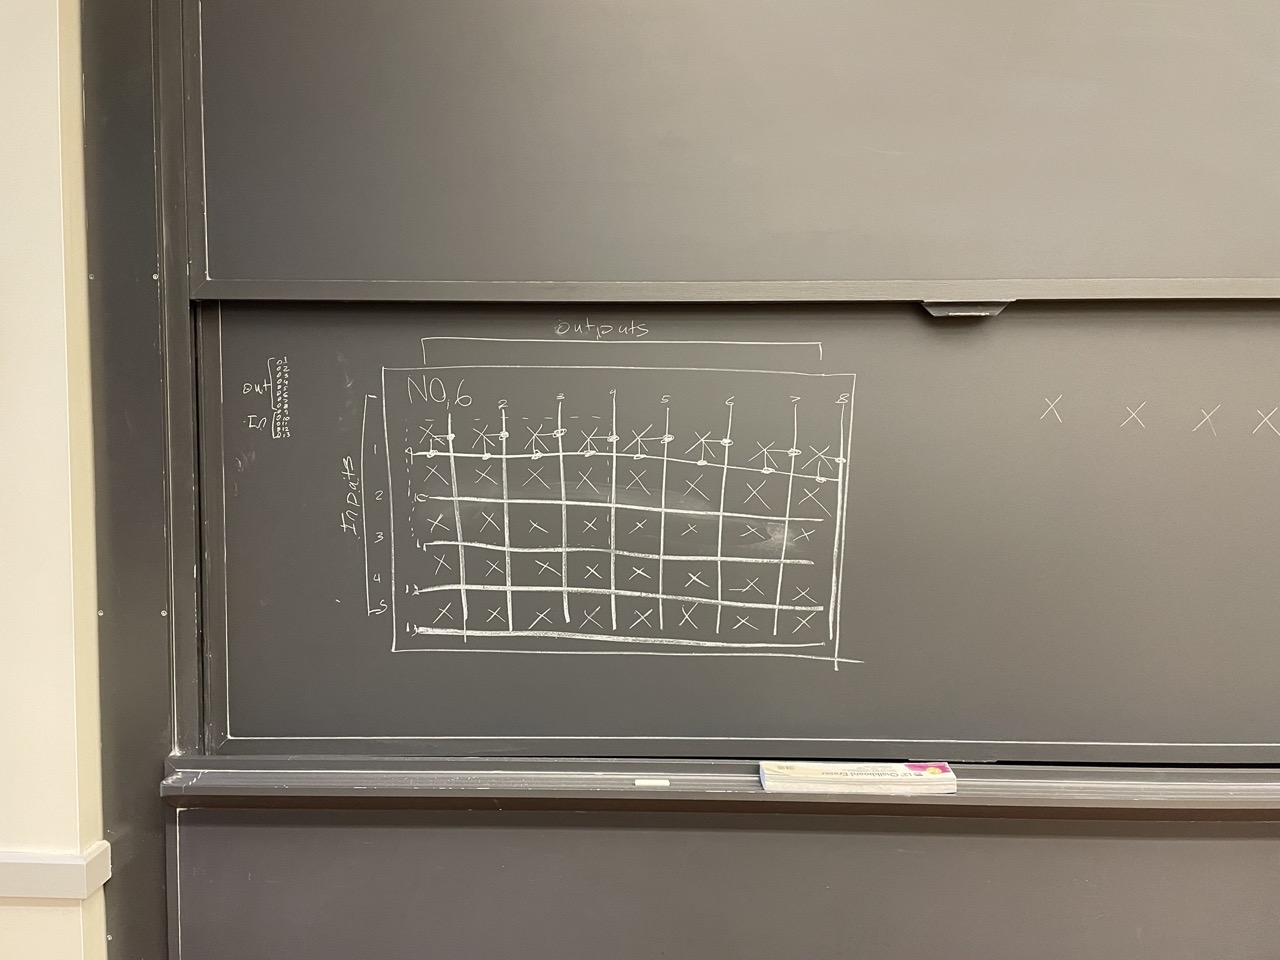
Coding the buttons was terrible because not only was one button saying it was multiple but there were multiple clicks within one button
Eventually I realized that i wasn't scanning both rows and colums at the same time cause this was multiplexed.
Also added debounce logic to help stabalize the signal
Additionally I learned that Pico w have pull up resistors built in so thank goodness
First try
First idea
End Product
Coding
I tried asking chatgpt to in one shot write a program that would take in account all residents being home or away and make a sound whenever they left or cameback. It was not successful
I was luckily able to modularize past code from other weeks by improving on them and then combining them
The most important part was getting buttons to from home and away states and then adding sound and leds on top of that logic
Also learning to read data sheets and pin outs became important again
First try
        from machine import Pin, PWM
import time
import neopixel

# Define pins for NeoPixel
output_pins = [Pin(0, Pin.OUT), Pin(1, Pin.OUT), Pin(2, Pin.OUT), Pin(3, Pin.OUT), Pin(6, Pin.OUT)]
input_pins = [Pin(7, Pin.IN, Pin.PULL_UP), Pin(8, Pin.IN, Pin.PULL_UP), Pin(9, Pin.IN, Pin.PULL_UP),
              Pin(10, Pin.IN, Pin.PULL_UP), Pin(11, Pin.IN, Pin.PULL_UP), Pin(12, Pin.IN, Pin.PULL_UP),
              Pin(13, Pin.IN, Pin.PULL_UP), Pin(14, Pin.IN, Pin.PULL_UP)]

# Define pins for sound
signal_pin = Pin(22, Pin.OUT)
shutdown_pin = Pin(21, Pin.OUT)
pwm = PWM(signal_pin)
frequency = 1000
duty_cycle = 500

# NeoPixel setup
num_pixels = 40
np = neopixel.NeoPixel(machine.Pin(15), num_pixels)

def update_leds(button_states):
    for i in range(num_pixels):
        if button_states[i]:
            np[i] = (0, 0, 255)
        else:
            np[i] = (255, 255, 0)
    np.write()

def play_sound():
    pwm.freq(frequency)
    pwm.duty_u16(duty_cycle)
    time.sleep(1)
    pwm.duty_u16(0)

# State tracking
button_states = [False] * num_pixels
last_change_time = time.ticks_ms()

def debounce_state(current_state, last_state):
    return time.ticks_diff(time.ticks_ms(), last_change_time) > 50 and current_state != last_state


# Define melody sequences
HOME_MELODY = [(262, 500), (294, 500), (330, 500)]  # Example warm melody: C, D, E
AWAY_MELODY = [(330, 500), (294, 500), (262, 500)]  # Example goodbye melody: E, D, C

def play_melody(melody):
    for freq, duration in melody:
        pwm.freq(freq)
        pwm.duty_u16(duty_cycle)
        time.sleep_ms(duration)
        pwm.duty_u16(0)
        time.sleep_ms(50)  # Pause between notes

while True:
    last_input_states = [[1] * len(output_pins) for _ in range(len(input_pins))]

    for row in range(len(output_pins)):
        output_pins[row].value(0)
        time.sleep_ms(10)

        for col in range(len(input_pins)):
            current_input_state = input_pins[col].value()

            if debounce_state(current_input_state, last_input_states[col][row]):

                button_number = row * 8 + col
                button_states[button_number] = not button_states[button_number]
                update_leds(button_states)

                if button_states[button_number]:
                    print(f"Button at Row {row + 1}, Column {col + 1}, Button {button_number + 1} is Home. Toggling to Home!")
                    play_melody(HOME_MELODY)  # Play warm melody
                else:
                    print(f"Button at Row {row + 1}, Column {col + 1}, Button {button_number + 1} is Away. Toggling to Away!")
                    play_melody(AWAY_MELODY)  # Play goodbye melody

                last_change_time = time.ticks_ms()
                break

            last_input_states[col][row] = current_input_state

        output_pins[row].value(1)

    time.sleep_ms(150)
Final thoughts
Construction paper is really sturdy - like all of my wiring is held up by paper and papers tape
While I am typing this I probably just spent like 4 days works for like 12 + hours everyday with minimal food but honestly - I HAD SOOOOOO MUCH FUN I onyl got depressed every once and a while when my code or something did not work
Making things is really great it's just problem solving on steroids
I am still really new and afraid of more EECS topics like wiring things and circuits so I would love to keep working on that
First try oh yeah
Final Questions
Document a final project masterpiece that integrates the range of units covered,
answering:
1 What does it do?
2 Who's done what beforehand?
3 What did you design?
4 What materials and components were used?
5 Where did they come from?
6 How much did they cost?
7 What parts and systems were made?
8 What processes were used?
9 What questions were answered?
10 What worked? What didn't?
11 How was it evaluated?
12 What are the implications?
Prepare a summary slide and a one minute video showing its
conception, construction, and operation
Your project should incorporate 2D and 3D design,
additive and subtractive fabrication processes,
electronics design and production,
embedded microcontroller design, interfacing, and programming,
system integration and packaging
Where possible, you should make rather than buy
the parts of your project
Projects can be separate or joint, but need to show individual
mastery of the skills, and be independently operable
Present your final project, weekly and group assignments, and documentation
Check in and out system for people living in my building. Can see whose home or not.
Have not seen one of these before. Another chapter of my fraternity has a compeltely physical version that people forget toflip a lot and the keys are made of wood
Designed a board that is supposed to reflect the building and community of number 6 with buttons and leds
Seen above
Everything came from lab
Pico 8 / Acryllic 5 / Buttons 10 / Leds 15
Everything was made except tape, acryllic, speaker, pico, and amplifier
Processes described above
described above
described above
Needed the buttons, sound, and leds to work with eachother which they do now
This can be used with very low effort but can also be picked up and have online modukles integrated if needed/wanted