
attempt number 1 came in a time where pcbs were my enemy and i could not produce a good one
i still wanted to make progress on using leds as output devices, so i just wired the leds to an arduino nano and fired it up (just connected gnd to gnd, 5v to 3v3, and the led pin to pin 10). this way, i could write most of the programming and test it out before moving to troubleshooting my pcb.
The vision was to test the loop that i want my final project and begin to refine the settings for each section (study, break warning, break, confetti). I think i got closer this week but will only know what i want fully after i have a shell for the box and can see what the different parts look like
        #include
            #define PIN            10
            #define NUMPIXELS      10
            #define MAX_BRIGHTNESS 255
            #define MIN_BRIGHTNESS 20
            #define DELAY_TIME     120  // Delay to control fade speed

            Adafruit_NeoPixel strip = Adafruit_NeoPixel(NUMPIXELS, PIN, NEO_GRB + NEO_KHZ800);

            void setup() {
              strip.begin();
              strip.setBrightness(MAX_BRIGHTNESS);
              strip.show();
            }

            void loop() {
              orangeFadeEffect();
              confettiEffect();
              pinkRedVibeEffect();
              lightsOff();
              delay(1000);
            }

            // Orange fading effect from lower brightness to bright over 30 seconds
            void orangeFadeEffect() {
              for (int i = 0; i < 255; i++) {
                int brightness = map(i, 0, 255, MIN_BRIGHTNESS, MAX_BRIGHTNESS);  // Map to a range for brightness

                for (int j = 0; j < NUMPIXELS; j++) {
                  strip.setPixelColor(j, strip.Color(brightness, (brightness / 2), 0));
                }

                strip.show();
                delay(DELAY_TIME);  // Adjust delay to get around 30 seconds for full fade-in
              }
            }

            // Confetti effect for 5 seconds (theater chase)
            void confettiEffect() {
              unsigned long startTime = millis();
              while (millis() - startTime < 5000) {  // Run the effect for 5 seconds
                for (int i = 0; i < NUMPIXELS; i++) {
                  strip.setPixelColor(i, random(0, 255), random(0, 255), random(0, 255));
                }
                strip.show();
                delay(50);
              }
            }

            // Pink/Red vibe for 10 seconds
            void pinkRedVibeEffect() {
              unsigned long startTime = millis();
              while (millis() - startTime < 10000) {  // Run the effect for 10 seconds
                for (int i = 0; i < NUMPIXELS; i++) {
                  int red = random(150, 255);
                  int green = random(0, 50);
                  int blue = random(50, 150);
                  strip.setPixelColor(i, strip.Color(red, green, blue));
                }
                strip.show();
                delay(100);
              }
            }

            // Turn off the lights
            void lightsOff() {
              for (int i = 0; i < NUMPIXELS; i++) {
                strip.setPixelColor(i, 0, 0, 0);
              }
              strip.show();
            }
although i was able to make progress on my final project by working on the programming, i was not able to wire successfully to a microcrontroller
with a newly minted PCB, i was able to get to work!
my pcb had an issue, which is that ground was connected to two power sources (external power and 5v from the xiao), so i severed the line from power to xiao. this did mean more wires, but it also meant my LEDs could be powered (my laptop wasn't providing enough power for the 5v leds)
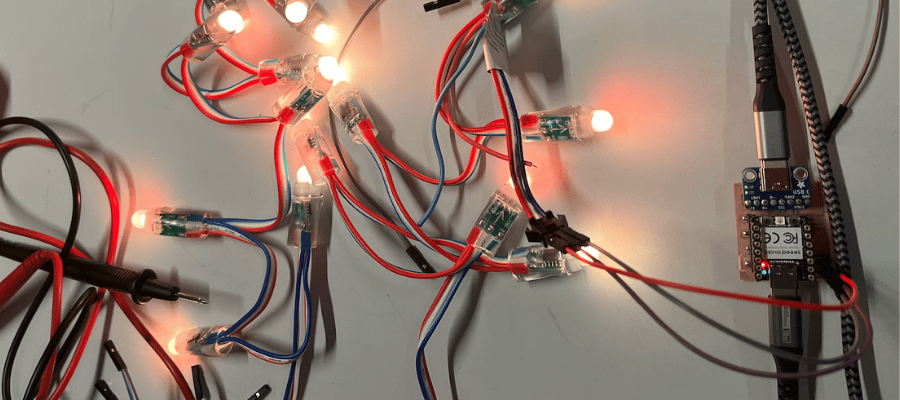
see here the wiring, just an led string attached to the pcb (gnd to gnd of xiao and gnd of external power, pin to D0, and power to 5v of the external battery
i wanted to start some testing for my final project, so i started by looking at different colors for my perfect candle color
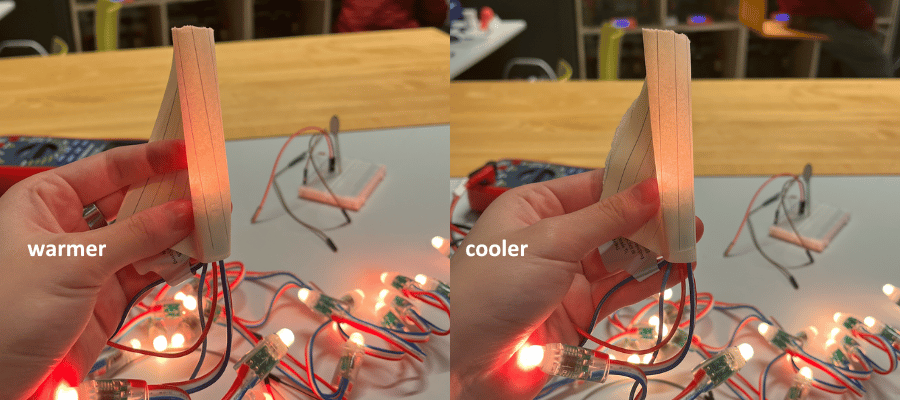
then, i ran the example code for a strand test (in arduino uno, under adafruit neopixel examples)
then, i edited some example code to start testing different modes for my pomodoro timer. see below an initializing sequence for the timer
  #include

    #define PIN D0        // NeoPixel data pin
    #define NUMPIXELS 50  // Number of NeoPixels

    Adafruit_NeoPixel strip(NUMPIXELS, PIN, NEO_RGB + NEO_KHZ800);

    void setup() {
      strip.begin();
      strip.show(); // Initialize all pixels to off
    }

    void loop() {
      // Color wipe to orange
      colorWipe(strip.Color(255, 80, 0), 10);

      // Color wipe to off
      colorWipe(strip.Color(0, 0, 0), 10);
    }

    // Function for color wipe effect
    void colorWipe(uint32_t color, int wait) {
      for (int i = 0; i < strip.numPixels(); i++) {
        strip.setPixelColor(i, color);
        strip.show();
        delay(wait);
      }
    }
with the help of chat gpt, i began integrating my input force sensors with my output LEDs
  #include

    // Constants for the NeoPixel
    #define PIN D6
    #define NUMPIXELS 50
    #define DELAYVAL 5000 // Time (in milliseconds) to pause between pixels

    Adafruit_NeoPixel pixels(NUMPIXELS, PIN, NEO_RGB + NEO_KHZ800);

    // Constants for the Force Sensor
    int fsrPin = D3;      // The FSR is connected to D0
    int fsrReading;       // The analog reading from the FSR
    int squeezeThreshold = 800; // Adjust this threshold for your "big squeeze"

    // Variables to track state
    bool isLightsOn = false; // Keeps track of whether the lights are on
    bool squeezeDetected = false; // Tracks if a squeeze was already processed

    void setup() {
      Serial.begin(9600);
      pixels.begin(); // Initialize NeoPixel strip
      pixels.clear(); // Ensure all pixels are off at the start
      pixels.show();
    }

    void loop() {
      // Read the force sensor value
      fsrReading = analogRead(fsrPin);

      // Check for a "big squeeze"
      if (fsrReading > squeezeThreshold) {
        if (!squeezeDetected) { // Prevent multiple toggles from the same squeeze
          isLightsOn = !isLightsOn; // Toggle the lights state
          squeezeDetected = true;  // Mark the squeeze as detected

          if (isLightsOn) {
            turnOnLights();
          } else {
            turnOffLights();
          }
        }
      } else {
        // Reset squeeze detection when pressure is released
        squeezeDetected = false;
      }

      delay(100); // Short delay to debounce the force sensor
    }

    void turnOnLights() {
      Serial.println("Turning lights ON...");
      for (int i = 0; i < NUMPIXELS; i++) {
        pixels.setPixelColor(i, pixels.Color(255, 80, 0));
      }
      pixels.show();
    }

    void turnOffLights() {
      pixels.clear();
      pixels.show();
    }