Change Color Mode


MAKE NEIL RGB AGAIN


For Interface week, i'll bring you behind the curtain on this drawing app I made that pixelates Neil, and allows you to brush his pixels around. Brush size increases the size of the cursor and the force you can move the pixels around with (you might need to move the slider twice at the start - a bug I haven't resolved.) Permanence affects how long the pixels stay away from their origin before being forced back together. The higher the permanence, the less you're able to keep Neil RGB. The lower it is, the more you can see him in his full glory. Have fun! But now for some learning.


STEP 1: UI ASSETS


  • I like simple interfaces on all things. The fewer the buttons, the better. I grew up in the Johnny Ive school of design. Here I define two buttons to toggle the color mode on the pixels between HSB and RGB. The HSB is more vibrant and conceptually closer to the logic of the app (making Neil RGB) but I think it's nice to see the difference between the two for didactic purposes. The two sliders control the brush and permanence and are defined as thus below, and the cursor is defined to iterate through colors to give that HSB rainbowy effect


  • STEP 2: CREATE CANVAS


    p5js has two main functions: setup() and draw(). The setup runs once at the start of the program and the draw iterates through the cycle of its use. We want to set the canvas up once. We also "spawn" the particles in the setup. I'll speak to that shortly - Particle dispersion is at the heart of the code.


  • STEP 3: PARTICLE DISPERSION


    In the simplest term, this app takes an image as its base, then makes a copy of that image on top of the base from which we will spawn particles that have a sense of their original position, and are attracted to that position after being repelled by the cursor. To do this, we first spawn particles into an array. I first create a function that I can call later to spawn the particles, by creating a class called particles that has information about x and y positions as well as color information from the original image. The spawn function will iterate through the image width and height to extract pixels relative to the resolution of the image.
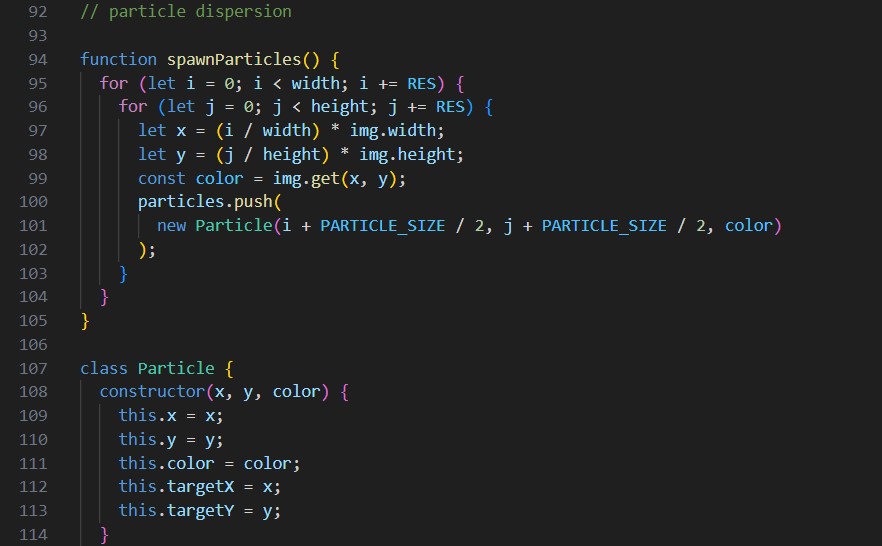


  • From here, the heavy lifting happens. p5js has a function called createVector that allows us to create a vector with x and y coordinates. We can then use the p5js function dist to calculate the distance between the cursor and the particle. We can then use the p5js function lerp to interpolate between the original position of the particle and the cursor position. This is how we get the particles to move towards the cursor and then back to their original position. The permanence slider controls how long the particles stay away from their original position before being forced back. The brush size slider controls the size of the cursor and the force with which the particles are moved. As far as interfacing goes, by making much of the math necessary to produce this image effect into adjustable variables, a user can easily manipulate the image without having to input a "MAX_FORCE R" that repels a vector relative to the mouse.


  • INTERFACE/INTERFACE/INTERFACE/INTERFACE/INTERFACE/INTERFACE/INTERFACE/INTERFACE/INTERFACE/INTERFACE/INTERFACE/INTERFACE/INTERFACE/INTERFACE/INTERFACE/INTERFACE/INTERFACE/INTERFACE/INTERFACE/INTERFACE/INTERFACE/INTERFACE/INTERFACE/INTERFACE/INTERFACE/INTERFACE/INTERFACE/INTERFACE/INTERFACE/INTERFACE/INTERFACE/INTERFACE/INTERFACE/INTERFACE/INTERFACE/INTERFACE/INTERFACE