Assignment Overview
This week covers:
• Introduction to electronics production and soldering
• Microcontroller programming and interfacing
• MIDI protocol and music controller development
• Display integration and user interface design
• Touch sensing and capacitive input methods
• Introduction to electronics production and soldering
• Microcontroller programming and interfacing
• MIDI protocol and music controller development
• Display integration and user interface design
• Touch sensing and capacitive input methods
Learning Objectives
• Understand electronics production and soldering techniques
• Learn microcontroller programming with QPAD development environment
• Develop MIDI controller applications
• Integrate OLED displays for visual feedback
• Implement capacitive touch sensing
• Create interactive music interfaces
• Learn microcontroller programming with QPAD development environment
• Develop MIDI controller applications
• Integrate OLED displays for visual feedback
• Implement capacitive touch sensing
• Create interactive music interfaces
Work Completed
Controller Soldering
• Assembled QPAD21 controller in workshop thanks to TA Quentin and Allen's help• Soldered all components including microcontroller, touch sensors, and display
• Tested basic functionality and connectivity
MIDI Controller Development
• Programmed QPAD-based MIDI controller• Implemented capacitive touch sensing for 6 touch pads
• Created piano keyboard mapping with MIDI note output
• Added OLED display for visual feedback
Display Integration
• Integrated Adafruit SSD1306 OLED display• Created piano keyboard visualization
• Implemented real-time touch feedback display
• Added note name indicators and touch pad status
Detailed Documentation
Project Overview
This week's assignment focused on electronics production and microcontroller programming. The main project involved soldering a QPAD21 controller in the workshop and then programming it to function as a MIDI piano controller with an integrated OLED display showing a visual piano keyboard interface.Hardware Components
• Microcontroller: QPAD21 board with capacitive touch capabilities• Touch Sensors: 6 capacitive touch pads (Q0-Q5) for piano input
• Display: Adafruit SSD1306 OLED 128x64 display for visual feedback
• LED: Status indicator for touch events
• MIDI Output: Serial communication for MIDI note transmission
Software Implementation
The controller runs custom code that combines touch sensing, MIDI output, and display management: Key Features:• Capacitive Touch Sensing: 6 touch pads with configurable threshold
• MIDI Protocol: Standard MIDI Note On/Off messages
• Piano Mapping: Maps touch pads to piano notes (C4, D4, E4, F4, G4, A4)
• Visual Display: Real-time piano keyboard visualization
• Debouncing: 300ms debounce delay to prevent multiple triggers
Technical Specifications:
• MIDI Channel: Channel 1
• Touch Threshold: 750 (configurable)
• Display Resolution: 128x64 pixels
• Update Rate: 50ms loop delay
• Serial Communication: 31250 baud for MIDI
• Touch Threshold: 750 (configurable)
• Display Resolution: 128x64 pixels
• Update Rate: 50ms loop delay
• Serial Communication: 31250 baud for MIDI
Development Process with Cursor
This project was developed using Cursor IDE, an AI-powered code editor that assisted in the iterative development process. The journey evolved from an initial DJ controller concept to a working piano controller through several phases of troubleshooting and refinement.
Summary: QPAD21 MIDI Controller Development Journey
Initial Request
• Goal: Create a DJ MIDI controller for QPAD21 using Arduino IDE
• Features: 6 touch pads for DJ controls, OLED display for track level visualization
Phase 1: Initial DJ Controller (Working Display)• Features: 6 touch pads for DJ controls, OLED display for track level visualization
Created
• 6 touch pads mapped to DJ functions (play/pause, cue, crossfader, volume)
• OLED display showing 4 track level meters
• MIDI output for DJ software integration
Result: Display worked, showing animated level bars
Phase 2: MIDI Connection Issuesdj_midi_controller.ino with:• 6 touch pads mapped to DJ functions (play/pause, cue, crossfader, volume)
• OLED display showing 4 track level meters
• MIDI output for DJ software integration
Result: Display worked, showing animated level bars
• Problem: Virtual DJ not detecting the controller
• Solution: Used Hairless MIDI + LoopMIDI bridge
• Steps:
1. Set up Hairless MIDI to convert serial to MIDI
2. Created LoopMIDI virtual port
3. Connected to Virtual DJ
Phase 3: Play/Stop Alternating Problem• Solution: Used Hairless MIDI + LoopMIDI bridge
• Steps:
1. Set up Hairless MIDI to convert serial to MIDI
2. Created LoopMIDI virtual port
3. Connected to Virtual DJ
• Problem: Tracks toggling play/stop rapidly
• Attempted Fixes:
• Added debouncing (200ms delay)
• Changed MIDI messages (Note On only vs On/Off)
• Increased touch threshold (500 → 750 → 800)
• Reduced update frequency
• Root Cause: Hairless MIDI settings causing Note On/Off pairs
Phase 4: MIDI Bridge Software Issues• Attempted Fixes:
• Added debouncing (200ms delay)
• Changed MIDI messages (Note On only vs On/Off)
• Increased touch threshold (500 → 750 → 800)
• Reduced update frequency
• Root Cause: Hairless MIDI settings causing Note On/Off pairs
• Discovered:
• Wrong baud rate (115200 instead of 31250)
• Feedback detection enabled (causing automatic Note Off messages)
• Hairless MIDI interpreting serial data incorrectly
• Attempted Solutions:
• Adjusted baud rates (31250, 38400, 57600)
• Disabled feedback detection
• Tested with minimal code (one message every 2 seconds)
Phase 5: Pivot to Piano Controller• Wrong baud rate (115200 instead of 31250)
• Feedback detection enabled (causing automatic Note Off messages)
• Hairless MIDI interpreting serial data incorrectly
• Attempted Solutions:
• Adjusted baud rates (31250, 38400, 57600)
• Disabled feedback detection
• Tested with minimal code (one message every 2 seconds)
• New Approach: Create a simple piano controller to test MIDI functionality
• Created
• 6 touch pads mapped to piano notes (C4, D4, E4, F4, G4, A4)
• Proper Note On/Off behavior for piano
• Visual piano keyboard on OLED display
• Keys highlight when pressed
Phase 6: Visual Improvements• Created
dj_midi_controller_piano.ino:• 6 touch pads mapped to piano notes (C4, D4, E4, F4, G4, A4)
• Proper Note On/Off behavior for piano
• Visual piano keyboard on OLED display
• Keys highlight when pressed
Added visual piano keyboard:
• 6 white keys with note names
• 4 black keys (sharps) positioned above
• Pressed keys highlighted (filled white)
• Touch pad indicators at bottom
Final State• 6 white keys with note names
• 4 black keys (sharps) positioned above
• Pressed keys highlighted (filled white)
• Touch pad indicators at bottom
Working piano controller with:
• Visual keyboard display
• Proper MIDI Note On/Off messages
• Touch pad to piano key mapping
• Microsoft GS Wavetable Synth compatibility
Lessons Learned• Visual keyboard display
• Proper MIDI Note On/Off messages
• Touch pad to piano key mapping
• Microsoft GS Wavetable Synth compatibility
1. MIDI bridge software (Hairless MIDI) can introduce issues
2. Baud rate must match (31250 for MIDI)
3. Feedback detection can cause unwanted Note Off messages
4. Starting with a simpler piano controller helped isolate MIDI issues
5. Visual feedback on the display improves usability
Current Status2. Baud rate must match (31250 for MIDI)
3. Feedback detection can cause unwanted Note Off messages
4. Starting with a simpler piano controller helped isolate MIDI issues
5. Visual feedback on the display improves usability
• Piano controller is functional
• DJ controller code exists but needs MIDI bridge configuration fixes
• Ready to adapt piano controller back to DJ functions once MIDI is stable
• DJ controller code exists but needs MIDI bridge configuration fixes
• Ready to adapt piano controller back to DJ functions once MIDI is stable
The journey went from a complex DJ controller → troubleshooting MIDI issues → simplifying to a piano controller → adding visual feedback → achieving a working MIDI instrument.
Source Code
Code written using Cursor IDE and compiled/uploaded with Arduino IDE
/*
 * QPAD21 MIDI Piano Controller
 *
 * Touch pads play piano notes and display the corresponding keys
 * Simple MIDI output for testing with Hairless MIDI
 *
 * Developed in Cursor IDE, compiled with Arduino IDE
 */

#include <Wire.h>
#include <Adafruit_GFX.h>
#include <Adafruit_SSD1306.h>
#include <Adafruit_FreeTouch.h>

// Display configuration
#define SCREEN_WIDTH 128
#define SCREEN_HEIGHT 64
#define OLED_RESET -1
#define SCREEN_ADDRESS 0x3C
Adafruit_SSD1306 display(SCREEN_WIDTH, SCREEN_HEIGHT, &Wire, OLED_RESET);

// Hardware pins
#define PIN_LED 15
#define N_TOUCH 6
#define THRESHOLD 750

// Touch pad configuration
uint8_t touch_pins[N_TOUCH] = {2, 3, 4, 5, 6, 7};
Adafruit_FreeTouch* touch_devices[N_TOUCH];

// Touch state tracking
int touch_values[N_TOUCH] = {0, 0, 0, 0, 0, 0};
bool pin_touched_now[N_TOUCH] = {false, false, false, false, false, false};
bool pin_touched_past[N_TOUCH] = {false, false, false, false, false, false};

// Debouncing
unsigned long last_touch_time[N_TOUCH] = {0, 0, 0, 0, 0, 0};
#define DEBOUNCE_DELAY 300 // 300ms debounce delay

// Piano notes (MIDI note numbers) - matches Microsoft GS Wavetable Synth
// These are the standard piano notes that sound good on Microsoft GS Wavetable Synth
byte piano_notes[N_TOUCH] = {60, 62, 64, 65, 67, 69}; // C4, D4, E4, F4, G4, A4
String note_names[N_TOUCH] = {"C4", "D4", "E4", "F4", "G4", "A4"};

// MIDI Configuration
#define MIDI_CHANNEL 1

void update_touch() {
  Ptc *ptc = ((Ptc *)PTC);

  for (int i = 0; i < N_TOUCH; i++) {
    touch_devices[i]->begin();
    touch_values[i] = touch_devices[i]->measure();

    ptc->CTRLA.bit.ENABLE = 0;
    ptc->CTRLA.bit.SWRESET = 1;

    pin_touched_past[i] = pin_touched_now[i];
    pin_touched_now[i] = touch_values[i] > THRESHOLD;
  }
}

void send_midi_note(byte note, byte velocity) {
  // Send MIDI Note On message
  Serial.write(0x90 | (MIDI_CHANNEL - 1)); // Note On, Channel 1
  Serial.write(note);
  Serial.write(velocity);
}

void send_midi_note_off(byte note) {
  // Send MIDI Note Off message
  Serial.write(0x80 | (MIDI_CHANNEL - 1)); // Note Off, Channel 1
  Serial.write(note);
  Serial.write((byte)0); // Velocity 0
}

void handle_touch_events() {
  unsigned long current_time = millis();

  for (int i = 0; i < N_TOUCH; i++) {
    // Note On when touched
    if (pin_touched_now[i] && !pin_touched_past[i] && (current_time - last_touch_time[i] > DEBOUNCE_DELAY)) {
      last_touch_time[i] = current_time;
      send_midi_note(piano_notes[i], 127); // Send Note On
      digitalWrite(PIN_LED, HIGH);
    }

    // Note Off when released
    if (!pin_touched_now[i] && pin_touched_past[i]) {
      send_midi_note_off(piano_notes[i]); // Send Note Off
      digitalWrite(PIN_LED, LOW);
    }
  }
}

void draw_piano_keyboard() {
  display.clearDisplay();

  // Draw title
  display.setTextSize(1);
  display.setCursor(0, 0);
  display.print("QPAD21 Piano");

  // Piano keyboard dimensions
  int key_width = 18;
  int key_height = 30;
  int start_x = 5;
  int start_y = 15;

  // Draw white keys (6 keys)
  for (int i = 0; i < N_TOUCH; i++) {
    int x = start_x + (i * key_width);
    int y = start_y;

    // Draw key background
    if (pin_touched_now[i]) {
      // Key pressed - filled rectangle
      display.fillRect(x, y, key_width - 1, key_height, SSD1306_WHITE);
      // Draw note name in black (inverted)
      display.setTextColor(SSD1306_BLACK);
      display.setCursor(x + 2, y + 8);
      display.print(note_names[i]);
      display.setTextColor(SSD1306_WHITE);
    } else {
      // Key not pressed - outline rectangle
      display.drawRect(x, y, key_width - 1, key_height, SSD1306_WHITE);
      // Draw note name in white
      display.setTextColor(SSD1306_WHITE);
      display.setCursor(x + 2, y + 8);
      display.print(note_names[i]);
    }
  }

  // Draw black keys (sharps) - smaller keys on top
  int black_key_width = 12;
  int black_key_height = 20;

  // Draw black keys for sharps (C#, D#, F#, G#)
  int black_keys[] = {0, 1, 3, 4}; // Q0, Q1, Q3, Q4 have sharps
  String black_note_names[] = {"C#", "D#", "F#", "G#"};

  for (int i = 0; i < 4; i++) {
    int key_index = black_keys[i];
    int x = start_x + (key_index * key_width) + (key_width / 2) - (black_key_width / 2);
    int y = start_y;

    // Draw black key
    display.fillRect(x, y, black_key_width, black_key_height, SSD1306_WHITE);
    // Draw note name in black
    display.setTextColor(SSD1306_BLACK);
    display.setCursor(x + 1, y + 5);
    display.print(black_note_names[i]);
    display.setTextColor(SSD1306_WHITE);
  }

  // Draw touch pad indicators at bottom
  display.setCursor(0, 50);
  display.print("Q0 Q1 Q2 Q3 Q4 Q5");

  // Draw pressed indicators
  display.setCursor(0, 58);
  for (int i = 0; i < N_TOUCH; i++) {
    if (pin_touched_now[i]) {
      display.print(" * ");
    } else {
      display.print(" - ");
    }
  }

  display.display();
}

void setup() {
  // Initialize serial for MIDI output
  Serial.begin(31250);

  // Initialize touch devices
  for (int i = 0; i < N_TOUCH; i++) {
    touch_devices[i] = new Adafruit_FreeTouch(touch_pins[i], OVERSAMPLE_1, RESISTOR_100K, FREQ_MODE_NONE);
  }

  // Initialize LED
  pinMode(PIN_LED, OUTPUT);
  digitalWrite(PIN_LED, LOW);

  // Initialize display
  if (!display.begin(SSD1306_SWITCHCAPVCC, SCREEN_ADDRESS)) {
    // Display initialization failed - flash LED
    for (int i = 0; i < 10; i++) {
      digitalWrite(PIN_LED, HIGH);
      delay(100);
      digitalWrite(PIN_LED, LOW);
      delay(100);
    }
  }

  // Initial display
  display.clearDisplay();
  display.setTextSize(1);
  display.setTextColor(SSD1306_WHITE);
  display.setCursor(10, 25);
  display.println("QPAD21 Piano");
  display.setCursor(10, 35);
  display.println("Ready!");
  display.display();

  delay(1000);
}

void loop() {
  // Update touch sensors
  update_touch();

  // Handle touch events
  handle_touch_events();

  // Update display
  draw_piano_keyboard();

  // Small delay
  delay(50);
}
Images
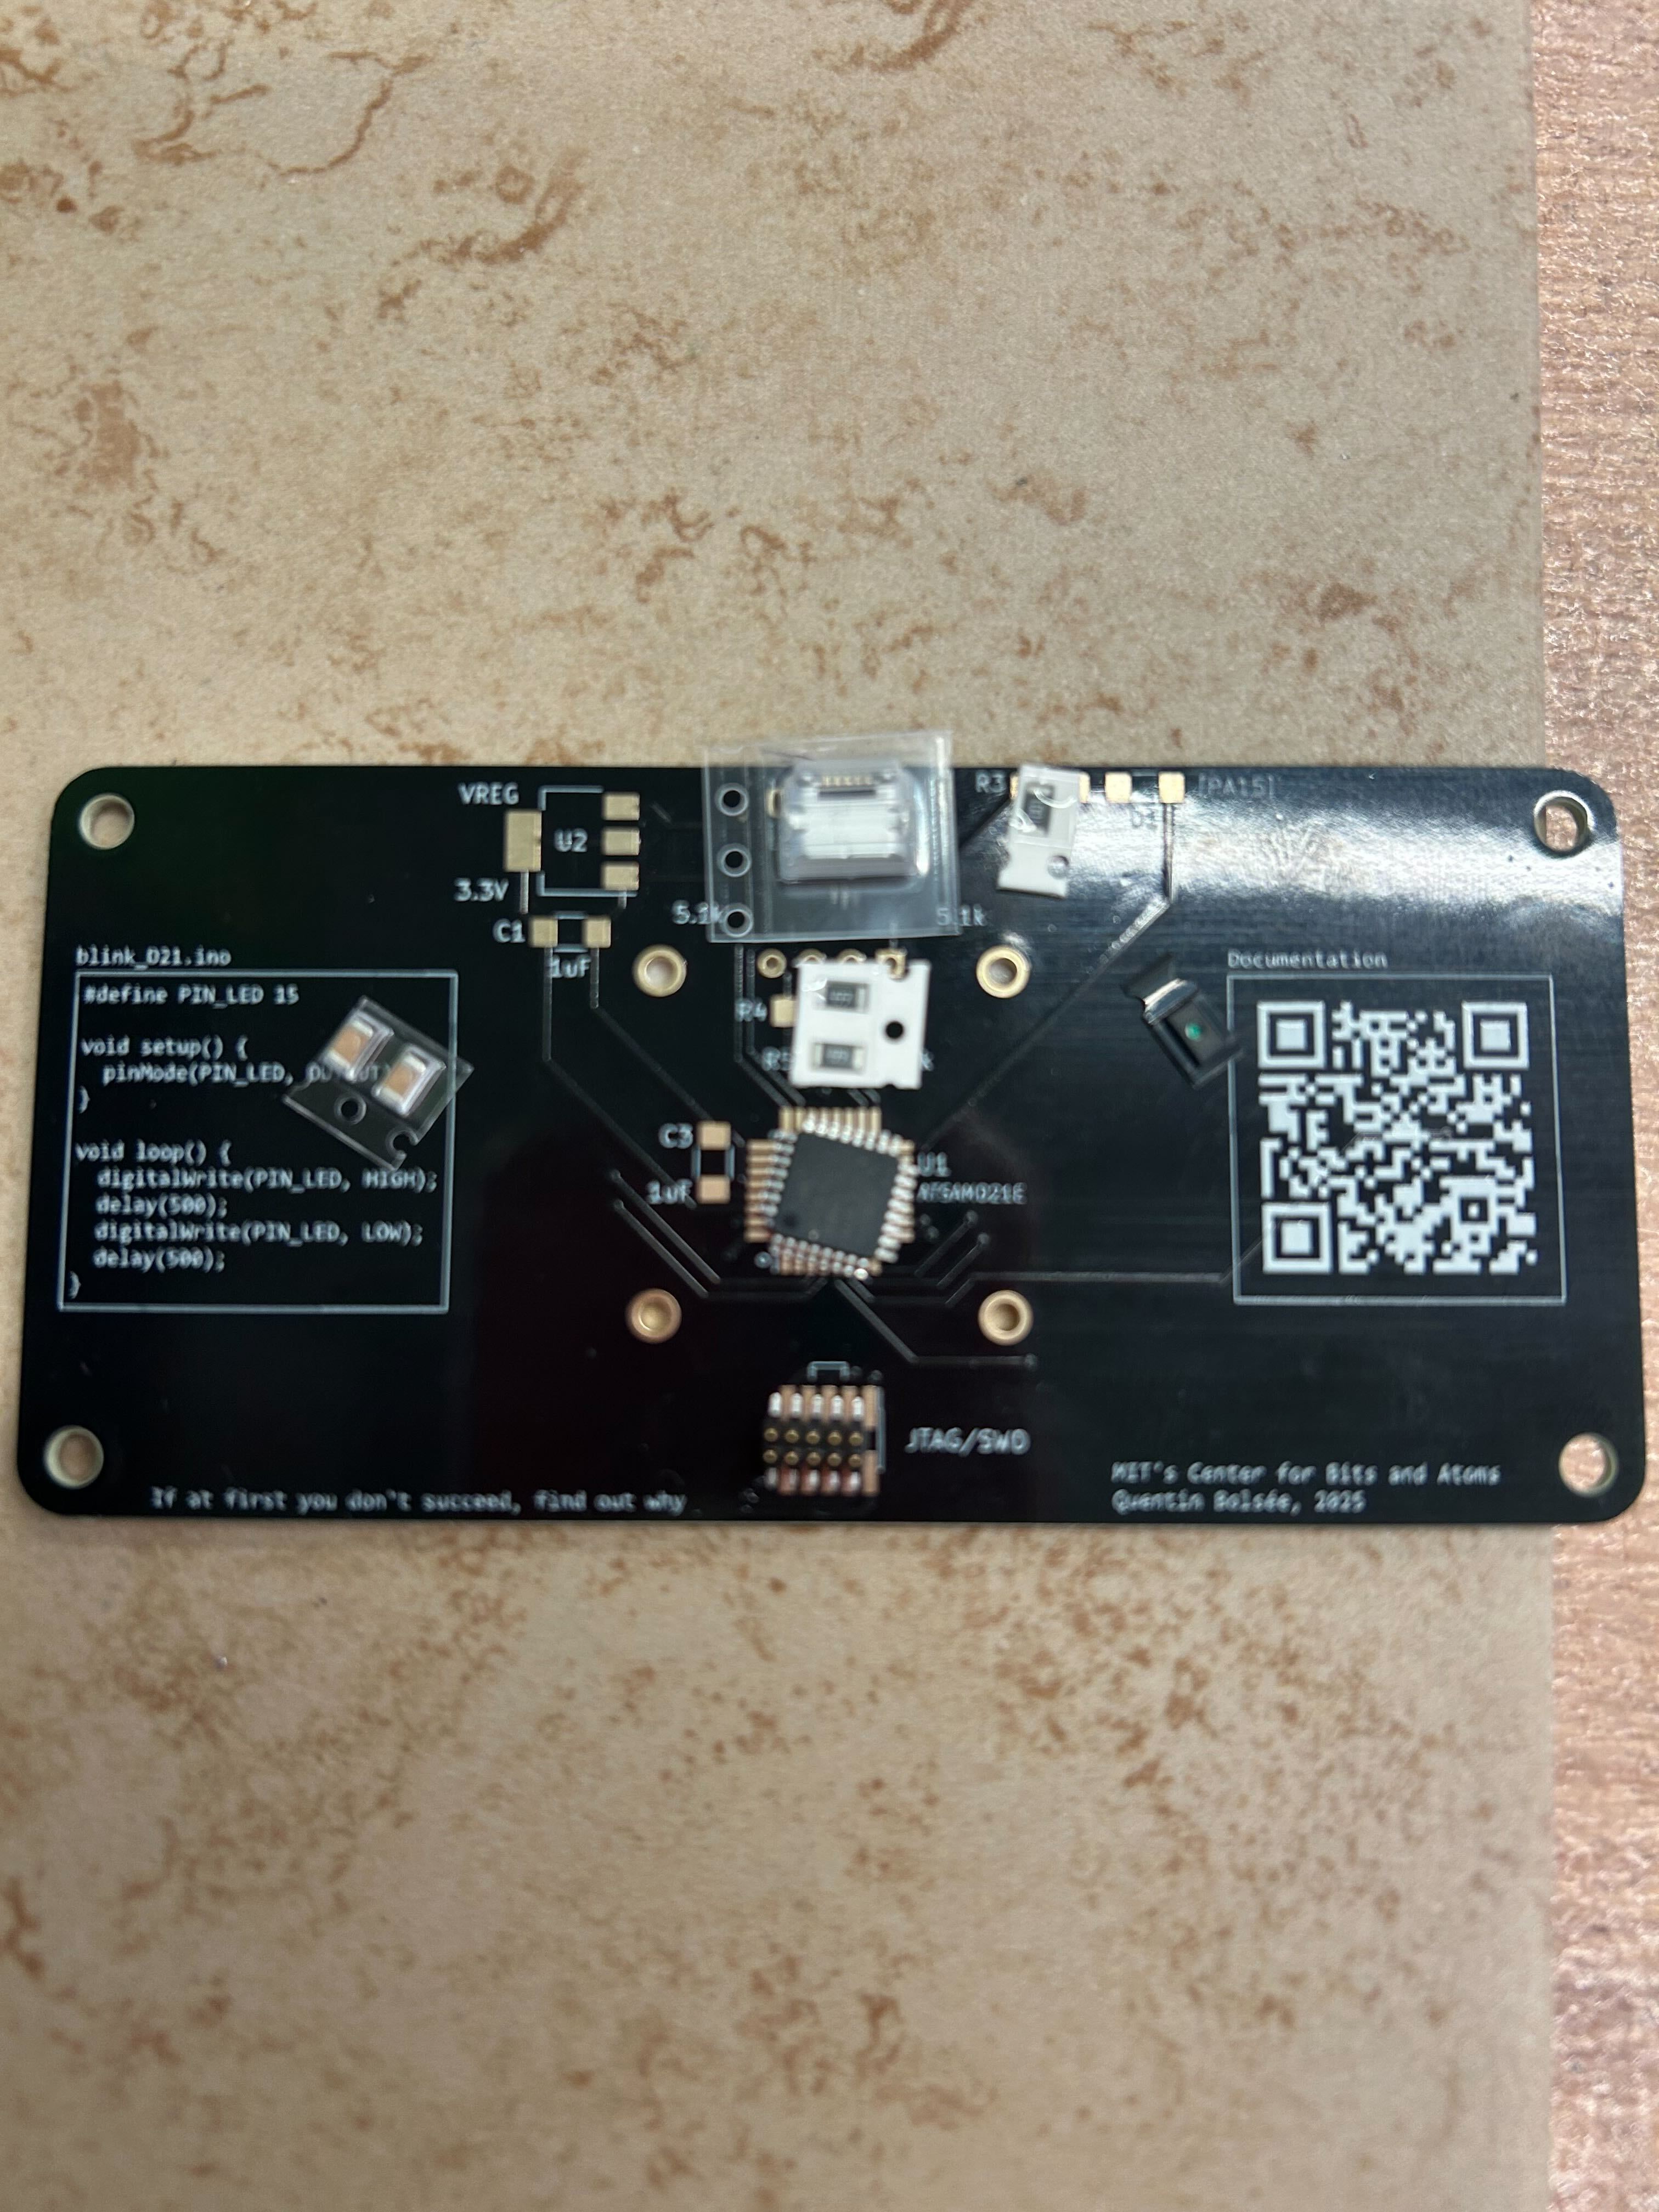
QPAD21 kit components before assembly - includes microcontroller, touch sensors, display, and supporting components
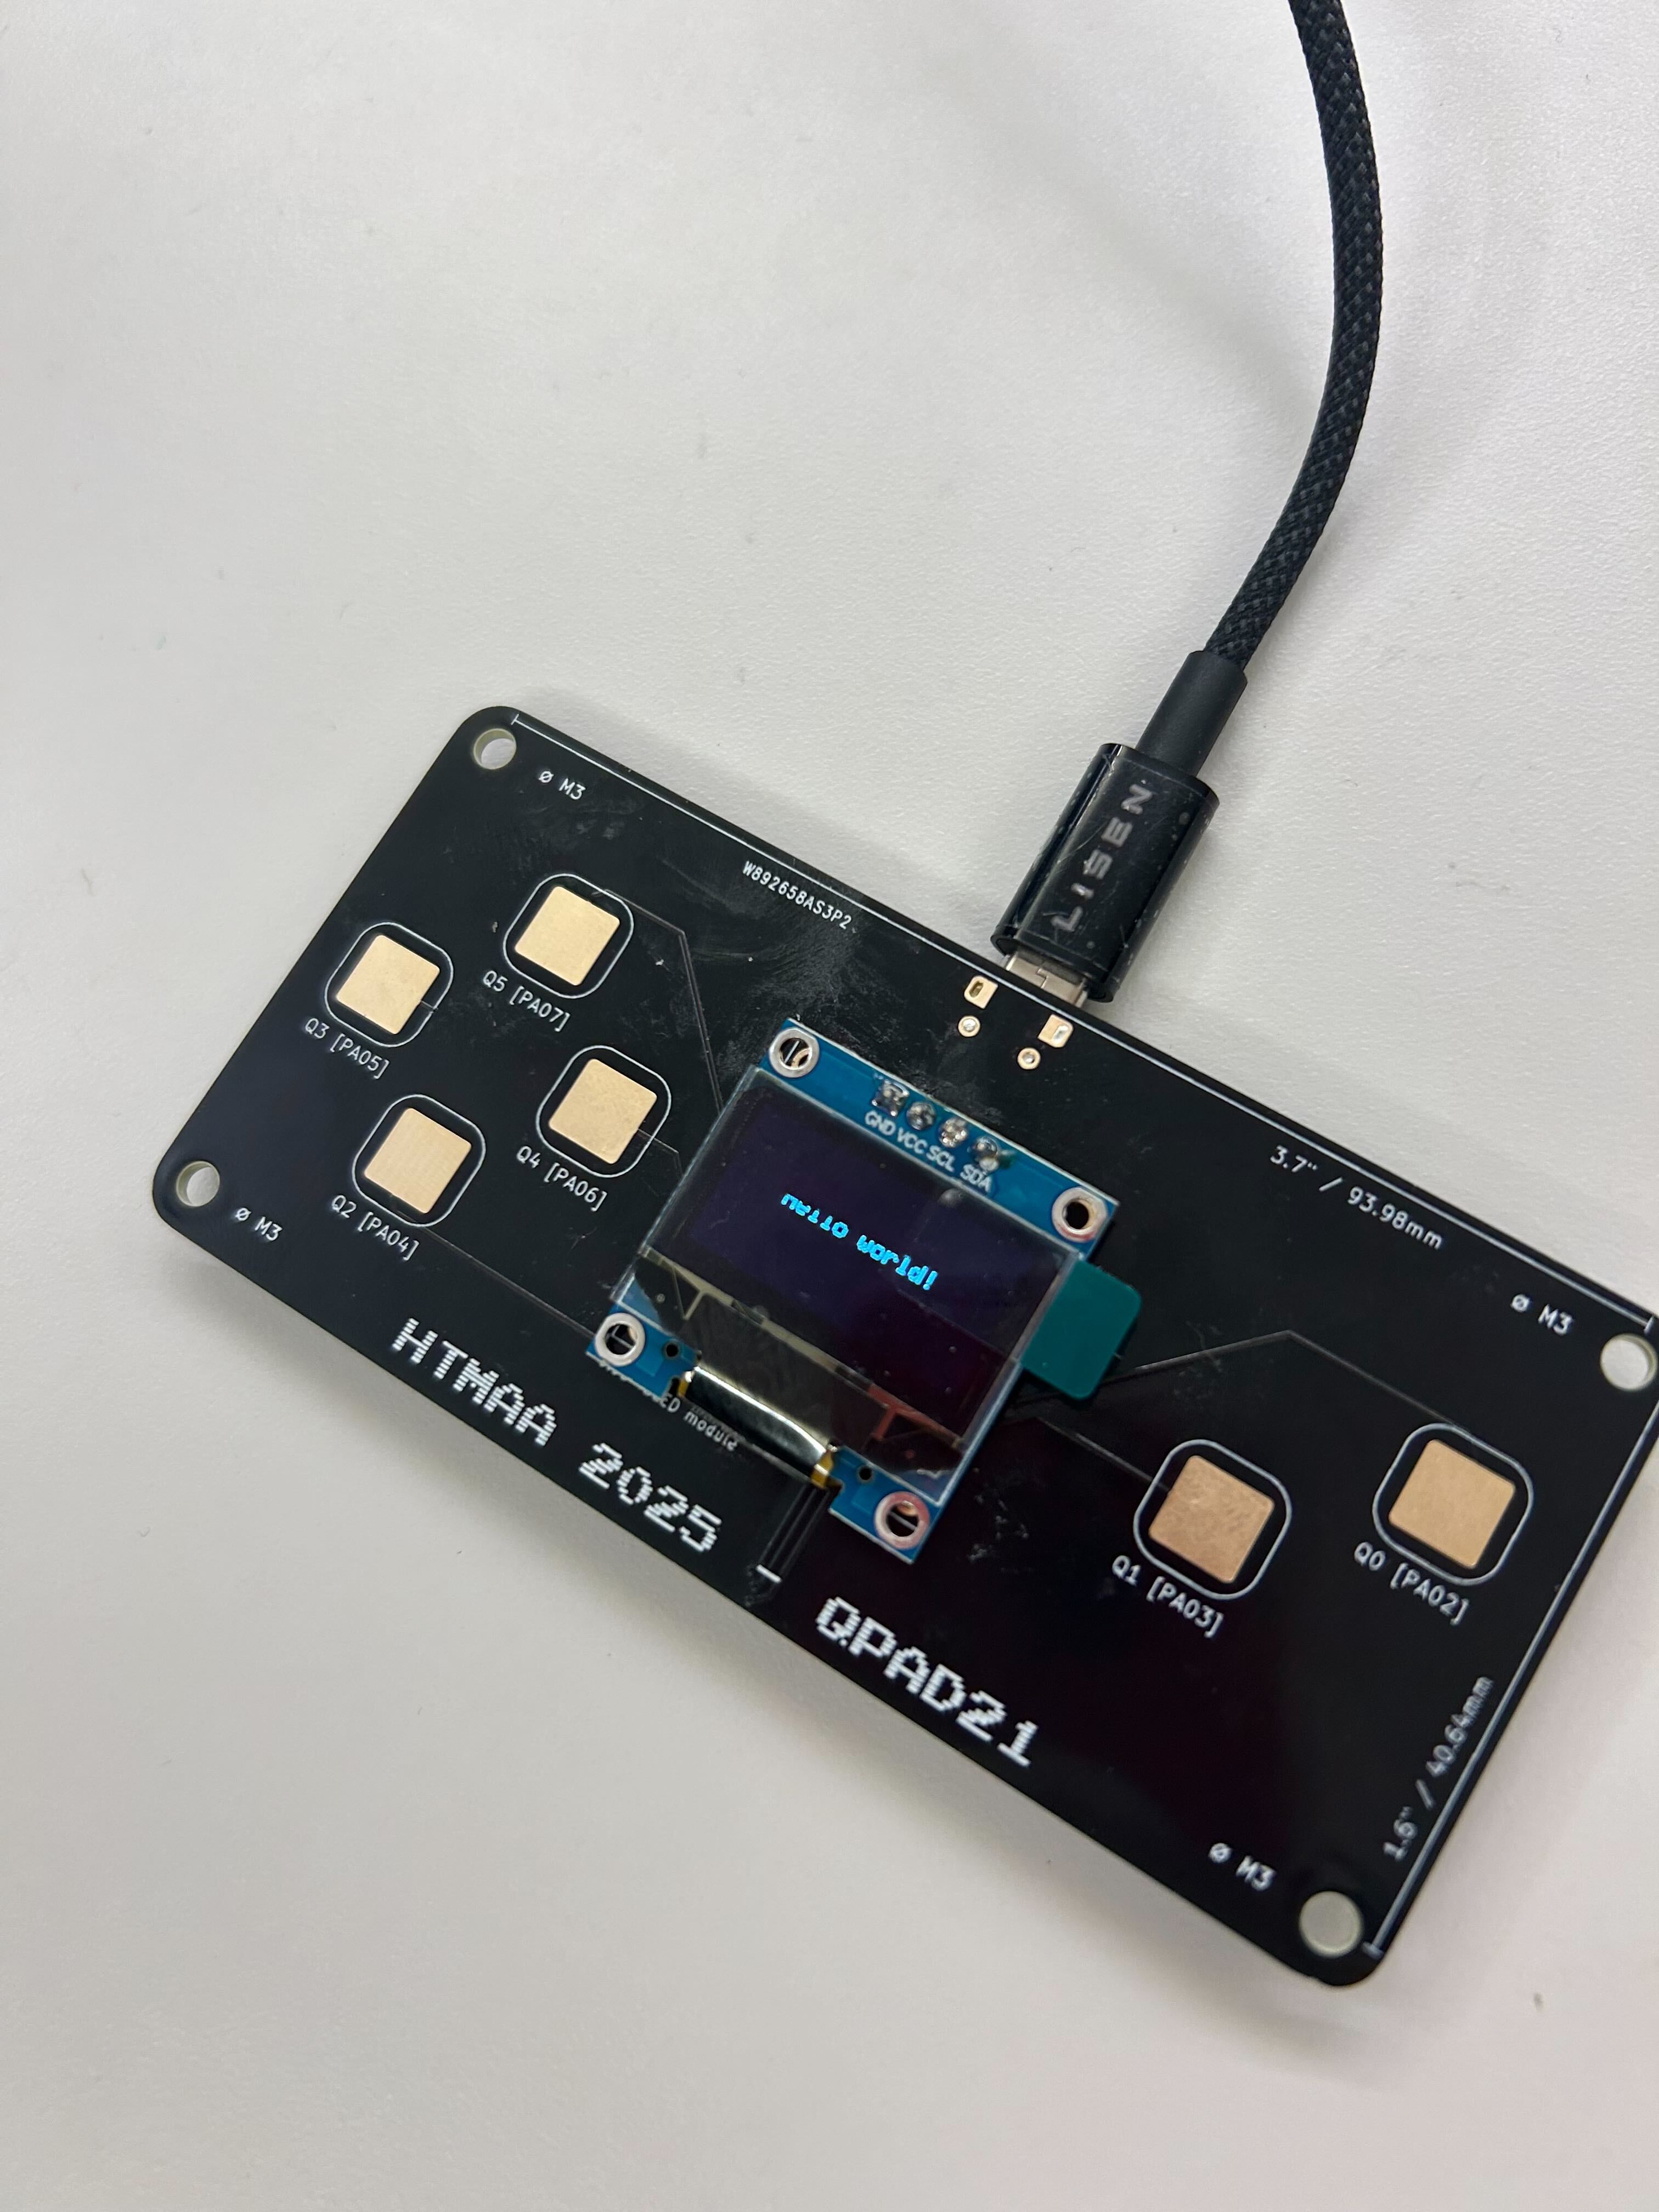
Completed QPAD21 controller after soldering and assembly
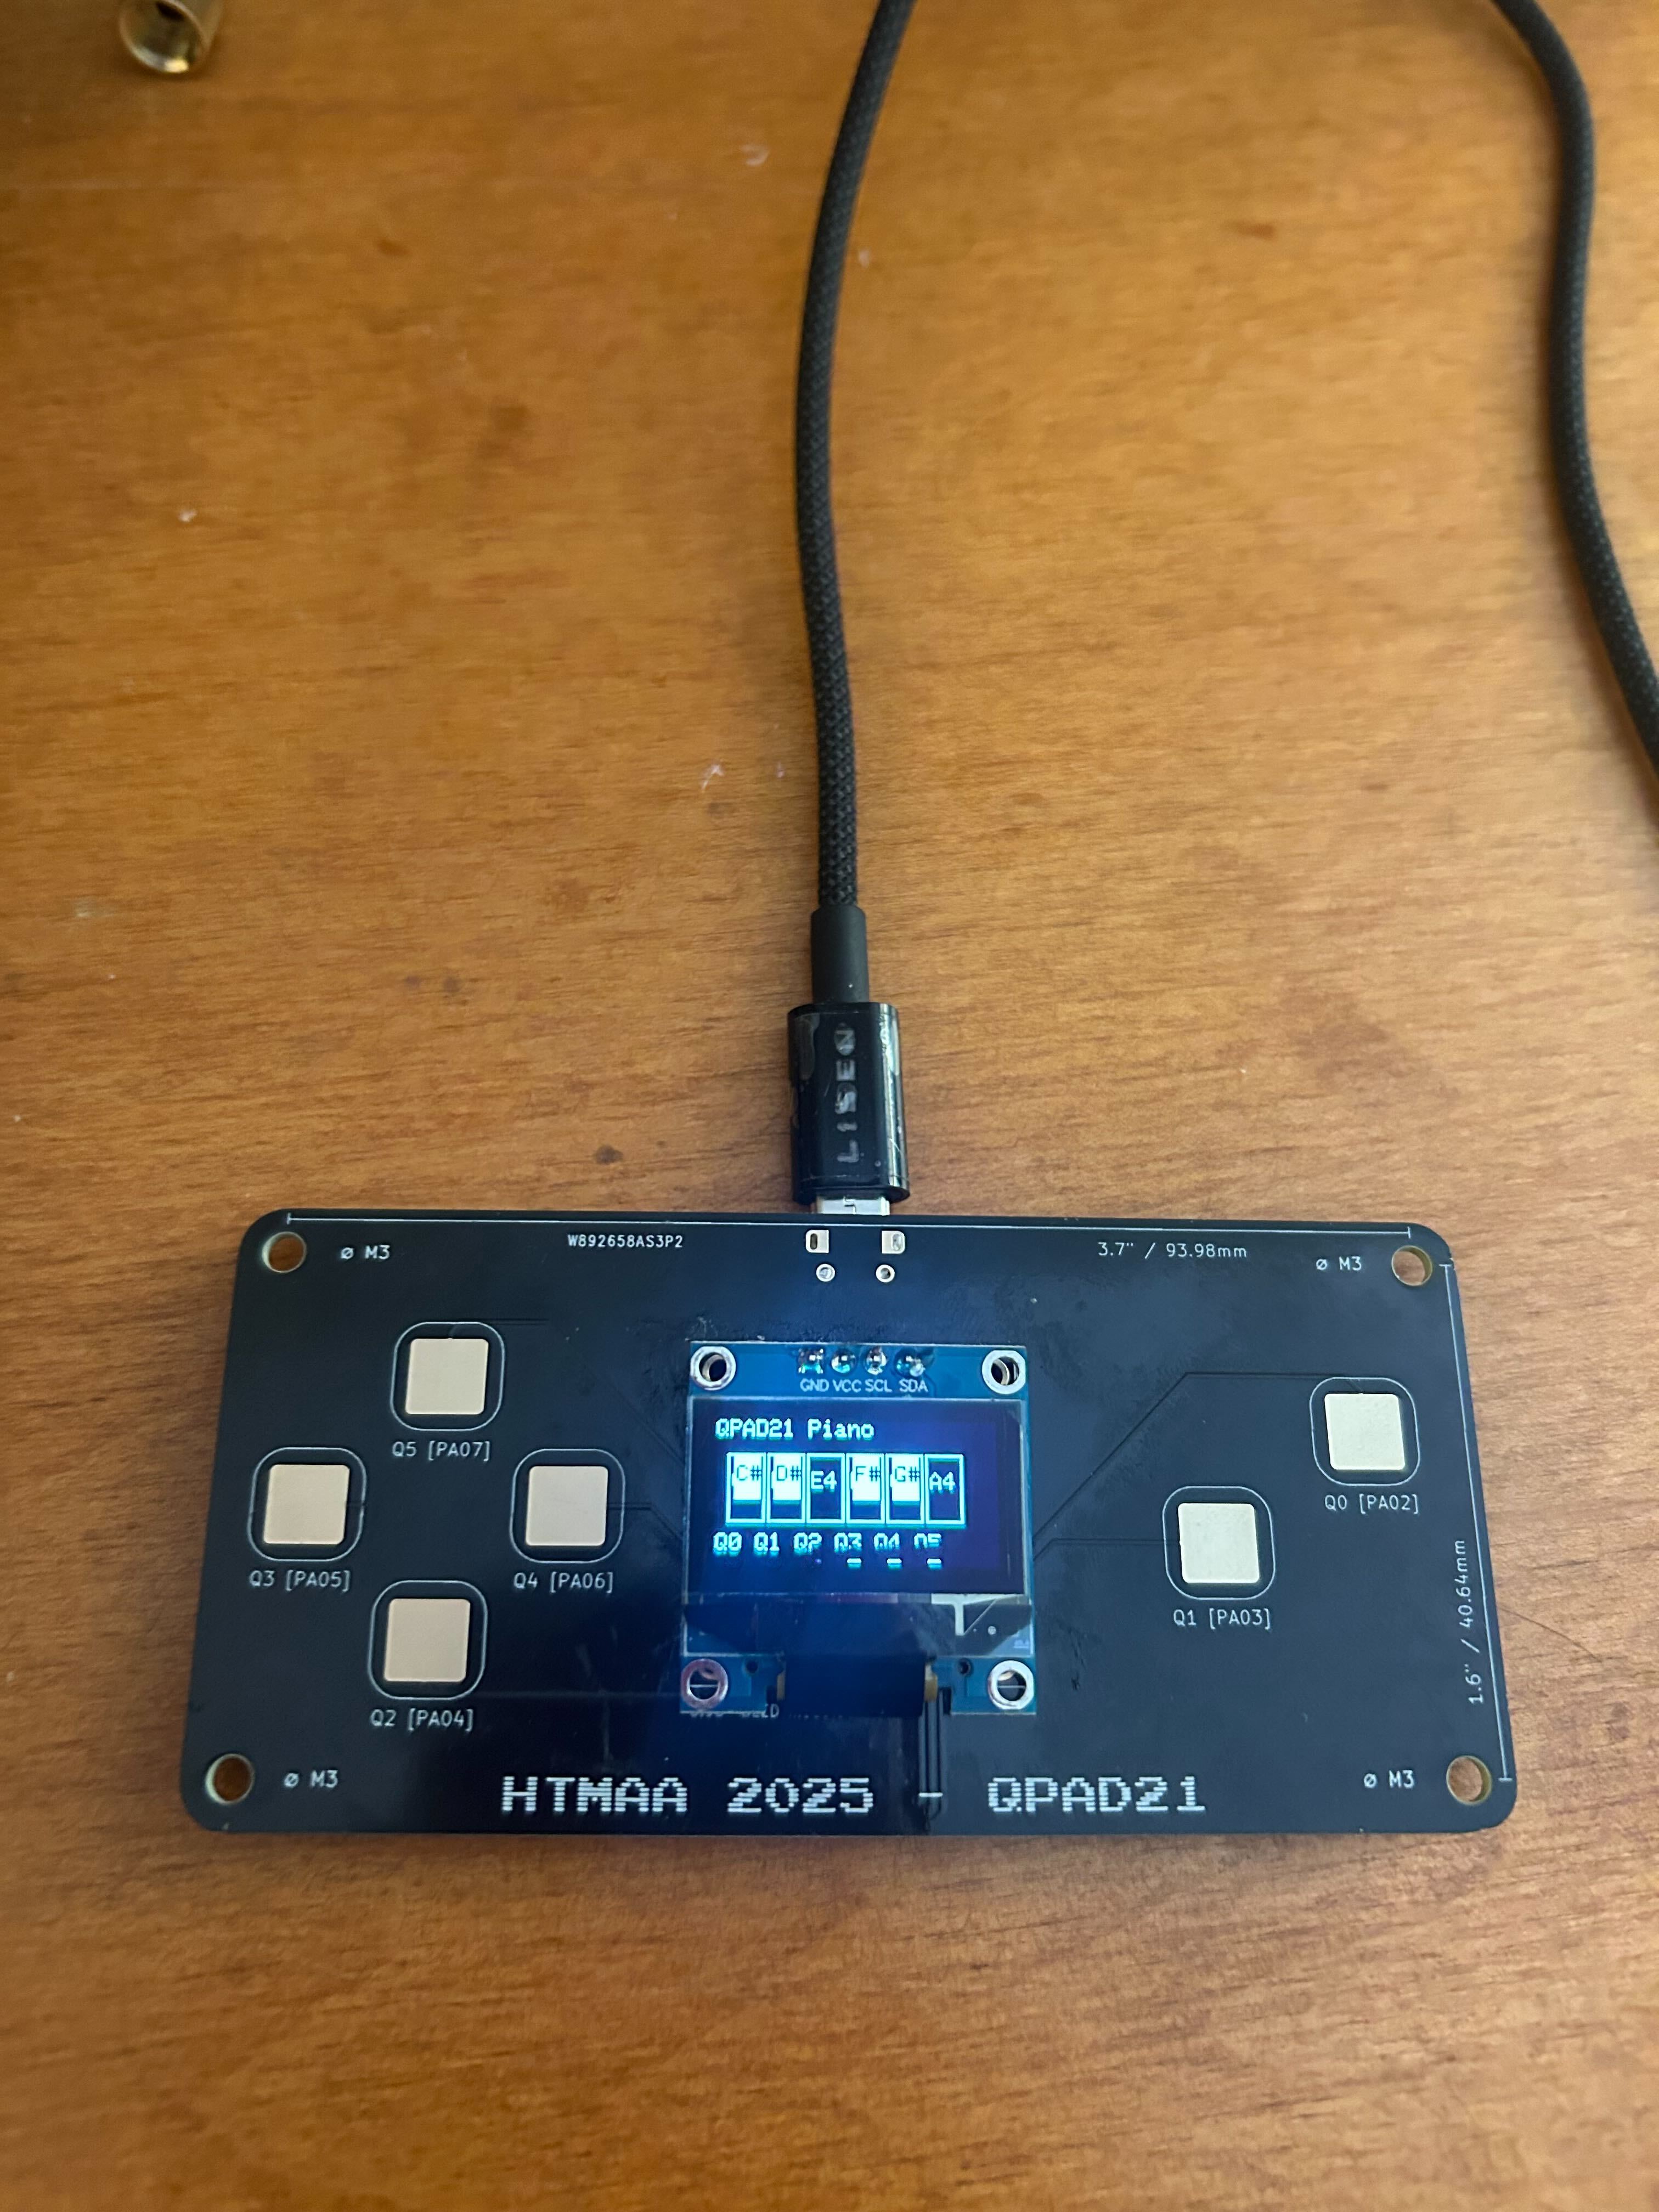
OLED display showing piano keyboard interface with touch feedback
Video demonstration of QPAD21 MIDI Piano Controller in action
Reflection
This week provided valuable experience in electronics production and microcontroller programming. Soldering the QPAD21 controller board taught me precision and attention to detail in hardware assembly. Programming the MIDI controller combined multiple technical skills including touch sensing, display management, and MIDI protocol implementation. The visual piano keyboard interface makes the controller intuitive to use, and the real-time feedback enhances the user experience.
Links