Week 13: Interfaces and Applications
Part I: SenseCraft AI with ESP32S3-Sense and Grove Vision AI V2
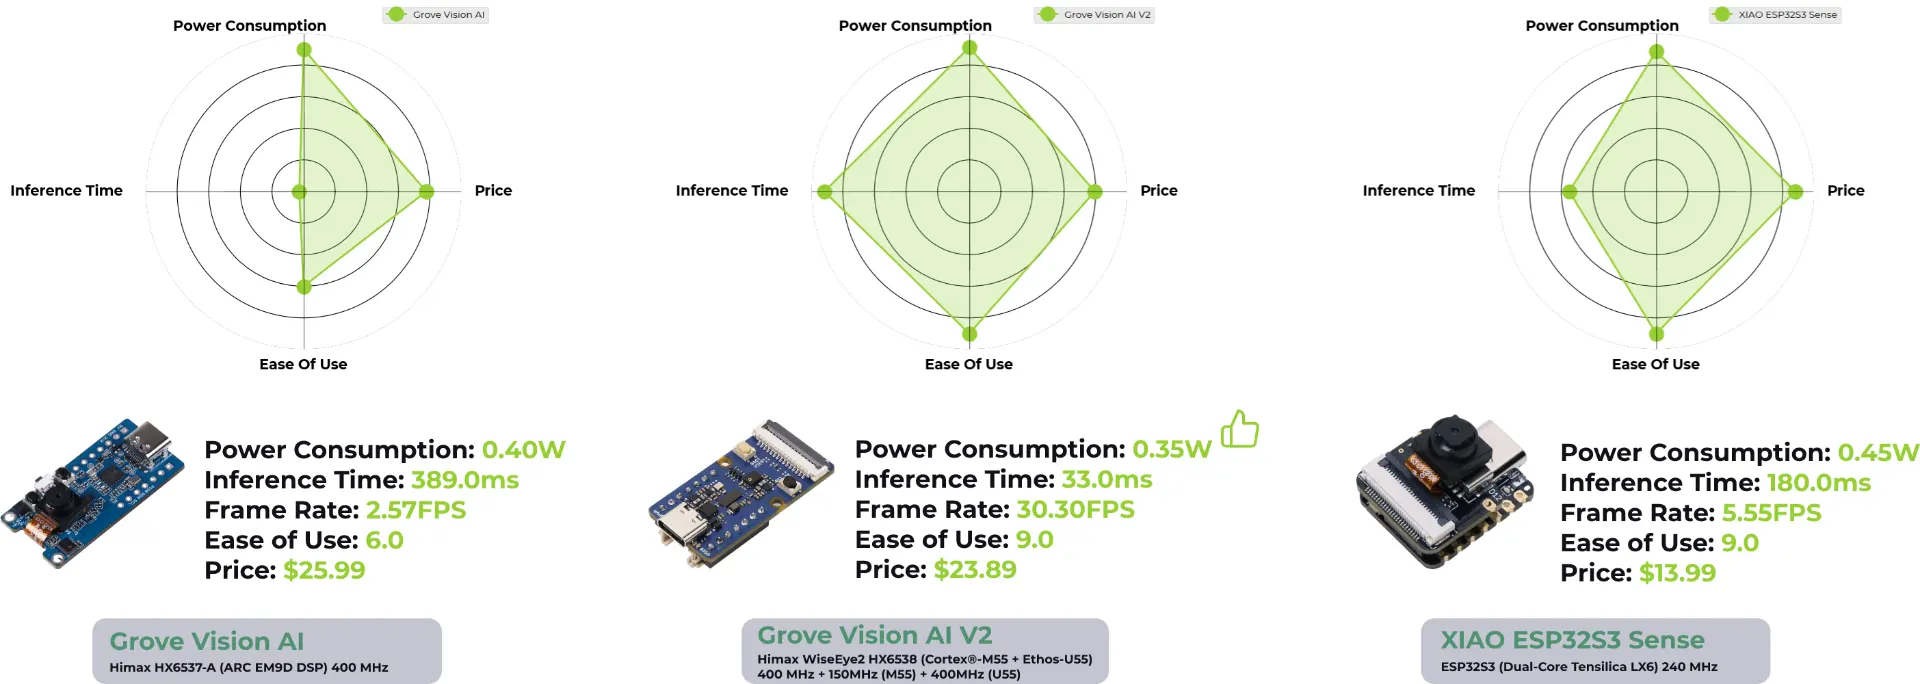
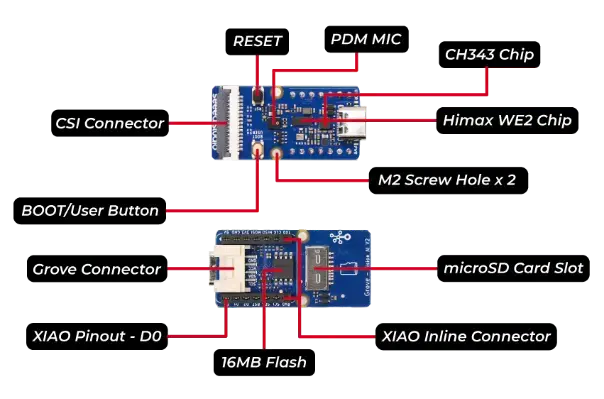
For this week, I wanted to make progress towards my final project, where I am making an AI-enable standing desk. I want to test the pretrained SenseCraft face detection models on the XIAO ESP32S3-Sense and the Grove Vision AI V2 from SeeedStudio. The Grove Vision AI V2 is a dedicated module for AI applications with WiseEye2 AI processor CPU/NPU and OV5647 MP camera. Here is a image from SeeedStudio comparing the Grove Vision modules with the XIAO ESP32S3-Sense. The Grove Vision AI V2 has faster inference times with slightly lower power usage thanks to its dedicated Neural Processing Unit (NPU) designed for deep learning algorithms. The Grove AI V2 module also comes with built-in microSD card and microphone just like Sense but no WiFi or bluetooth capabilities.
Seeed Studio released library called SSCMA, which includes several toolchains:
- SSCMA Model Zoo of pretrained computer vision models from OpenMMLab.
- SenseCraft AI a no-code web-based platform to train and deploy AI models on Seeed boards like Grove Vision AI V2 and XIAO ESP32S3-Sense.
- Seeed_Arduino_SSCMA an Arduino library to handle communication of predictions.
- SSCMA C++ SDK.
- SSCMA Python SDK.
The Seeed_Arduino_SSCMA library makes it especially easy to get the results of the inference such as the coordinates of bounding boxes for objects and other info such as keypoints, classes, and confidence level. Here is example from their repo.
Seeed_Arduino_SSCMA example code
#include <Seeed_Arduino_SSCMA.h>

SSCMA AI;

void setup()
{
    AI.begin();
    Serial.begin(9600);
}

void loop()
{
    if (!AI.invoke())
    {
        Serial.println("invoke success");
        Serial.printf("perf: prepocess=%d, inference=%d, postprocess=%d\n",
                      AI.perf().prepocess, AI.perf().inference,
                      AI.perf().postprocess);
        for (int i = 0; i < AI.boxes().size(); i++)
        {
            Serial.printf(
                "box %d: x=%d, y=%d, w=%d, h=%d, score=%d, target=%d\n", i,
                AI.boxes()[i].x, AI.boxes()[i].y, AI.boxes()[i].w,
                AI.boxes()[i].h, AI.boxes()[i].score, AI.boxes()[i].target);
        }
        for (int i = 0; i < AI.classes().size(); i++)
        {
            Serial.printf("class %d: target=%d, score=%d\n", i,
                          AI.classes()[i].target, AI.classes()[i].score);
        }
        for (int i = 0; i < AI.points().size(); i++)
        {
            Serial.printf("point %d: x=%d, y=%d, z=%d, score=%d, target=%d\n",
                          i, AI.points()[i].x, AI.points()[i].y,
                          AI.points()[i].z, AI.points()[i].score,
                          AI.points()[i].target);
        }
    }
}
For AI on embedded devices, it seems that LiteRT (formerly TensorFlow Lite) is the most supported currently but conversion from PyTorch to .tflite.
The export tool in the SSCMA library seems to be wrap around MMEngine and ONNX.
I found this Harvard course page and this tutorial very helpful in getting started with the SenseCraft web application and learning about the Grove AI module. I found that the it did not work on Firefox or Safari browser and only supports Chrome.
I first flashed the XIAO ESP32S3-Sense with the Swift-Yolo face detection .
Here is the model weights in .tflite format quantized to int8.
According to the config json, each input image frame is resized to \( 96 \times 96 \times 3 \) and the output is a \( 567 \times 6 \) tensor of candidate bounding boxes, each of size \([x, y, w, h, \text{score}, \text{class}]\).
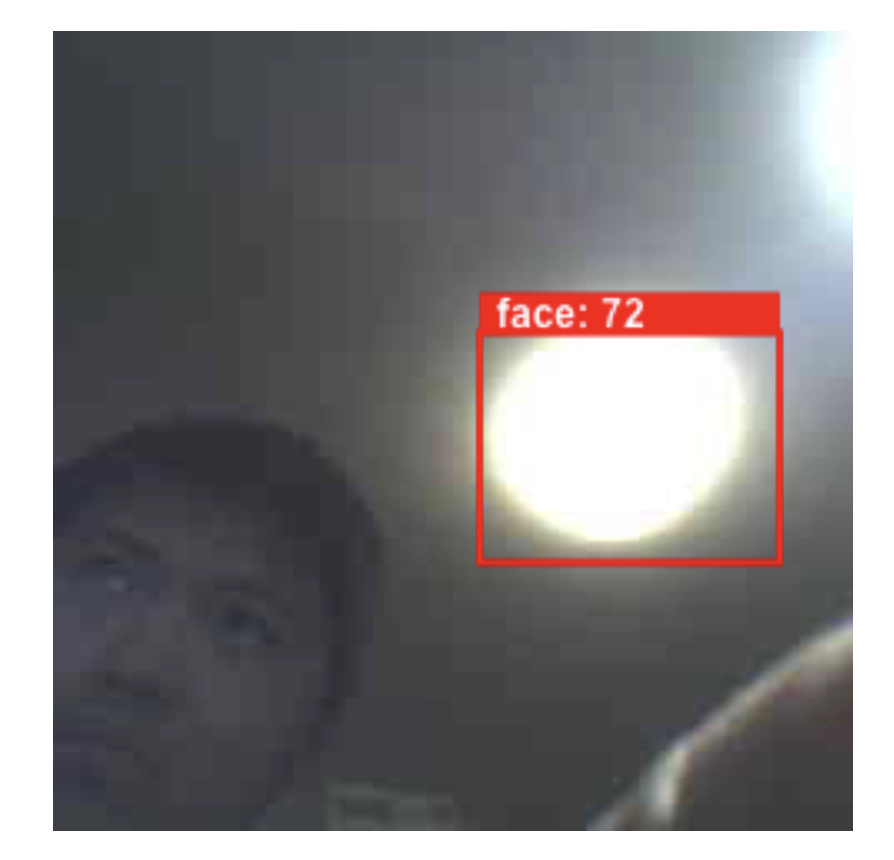
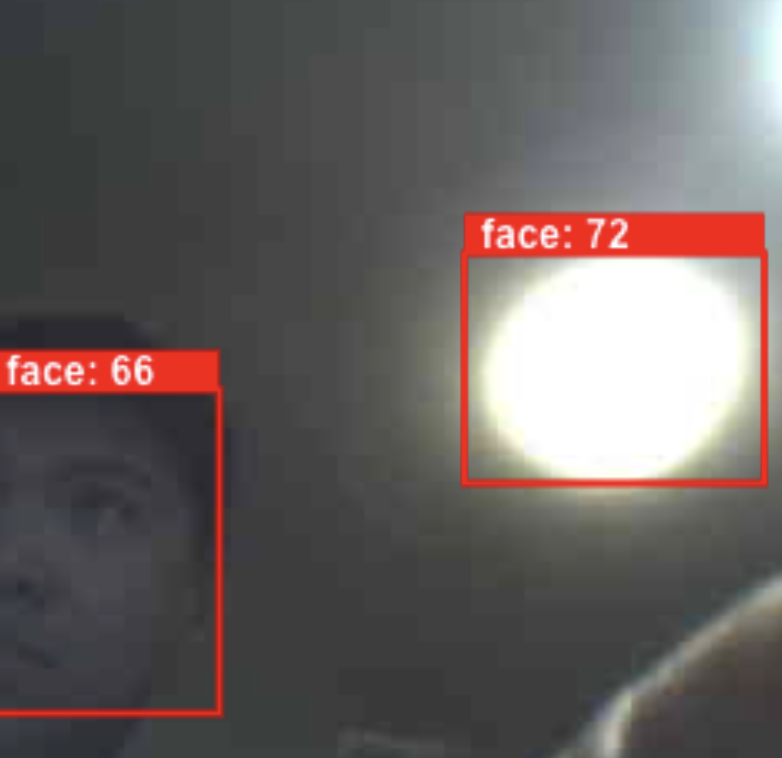
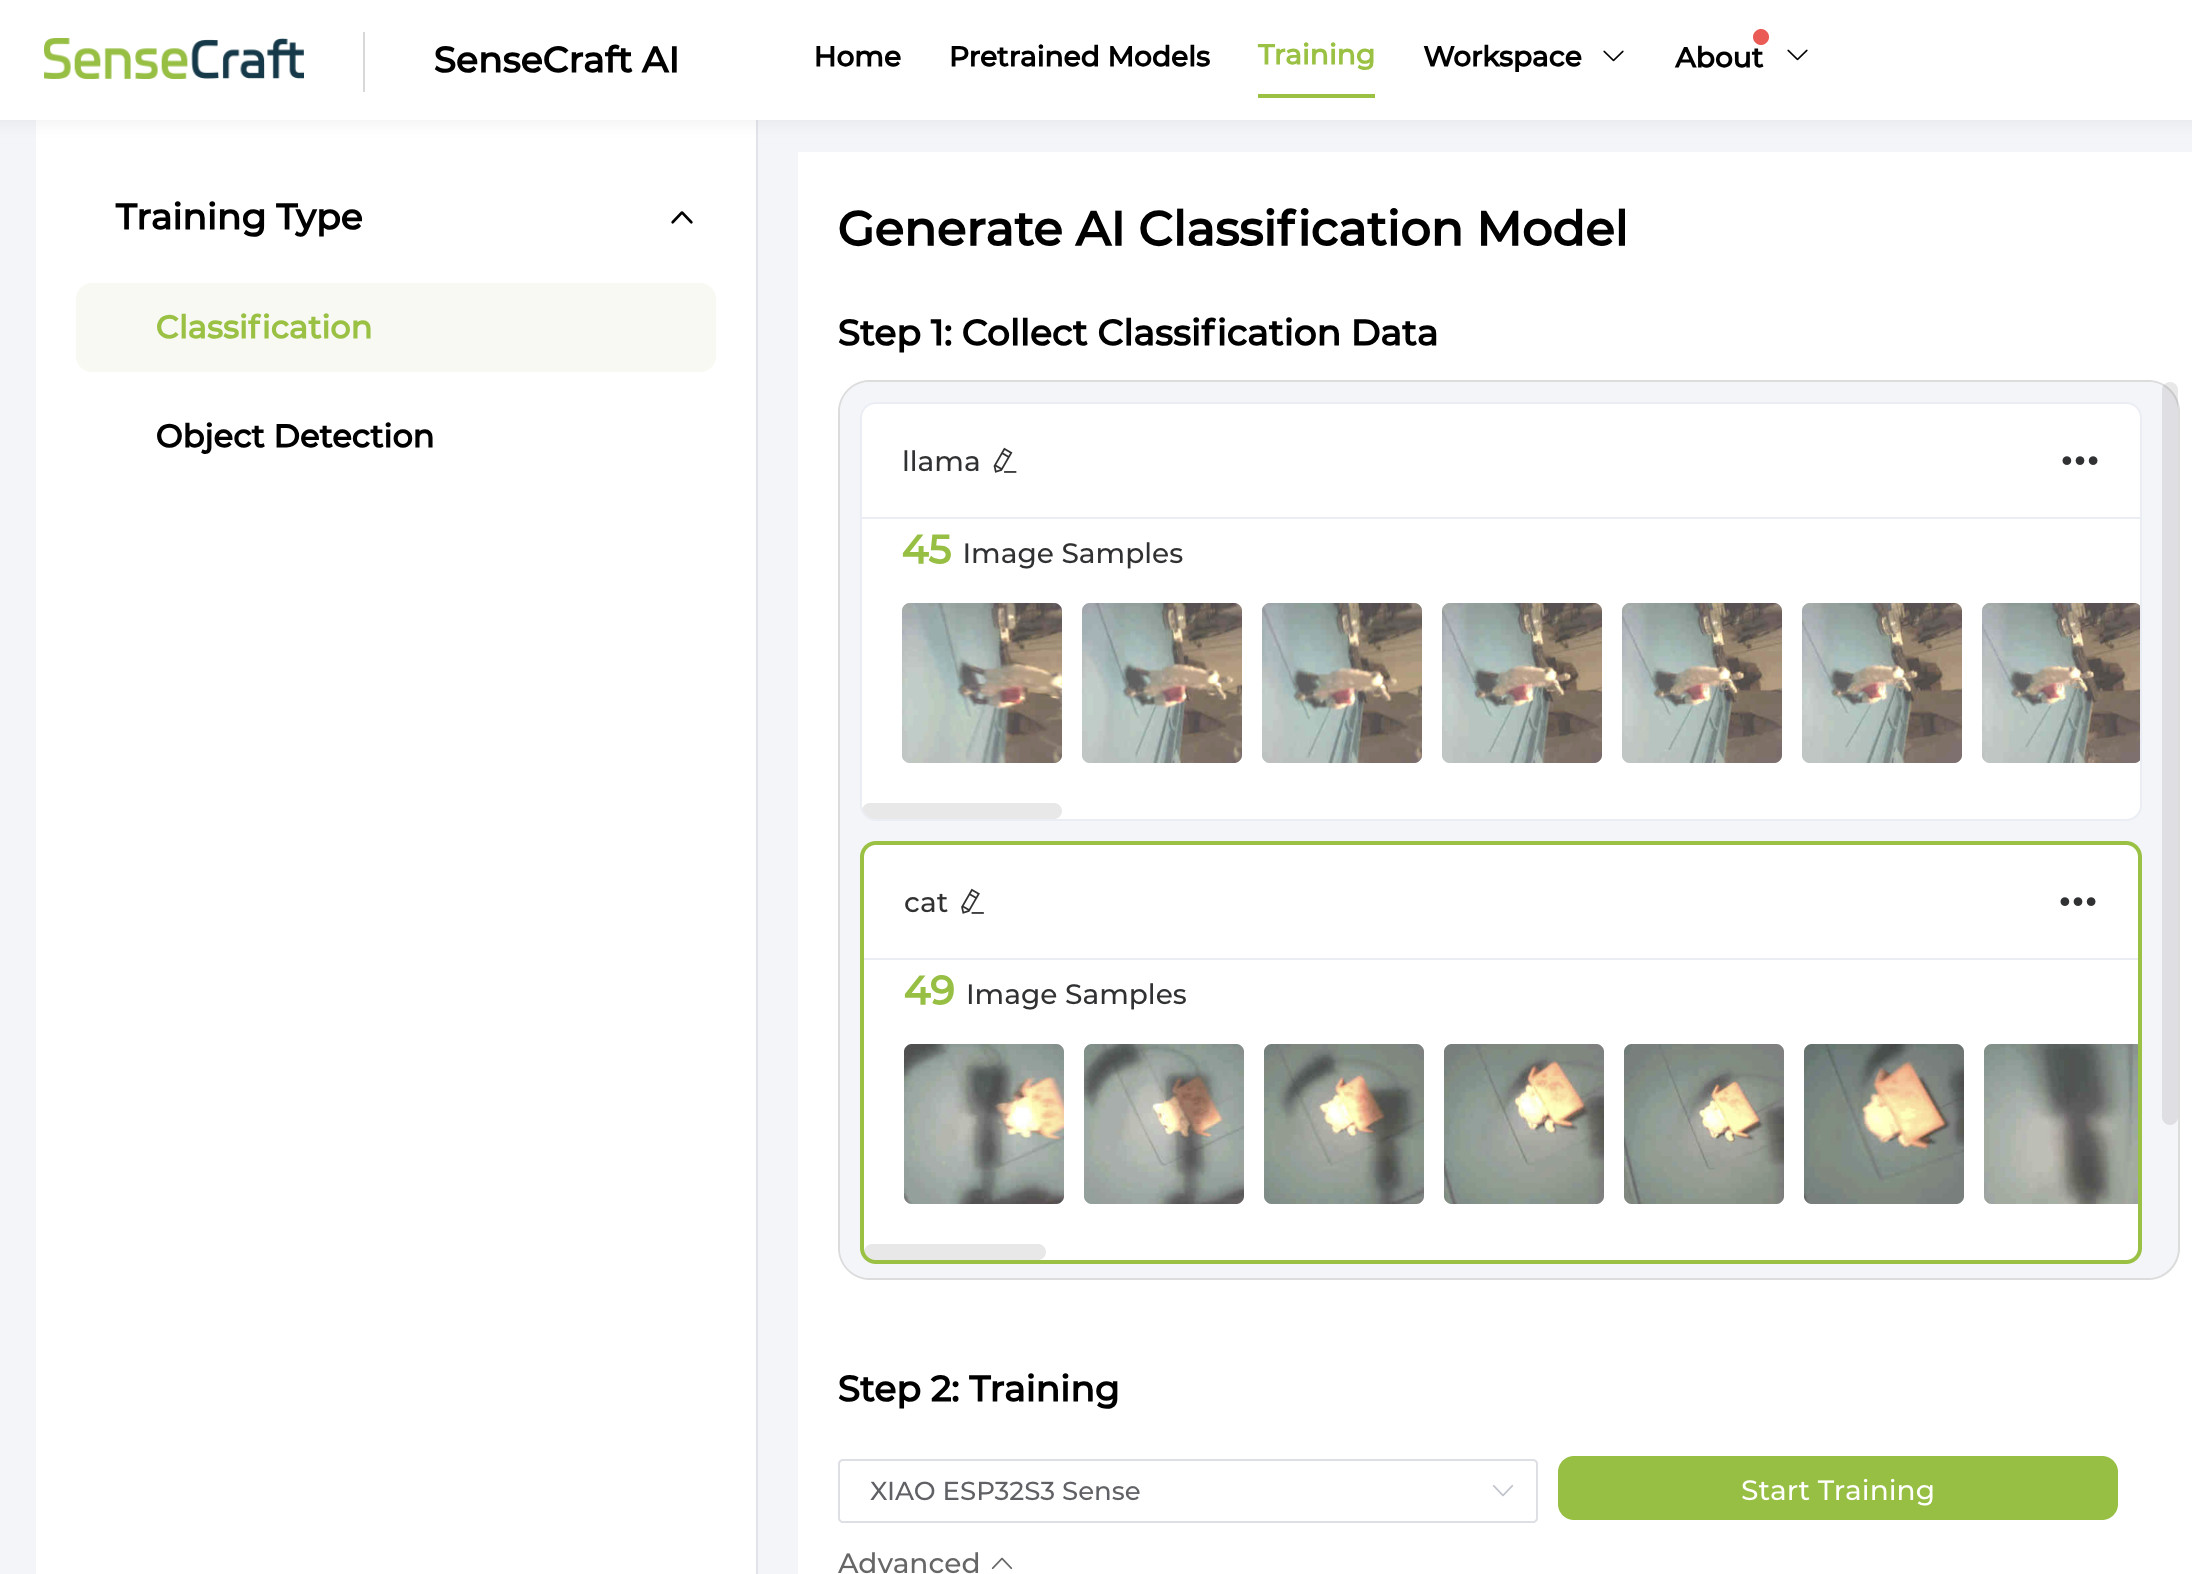
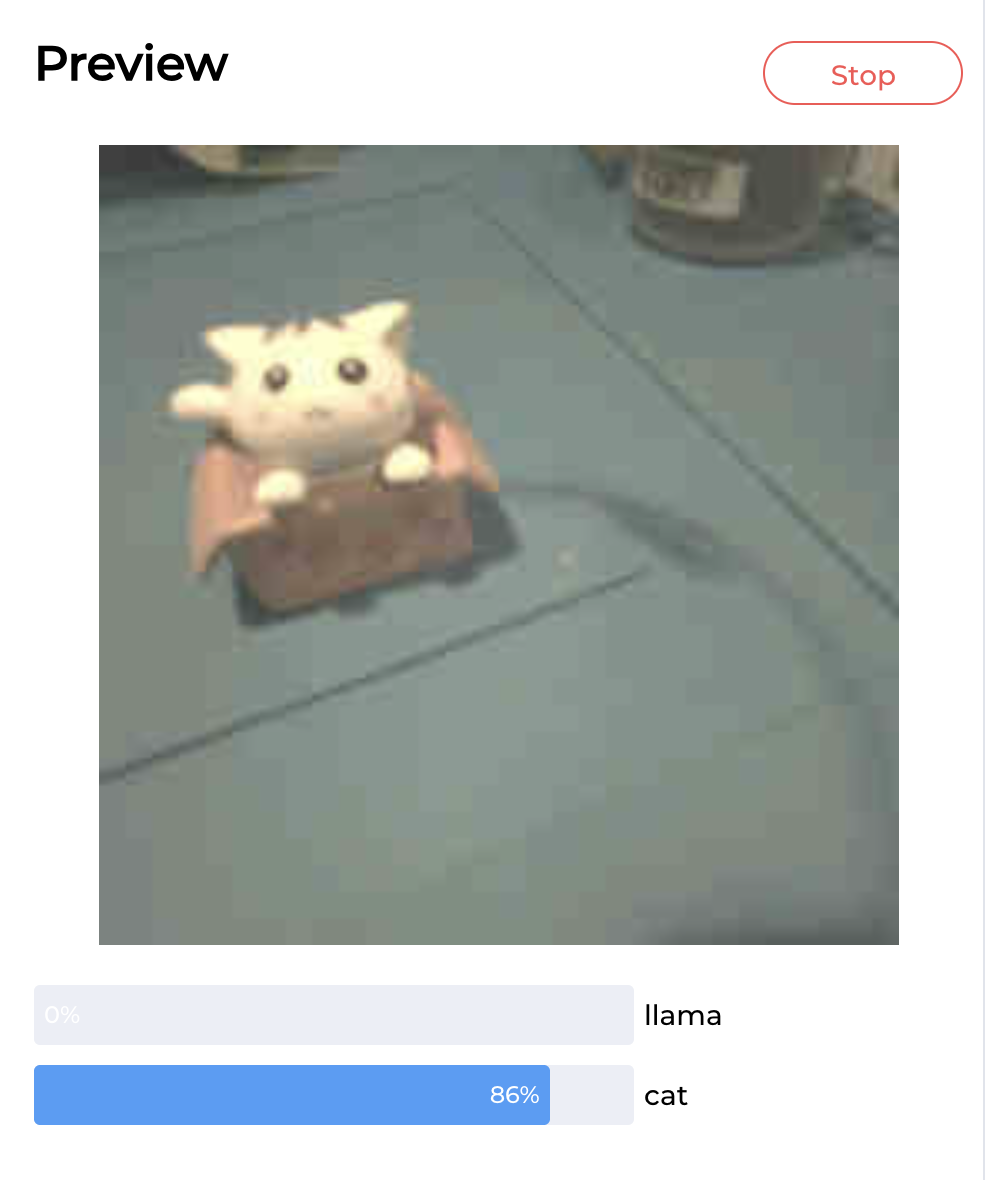
I noticed that the face detection model on the XIAO ESP32S3-Sense was more prone to false positives (maybe due to the camera being only 2 MP) than the Grove AI V2 version. I also experimented with the web based training for two classes: llama and cat. I used the SenseCraft platform and the XIAO ESP32S3-Sense to capture around 50 images of both objects. I trained only on images of the white cat and found the model had some issues generalizing to the grey cat it was not trained on.

The SenseCraft AI platform supports Serial communication through UART, I2C, and SPI and digital output via GPIO. It also has MQTT WIFI but I could not get it to work for some reason. One thing I found confusing at first was that the Grove AI V2 requires another microcontroller to process the output of the AI model. This website has a nice description of this point and the integration with the SenseCraft platform that I quote below:
"The SenseCraft AI platform makes it very easy to integrate a pre-trained AI model in your TinyML projects. You don’t need to write any code to deploy or run the model. The web interface allows you to configure different output options (GPIO, Serial, MQTT), again without any coding. But the Serial interface enables you to write your own code to process detection results further, if needed. However, you will need to connect a second microcontroller for that. A disadvantage of the SenseCraft AI platform is that you essentially cannot extend the code for the deployed model. All further processing code needs to run on a second microcontroller. On the other hand, in most cases the computational load of the model is so high that you are better of with a separate microcontroller anyway."
Part II: Testing Standing Desk Face Detection
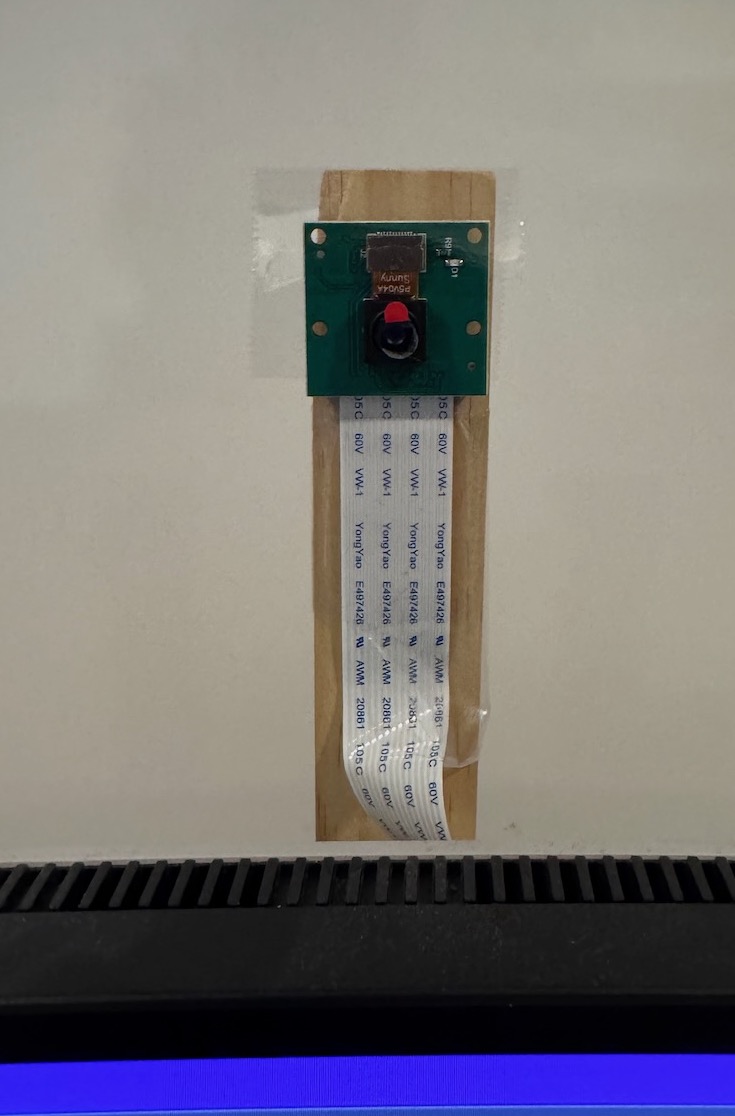
I made a mock setup of the face detection for my final project by taping the camera to a ruler on the back of the monitor and printing to serial monitor when a face is detected. I connected SDA/SCL/GND from the Grove AI V2 module to the XIAO ESP32S3 and flashed this code to print if a face is detected in the bottom or top zones of the frame. This way I can move the desk to keep the face centered at all times. Here is the Gemini chat I used to help write the code. In the full version, the XIAO ESP32S3 will be connected to the buttons of the standing desk PCB to move the desk when a face is detected above or below the center region.
Mock standing desk face detection code
#include <Wire.h>
#include <Seeed_Arduino_SSCMA.h>

SSCMA AI;

#define STATUS_LED LED_BUILTIN

// 3. SETTINGS
// Y=0 is TOP, Y=100 is BOTTOM
#define ZONE_TOP     100
#define ZONE_BOTTOM  150

void setup() {
    Serial.begin(115200);
    pinMode(STATUS_LED, OUTPUT);
    digitalWrite(STATUS_LED, LOW); // Start OFF
    Wire.begin();
    Serial.print("Connecting to S3 Sense...");
    if (!AI.begin()) {
        Serial.println("Failed! Check Wiring (D4/D5) & Power.");
    } else {
        Serial.println("Connected!");
    }
}

void loop() {
    // A. INVOKE INFERENCE
    if (!AI.invoke(1, false, false)) {

        // B. PARSE RESULTS
        if (AI.boxes().size() > 0) {
            boxes_t &b = AI.boxes()[0];

            int y = b.y;
            int score = b.score;

            // C. SERIAL OUTPUT
            Serial.printf("Face Y: %d (Score: %d%%) -> ", y, score);

            // D. CONTROL LOGIC
            if (y < ZONE_TOP) {
                Serial.println("MOVING UP");
                signalMove(); // Flash LED
            }
            else if (y > ZONE_BOTTOM) {
                Serial.println("MOVING DOWN");
                signalMove(); // Flash LED
            }
            else {
                Serial.println("HOLDING (Centered)");
                signalStop(); // LED Off
            }
        } else {
            Serial.println("Status: No Face -> HOLDING");
            signalStop(); // LED Off
        }
    } else {
        Serial.println("Waiting for Sensor...");
        signalStop();
    }

    delay(100); // Loop runs ~10 times per second
}

// Helper to flash LED when moving
void signalMove() {
    // Toggle LED state to create a flash effect
    digitalWrite(STATUS_LED, !digitalRead(STATUS_LED));
}

// Helper to ensure LED is off when stopped
void signalStop() {
    digitalWrite(STATUS_LED, LOW); // Turn off
    // Note: If LED is Active Low, change this to HIGH
}