Week 3: Embedded Programming
Part I: An Exercise in Soldering
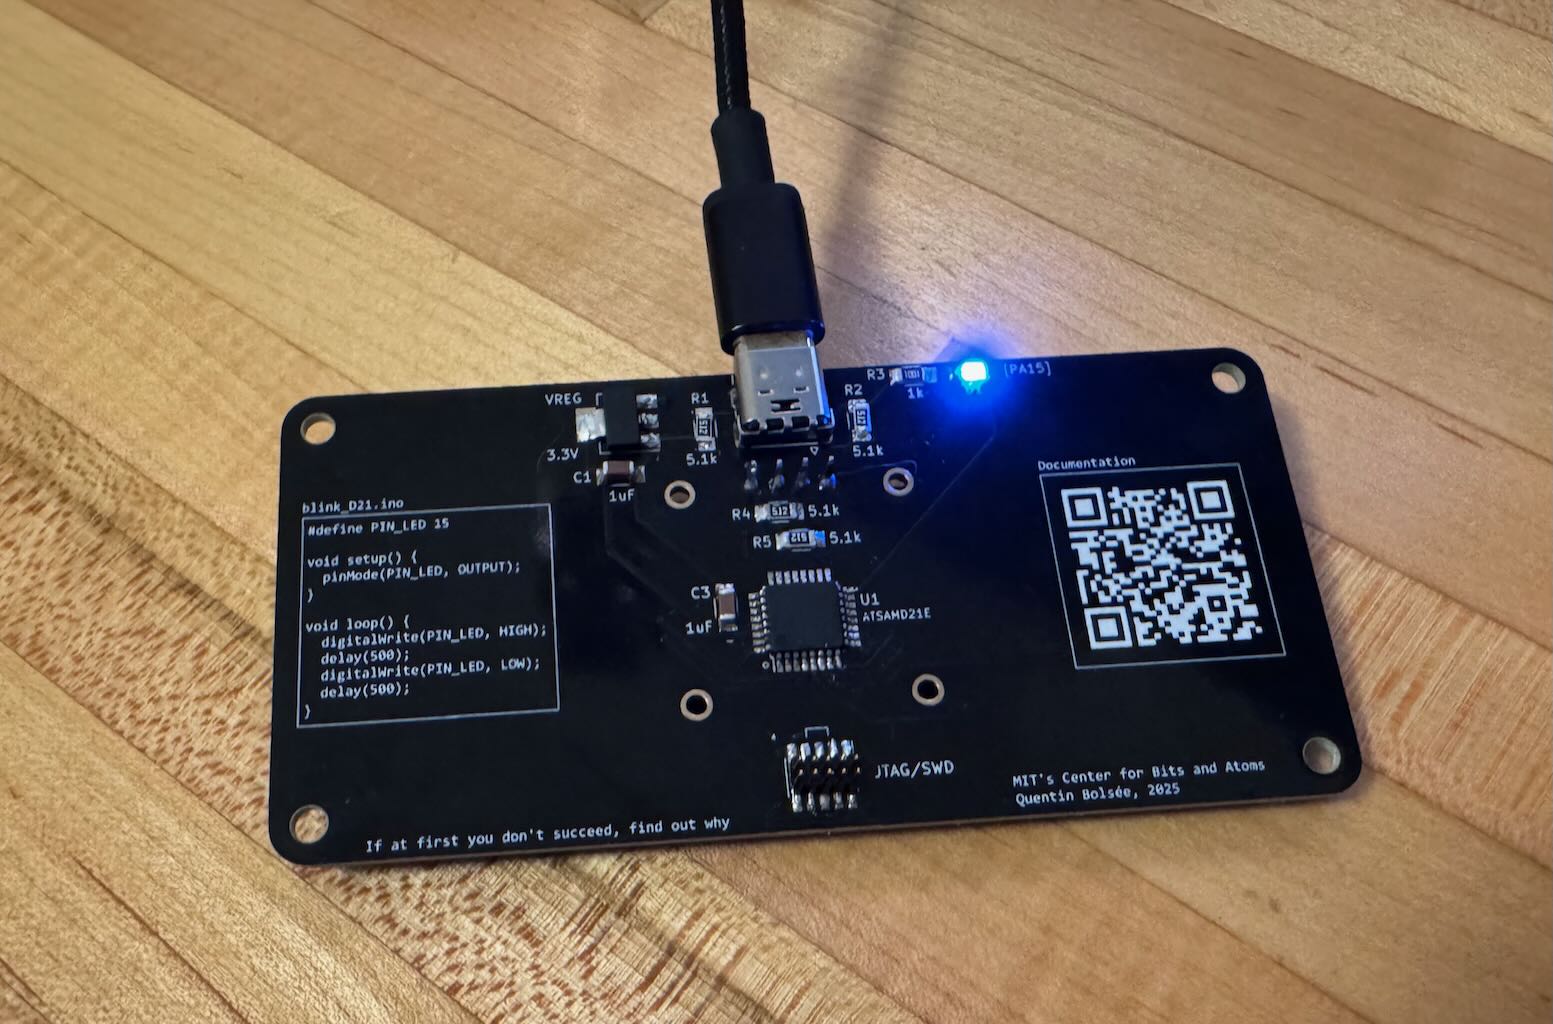
While I had some prior experience in soldering, I was never that good. I think the three hours I spent solding the Q-PAD 21 improved my soldering skills. Against well-cautioned advice, I choose to use the USB-C connector as I didn't want to use the micro USB. The hardest part was soldering the pins of the microcontroller. Neil showed me how to use the wick to remove excess solder. I mistakenly soldered the LCD backwards. Quentin helped me to desolder and also my debug a short in the microcontroller pins.
I used the Arduino IDE and programmed the completed circuit using existing arduino libraries which did all the heavy lifting. Alternatively, I looked into Thonny for MicroPython but would have to flash the board with Python bootloader. Here is my chat Gemini to help debug mostly import bugs. First, I tested with the starter code from the Q-PAD's QR code.
Hello World code
#include <Wire.h>
#include <Adafruit_GFX.h>
#include <Adafruit_SSD1306.h>

#define SCREEN_WIDTH 128
#define SCREEN_HEIGHT 64
#define SCREEN_ADDRESS 0x3C
#define PIN_LED 15

Adafruit_SSD1306 display(SCREEN_WIDTH, SCREEN_HEIGHT, &Wire, -1, 1000000UL, 1000000UL);

void setup() {
  // put your setup code here, to run once:
  pinMode(PIN_LED, OUTPUT);
  Serial.begin(0);
  display.begin(SSD1306_SWITCHCAPVCC, SCREEN_ADDRESS);
  display.clearDisplay();
  display.display();
  display.setTextSize(1);
  display.setTextColor(SSD1306_WHITE);
}

void loop() {
  // put your main code here, to run repeatedly:
  digitalWrite(PIN_LED, HIGH);
  delay(5000);
  digitalWrite(PIN_LED, LOW);
  delay(5000);
  display.clearDisplay();
  display.setCursor(28, 25);
  display.print("Hello wold");
  display.display();
}
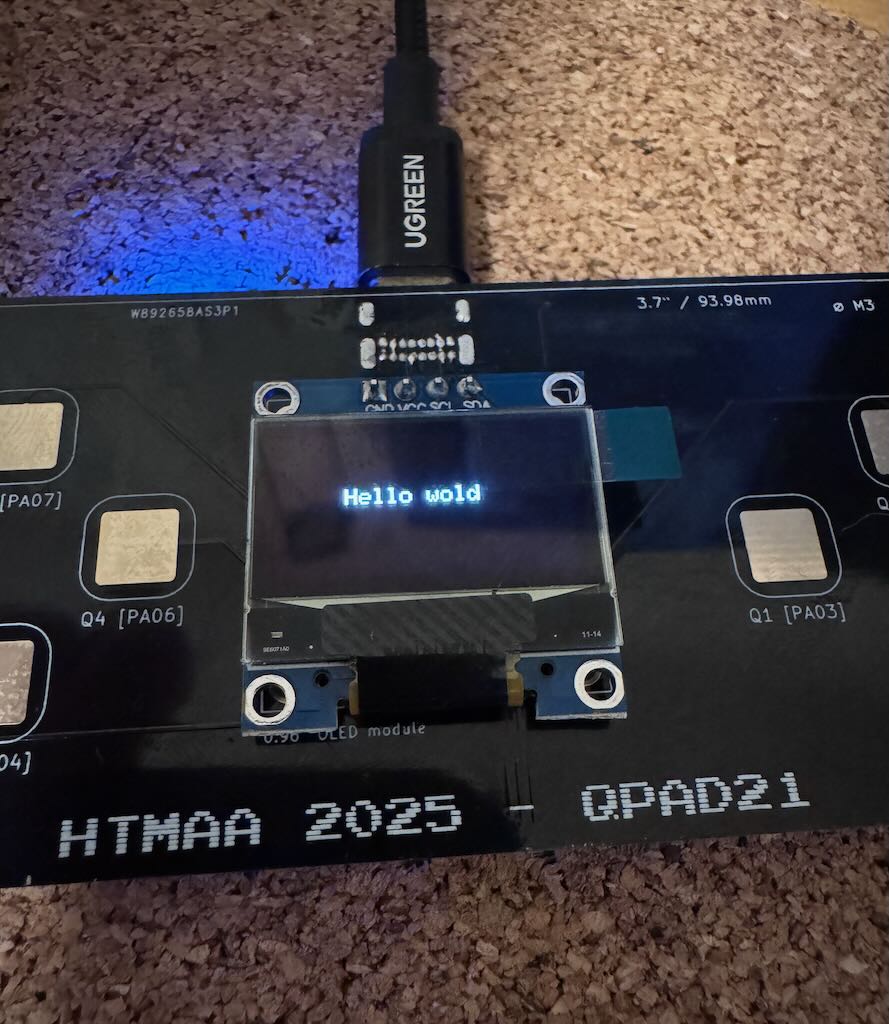
I then used Gemini to help create a mock menu for the OLED display. The Q-PAD is helpfully labelled with the order for each touch sensor on the board. I first tested by printing out to serial monitor before using the OLED display. I created some nested menus that should be useful for the final project where the display of the standing desk will provide critical options such as reseting the legs in the event of loss of synchronization. One issue I noticed was the menu program would only run when uploaded with the Arduino IDE and not work when connected to an external USB power supply. I tried a couple other programs. The blink program worked while the hello world program didn't, so I figure it was some issue with the OLED. Further investigation found that the display draws a higher voltage, so it has a internal charge pump components. On startup, rapidly charging these capacitors can create a volutage sag which resets the microcontroller. Simply adding a delay before initializing the display solves the issue.
Mock Menu code
#include <Wire.h>
#include <Adafruit_GFX.h>
#include <Adafruit_SSD1306.h>
#include "Adafruit_FreeTouch.h"

// --- Display Settings ---
#define SCREEN_WIDTH 128
#define SCREEN_HEIGHT 64
#define SCREEN_ADDRESS 0x3C
Adafruit_SSD1306 display(SCREEN_WIDTH, SCREEN_HEIGHT, &Wire, -1);

// --- Touch & Pin Settings ---
#define PIN_LED 15
#define N_TOUCH 6
#define THRESHOLD 500
#define BTN_B 0
#define BTN_A 1
#define BTN_DOWN 2
#define BTN_LEFT 3
#define BTN_RIGHT 4
#define BTN_UP 5


// --- Global Variables ---
uint8_t touch_pins[N_TOUCH] = {2, 3, 4, 5, 6, 7};
Adafruit_FreeTouch* touch_devices[N_TOUCH];
int touch_values[N_TOUCH] = {0};
bool pin_touched_now[N_TOUCH] = {false};
bool pin_touched_past[N_TOUCH] = {false};

// --- Menu Data Structures ---
struct Menu;
typedef struct {
  const char* name;
  void (*action)();
  struct Menu* subMenu;
} MenuItem;
typedef struct Menu {
  const char* title;
  const MenuItem* items;
  int numItems;
  struct Menu* parentMenu;
} Menu;

// --- Action Functions (Modified for OLED) ---
void actionRunLEDTest() {
  display.clearDisplay();
  display.setCursor(10, 25);
  display.print("Running LED Test...");
  display.display();

  digitalWrite(PIN_LED, HIGH);
  delay(1000);
  digitalWrite(PIN_LED, LOW);
  delay(1000);
}

void actionReadSensors() {
  display.clearDisplay();
  display.setCursor(0, 0);
  display.println("Sensor Values:");
  for (int i=0; i < N_TOUCH; i++) {
    char buffer[20];
    sprintf(buffer, "S%d: %d", i, touch_values[i]);
    display.println(buffer);
  }
  display.display();
  delay(2500); // Show values for 2.5 seconds
}

void actionPlaceholder() {
  display.clearDisplay();
  display.setCursor(10, 25);
  display.print("Option selected!");
  display.display();
  delay(1500);
}

// --- Define Menu Hierarchy ---
extern Menu mainMenu;
extern Menu testsMenu;
extern Menu nested1Menu;
extern Menu nested2Menu;

const MenuItem testsMenuItems[] = {
  {"Run LED Test", actionRunLEDTest, NULL},
  {"Read All Sensors", actionReadSensors, NULL}
};
Menu testsMenu = {"--- All Tests ---", testsMenuItems, 2, &mainMenu};

const MenuItem nested1MenuItems[] = {
  {"Nested Option 1", NULL, &nested2Menu},
  {"Nested Option 2", actionPlaceholder, NULL},
  {"Nested Option 3", actionPlaceholder, NULL},
  {"Nested Option 4", actionPlaceholder, NULL},
};
Menu nested1Menu = {"*** Nested 1 Menu***", nested1MenuItems, 4, &mainMenu};

const MenuItem nested2MenuItems[] = {
  {"Nested Option 1", actionPlaceholder, NULL},
  {"Nested Option 2", actionPlaceholder, NULL},
};
Menu nested2Menu = {"+++ Nested 2 Menu +++", nested2MenuItems, 2, &nested1Menu};

const MenuItem mainMenuItems[] = {
  {"Run Tests", NULL, &testsMenu},
  {"Option 1", NULL, &nested1Menu},
  {"Option 2", actionPlaceholder, NULL},
  {"Option 3", actionPlaceholder, NULL}
};
Menu mainMenu = {"#==== Main Menu ====#", mainMenuItems, 4, NULL};

// --- Menu State and Logic ---
Menu* currentMenu;
int cursorPosition = 0;

// NEW: This function now draws to the OLED instead of Serial
void drawMenu() {
  display.clearDisplay();
  display.setTextSize(1);
  display.setTextColor(SSD1306_WHITE);

  // Draw the title
  display.setCursor(0, 0);
  display.println(currentMenu->title);
  display.drawFastHLine(0, 10, SCREEN_WIDTH, SSD1306_WHITE);

  // Draw the menu items
  for (int i = 0; i < currentMenu->numItems; i++) {
    // Set Y position for each item, with 10 pixels per line
    display.setCursor(0, 15 + (i * 10));

    if (i == cursorPosition) {
      display.print("> ");
    } else {
      display.print("  ");
    }
    display.print(currentMenu->items[i].name);
  }

  display.display(); // Push buffer to the screen
}

void handleInput() {
  bool menuStateChanged = false;

  // --- UP ---
  if (pin_touched_now[BTN_UP] && !pin_touched_past[BTN_UP]) {
    cursorPosition = (cursorPosition > 0) ? cursorPosition - 1 : currentMenu->numItems - 1;
    menuStateChanged = true;
  }
  // --- DOWN ---
  if (pin_touched_now[BTN_DOWN] && !pin_touched_past[BTN_DOWN]) {
    cursorPosition = (cursorPosition < currentMenu->numItems - 1) ? cursorPosition + 1 : 0;
    menuStateChanged = true;
  }
  // --- SELECT (A or RIGHT) ---
  if ((pin_touched_now[BTN_A] && !pin_touched_past[BTN_A]) || (pin_touched_now[BTN_RIGHT] && !pin_touched_past[BTN_RIGHT])) {
    MenuItem selectedItem = currentMenu->items[cursorPosition];
    if (selectedItem.action) {
      selectedItem.action();
      menuStateChanged = true; // Redraw menu after action
    }
    if (selectedItem.subMenu) {
      currentMenu = selectedItem.subMenu;
      cursorPosition = 0;
      menuStateChanged = true;
    }
  }
  // --- BACK (B or LEFT) ---
  if ((pin_touched_now[BTN_B] && !pin_touched_past[BTN_B]) || (pin_touched_now[BTN_LEFT] && !pin_touched_past[BTN_LEFT])) {
    if (currentMenu->parentMenu) {
      currentMenu = currentMenu->parentMenu;
      cursorPosition = 0;
      menuStateChanged = true;
    }
  }

  if (menuStateChanged) {
    drawMenu();
  }
}

void update_touch() {
  Ptc *ptc = ((Ptc *)PTC);
  for (int i = 0; i < N_TOUCH; i++) {
    touch_devices[i]->begin();
    touch_values[i] = touch_devices[i]->measure();
    ptc->CTRLA.bit.ENABLE = 0;
    ptc->CTRLA.bit.SWRESET = 1;
    pin_touched_past[i] = pin_touched_now[i];
    pin_touched_now[i] = touch_values[i] > THRESHOLD;
  }
}

void setup() {
  // Fixes inrush current for OLED by letting power stabilize
  delay(100);

  Serial.begin(115200);

  // Initialize display
  if(!display.begin(SSD1306_SWITCHCAPVCC, SCREEN_ADDRESS)) {
    Serial.println(F("SSD1306 allocation failed"));
    for(;;);
  }

  // Initialize touch peripherals
  for (int i = 0; i < N_TOUCH; i++) {
    touch_devices[i] = new Adafruit_FreeTouch(touch_pins[i], OVERSAMPLE_1, RESISTOR_100K, FREQ_MODE_NONE);
  }

  pinMode(PIN_LED, OUTPUT);

  // Initialize the menu system
  currentMenu = &mainMenu;
  drawMenu(); // Draw the initial menu screen
}

void loop() {
  update_touch();
  handleInput();
  delay(50);
}
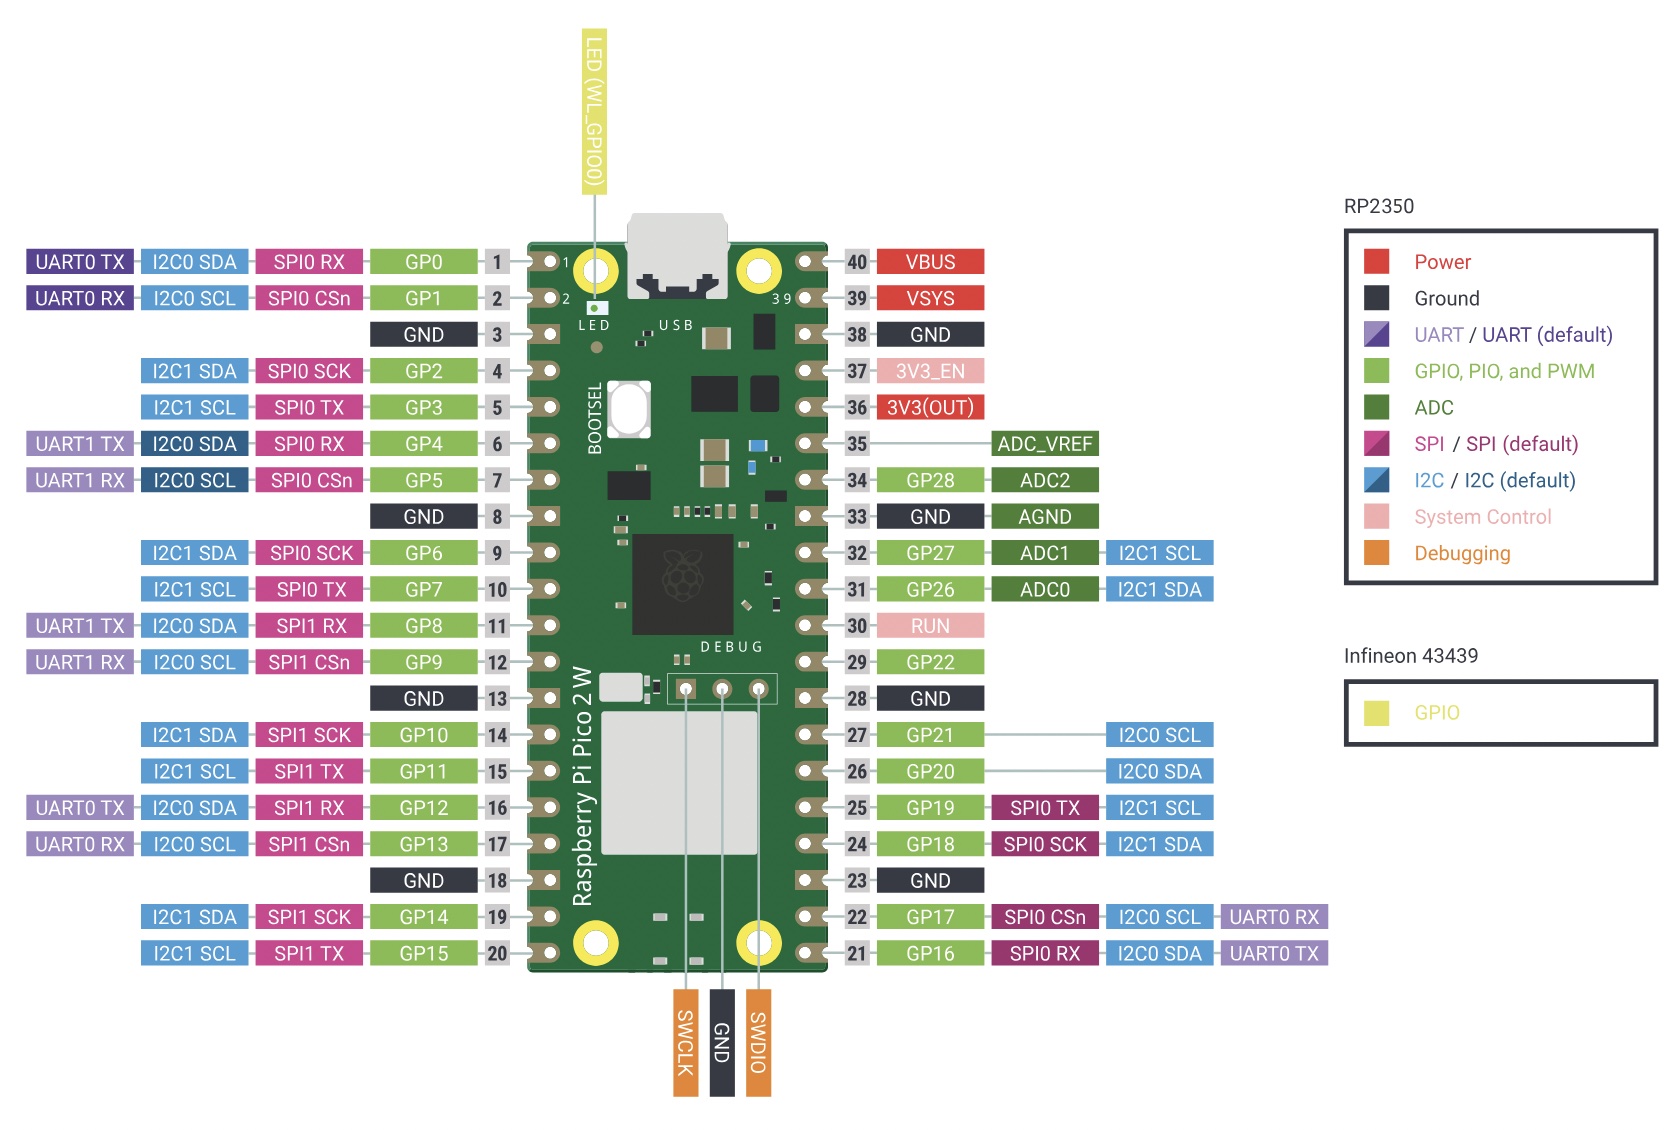
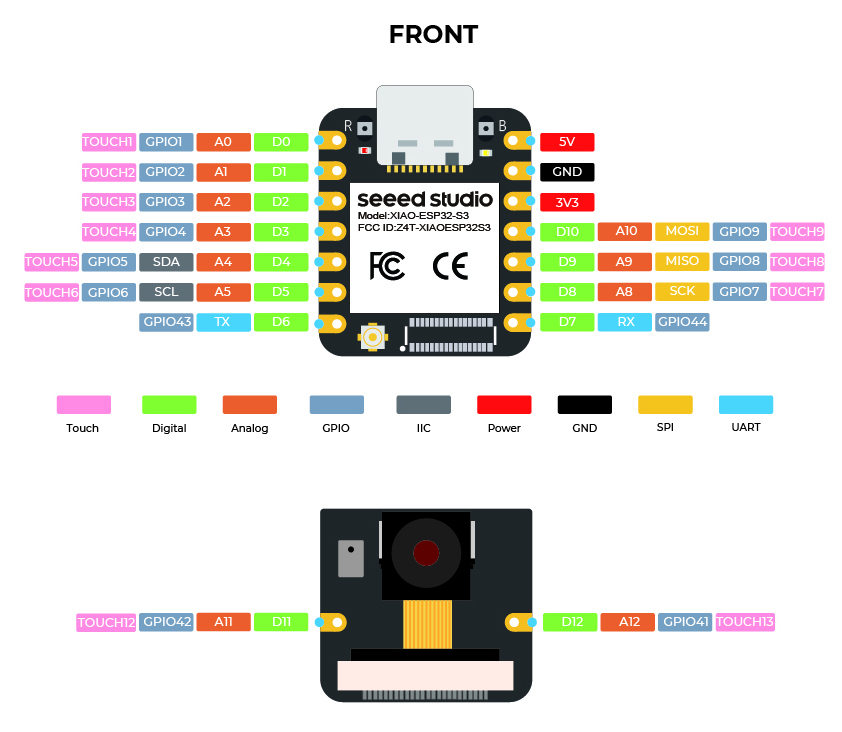
Part II: Raspberry Pi Pico 2 ESP32-S3 Datasheet
I read the datasheet for the Pi Pico 2 W, which is likely what I'll use for my final project. The Pico 2 uses the RP2350 microcontroller. The toolchain for Pi Pico series seems to promote MicroPython as default according to this guide. Since my background is in machine learning, I am comfortable with Python so it will be interesting to play around with embedded programming libraries.
Upon further consideration, I decided to switch to the XIAO ESP32-S3 Sense for my final project since it has better performance and support for ML applications (e.g. face tracking in video) and comes with camera, microphone, WiFi, Bluetooth, and support for MicroSD memory card.