Week 9: Output Devices
Part I: Cat Counter Couter-measure Device
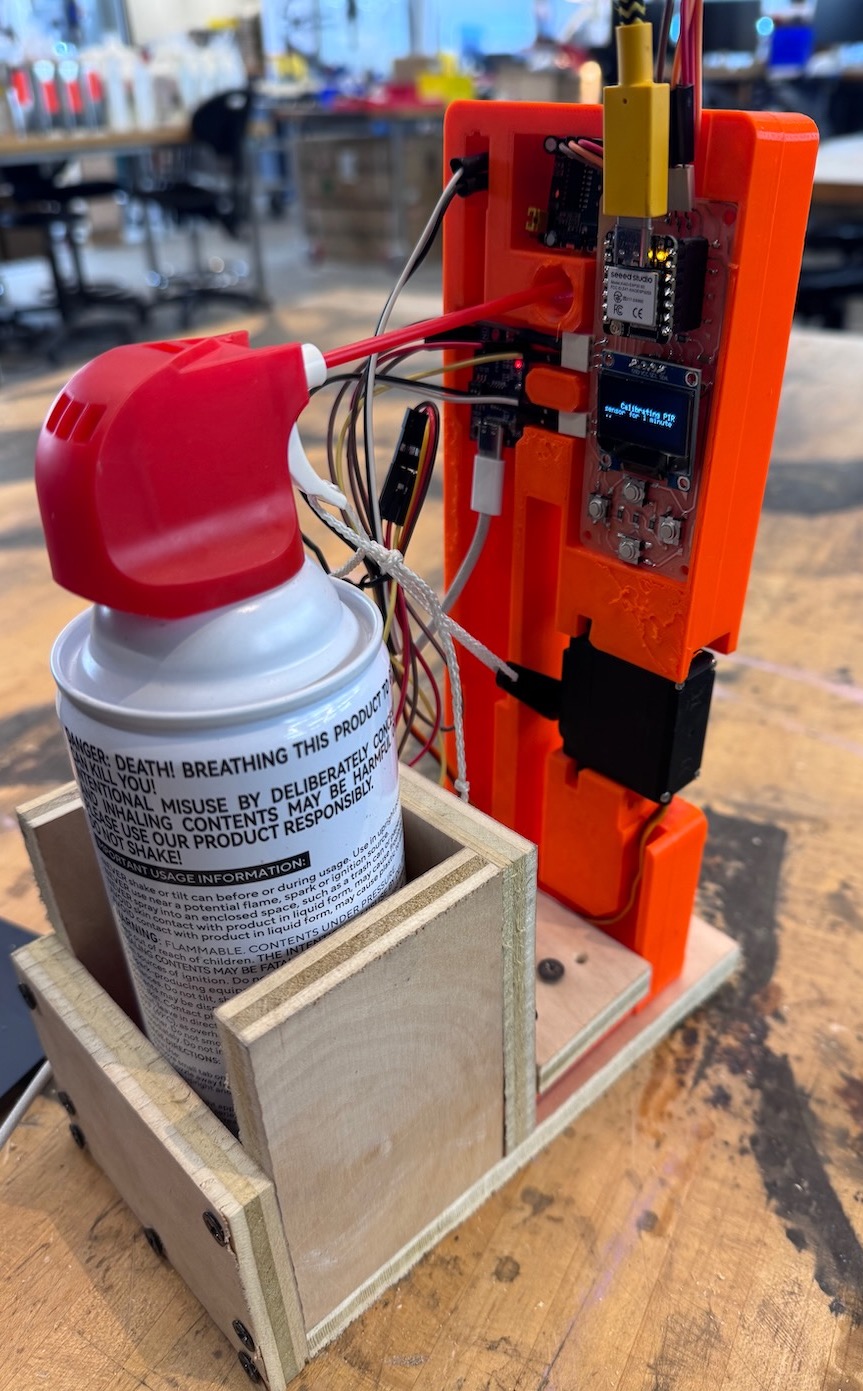
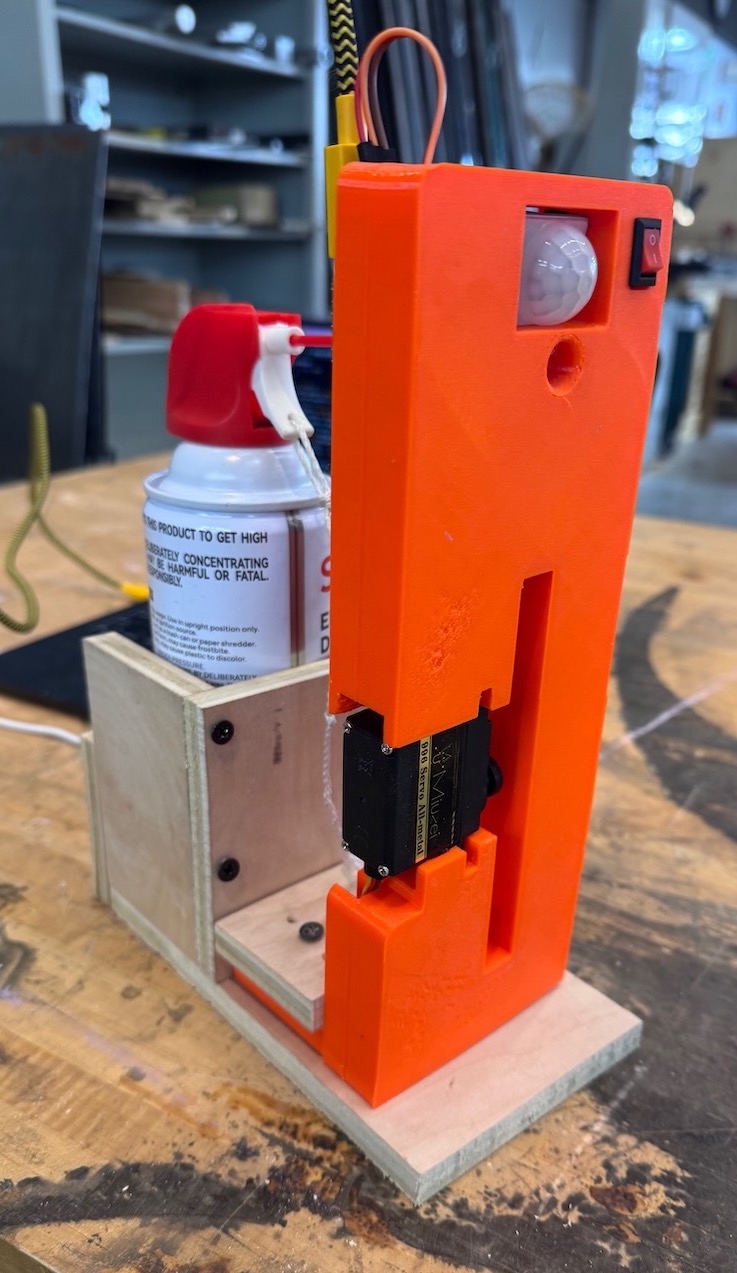
For this week, I wanted to build a device that would deter my two cats (named \(\pi\) and \(\tau\)) from going on my kitchen counter while I am away or asleep. Amazon sells these motion sensing pet spray deterrent compressed, which are very expensive so I thought I could recreate my own version using compressed air can and a servo motor triggered by a HC-SR501 PIR motion sensor.
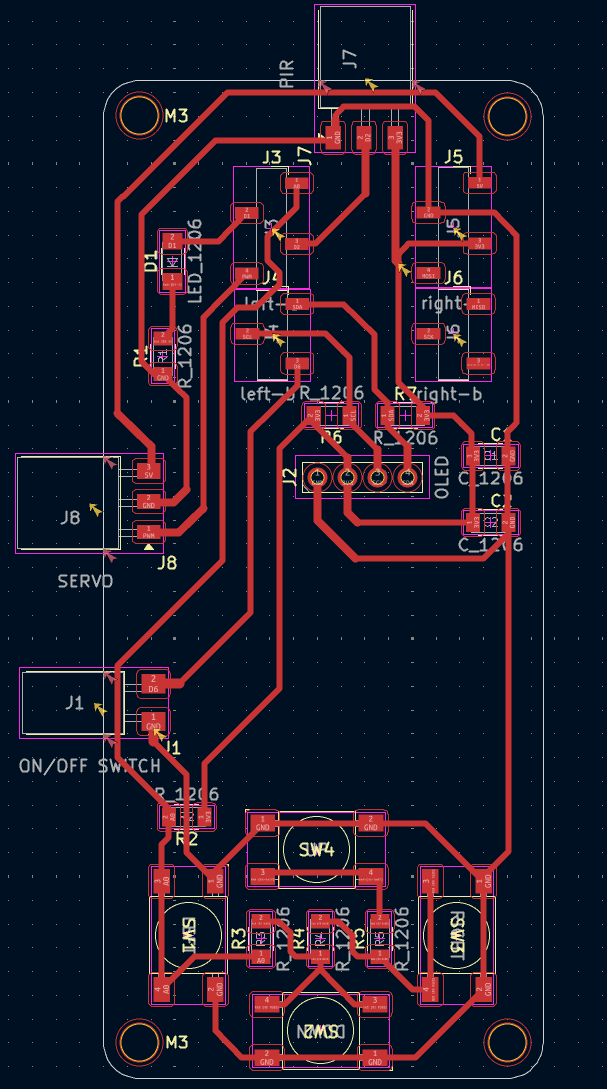
Tektronix PS280 I designed the XIAO ESP32S3-based PCB to have two output devices (OLED and MG995 Servo Motor), PIR motion sensor, four buttons, an LED and an on/off toggle switch to disable the device when not in use. I met with Anthony to check the schematics and he pointed out that I needed pull-up resistors on the SDA and SCL lines of the OLED display as the onboard pull-up resistors of the ESP32 are too weak for high speed I2C communication protocol. Also, I connected four buttons to one analog pin using a resister ladder with help from this tutorial. Here is the final PCB layout.
Milling the first board, there was little stock left so I had to use large piece of double sided copper (later I discovered that using larger piece are more prone to cupping/warping that led to several milling defects).
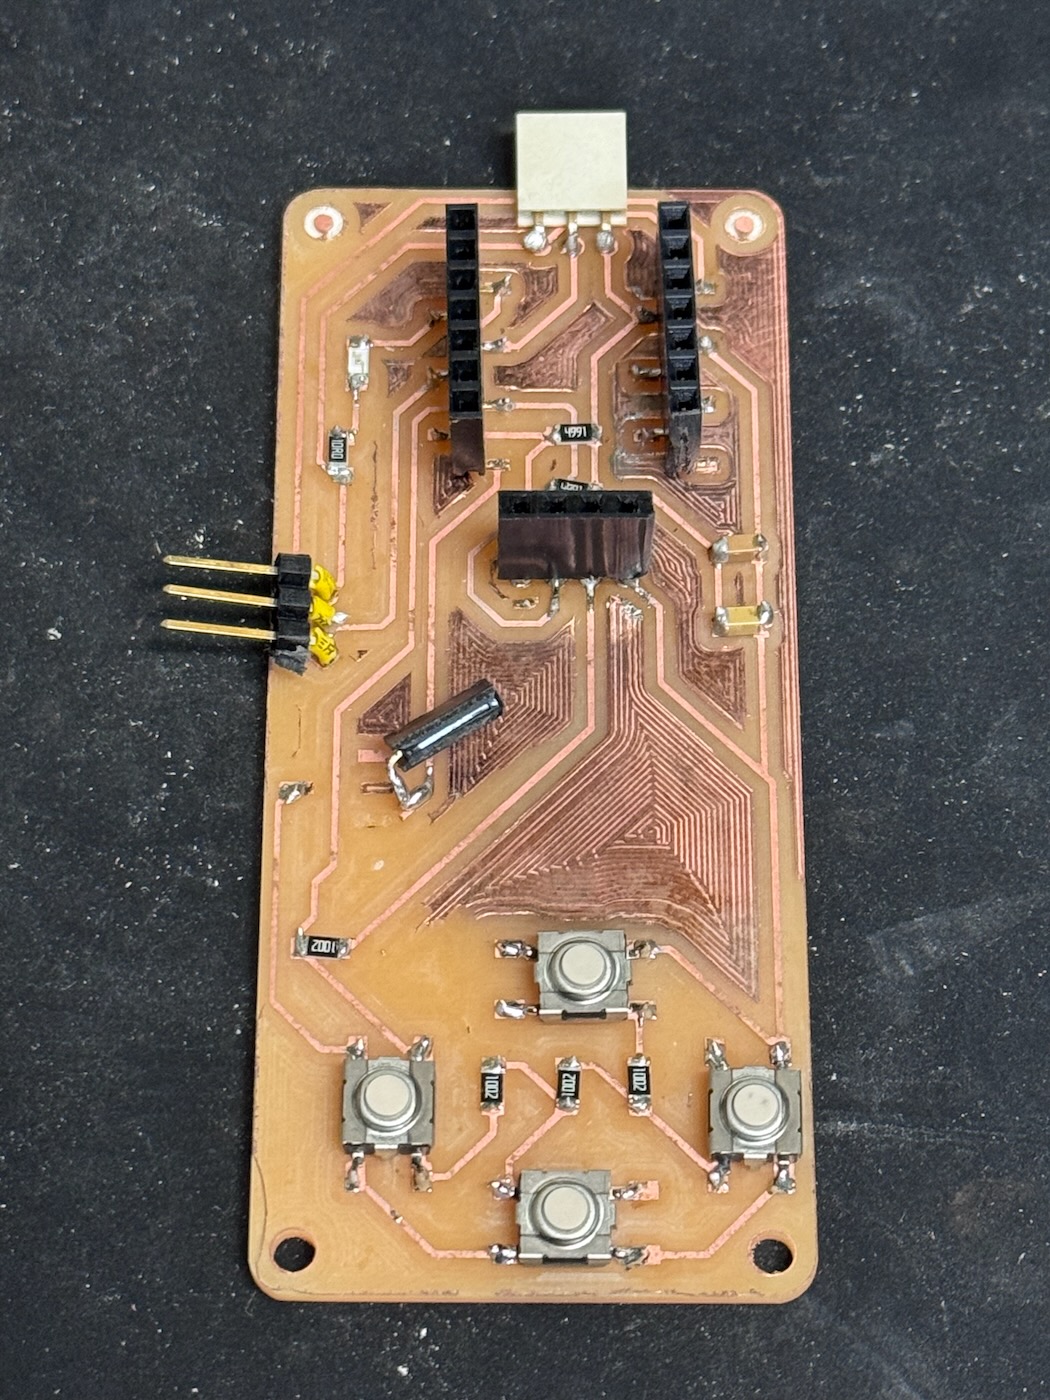
I soldered everything on and was met several bugs/weird behavoirs. First the LED didn't work (testing with multimeter seemed fine); second, the OLED display serial monitor gave SPI error about check the pull-up resistors, the PIR sensor would work erratically/unreliably. Initially, I thought this was a power supply issue as the servo would consume too much power. I tested continuity and did not find any shorts. I then tried to isolate the problem by testing each component separately. Connecting the PIR sensor directly to the XIAO ESP32 seemed to work correctly and using the variable DC power supply, I was able to drive the servo motor with 5V and around 0.2-0.4 amps of current.
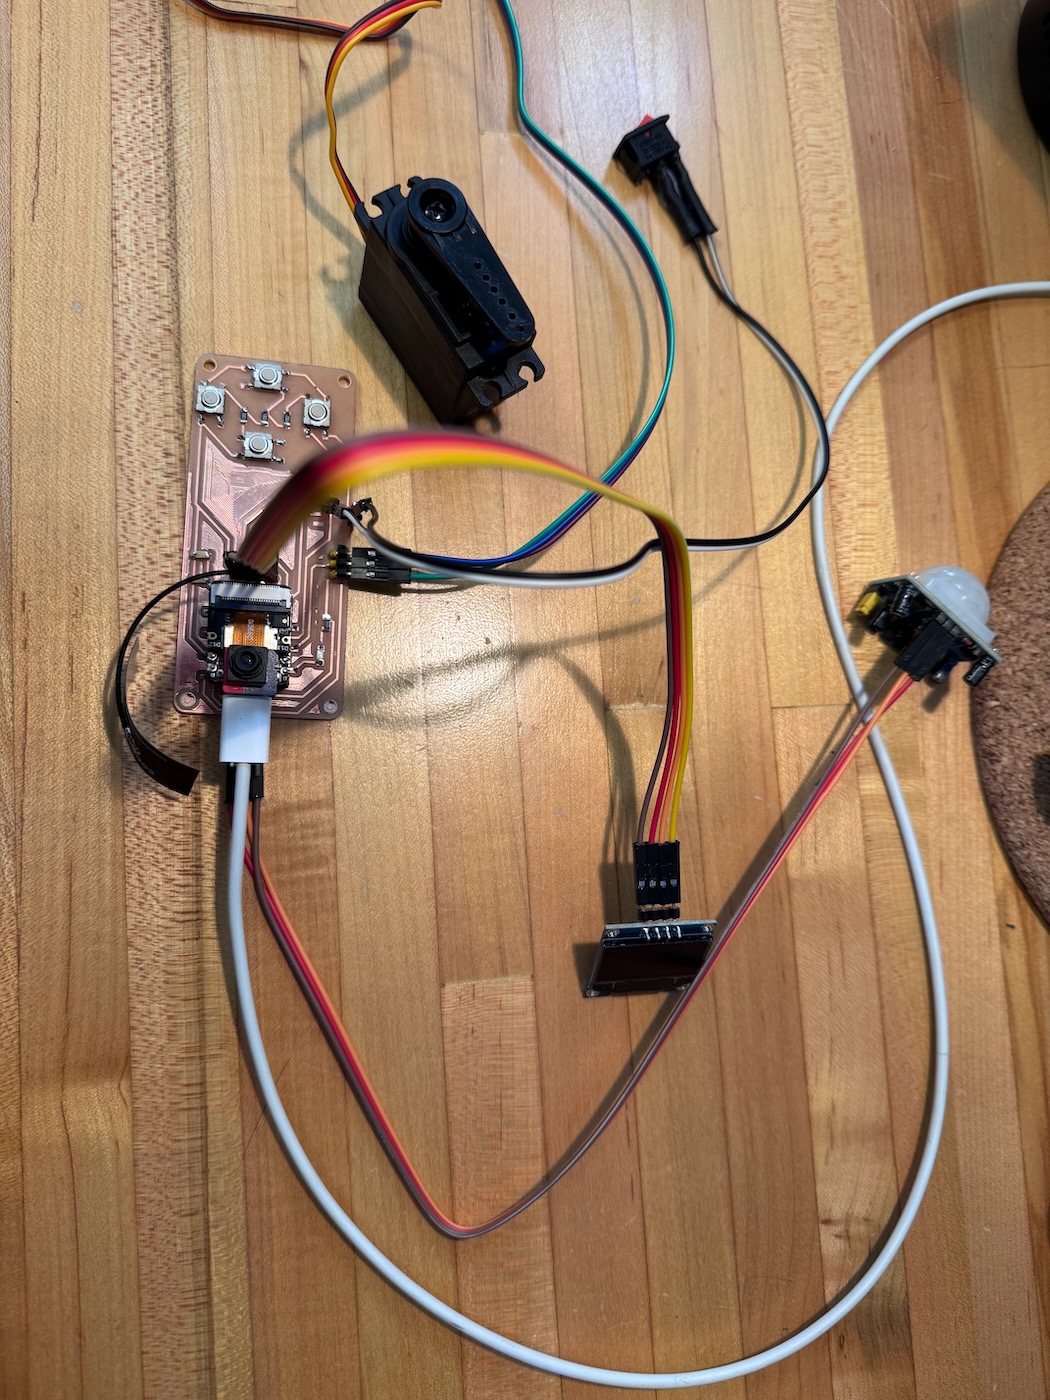
Talking to Quentin, he pointed out the OLED display getting really hot was abnormal -- checking the traces again in Ki-CAD, I realized I wired the 3.3V and GND the wrong way causing most of the issues. I milled out a second improved board with larger traces, used a smaller stock to avoid the milling artifacts, and changed the pin headers to vertical sockets. After soldering the second board and using an external power supply with the USB-C breakout power board, I was able to correctly implement the motion-triggered servo functionality. Although I still could not figure out how to power the servo motor with only the XIAO ESP32 5V without external USB-C power and ended up bricking two XIAO ESP32 in the process (pressing the boot button did not fix them).
Part II: 3D printing the device
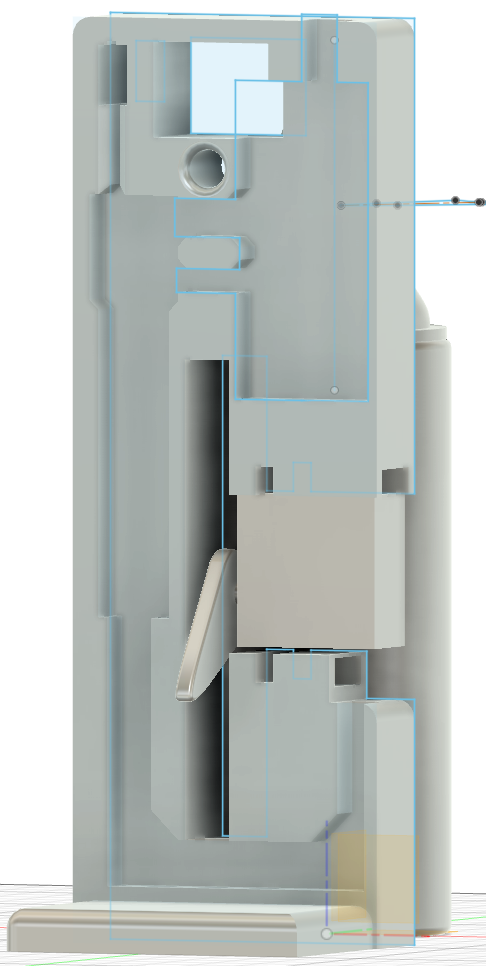
After getting the PIR input and controlling the servo output working, I decided to model the rest of the device in Fusion. I measured the compressed air cannister and the sizes all the other components (PCB, servo, PIR) and created a simple device with cutouts for all the parts and wires. Initially, I made a hole for the string for the servo to pull the trigger of the air can but I realized later that the trigger motion is really a downward one so I ended up placing the air can behind the device in the final version (see pictures below). Here are the CAD files
Here is the CAD file.
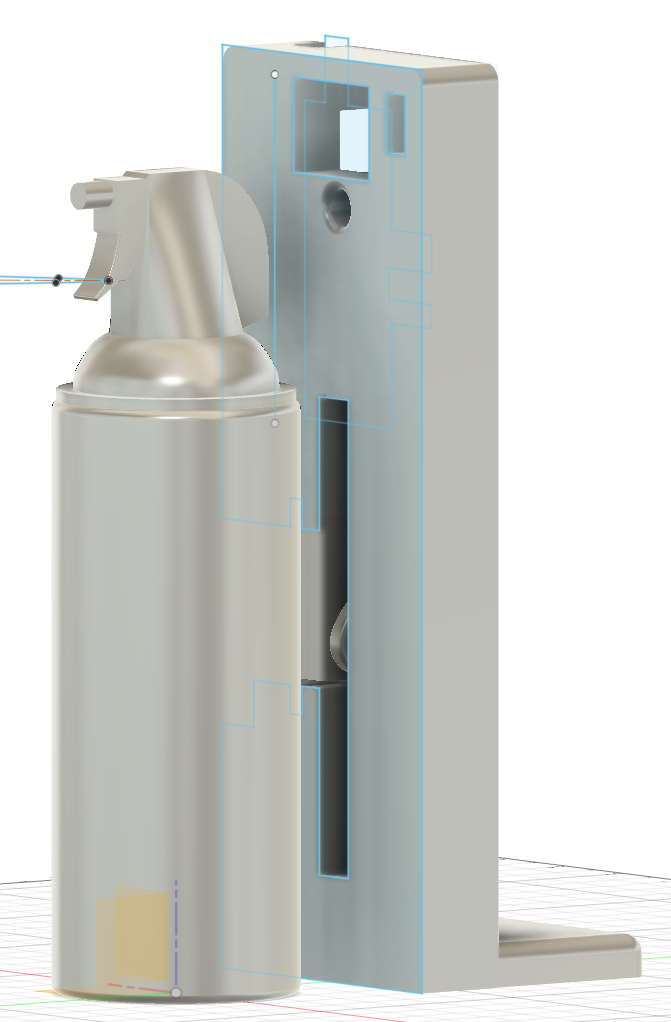
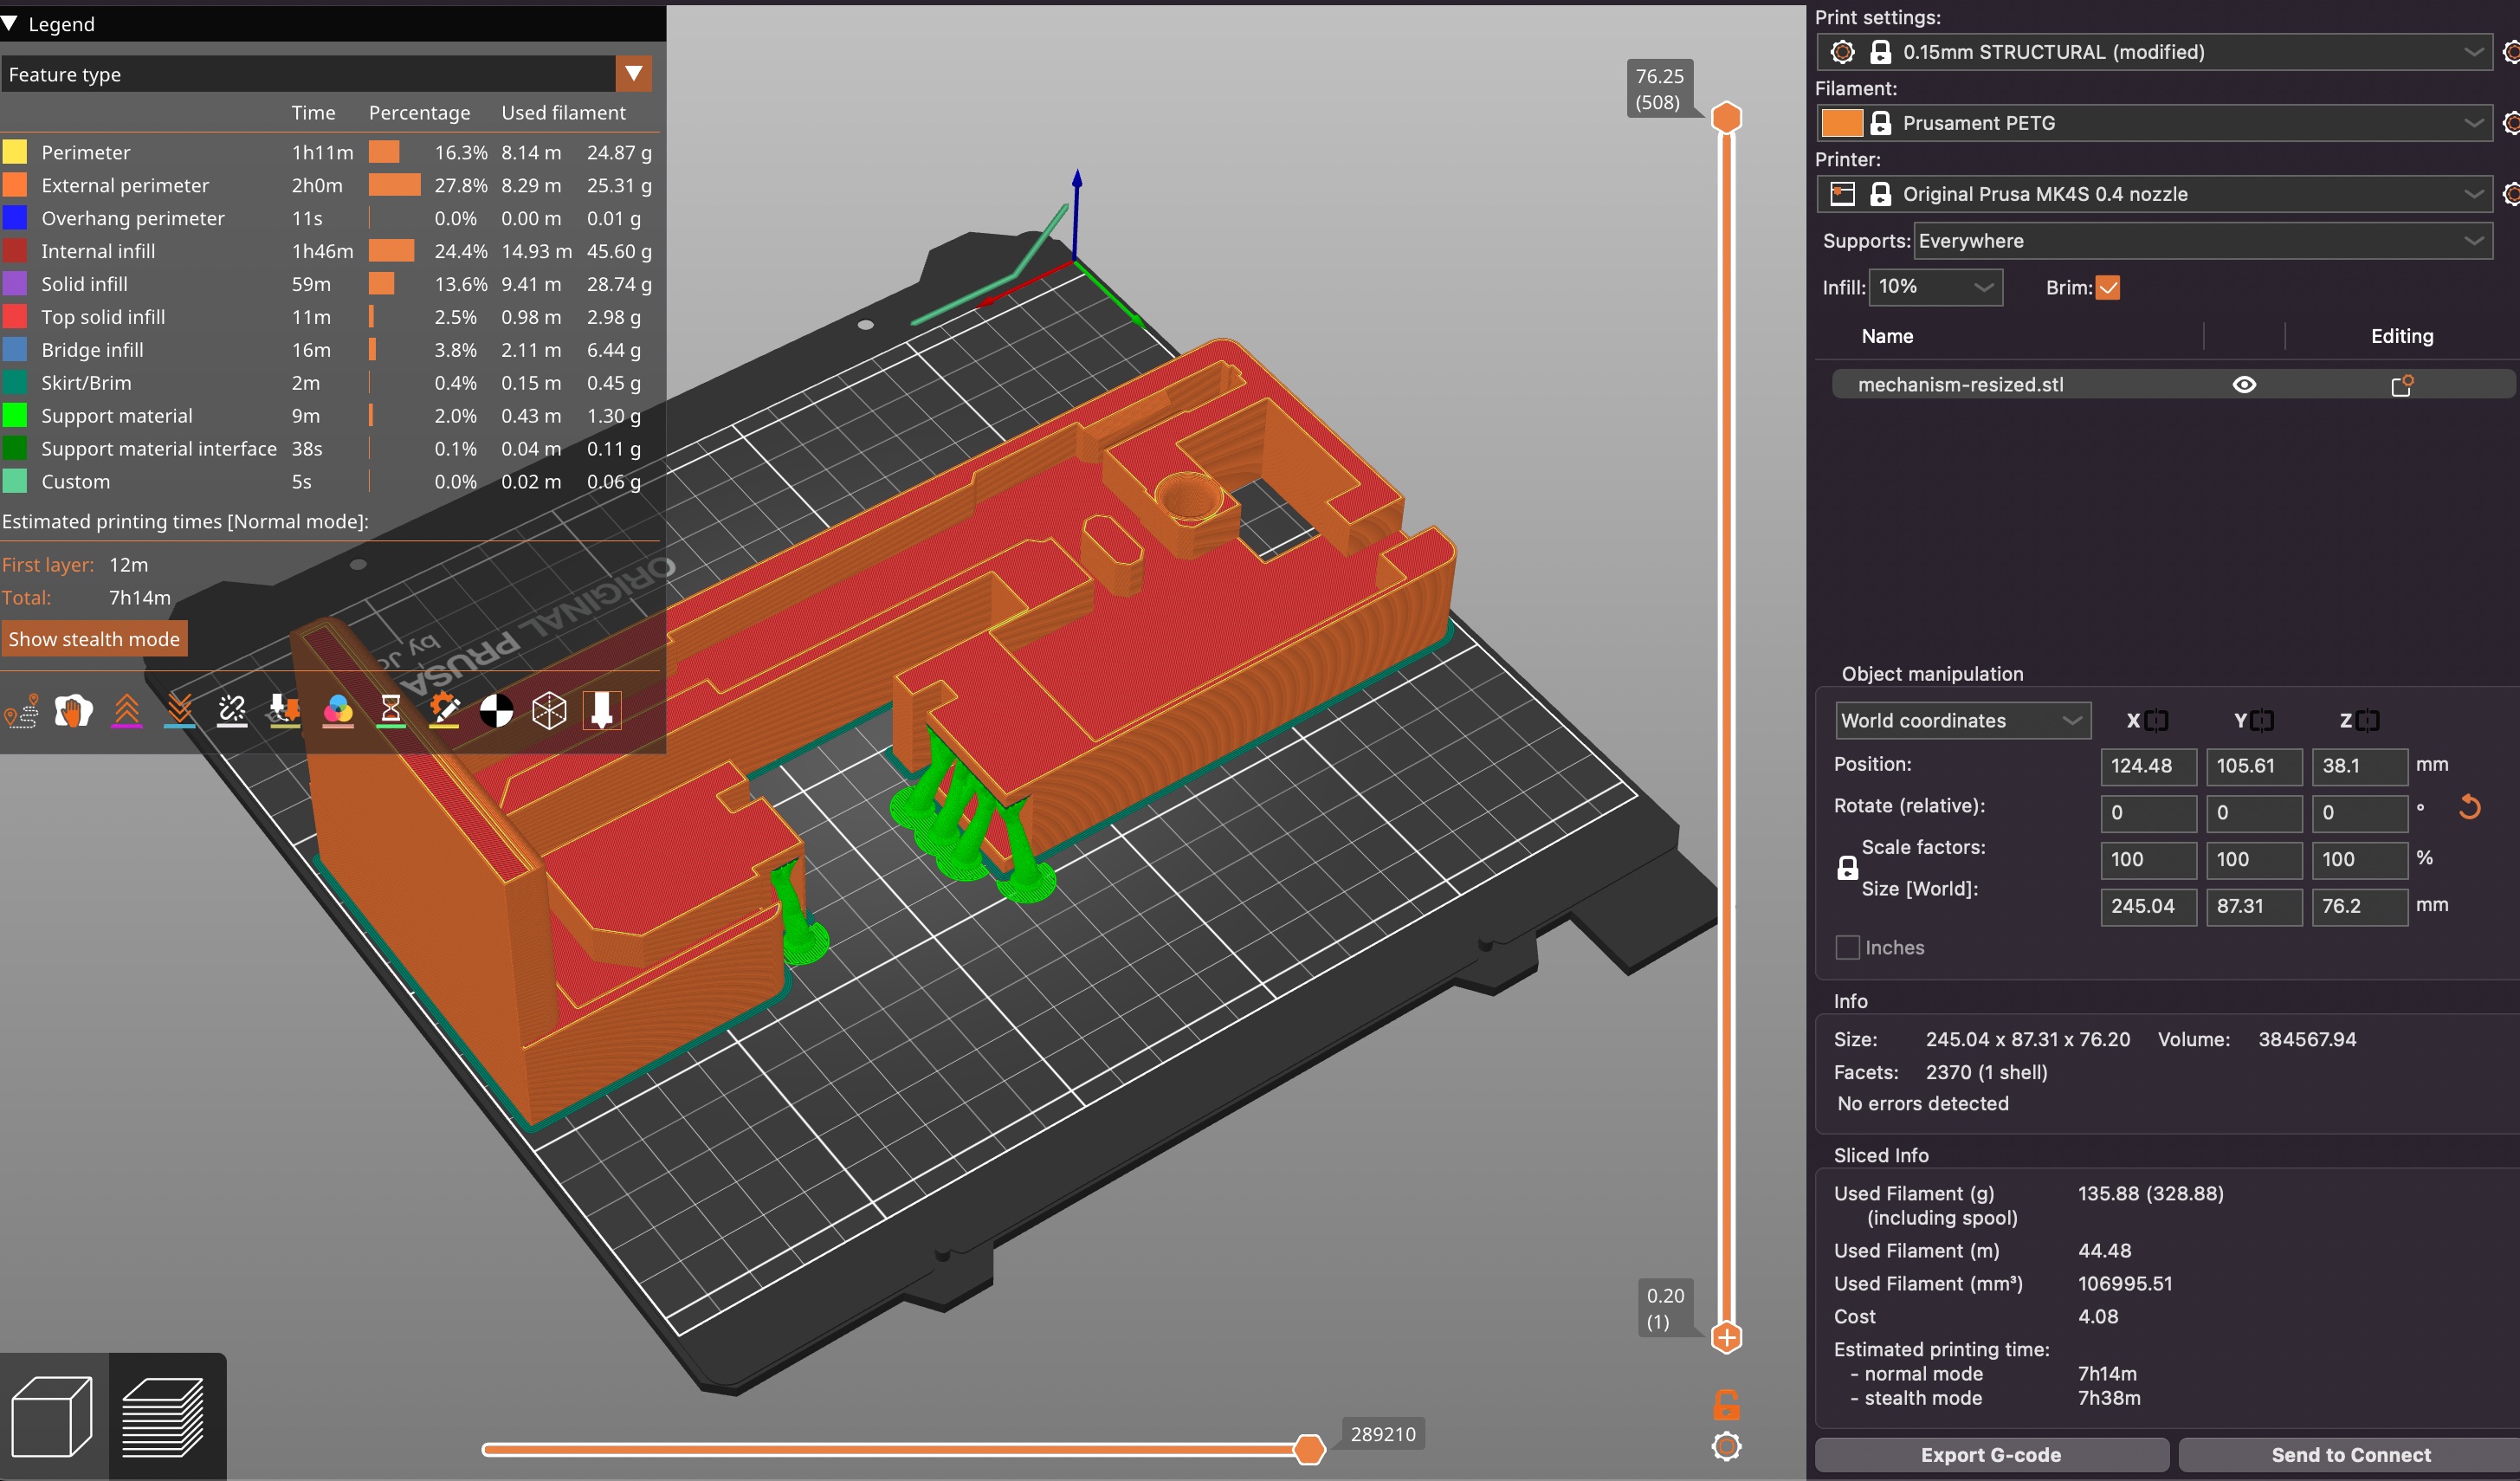
It ended out taking around 7 hours to print the housing with PETG filament and 10\% percent infill. To house the air can and mount the device, I cut some scrap wood with the bandsaw and used wood screws to secure all the pieces.
Part III: Building the mechanism and programming device
Programming the controller was relatively straightforward. First I wait for the PIR to calibrate for one minute before beggining the control loop. When the toggle switch is on, the PIR sensor triggers the servo motor to pull the string, which is attached to the trigger of the air cannister before rotating back to the start position (75 degrees in this case). I also added a manual mode when the ON/OFF switch is toggled that allows the servo to be controlled by the buttons.
Counter Cat Counter Code
#include <ESP32Servo.h>
#include <Wire.h>
#include <Adafruit_GFX.h>
#include <Adafruit_SSD1306.h>

#define SCREEN_WIDTH 128
#define SCREEN_HEIGHT 64
#define SCREEN_ADDRESS 0x3C

Servo servo;

const int ANALOG_PIN = A0;
const int led_pin = D1;
const int pir_pin = D2;
const int servo_pin = D3;
const int ON_OFF_PIN = D6;

int on_off_switch = HIGH;
int pir_state = LOW;
int last_pir_state = LOW;


Adafruit_SSD1306 display(SCREEN_WIDTH, SCREEN_HEIGHT, &Wire, -1, 1000000UL, 1000000UL);

void setup() {
  Serial.begin(115200);

  servo.attach(servo_pin); // D3
  pinMode(pir_pin, INPUT);
  pinMode(pir_pin, INPUT_PULLDOWN);
  pinMode(ANALOG_PIN, INPUT);
  pinMode(led_pin, OUTPUT);
  pinMode(LED_BUILTIN, OUTPUT);
  digitalWrite(led_pin, LOW);
  digitalWrite(LED_BUILTIN, LOW);
  pinMode(ON_OFF_PIN, INPUT_PULLUP);

  display.begin(SSD1306_SWITCHCAPVCC, SCREEN_ADDRESS);
  display.clearDisplay();
  display.display();
  display.setTextSize(1);
  display.setTextColor(SSD1306_WHITE);

  show("Calibrating PIR sensor for 1 minute");
  for (int j = 0; j < 12; j ++ ) {
    delay(5000);
    Serial.print(".");
    display.print(".");
    display.display();
  }
  show("Sensor ready");
}

void show(String text) {
  Serial.println(text);
  display.clearDisplay();
  display.setCursor(28, 25);
  display.println(text);
  display.display();
}

int getButton() {
  int x = analogRead(ANALOG_PIN);
  int ret = 0; // DEFAULT NO BUTTON PRESSED
  if (0 <= x && x < 200) {
    ret = 1; // LEFT BUTTON PRESSED
  } else if (1800 <= x && x < 2000) {
    ret = 2; // DOWN BUTTON PRESSED
  } else if (2400 <= x && x < 2700) {
    ret = 3; // RIGHT BUTTON PRESSED
  } else if (2800 <= x && x < 3000) {
    ret = 4; // UP BUTTON PRESSED
  } else {
    ret = x;
  }
  return ret;
}

void loop() {
  on_off_switch = digitalRead(ON_OFF_PIN);
  if (on_off_switch == LOW) {
    // show("Switch on");
    pir_state = digitalRead(pir_pin);
    if (pir_state != last_pir_state){
      if (pir_state == HIGH){
        show("Motion detected");
        digitalWrite(led_pin, HIGH);
        digitalWrite(LED_BUILTIN, HIGH);
        servo.write(0);  // press trigger to turn air on
        delay(500);  // add half second delay to allow servo time to move
        servo.write(75); // depress trigger to turn air off
      } else {
        show("Motion stopped");
        digitalWrite(led_pin, LOW);
        digitalWrite(LED_BUILTIN, LOW);
      }
      last_pir_state = pir_state;
    }
  } else {
    show("Switch off");
    int button_val = getButton();
    show(String(button_val));
    if (button_val == 1) {
      servo.write(75);  // left
    } else if (button_val == 2) {
      servo.write(0); // down
    } else if (button_val == 3) {
      servo.write(75);  // right
    } else if (button_val == 4) {
      servo.write(75);  // up
    } else {
      // do nothing
    }
  }
  delay(200); // debouce
}