HTMAA 25
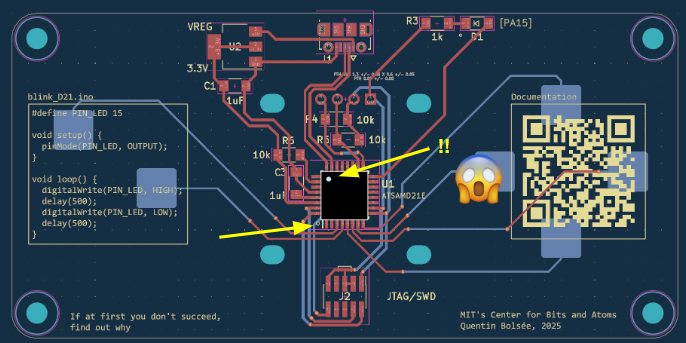
home about me final projectThis week we did embedded programming on QPAD boards developed by Quentin, one of the course TAs. I used the QPAD21 design with an ATSAMD21E18 microprocessor and USB-C adapter.
We talked about and compared a few different boards, languages, and tools. Here is the documentation.
I began with soldering the microprocessor using the solder paste + heatgun method demonstrated by Anthony. This was incredibly successful, up til I realized I’d put the chip on in the wrong orientation and had to heatgun it off. I had been too distracted by soldering to remember to take photos, so here’s google drawings reenactment:
Upon fixing it, I had a strange combination of many solder bridges and not enough solder, but I slunk back to fix this with my soldering iron, which I was more proficient in using.
The resistors and other solder pad components went on uneventfully.
I learnt another new method for soldering the USB-C connector, which had pins that didn’t go through the board. For this, I first started by fixing the connector in place with solder on the back side of the board, before flipping it to the front side and then applying flux to the holes the pins would have come out of, had they been long enough. When hot solder is applied, the flux evaporates and draws the solder into the holes to the pins. I think my connection might have ended up a little faulty, since sometimes the USB-C doesn’t connect immediately and requires a few wiggles.
A wonderful TA helped me flash the bootloader and an example program.
My first plan of action was to just flash small snippets of code to get comfortable with how the board and touchpads worked. This failed almost immediately when I failed to commit a “Hello World” program to the board - no matter which port I plugged it into, my Arduino IDE could not recognize or find the board. Fearing this was an issue with the bootloader or with my soldering, I dropped by the EDS lab for help.
Anthony quickly managed to determine that my trusty USB-A to USB-C line did not seem to have a data line integrated. Switching out the cable fixed the issue perfectly. I’ve been told this is an unusual problem for USB-C cables.
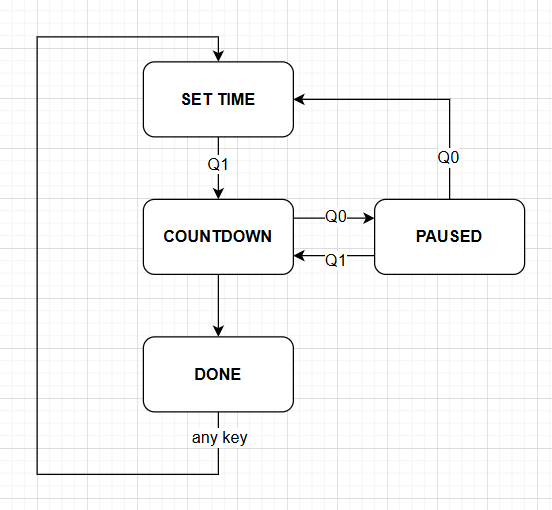
The up-down-left-right buttons and the two buttons on the side gave me the idea of creating a timer, with the directional buttons for setting time and the other two buttons for start and pause/cancel.
The timer program would transition through several states:
The state transition diagram is shown below:
I took the touchpad and display initialization code from this repo. I then added the additional quality of life improvements to help with the touchpad:
// defining the touchpad indices in the touch_pins array
#define UP 5
#define DOWN 2
#define LEFT 3
#define RIGHT 4
#define A 1
#define B 0

// func to check if a button has just been lifted
bool pressed(int button) {
  return pin_touched_past[button] && !pin_touched_now[button];
}
As well as refactoring the example text-writing into a useful:
void write_text(char* s, int size, int x, int y) {
  display.setTextSize(size);
  display.setCursor(x, y);
  display.print(s);
}The current state of the program is kept in a global variable called prog_state. It’s kept track of with the following macro/enum defined at the top of the page:
// program states
#define SET_TIME 0
#define COUNTDOWN 1
#define PAUSE 2
#define DONE 3
The SET_TIME screen needs to keep track of the user’s selected digit as well.
int selected_digit = 4; // mm:ssNext, we need to keep track of the timer. This comes in three flavours, all of which represent seconds.
set_time is the time last set by the user. We want to return to this as a default when the timer is done or when the execution is cancelled, so that the user can set the same timer again. This seems like good UI.show_time is the time shown on the screen.start_time is more special. I want to calculate show_time based on the time elapsed since the user clicked start, to minimize error from weird calculation methods, but since the user can pause then resume, we need to know the time showing on the display when the user last clicked resume.Whenever we transition into a COUNTDOWN state, we also need to set a variable called start_millis, which keeps track of the IRL time when the user clicked start or resume. We will keep this in the default milliseconds from millis() calls.
Our state management code then looks like:
if (prog_state == SET_TIME) {
    // int increments[4] = {600, 60, 10, 1};
    if (pressed(UP)) {
        set_time += increments[selected_digit];
    }
    if (pressed(DOWN)) {
        set_time -= increments[selected_digit];
    }
    set_time = (set_time + 3600) % 3600;

    if (pressed(LEFT)) {
        selected_digit--;
    }
    if (pressed(RIGHT)) {
        selected_digit++;
    }
    selected_digit %= 4;

    show_time = set_time;

    if (pressed(A)) {
        prog_state = COUNTDOWN;
        start_time = set_time;
        start_millis = millis();
    }
}

else if (prog_state == COUNTDOWN) {
    int current_millis = millis();
    int time_elapsed = (current_millis - start_millis) / 1000;
    show_time = start_time - time_elapsed;

    if (show_time <= 0) {
        show_time = 0;
        start_millis = millis(); // useful for DONE animations
        prog_state = DONE;
    }

    if (pressed(B)) {
        prog_state = PAUSE;
    }
}

else if (prog_state == PAUSE) {
    if (pressed(A)) {
        start_time = show_time;
        start_millis = millis();
        prog_state = COUNTDOWN;
    }
    if (pressed(B)) {
        prog_state = SET_TIME;
    }
}

else if (prog_state == DONE) {
    int current_millis = millis();
    if (((current_millis - start_millis) / 1000) % 2 == 0) {
        invert_screen(); // simple end animation of flashing screen
    }
    if(pressed(A) || pressed(B) || pressed(UP) || pressed(DOWN) || pressed(LEFT) || pressed(RIGHT)) {
        prog_state = SET_TIME;
    }
}Time is displayed in mm:ss format, for which I use the following code:
void display_time() {
  int size = 3;
  int len = 5;
  int letterHeight = size * 8;
  int letterWidth = size * 5;
  int textWidth = size * (6 * len - 1); // at size 1, 1-pixel space between letters

  int x = (SCREEN_WIDTH - textWidth) / 2;
  int y = (SCREEN_HEIGHT - letterHeight) / 2 - 8; // offset upwards to save space for display_state

  char displayString[5];
  sprintf(displayString, "%02d:%02d", show_time / 60, show_time % 60);
  write_text(displayString, size, x, y);

  if(prog_state == SET_TIME) { // want to highlight selected digit
    int selectedChar = (selected_digit > 1 ? selected_digit + 1 : selected_digit);
    display.fillRect(x + (letterWidth + size) * selectedChar - 1, y - size, letterWidth + 2, letterHeight + size, SSD1306_INVERSE);
  }
}
I originally just had the time displaying, but it got a bit confusing to try and differentiate between COUNTDOWN and PAUSE modes, as it required at minimum a second of waiting - unforgivably unresponsive in UI design. The simplest way to help with this (and allow me a much better debugging experience) was to display state, too, with the following:
void display_state() {
  int size = 1;
  char* state;
  switch(prog_state) {
    case SET_TIME:
      state = "SET TIME";
      break;
    case COUNTDOWN:
      state = "COUNTDOWN";
      break;
    case PAUSE:
      state = "PAUSED";
      break;
    case DONE:
      state = "TIME'S UP!";
      break;
    default:
      state = "ERROR";
  }

  int len = strlen(state);
  int letterHeight = size * 8;
  int textWidth = size * (6 * len - 1);

  int x = (SCREEN_WIDTH - textWidth) / 2;
  int y = (SCREEN_HEIGHT - letterHeight * 2);
  write_text(state, size, x, y);
}… can be found here .
Fun week! Learnt a bit about soldering and got to stretch my Arduino muscles. Some potential extensions:
But honestly the board as-is is complete and usable - I’m using it to pomodoro my website writing right now :)