HTMAA 25
home about me final projectThis week’s assignment was actually to make our own assignment! Precisely, we had to design and produce something with a digital process not covered in another assignment. I interpreted this so as to set myself two goals:
I signed up for the glass engraving session.
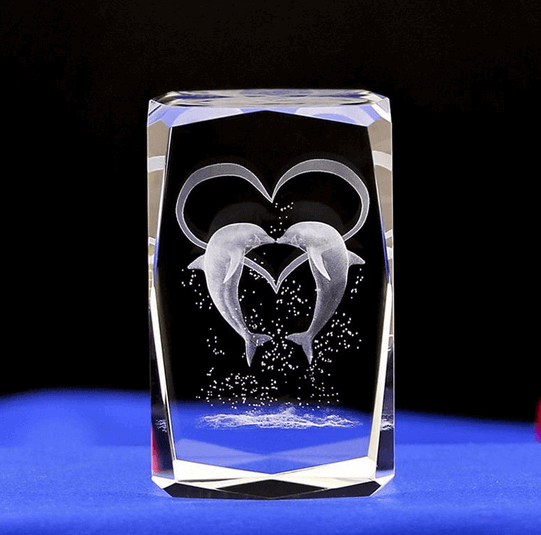
As I was looking through glass engraving examples, I was pretty struck by this one, which seems to have a kind of gradient going on with the dolphin tails and the sand:
It didn’t seem immediately obvious to me how to do that, as the laser engraver just took a plain 3D model without color or light information. As I thought about how I would recreate that, I thought about 2D color with only black and white, and techniques that imply value such as halftones and dithering.
Obviously, this wasn’t going to be modelled by hand. I wasn’t going to learn computational design software in a week, but I did know Python. It seemed pretty simple to just write a script that would do some dithering for me?
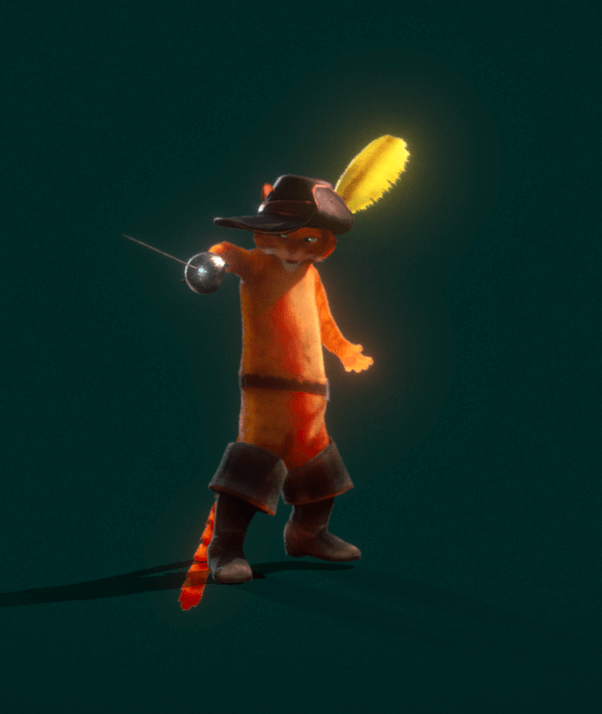
Set on this plan, I decided to model Puss from Puss in Boots: The Last Wish. I found this model by CVRxEarth on Sketchfab, which seemed appropriately colored and, critically, already in a cool looking pose, unlike the other Puss models I had found that had been advertised as rig-ready.
… unfortunately, it only came in a .blend file, which meant I finally had to get around to installing Blender. I then spent about three hours trying to do my next step: exporting it as a .obj file and importing it into my Python notebook. Things I learnt:
Having figured this out, I chose the trimesh library because I’d vaguely used it before and a quick documentation skim convinced me it seemed powerful enough.
I then loaded it in, converting it to a color visual as opposed to a texture visual, because color visuals in trimesh came with much more useful functions for me.
mesh = trimesh.load("PussInBoots.obj", force="mesh")
color_visual = mesh.visual.to_color()
mesh.visual = color_visual
mesh.show(height=150)
Then, with these helper functions:
def greyscale(img): # img is numpy, last axis represents rgb channels
  r = img[..., 0]
  g = img[..., 1]
  b = img[..., 2]
  return (0.21 * r + 0.71 * g +  0.07 * b) # nice greyscaling apparently from wikipedia

def point(size = 0.5): # icosahedron
  return trimesh.creation.icosphere(subdivisions=0, radius=0.01)
And the following script:
points, face_indices = trimesh.sample.sample_surface(mesh, count=50000)
grey = greyscale(mesh.visual.face_colors) / 255 # scale to 0-1

spheres = []

for p, f in zip(points, face_indices):
  if grey[f] > np.random.normal(0.5, 0.3): # show point if light enough
    s = point(0.1)
    s.apply_translation(p)
    spheres.append(s)

spheres_mesh = trimesh.util.concatenate(spheres)

spheres_mesh.show()
And some tuning of sizes/numbers etc, I created this:
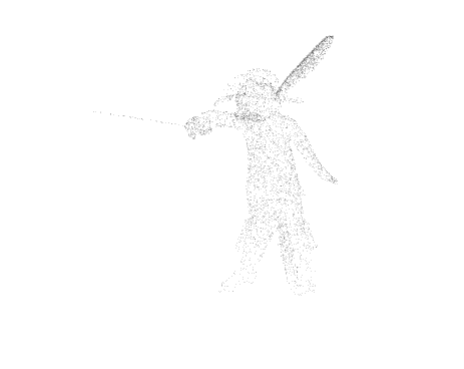
Which ended up containing about 11000 tiny spheres (icosahedrons) as poing and was excellent as a proof of concept - you could see how the random surface points were denser around lighter areas and sparser on darker areas, as desired. However, I was pretty excited about experimenting more at this point!
My first ideas involved trying to render more color detail, since it seemed pretty disappointing to have such high-resolution texturing and then reduce it to face colors. Unfortunately, I could not figure out a way to get colors corresponding to a point on a surface through trimesh, and I really didn’t feel like writing my own UV mapping functions (these were already running so slow).
My next ideas involved trying to gain more control over the point selection. I thought about sampling more regularly instead of randomly, and my first idea was to sample systematically on say, a spherical surface and map it onto Puss. ChatGPT gave me the following code:
# prompt: python generate evenly spaced direction vectors, such that they uniformly sample the unit sphere?

import numpy as np

def fibonacci_sphere(n_points):
    phi = np.pi * (3. - np.sqrt(5.))   # golden angle
    y = np.linspace(1 - 1.0/n_points, -1 + 1.0/n_points, n_points)
    radius = np.sqrt(1 - y * y)

    theta = phi * np.arange(n_points)

    x = radius * np.cos(theta)
    z = radius * np.sin(theta)

    return np.vstack((x, y, z)).T
Then, using these as points as direction vectors, I found points by tracing rays in all the directions from Puss’ center, and storing the points at which they intersected with Puss’ surface. This was done with trimesh’s ray_pyembree library, which was actually the part of trimesh I’d used before.
Unfortunately, Puss was very… not convex, and the generated points were neither anywhere near evenly spaced (as I definitely should have expected) nor looked good. It did, however, remind me of a point light source, which led me to the next idea of, instead of tracing from Puss’ center, tracing from a light source.
Some experimenting later, I ended up with the following code:
import trimesh.ray.ray_pyembree

# initialize an intersector (I think does a bunch of precomputation stuff to make raytracing speedy)
intersector = trimesh.ray.ray_pyembree.RayMeshIntersector(mesh)

# figure out my light source
icosahedron = trimesh.creation.icosphere(radius=15) # create icosahedron (has subdivisions)
icosahedron.apply_translation(np.mean(mesh.vertices, axis=0)) # translate it so its center lines up with our model's
centers = np.array(icosahedron.vertices) # we want light sources on all the vertices of the icosahedron
centers = centers[(centers[:, 0] < 0) & (centers[:, 1] > 8) & (centers[:, 2] > 8)] # ... with x-coord < 0 and y-coord, z=coord > 8

# set density of ray-trace
num_rays = 80000

points, faces = trimesh.sample.sample_surface(mesh, count=400) # initialize with some points because I don't want the back to be like pitch black
points = list(points)
faces = list(faces)

for center in centers:
  sphere_points = fibonacci_sphere(num_rays) # generate direction vectors

  # do the raytraces
  index_tri, index_ray, locations = intersector.intersects_id(
    np.repeat(np.array([center]), num_rays, axis=0),
    sphere_points,
    multiple_hits = False,
    return_locations = True
  )

  # add to points
  points.extend(locations)
  faces.extend(index_tri)
Combining the returned surface points with the dithering code from earlier, I arrived at:
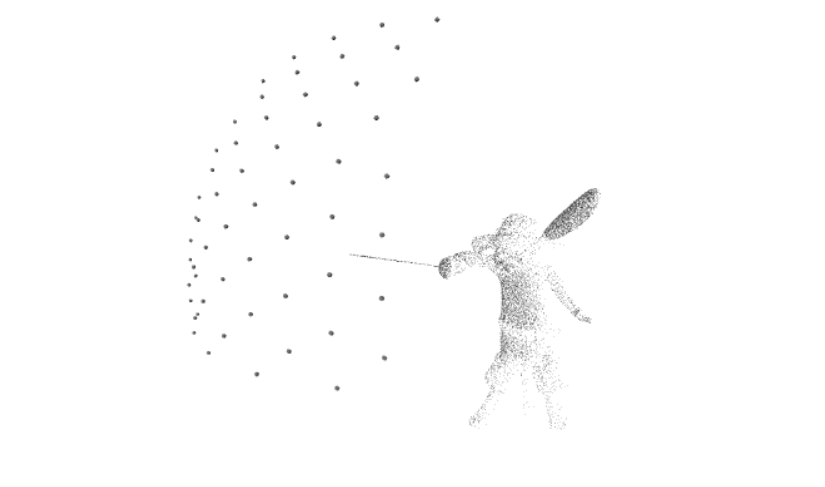
Where the larger dots represented the point light sources. This (minus the light source visual) contained about 190,000 faces, and was several megabytes in size, which my computer was not intensely happy about downloading. This prompted the optimization to use tetrahedrons as my points instead of icospheres:
def point(size = 0.5):
  return trimesh.creation.cone(
      radius=0.17 * size,
      height=0.20 * size,
      sections=3,
    )
In retrospect, I could have also done loose triangles, since the laser engraver ended up having no problems with non-closed surfaces.
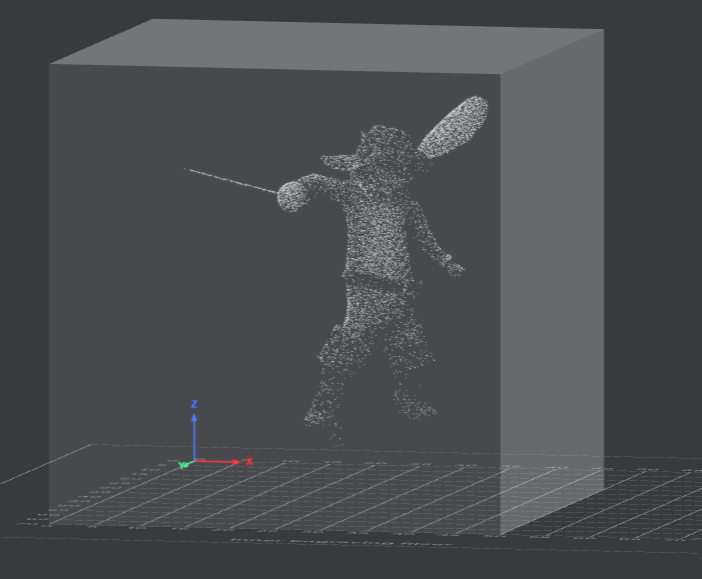
Here’s what it ended up looking like in our 50x50mm cube in xTool Studio - i.e. hella cool.
Here’s the somewhat messy colab notebook I was working on: notebook
And here’s my obj file and my final dither stl
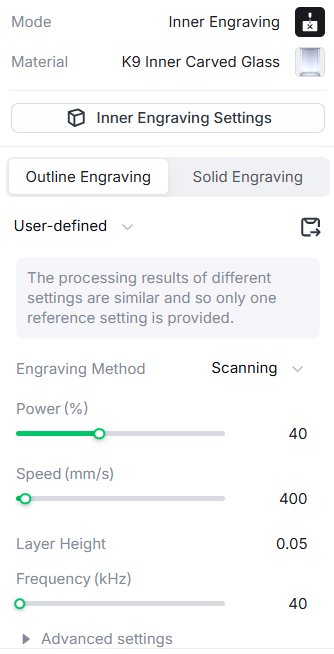
We used the xTool F2 Ultra UV laser to engrave 50mm K9 crystal glass cubes. Using the laser was actually super easy - we placed the cube inside the laser, entered its dimensions and the value listed by the positioning slider onto xTool, and listed the following settings under the model:
And it came out like this!
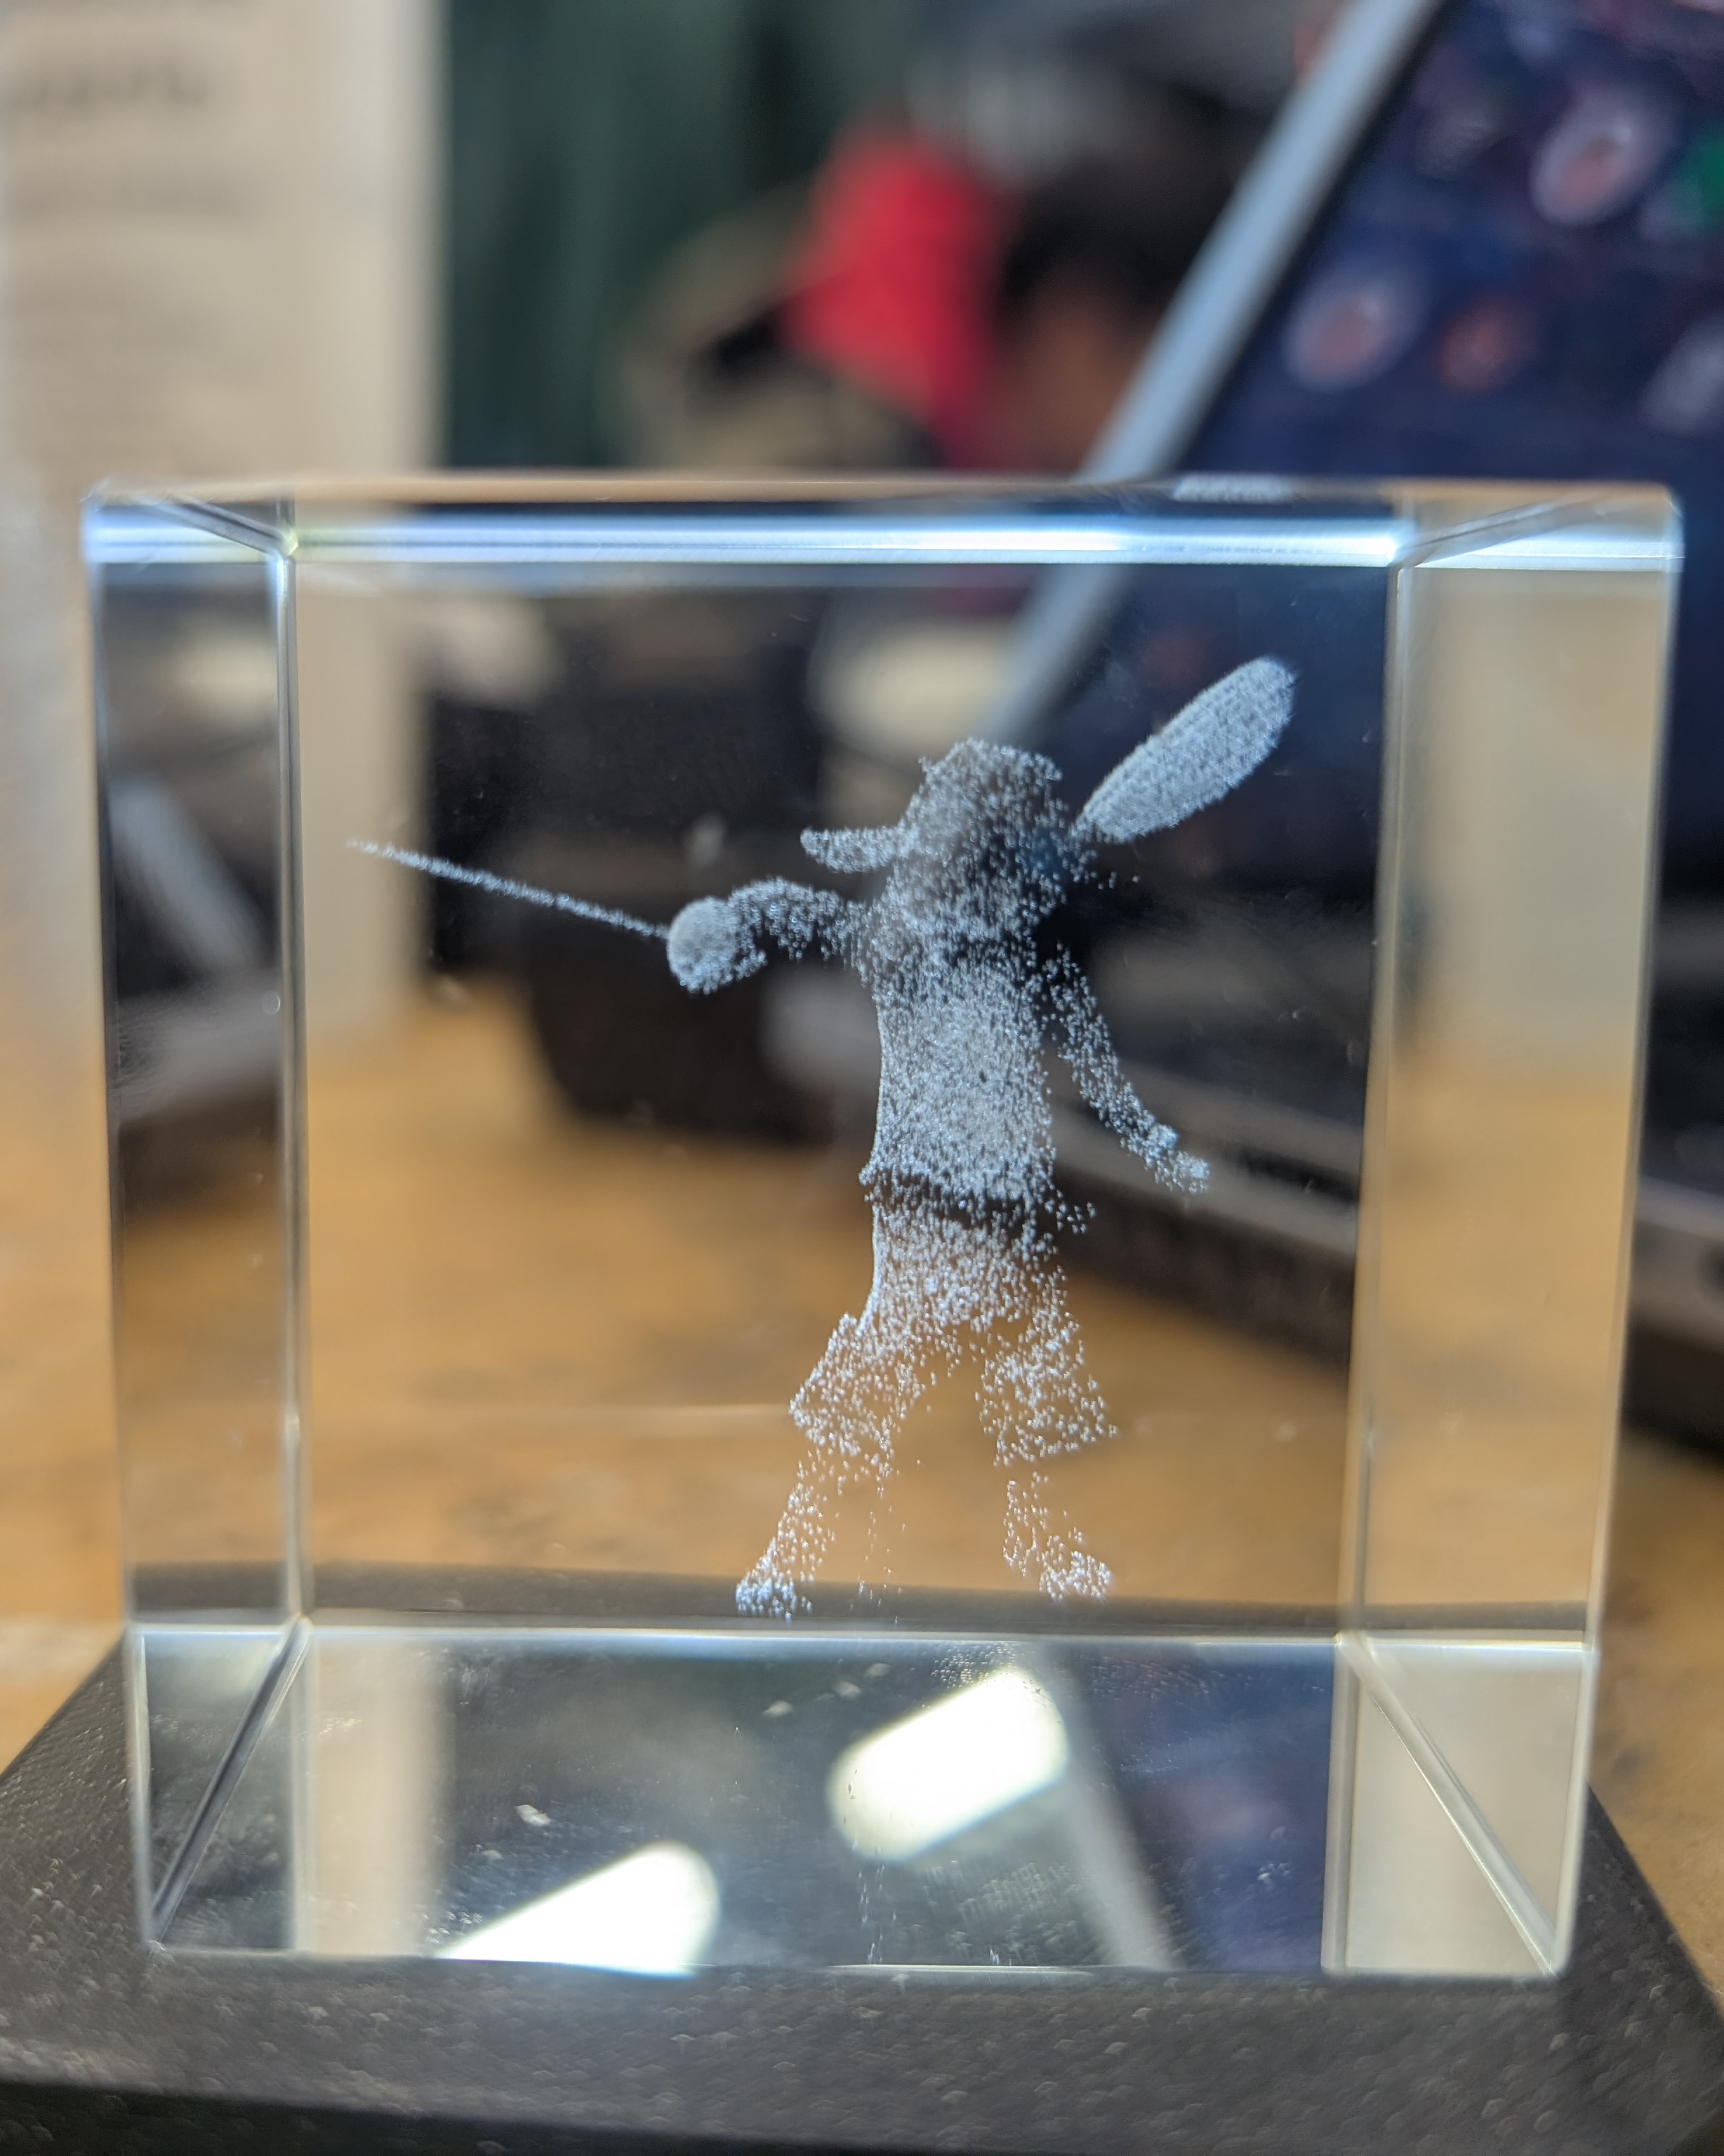
Super happy with the result. I suppose I could have made the tetrahedrons smaller relative to the overall volume, but I’m not upset about the surface texture in this case - it looks a little like fur.
I probably should have spent more time doing my final project and less time coding during this week, but this was super fun. I met my requirements of learning new things, and I gained a Christmas gift for someone.