Assignment
Neil’s notes for this week’s lecture can be found here.
individual assignment:
• write an application that interfaces a user with
  an input &/or output device that you made
group assignment: • compare as many tool options as possible
Group Assignment
As always, the documentation for the group assignment can be found on the respective section of our shared website.
Individual Assignment
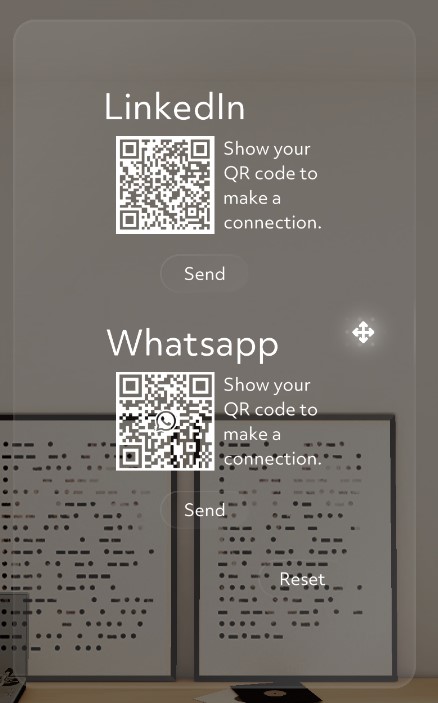
For this week’s “Interface and Application Programming” assignment, I’m making an XR UI. See the final result below. It allows selecting QR codes from a list and showing it on an e-ink screen. The application makes use of the server setup I documented in Week 12.
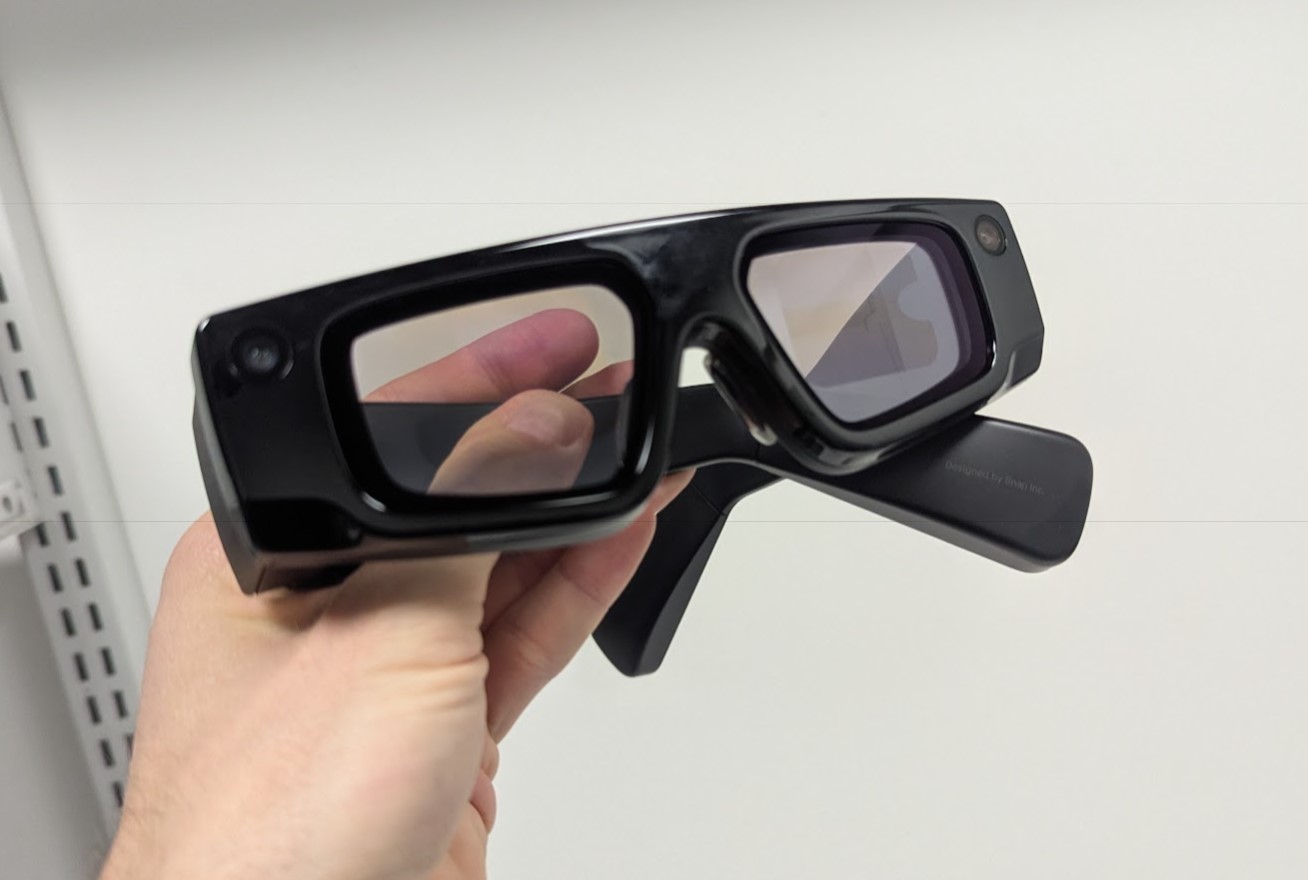
I’m using the Snap Spectacles to show the UI. While I’m very familiar with other devices like the Quest line of headsets by Meta, or the Apple Vision Pro, I have never used the Snap Spectacles and I’m excited to try them. A key difference to the other devices listed is that the Spectacles don’t use pass-through for the AR experience.
Pass-Through: Cameras at the front of the headset record a first-person view of the surroundings. Screens inside of the headset show that feed. The user doesn’t actually look at the world, but looks at screens instead. This allows for the recorded camera feed to be modified so that the user sees an augmented version of the reality that surrounds them.
The Spectacles on the other hand are similar to devices like the Magic Leap 2. They are see-through instead of pass-through and special transparent screens are used to alter someone’s reality. It’s a notably different experience and I’m excited to try the Spectacles which are intended to be a standalone device (no compute puck, no external battery) that offers features like hand-tracking and environment reconstruction.
On the software side, there’s a notable difference to the pass-through devices I listed as well: Snap use their own application for building apps. It’s called Lens Studio. The other devices allow developers to use more widely-used tools like Unity to create apps. I’m curious to explore Snap’s own tool and to compare it to Unity.
Design
I started calling my final project “glyph”. According to merriam-webster it’s “a symbol (such as a curved arrow on a road sign) that conveys information nonverbally”. I think it’s a nice fit and I like the sound of the word. I made some simple images in figma that I can drop into a UI and show on the screen itself. The font is Inter.


UI Development
Snap has a guide for developers coming from Unity. They also have a guide for setting up Visual Studio Code for developing.
Instead of using C# (like Unity), Lens Studio uses Javascript or, if you want, Typescript. The latter makes the code look much more like what people might be used to from Unity because of the more object-oriented and typed nature of Typescript.
First Impressions
There’s a few things to love about Lens Studio, and a few areas with room for improvement.
I really like how quickly you can preview your work. The iteration time in Lens Studio feels much faster than what I’m used to from Unity. Since Lens Studio has to target only a single line of devices, it feels much easier to connect to said devices. Hooking up the Spectacles hardware was really quick. Deploying applications (Snap calls them “lenses”) is very fast, too. Overall, it feels like a very mature developer experience from an ecosystem/infrastructure perspective.
I’m using the Spectacles UIKit to develop the interface. It feels a little barebones still. This introductory video has a good overview and is what I used to get familiar with Lens Studio and the UI system.
The Actual UI
Following the video, I installed the UIKit which in turn automatically brings in the InteractionKit (enabling users to use their hands to interact with the UI). UIKit comes with an example UI that is great for some exploration and for then extending it.
Again, following the video, I started by writing a simple script that listens to slider value changes and button clicks. For my final UI, only the button clicks will be needed. Note that your Visual Studio Code might bring in the wrong modules for the Slider and Button classes. There seem to be multiple in Lens Studio (presumably because Lens Studio also supports non-immersive interfaces for the phone).
import { Slider } from "SpectaclesUIKit.lspkg/Scripts/Components/Slider/Slider";
import { BaseButton } from "SpectaclesUIKit.lspkg/Scripts/Components/Button/BaseButton";

@component
export class SceneManager extends BaseScriptComponent {

    @input
    slider: Slider

    @input
    button: BaseButton

    onAwake() {

        this.createEvent("OnStartEvent").bind(() => {

            this.slider.onValueChange.add((value: number) => {
                console.log("Slider value changed to: " + value);
            });

            this.button.onTriggerUp.add(() => {
                console.log("Button was clicked!");
            });
        })
    }
}
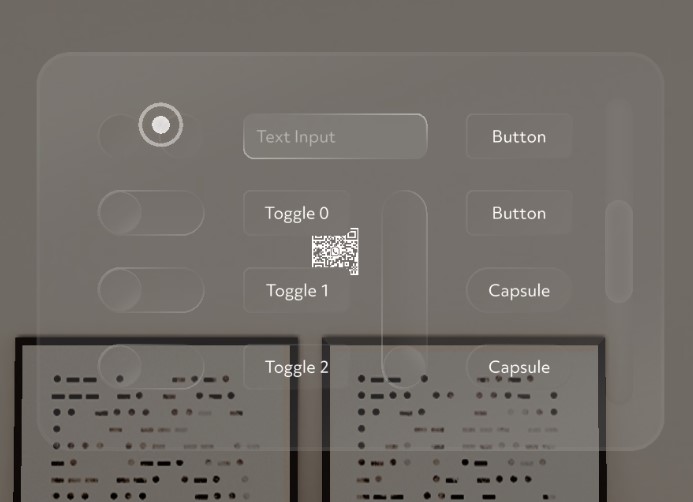
I also added the UnitPlane rendering + shader setup from the intro video. I like the setup that just renders a plane with an attached shader so I can do whatever I want in said shader. For this app, we’re keeping it simple. Instead of using color, as in the video, I use a 2D Texture Parameter to sample and show an image.
The image below shows said unit plane at its default position. Everything else you see in the image is part of the example UI that the UIKit comes with.
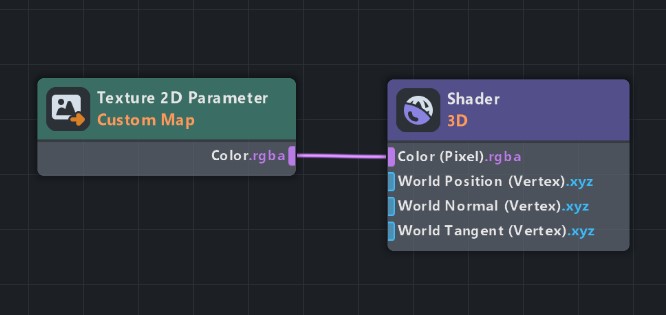
The shader setup can be seen in the following images. Again, it’s very simple for this application but I like that Lens Studio has this feature.
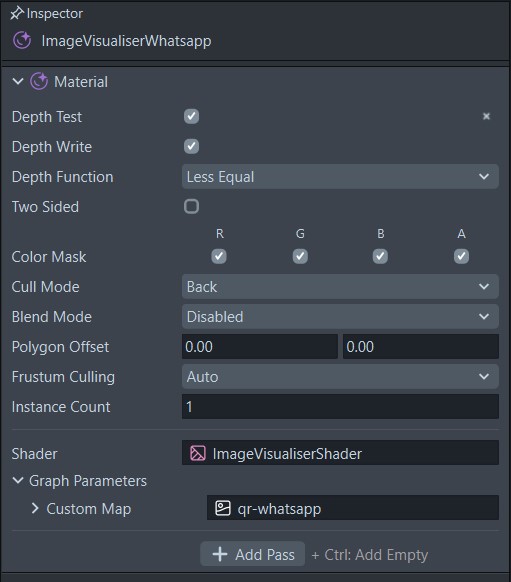
I then also tested the web connection required to make HTTP requests to my cloud setup. For these sorts of use cases, Lens Studio provides InternetModule and you’ll have to use it instead of using your regular ol' javascript requests. The InternetModule needs to be assigned as a parameter on scripts that want to use it. The screenshots below show how Lens Studio exposes parameters in its UI. It’s very similar to Unity’s inspector.
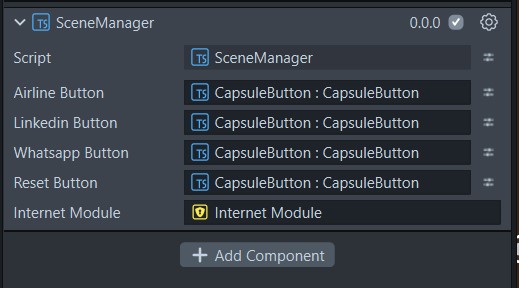
On that note - I really like that Lens Studio fails very early if you forgot to assign a value to the parameters of your script. Often, you want to reference other components or objects in your scene and assigning them in this way is how you give scripts the respective handles. In Unity, your script will silently accept null values unless you run checks yourself on startup. It’s very common to run through a test session and to then eventually run into an error because an object wasn’t assigned properly. In Lens Studio, the behaviour is more similar to a compile-time error rather than a runtime error. I personally prefer that.
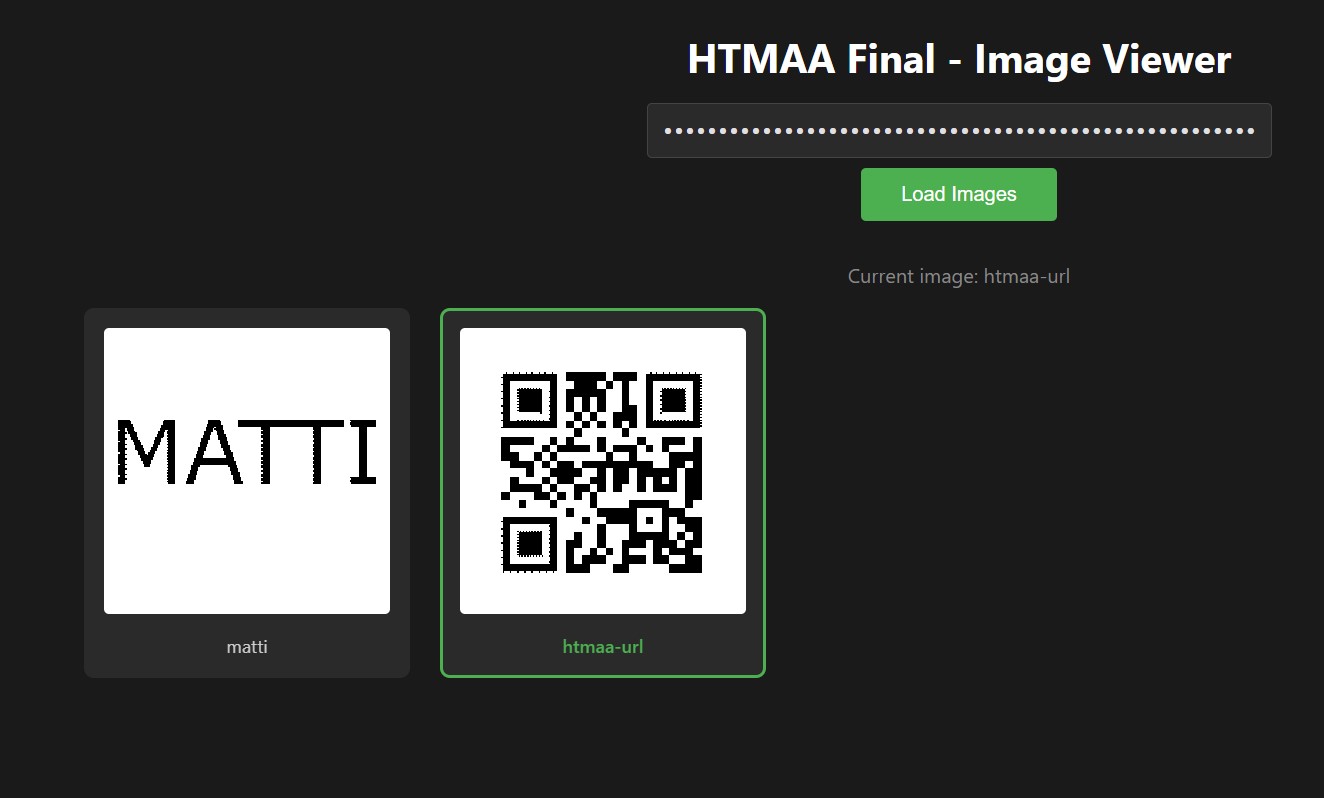
Back to the UI! In Lens Studio you can use the simulator to test your app without putting it on the device. That way, I was able to confirm that the HTTP requests go out correctly. I can monitor with a custom web page that exposes the state of the server, see screenshot below.
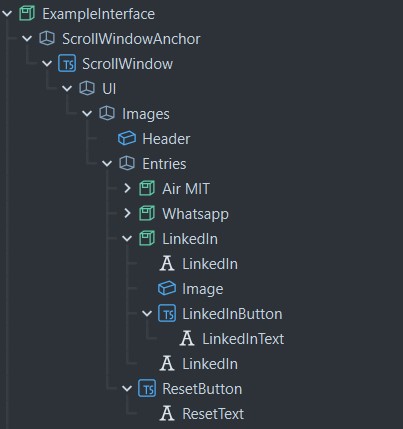
As you can see in the Lens Studio screenshots above (Scene Hierarchy + Inspector), I proceeded to build out the final UI in the scene, - adding buttons and images and hooking them up to the final SceneManager.ts script that manages the button clicks. The file is available for download in the list on the right. You can read the code in the collapsable element below.
SceneManager.ts
import { Slider } from "SpectaclesUIKit.lspkg/Scripts/Components/Slider/Slider";
import { BaseButton } from "SpectaclesUIKit.lspkg/Scripts/Components/Button/BaseButton";

@component
export class SceneManager extends BaseScriptComponent {

    @input
    airlineButton: BaseButton

    @input
    linkedinButton: BaseButton

    @input
    whatsappButton: BaseButton

    @input
    resetButton: BaseButton

    @input
    internetModule: InternetModule;

    onAwake() {

        this.createEvent("OnStartEvent").bind(() => {

            this.airlineButton.onTriggerUp.add(() => {
                this.postCurrentName("boardingpass");
            });

            this.linkedinButton.onTriggerUp.add(() => {
                this.postCurrentName("linkedin");
            });

            this.whatsappButton.onTriggerUp.add(() => {
                this.postCurrentName("whatsapp");
            });

            this.resetButton.onTriggerUp.add(() => {
                this.postCurrentName("glyph");
            });

        })
    }

    async postCurrentName(name: string) {
        const url = "";
        const apiKey = ""

        let request = new Request(url, {
            method: 'POST',
            body: JSON.stringify({ name: name }),
            headers: {
                'Content-Type': 'application/json',
                'X-API-Key': apiKey
            },
        });

        let response = await this.internetModule.fetch(request);
        if (response.status != 200) {
        print('Failure: response not successful');
        return;
        }

        let contentTypeHeader = response.headers.get('Content-Type');
        if (!contentTypeHeader.includes('application/json')) {
            print('Failure: wrong content type in response' + contentTypeHeader);
            return;
        }

        print(await response.json())
    }
}
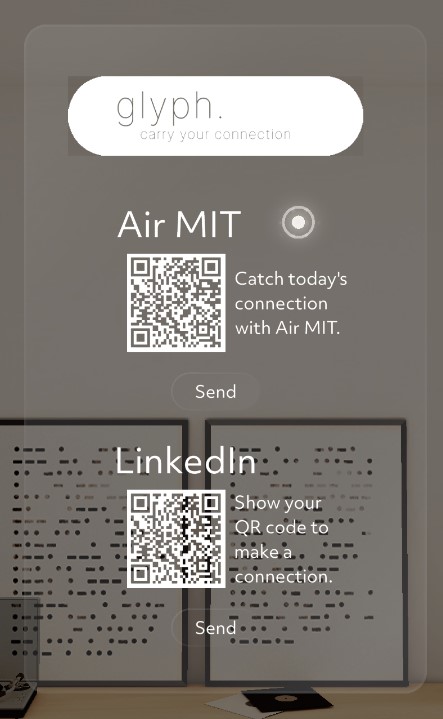
Final Look In Lens Studio
The preview of the final UI in Lens Studio looks like this:
Installing Application On The Device
As alluded to earlier, the process of sending apps to the Spectacles is very straightforward and generally much easier than what I’m used to from Unity and other XR hardware.
In the project settings, you’ll have to indicate that you’re building a Spectacles app:

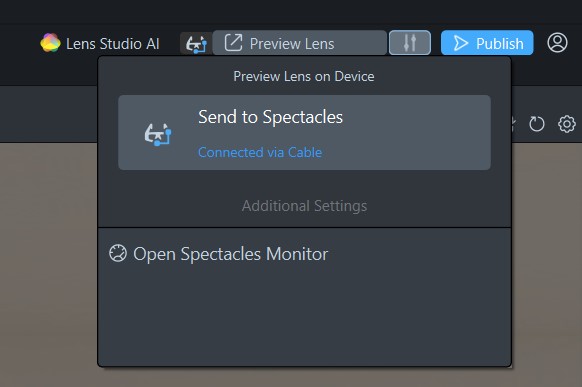
You can then connect the device to the laptop via USB-C cable and it should show up automatically in your Lens Studio session. If it doesn’t, go into the companion app on your phone and enable the wired connection in the Developer Settings. To start using a Spectacles device, you’ll have to pair it with a phone initially and all future administration of the device is done via the Spectacles app.
Once the device shows up in Lens Studio, you can easily preview your application on it.
The Result
This is what the final experience looks like. As you can see, the selected QR codes are sent to the e-ink screen as per the documentation for last week’s assignment.
Reflection
This was an interesting experience! Using web technologies (JS and TS) for this sort of work felt a bit foreign to me initially, but it ended up being very quick and enjoyable. For larger projects, I would definitely opt for the TypeScript route to get the benefits of types.
I’m looking forward to building more experiences with the Spectacles. Fun device!!