Interface Design: Smartphone Control
For the interface and application programming week, I designed a web-based control panel hosted directly on the robot (Robot 1). This allows me to control both the parent and baby robots using any smartphone connected to the same WiFi network, without needing a dedicated app.
🤖 ROBOT 1: The Commander
This robot acts as the web server. It serves a simple, responsive HTML/CSS/JS page to the client (my
phone).
Interface Features:
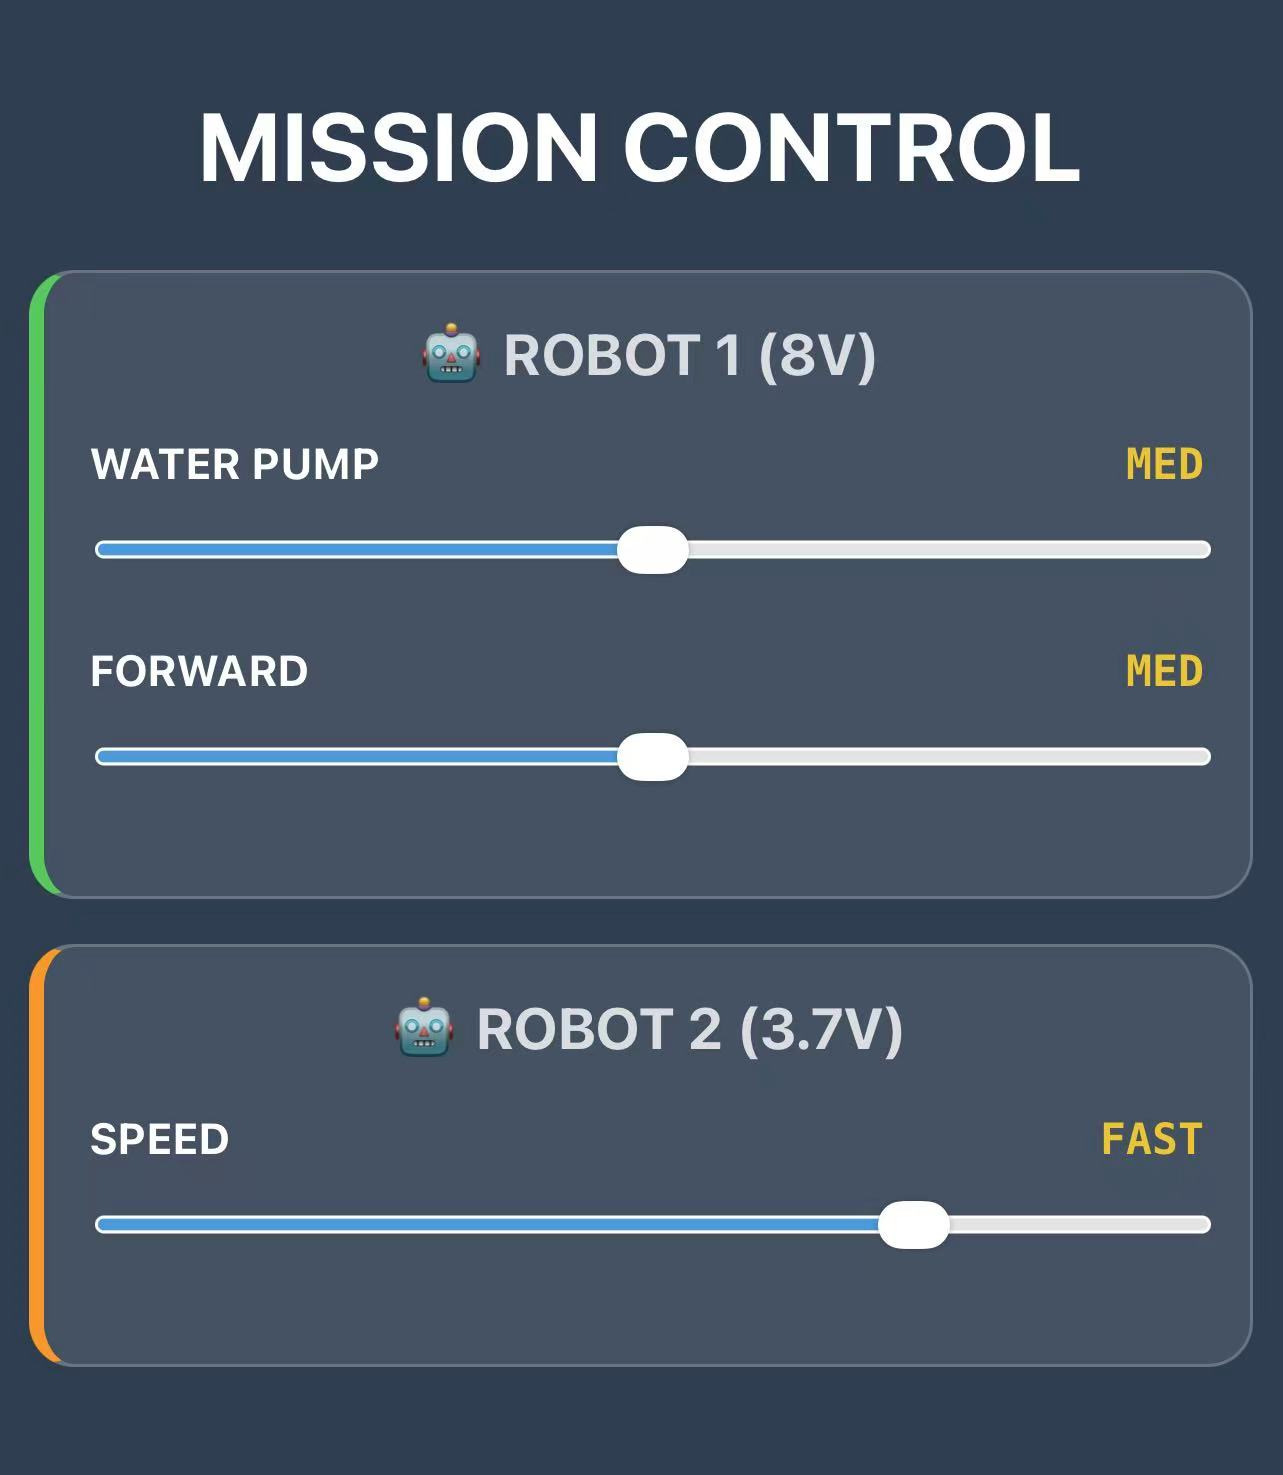
- Responsive Design: The interface is styled with CSS to look like a modern "Mission Control" dashboard, with distinct sections for each robot.
- Real-time Control: I used HTML5
<input type="range">sliders for intuitive speed control. JavaScript handles theoninputevents to send asynchronous HTTP requests (usingfetch) to the ESP32 server efficiently. - Cross-Device Communication: When I adjust the sliders for Robot 2 (the baby) on this interface, Robot 1 receives the request and relays it over WiFi, effectively bridging the control.
The Code
Below is the complete code derived from my final project, highlighting the
index_html raw string literal that defines the UI and the server logic to handle
requests.
/*
 * ROBOT 1: COMMANDER NODE (Web Server & Interface)
 */

#include <WiFi.h>
#include <WebServer.h>

// --- Pin Definitions ---
const int IN1 = D5;
const int IN2 = D6;
const int IN3 = D7;
const int IN4 = D8;
const int SLEEP_PIN = D9;
const int FAULT = D4;

// --- Wi-Fi Credentials ---
const char* ssid = "MLDEV";
const char* password = "Aysyw2ch?";

// --- Static IP Configuration ---
IPAddress local_IP(192, 168, 41, 251);
IPAddress gateway(192, 168, 41, 1);
IPAddress subnet(255, 255, 255, 0);
IPAddress primaryDNS(18, 27, 72, 81);

WebServer server(80);

// --- PWM Settings ---
const int freq = 30000;
const int resolution = 8;

// --- Web Interface (HTML/CSS/JS) ---
const char index_html[] PROGMEM = R"rawliteral(
<!DOCTYPE html>
<html lang="en">
<head>
  <meta charset="UTF-8">
  <meta name="viewport" content="width=device-width, initial-scale=1">
  <title>Mission Control</title>
  <style>
    body { font-family: -apple-system, sans-serif; text-align: center; background: #2c3e50; color: white; padding: 10px; margin: 0;}
    h2 { margin-top: 0; font-size: 1.2rem; opacity: 0.8; }

    /* Card Styles */
    .robot-box {
      background: rgba(255,255,255,0.1);
      border-radius: 15px; padding: 15px; margin: 15px auto;
      max-width: 400px; border: 1px solid rgba(255,255,255,0.2);
    }
    .robot-1 { border-left: 5px solid #34c759; } /* Green for Robot 1 */
    .robot-2 { border-left: 5px solid #ff9500; } /* Orange for Robot 2 */

    .control-group { margin-bottom: 15px; }
    .label { display: flex; justify-content: space-between; font-weight: bold; font-size: 0.9rem; margin-bottom: 5px;}
    input[type=range] { width: 100%; height: 25px; accent-color: #3498db; }

    .status { font-family: monospace; font-weight: bold; color: #f1c40f; }
  </style>
</head>
<body>

  <h1>MISSION CONTROL</h1>

  <div class="robot-box robot-1">
    <h2>🤖 ROBOT 1 (8V)</h2>
    <div class="control-group">
      <div class="label"><span>WATER PUMP</span> <span id="r1_pump_txt" class="status">STOP</span></div>
      <input type="range" min="0" max="4" value="0" oninput="cmd(1, 'pump', this.value)">
    </div>
    <div class="control-group">
      <div class="label"><span>FORWARD</span> <span id="r1_move_txt" class="status">STOP</span></div>
      <input type="range" min="0" max="4" value="0" oninput="cmd(1, 'move', this.value)">
    </div>
  </div>

  <div class="robot-box robot-2">
    <h2>🤖 ROBOT 2 (3.7V)</h2>
    <div class="control-group">
      <div class="label"><span>SPEED</span> <span id="r2_speed_txt" class="status">STOP</span></div>
      <input type="range" min="0" max="4" value="0" oninput="cmd(2, 'speed', this.value)">
    </div>
  </div>

  <script>
    const gears = ["STOP", "SLOW", "MED", "FAST", "TURBO"];
    function cmd(robot, type, val) {
      if(robot === 1) {
         document.getElementById("r1_" + type + "_txt").innerText = gears[val];
      } else {
         document.getElementById("r2_speed_txt").innerText = gears[val];
      }

      // Send command to server
      fetch("/set?robot=" + robot + "&motor=" + type + "&val=" + val)
        .catch(e => console.log(e));
    }
  </script>
</body>
</html>
)rawliteral";

void handleRoot() {
  server.send(200, "text/html", index_html);
}

void handleSet() {
  if (server.hasArg("robot") && server.hasArg("val")) {
    int robot = server.arg("robot").toInt();
    String motor = server.arg("motor");
    int val = server.arg("val").toInt();

    // Motor control logic would go here...

    server.send(200, "text/plain", "OK");
  } else {
    server.send(400, "text/plain", "Bad Request");
  }
}

void setup() {
  Serial.begin(115200);

  // Connect to Wi-Fi
  WiFi.config(local_IP, gateway, subnet, primaryDNS);
  WiFi.begin(ssid, password);
  while (WiFi.status() != WL_CONNECTED) {
    delay(500);
  }

  server.on("/", handleRoot);
  server.on("/set", handleSet);
  server.begin();
}

void loop() {
  server.handleClient();
}
🤖 ROBOT 2: The Receiver (Baby Robot)
This robot basically listens to whatever Robot 1 says.
How the Code Works:
- Permission to Talk (CORS): Web browsers are strict; they usually block websites from sending commands to different devices. The "CORS" code is just a way of telling the browser, "It's okay, let Robot 1 talk to me."
- Full Power: Since this robot runs on a smaller battery, it needs all the juice it can get. Unlike Robot 1, I let the motors run at 100% power here to make sure they have enough strength to push the water.
- Simple Instructions: It doesn't "think" much. It just waits for a speed number (like 1, 2, 3...) and immediately sets the motor to that speed.
Code: Robot 2 (Receiver)
/*
 * ROBOT 2: RECEIVER NODE
 * Battery: 3.7V (Max Power Allowed)
 * IP Address: 192.168.41.252
 * Function: Receives commands via HTTP, allows Cross-Origin requests.
 */

#include <WiFi.h>
#include <WebServer.h>

// --- Pin Definitions ---
const int IN1 = D5; const int IN2 = D6;
const int IN3 = D7; const int IN4 = D8;
const int SLEEP_PIN = D9;
const int FAULT = D4;

// --- Wi-Fi Credentials ---
const char* ssid = "MLDEV";
const char* password = "Aysyw2ch?";

// --- Static IP Configuration (.252) ---
IPAddress local_IP(192, 168, 41, 252);
IPAddress gateway(192, 168, 41, 1);
IPAddress subnet(255, 255, 255, 0);
IPAddress primaryDNS(18, 27, 72, 81);

WebServer server(80);

const int freq = 30000;
const int resolution = 8;

void handleSet() {
  // --- CRITICAL: CORS Header ---
  // Allows Robot 1 (at .251) to control this robot
  server.sendHeader("Access-Control-Allow-Origin", "*");

  if (server.hasArg("val")) {
    int val = server.arg("val").toInt();
    int pwm = 0;

    // --- LOGIC: 3.7V Power Mapping ---
    // Since voltage is low, we need higher PWM values to move
    switch(val) {
      case 0: pwm = 1;   break; // Anti-Sleep (Keep signal alive)
      case 1: pwm = 150; break; // SLOW (Needs high PWM to start)
      case 2: pwm = 185; break; // MED
      case 3: pwm = 220; break; // FAST
      case 4: pwm = 255; break; // MAX (Full 3.7V power)
      default: pwm = 1;
    }

    // drive both ports synchronously
    ledcWrite(IN1, pwm);
    ledcWrite(IN3, pwm);

    server.send(200, "text/plain", "OK");
  } else {
    server.send(400, "text/plain", "Bad Request");
  }
}

void setup() {
  Serial.begin(115200);
  pinMode(IN1, OUTPUT); pinMode(IN2, OUTPUT);
  pinMode(IN3, OUTPUT); pinMode(IN4, OUTPUT);
  pinMode(SLEEP_PIN, OUTPUT); digitalWrite(SLEEP_PIN, HIGH);

  ledcAttach(IN1, freq, resolution);
  ledcAttach(IN3, freq, resolution);

  // Network Setup
  WiFi.config(local_IP, gateway, subnet, primaryDNS);
  WiFi.begin(ssid, password);
  while (WiFi.status() != WL_CONNECTED) { delay(500); }

  server.on("/set", handleSet);
  server.begin();
}

void loop() {
  server.handleClient();
  digitalWrite(SLEEP_PIN, HIGH); // Watchdog
  delay(2);
}
Voice Reactivity (Audio-to-Motion)
To give the robots a sense of "hearing," I integrated TouchDesigner.
How it Works
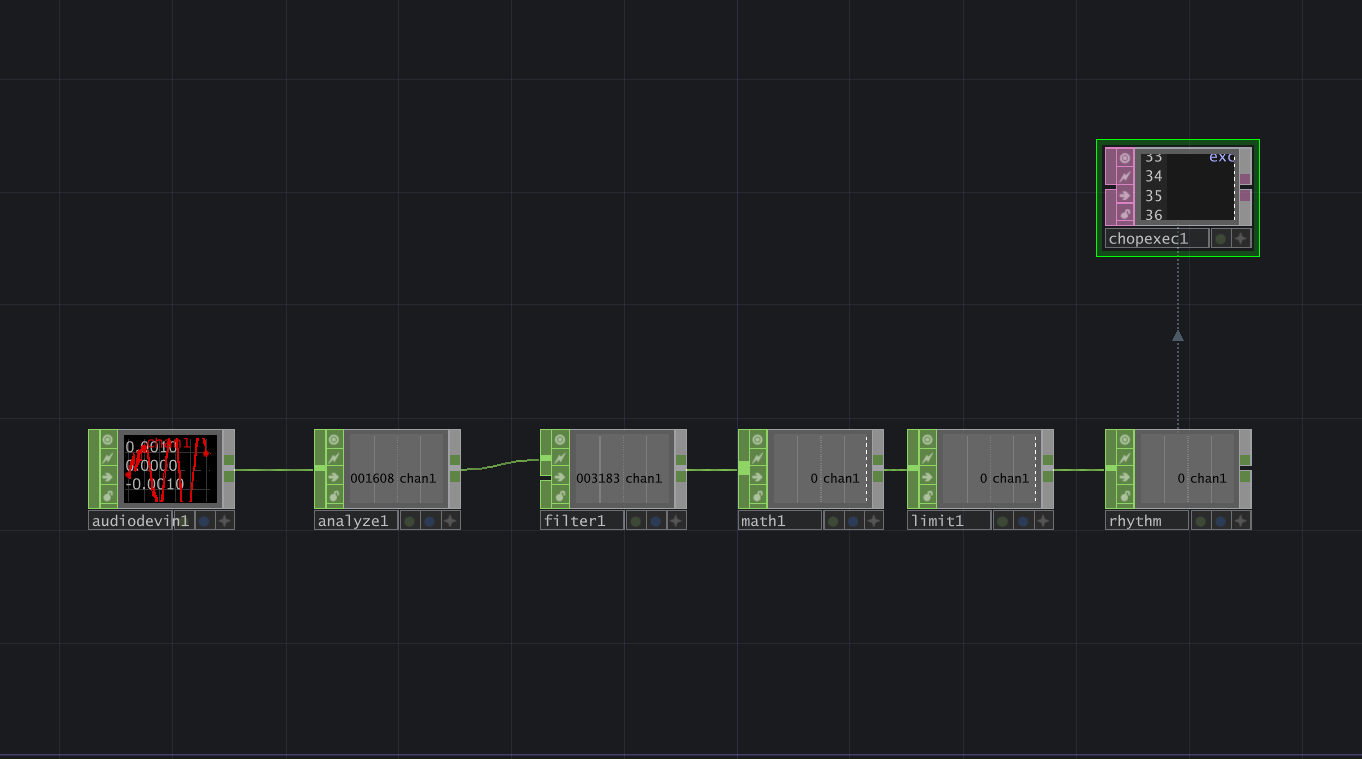
- Audio Analysis: An Audio Device In CHOP feeds into an Analyze CHOP to calculate the RMS Power (volume) of the environment.
- Signal Mapping: A Math CHOP maps the volume (0.0–0.2) to discrete motor gears (0–4).
- Python Logic: A CHOP Execute DAT runs a Python script to send HTTP GET requests to the robots.
Technical Challenge: The "Cooldown" Mechanism
A major challenge was network congestion. Rapid voice changes caused TouchDesigner to send hundreds of requests per second, crashing the ESP32's web server (effectively a DDoS attack).
To solve this, I implemented a Threaded Cooldown Mechanism in Python. This logic ensures commands are sent only when the motor gear changes, and forces a minimum delay (0.25s) between requests to maintain stability.
Below is the core Python logic used in TouchDesigner to drive the robots based on voice rhythm:
# TouchDesigner Python Script: Voice-to-Motion Bridge
import requests
import threading
import time

# Target: Robot 1 (Commander Node)
target_url = "http://192.168.41.251/set?motor=move&val="

# Cooldown Configuration
last_send_time = 0
cooldown = 0.25  # Minimum seconds between requests to prevent network flooding

def send_speed(gear):
    global last_send_time
    current_time = time.time()

    # 1. Check if the network is busy (Cooldown)
    if (current_time - last_send_time) < cooldown:
        return # Skip this request

    # 2. Update timestamp and send command
    last_send_time = current_time
    try:
        # Send HTTP GET request with a generous timeout
        requests.get(target_url + str(int(gear)), timeout=1.0)
        print(f"✅ Command Sent: Gear {int(gear)}")
    except Exception as e:
        print(f"⚠️ Network Busy: {e}")

# Triggered only when the gear integer changes (0->1, 1->2, etc.)
def onValueChange(channel, sampleIndex, val, prev):
    if int(val) != int(prev):
        threading.Thread(target=send_speed, args=(val,)).start()
Here are the live demos showing the voice and music control in action. The water pump speed adjusts dynamically (levels 0-4) based on the audio input.