
Week 1
Computer-Controlled Cutting
The initial phase of our exploration focuses on constructing the primary drone body. Despite the laser cutter being an advanced tool, it's essential to acknowledge that high school students from economically disadvantaged backgrounds may lack access to this equipment. However, at this juncture of the project, this prototyping method enables me to swiftly test my ideas and create potential templates that can serve as guidance for the students, even if they have to resort to manually cutting out the body with a knife.
Cardboard emerges as the ideal and accessible material for this purpose. Personally, I hold the belief that cardboard's structural properties are often underestimated.

After I designed the desired parts (the jig), I proceeded to duplicate the jig and arrange the file for laser cutting. This process involved minimizing the space between the parts to conserve materials and reduce waste.

Then, I had to prep material for the laser cutter - the first step is cutting it to the the same size as the laser cuetrs bed.

Placing the material - checking that it fits.

Small tip - you can tape the material to the bed to secure and improve accuarcy of the laser cutting.
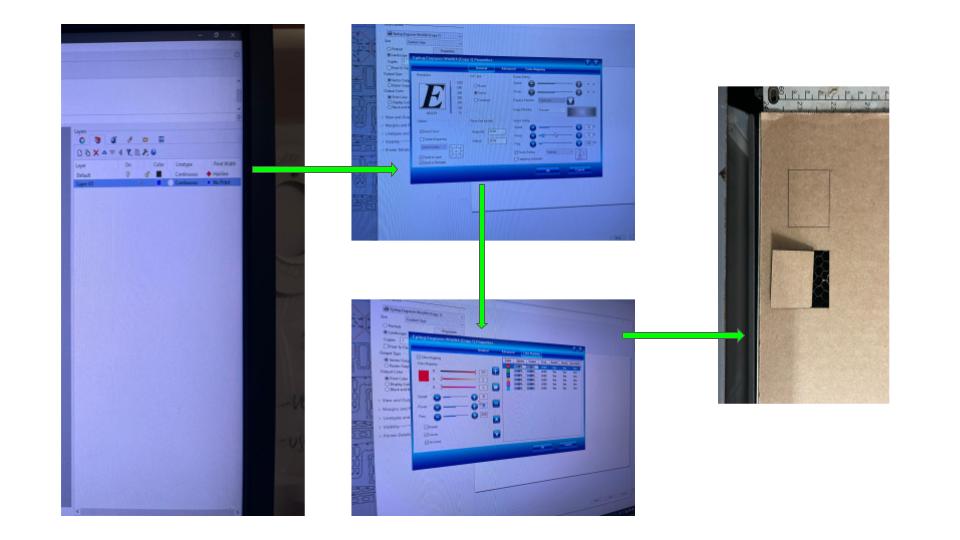
Setting up the file for cutting. Firstly I decided to make a small test, to make sure that my settings on the laser cutter are correct and can cut through. You have to make sure that layers in the file are grouped correctly and colou coded according to the function you want the laser cut to perform (engraving, cut through etc). After adjusting speed and power I have perfomed the test - the test was succesful.

Now, the file is ready to be printed.

It took some time time to laser the file, after the laser cutter was finished, i decided to tape down the elements with the masking tape, to prevent them all falling out on top of the laser cutter during extraction. This is a very nice tip for a largy, detailed files.
Unfortenately, the file I have prepared was not correct - the joints did not match up bc i got the thikness wring. Now I have to go back and adjust the CAD file and make sure that the joints are working.


Vinyl Cutting
For the Vinyl Cutting, I opted to experiment with a project that kids can later apply to their drones. I chose the Coat of Arms of Ukraine as the design.
Educational: It teaches kids about their country's history and culture.
Customization: Allows personalization and creativity.
Patriotism: Fosters pride in their work and homeland.
Artistic Skills: Improves fine motor skills and attention to detail.
Inspiration: Sparks discussions about history and culture.

First, I needed to prepare a PNG file and set it up within the pre-written algorithm designed to send the file directly to the Vinyl Cutter.

Due to the intricate design, it's crucial to exercise extreme care when removing the vinyl after the cutting process is finished. Pull the vinyl out very slowly and delicately to ensure the design remains intact and undamaged.

To apply the sticker to the object, begin by using adhesive paper as a base. Once the adhesive paper is in place, you can securely affix the sticker to the object. This method is particularly useful when your sticker consists of multiple separate elements that do not naturally connect with each other. It is also recommended for thin and delicate stickers to minimize the risk of tearing or damage during the application process.
