Final Project
Conceptualization
The concept of "Rain" emerged from the desire to create an interactive, water-based installation that simulates the natural occurrence of rain. The idea was to blend technology with a sensory experience of nature, encapsulating the tranquil and rhythmic essence of rain.
Design and Planning
The ESP32-C3 Xiao was selected for its WiFi capabilities and ease of programming, paired with suitable vibro-motors to create the desired water movements.
What does it do?
Simulates Rain: The primary function of "Rain" is to mimic the appearance and sound of raindrops falling on a surface of water. This is achieved through motors strategically placed in a water-holding case. When activated, these motors create patterns and movements in the water, resembling the natural dynamics of rain.
Remote Control via WiFi: The installation is controlled remotely through a custom Processing application. This application communicates with the ESP32-C3 Xiao microcontroller, which in turn controls the motors. Users can interact with "Rain" by sending commands via the application to activate or change the pattern of the motors, thereby altering the simulation of rain.
Aesthetic Appeal: The installation has been designed not only for functional purposes but also with an eye for aesthetic appeal. It creates a visually engaging and soothing atmosphere, making it suitable for spaces like galleries, educational institutions, or public areas where interactive art is appreciated.
Who is done beforehand?
There are several installation projects that has been done on water and rain concept. The initial goal of this project was to design a big water tank that has low in height but has large surface in terms of water. Some examples on installations are, Random International's 'Rain Room', Ned Kahn's Environmental Art Installations, Berndnaut Smilde's Nimbus sERIES, Olafur Eliasson's Weather Projects, Philip Beesley's Responsive Architectures, Daan Roosegaarde's Waterlicht.
What did you design?
In the "Rain" project, I created a prototype that serves as a conceptual model for an interactive art piece. This prototype features a small water-holding case with motors, controlled by an ESP32-C3 Xiao microcontroller and managed remotely via a custom Processing application. The design revolves around the use of these motors to generate movements in the water, effectively simulating the visual and auditory effects of raindrops. This prototype exemplifies how electronic components can be harmoniously integrated to mimic natural phenomena, focusing on the artistic emulation of rain. It stands as a testament to the potential for creating larger, more immersive art installations that blend technology with elements of nature, inviting viewers to engage with and reflect on the interplay between the artificial and the natural.
What materials and components were used?
3D Printed Base Serves as the structural foundation of the project, providing support for all other components. Acrylic Top A transparent cover that allows viewers to see the water movements inside the case while keeping the system enclosed and safe. Water Hoses Integrated with Cables Facilitate the controlled movement of water within the case, creating the rain-like effect. These hoses are integrated with the electronic control cables. Xiao ESP32-C3 The microcontroller used for controlling the motors and managing wireless communication. It's the central component for the project's interactivity. 3D Printed Pieces Custom-designed parts utilized in assembling the project. This includes mounts, connectors, and other bespoke components necessary for the construction and functionality of "Rain".
Where did they come from?
3D Printed Base and Pieces Produced using the 3D printers available at the MIT shop. These were likely printed from designs created using CAD software. Acrylic Top Provided by the MIT shop, possibly cut to size using the shop's tools or ordered pre-cut based on the project's specifications. Water Hoses Integrated with Cables Supplied by the MIT shop, selected for their suitability in creating the water movement within the project. Xiao ESP32-C3 Microcontroller Obtained from the MIT shop's electronics section, which stocks various microcontrollers and electronic components for student projects. 3D Printed Pieces Similar to the 3D printed base, these custom-designed parts were also produced using the 3D printers at the MIT shop.
How much did they cost?
All components were supplied by the MIT shop at no cost.
What parts and systems were made?
3D Printed Base: A custom-designed base made using 3D printing technology. This base served as the foundational structure for the entire project, ensuring stability and proper alignment of all other components. 3D Printed Pieces: Various custom pieces were 3D printed to fulfill specific needs of the project. This could include mounts for the motors, holders for the water hoses, and any other bespoke parts necessary for assembly and operation. Water Motion System: A system comprising motors and water hoses to create the rain-like effect on the water surface. This system was designed to control the flow and movement of water in a way that mimics the natural occurrence of rain. Control System (Featuring the Xiao ESP32-C3): An electronic control system using the Xiao ESP32-C3 microcontroller. This system was programmed to manage the operation of the motors based on input from the Processing application, thereby controlling the water motion system. User Interface (Processing Application): A custom-developed Processing application that served as the user interface for remote interaction with the installation. This software allowed users to control the water motion system wirelessly. Acrylic Top: While not made from scratch, the acrylic top was likely modified or tailored to fit the dimensions of the project. It served as a transparent cover, allowing viewers to observe the movements within the water-holding case while keeping the electronic components protected.
What processes were used?
3D printing, electronics assembly, programming and software development (Arduino IDE, Processing), System Integration, Testing and Debugging
What questions were answered?
What worked?
Interface, water movement worked!
What didn't?
Initially, the water patterns were thought as a reflection of light with photoresistors, unfortunately photoresistors did not work on time.
How was it evaluated?
Functionality does not serve but project is designed to give an aesthetic appeal and the experiments on water movements, also interaction has tested with processing interface, technical details are evaluated through the components used. Project has begun ambitious but needed to be simplied.
What are the implications?
Design Process
Initially, this project has been thought as a large scale installation-like project that mimics rainwaters with some nodes at the end of the hoses that connected to the cables.
I realized that I need to simplify the project and I decided to make a small scale prototype that has a small water tank and 4 motors that connected to the cables.
After that, I started to design the base and the pieces that I need to assemble the project.
Electronics Design
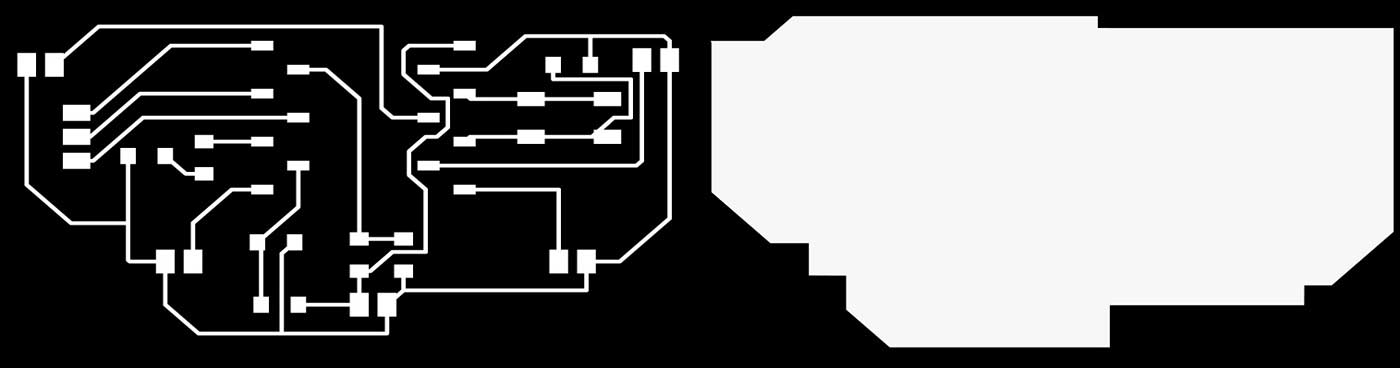
From week 14, I was prepared for the electronics part I designed, it really helped me figure out what to use for my final project.

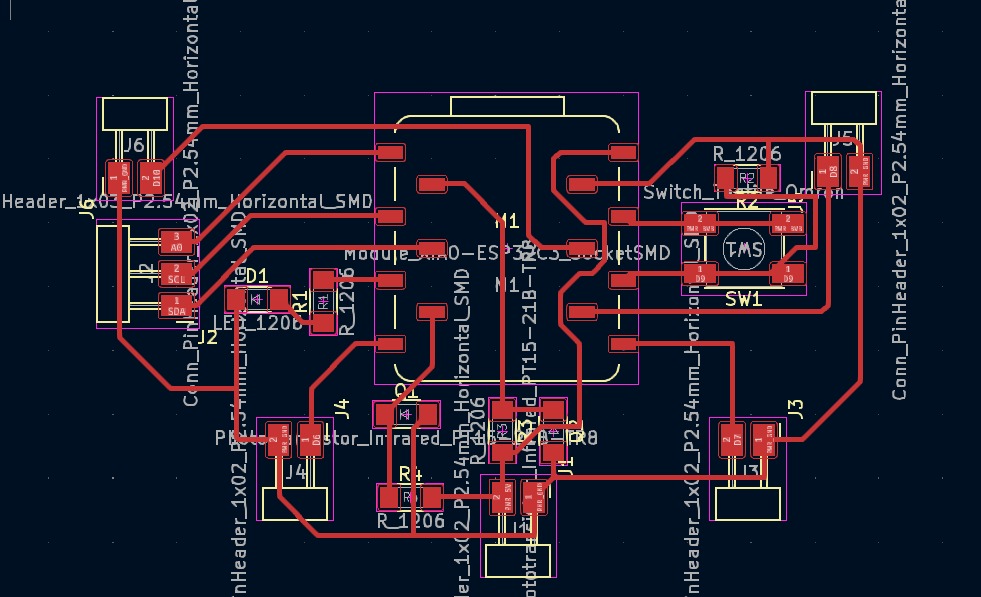
After miling and soldering my pcb looked like this:
 >
>
 >
>
After finishing the PCB I tested it and yay!! It was working.
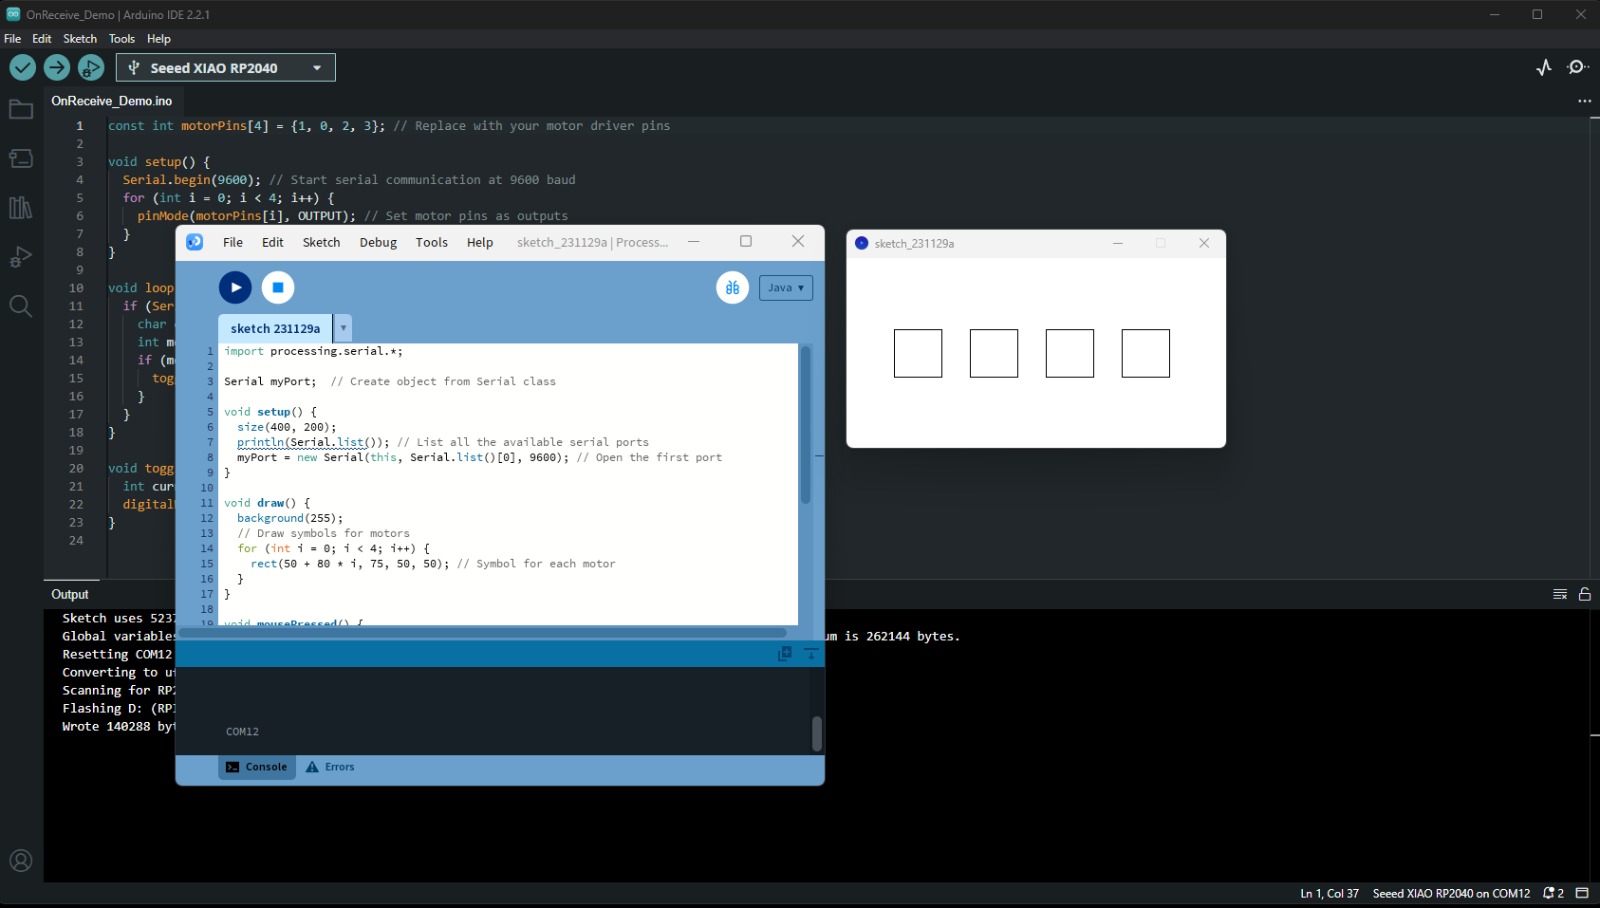
Now, it was time to implement an interface for my pcb, it was easier than I thought. My initial idea was to have 4 buttons on screen and one by one controlling motors individually. I will try to expand this idea and I hope to control my device remotely from computer for the final project. For now here is the demonstration:
Programming
When it comes to coding part I used XIAO Esp32c3 as a wifi AP and connected with this WiFi through processing using the API adress 192.168.4.1 which is a common adress when you use XIAO Esp32c3 as a WiFi router.
Unfortunately, Esp32c3 had a lot of problems, each time before uploading the code I needed to run the software from Espressive, followed this tutorial : https://www.youtube.com/watch?v=-rI5l7HxSTI
After that, I needed to upload the code to the board, I used Arduino IDE for this process. Here is the code I used!
								#include

									// Set the SSID and Password for the AP
									const char *ssid = "ESP32-C3-AP";
									const char *password = "12345678"; // You can change this password

									WiFiServer wifiServer(23);

									const int motorPins[] = {8, 10, 20, 21}; // Motor pin definitions

									void setup() {
									  Serial.begin(115200);

									  // Initialize motor pins as outputs
									  for (int i = 0; i < 4; i++) {
										pinMode(motorPins[i], OUTPUT);
										digitalWrite(motorPins[i], LOW); // Initially turn off motors
									  }

									  // Set up the ESP32-C3 as an Access Point
									  WiFi.softAP(ssid, password);
									  IPAddress IP = WiFi.softAPIP();
									  Serial.print("AP IP address: ");
									  Serial.println(IP);

									  // Start the server
									  wifiServer.begin();
									}

									void loop() {
									  // Check if a client has connected
									  WiFiClient client = wifiServer.available();
									  if (client) {
										Serial.println("Client Connected");
										while (client.connected()) {
										  if (client.available()) {
											// Read the command
											char command = client.read();
											int motorIndex = command - '1'; // Convert char to motor index
											if (motorIndex >= 0 && motorIndex < 4) {
											  // Toggle motor state
											  digitalWrite(motorPins[motorIndex], !digitalRead(motorPins[motorIndex]));
											  Serial.println("Toggled motor " + String(motorIndex + 1));
											}
										  }
										}
										client.stop();
										Serial.println("Client Disconnected");
									  }
									}
After that, I needed to connect the board to the processing, I used this code for processing.
import processing.net.*;

Client myClient;
int port = 23; // The port number set in the ESP32-C3 code
String ip = "192.168.4.1"; // The IP address of the ESP32-C3 in AP mode

void setup() {
  size(400, 200);
  println("Connecting to ESP32-C3...");
  myClient = new Client(this, ip, port); // Connect to the ESP32-C3
}

void draw() {
  background(255);
  // Draw symbols for motors
  for (int i = 0; i < 4; i++) {
    rect(50 + 80 * i, 75, 50, 50); // Symbol for each motor
  }

  // Check if the client is connected
  if (myClient != null && myClient.active()) {
    fill(0, 255, 0); // Green color if connected
  } else {
    fill(255, 0, 0); // Red color if not connected
    text("Disconnected", 20, 20);
  }
}

void mousePressed() {
  if (myClient != null && myClient.active()) {
    for (int i = 0; i < 4; i++) {
      if (overRect(50 + 80 * i, 75, 50, 50)) {
        println("Sending command to motor " + (i + 1));
        myClient.write(str(i + 1).charAt(0)); // Send command to toggle corresponding motor
      }
    }
  } else {
    println("Connection lost. Attempting to reconnect...");
    myClient = new Client(this, ip, port); // Attempt to reconnect
  }
}

boolean overRect(int x, int y, int width, int height)  {
  return mouseX >= x && mouseX <= x+width && mouseY >= y && mouseY <= y+height;
}
With processing interface I was able control motors individually which helped me to generate patterns based on motor locations.
In the end, the project assembled as following.
Here are some water patterns that I was able to catch. With correct lighting they get more visible.