
For my individual assignment this week, I'll start by thoroughly reviewing the microcontroller's datasheet. Afterward, I'll program the microcontroller development board to perform advanced tasks involving local inputs and outputs. I'll also explore various programming languages and alternative development tools, potentially incorporating AI tools for added benefits. Additionally, I'll enhance my project by integrating extra components into the board. As for our group assignment, we'll be comparing performance metrics and development processes across different microcontroller architectures.
So, I wanted to get started with Seeed Studio Xiao ESP32-C3 and Seeed Xiao RP2040, and here's what I did:
First off, I needed the Arduino IDE, right? So, I hopped on over to the Arduino website at https://www.arduino.cc/en/software and grabbed the version that works on Windows. After installing the Arduino IDE and opened it. Once it was open, I went up to the top-left corner and clicked on "Preferences." In the "Preferences" window, there's this field called "Additional Boards Manager URLs." I pasted in this web address for Seeed Studio Xiao ESP32-C3: https://github.com/espressif/arduino-esp32-c3/releases/download/package_esp32c3_index.json and for Seeed Xiao RP2040 https://github.com/earlephilhower/arduino-pico/releases/download/global/package_rp2040_index.json.
For ESP32-C3;
- Then, I headed over to "Tools" -> "Board" -> "Boards Manager."In the Boards Manager, I typed "ESP32-C3" into the search bar.
- Bingo! Found an entry called "esp32c3" by Espressif Systems. Clicked that "Install" button. It started installing the stuff we needed for the board.
- Once the installation was all done, I had to pick the ESP32-C3 board, you know, tell the IDE what we're working with:
- Went to "Tools" -> "Board."
- From the list, I found "ESP32-C3 Dev Module" and selected it as my target board.
- Also, don't forget to choose the right COM port for your ESP32-C3 under "Tools" -> "Port"
- Now, depending on what cool gadgets and gizmos you're planning to use for your projects, you might need to add some extra libraries. Clicked on "Sketch" -> "Include Library" -> "Manage Libraries." In this Library Manager thing, you can look for and install the libraries you need for stuff like sensors or displays.
Then I made the same thing for RP2040;
- I headed over to "Tools" -> "Board" -> "Boards Manager."
- In the Boards Manager, I typed "RP2040" into the search bar.
- Found "Raspberry Pi Pico/RP2040" by Earle F. Philhower, III and clicked that "Install" button.
- Once the installation was all done, I had to pick the Seeed Xiao RP2040 board and tell the IDE what we're working with:
- Went to "Tools" -> "Board."
- From the list, I found "Rasberry Pi Pico/RP2040 > Seeed Xiao RP2040" and selected it as my target board and choose COM port for RP2040 under "Tools" -> "Port."

Project 1
Counting and Blinking and Communicating with Seed Xiao RP2040
Once I had the Arduino IDE all set up, Niklas provided valuable assistance as we delved into understanding some built-in examples. My initial experiment was with the classic 'blink' program, a fundamental starting point. After successfully getting my RP2040 to blink, Niklas and I collaborated once more.
Together, we programmed our microcontroller to count until the word 'dur,' which means 'stop' in Turkish. If I typed anything else, it would continue counting while intermittently blinking with a 400-millisecond delay, equivalent to 0.4 seconds. Simultaneously, it would display a rainbow of colors, including Violet (148, 0, 211), Indigo (75, 0, 130), Blue (0, 0, 255), Green (0, 255, 0), Yellow (255, 255, 0), Orange (255, 127, 0), and Red (255, 0, 0).
#include

int Power = 11;
int PIN = 12;
int var = 0;
#define NUMPIXELS 1
String command;

Adafruit_NeoPixel pixels(NUMPIXELS, PIN, NEO_GRB + NEO_KHZ800);

void setup() {
  pixels.begin();
  pinMode(Power, OUTPUT);
  digitalWrite(Power, HIGH);
  Serial.begin(9600);
}

void loop() {

  manualInput();

  if (command.equals("dur")) {
    pixels.clear();
    pixels.setPixelColor(0, pixels.Color(0, 0, 0));
    delay(400);
    pixels.show();
  } else {
    var++;
    Serial.println(var);
    pixels.clear();
    pixels.setPixelColor(0, pixels.Color(148, 0, 211));
    delay(400);
    pixels.show();
    pixels.clear();
    pixels.setPixelColor(0, pixels.Color(75, 0, 130));
    delay(400);
    pixels.show();
    pixels.clear();
    pixels.setPixelColor(0, pixels.Color(0, 0, 255));
    delay(400);
    pixels.show();
    pixels.clear();
    pixels.setPixelColor(0, pixels.Color(0, 255, 0));
    delay(400);
    pixels.show();
    pixels.clear();
    pixels.setPixelColor(0, pixels.Color(255, 255, 0));
    delay(400);
    pixels.show();
    delay(500);
    pixels.show();
    pixels.clear();
    pixels.setPixelColor(0, pixels.Color(255, 127, 0));
    delay(400);
    pixels.show();
    delay(500);
    pixels.show();
    pixels.clear();
    pixels.setPixelColor(0, pixels.Color(255, 0 , 0));
    delay(400);
    pixels.show();
    delay(500);
  }
}


void manualInput() {

  if (Serial.available()) {
    command = Serial.readStringUntil('\n');
  }
}
Odio dignissimos ducimus qui blanditiis praesentium voluptatum deleniti atque corrupti dolores et quas molestias excepturi sint occaecati cupiditate non provident, similique sunt in culpa. Aenean eu leo quam. Pellentesque ornare sem lacinia quam venenatis vestibulum. Nulla vitae elit libero, a pharetra augue laboris in sit minim cupidatat ut dolor voluptate enim veniam consequat occaecat fugiat in adipisicing in amet Ut nulla nisi non ut enim aliqua laborum mollit quis nostrud sed sed..
Project 2
Eye Controlled Mouse with ESP32-C3 and ESP32-CAM
I embarked on a rather audacious journey into the world of coding. Despite my complete lack of prior coding experience, I found myself yearning to tackle an ambitious project as a means to learn by doing, to fuse various elements together, and ultimately bring it to fruition (with help of ChatGpt of course). It's a daunting task, but one I'm determined to conquer.
My quest also led me to explore a new programming interface, steering away from the familiar grounds of the Arduino IDE. Instead, I decided to plunge into the realms of MicroPython, hoping to expand my coding horizons.
The catalyst for my endeavor was a video I stumbled upon, where a programmer ingeniously crafted an eye-controlled mouse using the Python language. My first task was to grasp the essence of what he was accomplishing. In essence, he started by defining the camera's role in this fascinating venture. From there, he utilized 'MediaPipe,' Google's facial recognition interface, to pinpoint and track the movement of his eye. The final piece of the puzzle was synchronizing mouse control with the subtle nuances of his eye's movements.
Here is the link for his video and the code he is using : 'https://www.youtube.com/watch?v=k3PcVruvZCs'
#include

int Power = 11;
int PIN = 12;
int var = 0;
#define NUMPIXELS 1
String command;

Adafruit_NeoPixel pixels(NUMPIXELS, PIN, NEO_GRB + NEO_KHZ800);

void setup() {
  pixels.begin();
  pinMode(Power, OUTPUT);
  digitalWrite(Power, HIGH);
  Serial.begin(9600);
}

void loop() {

  manualInput();

  if (command.equals("dur")) {
    pixels.clear();
    pixels.setPixelColor(0, pixels.Color(0, 0, 0));
    delay(400);
    pixels.show();
  } else {
    var++;
    Serial.println(var);
    pixels.clear();
    pixels.setPixelColor(0, pixels.Color(148, 0, 211));
    delay(400);
    pixels.show();
    pixels.clear();
    pixels.setPixelColor(0, pixels.Color(75, 0, 130));
    delay(400);
    pixels.show();
    pixels.clear();
    pixels.setPixelColor(0, pixels.Color(0, 0, 255));
    delay(400);
    pixels.show();
    pixels.clear();
    pixels.setPixelColor(0, pixels.Color(0, 255, 0));
    delay(400);
    pixels.show();
    pixels.clear();
    pixels.setPixelColor(0, pixels.Color(255, 255, 0));
    delay(400);
    pixels.show();
    delay(500);
    pixels.show();
    pixels.clear();
    pixels.setPixelColor(0, pixels.Color(255, 127, 0));
    delay(400);
    pixels.show();
    delay(500);
    pixels.show();
    pixels.clear();
    pixels.setPixelColor(0, pixels.Color(255, 0 , 0));
    delay(400);
    pixels.show();
    delay(500);
  }
}


void manualInput() {

  if (Serial.available()) {
    command = Serial.readStringUntil('\n');
  }
}
Conceptually, it seemed straightforward, almost logical, but for someone like me, with no prior coding knowledge, it was an exceedingly ambitious undertaking. Nevertheless, armed with determination and a sheer will to learn, I dedicated approximately three days to this project, investing both my mornings and evenings into the journey.
I teamed up with ChatGPT to translate Python into C++, a challenging task to adapt it for Arduino IDE. It was no cakewalk. The libraries used in the tutorial I followed had changed, forcing me to hunt down and upload new ones for each step.
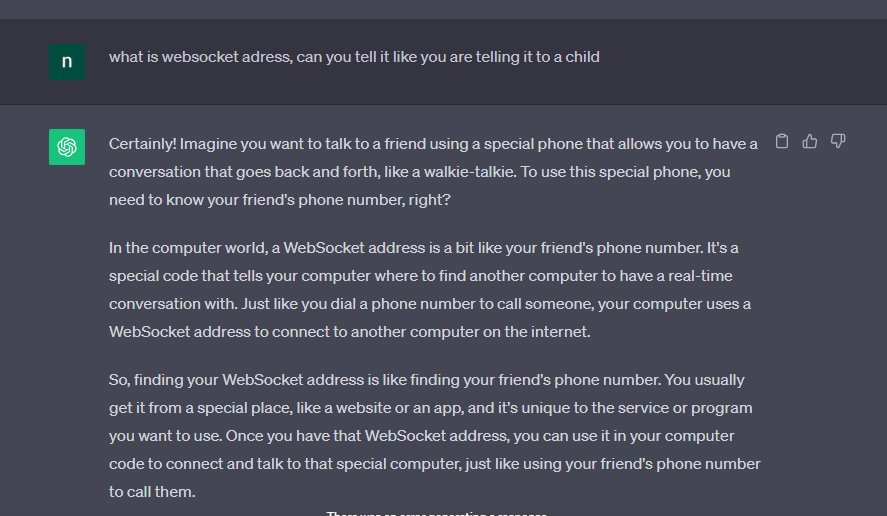
Despite my best efforts, I couldn't grasp everything ChatGPT explained. I found myself repeatedly seeking clarification on each step. One major roadblock was establishing communication between my microcontroller and computer. ChatGPT introduced the concept of WebSockets, which proved baffling due to my lack of prior knowledge. I had to ask for explanations repeatedly, sometimes simplifying them to the level of a child's understanding.


"To use my ESP32-C3 with an ESP32-CAM as a USB-connected eye-controlled mouse for my computer, follow these steps:
- Installed the Thonny: Start by downloading and installing an IDE suitable for my needs as a beginner, Thonny is a user-friendly option.
- Once Thonny set up, I İnstalled MicroPython on your ESP32-C3. I followed the instructions for installing MicroPython on the ESP32-C3 in the official MicroPython documentation. I downloaded the .uf2 format document and copied it to ESP32-C3 file.
- To enable eye-controlled mouse functionality, I need to ensure that I have the necessary sensors and libraries. One important library is MediaPipe from Google, which offers a machine learning-based eye detection algorithm. However, MediaPipe is not compatible with MicroPython. Instead, I need to use manually written, less complex code generated by ChatGPT.
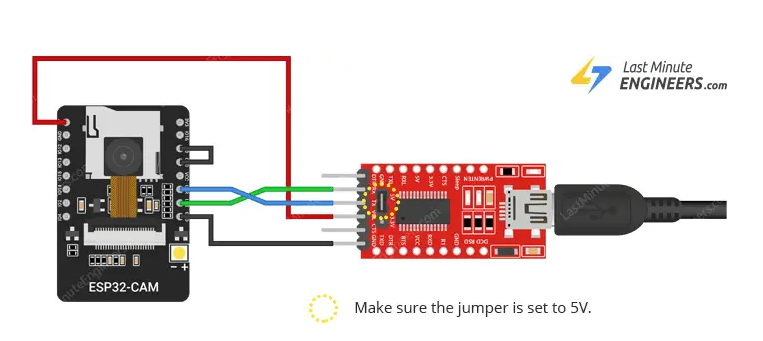
- I need to be sure ESP32-CAM is properly connected to ESP32-C3 and is set up to capture video frames. Ensure that the computer and ESP32-C3 can communicate with each other over a USB connection.
- I utilized the code provided by ChatGPT, which is tailored for ESP32-C3 and ESP32-CAM setup. It suppose to implement a simplified version of eye tracking using basic image processing techniques.
- Using my IDE (Thonny), I uploaded the generated code to your ESP32-C3. After uploading, I run the code on the microcontroller. This code 'jopefully' will process video frames from the ESP32-CAM, detect eyes, and control the mouse cursor based on detected eye movements.
Here is the complete code that ChatGPT created for me. Basically same logic of the youtube video was used in different programming language.
import sensor
import image
import lcd
import time
import uinput

# Initialize the camera (ESP32-CAM)
sensor.reset()
sensor.set_pixformat(sensor.RGB565)
sensor.set_framesize(sensor.QVGA)
sensor.skip_frames(30)

# Initialize the LCD (if available)
lcd.init(freq=15000000)

# Initialize the mouse emulator (RP2040)
mouse = uinput.Mouse(0x01, 0x02, 0)
move_scale = 5  # Adjust mouse movement speed

# Constants for eye tracking
min_eye_area = 500  # Minimum area for eye detection
prev_eye_center_x = 0
prev_eye_center_y = 0

while True:
    img = sensor.snapshot()

    # Convert the frame to grayscale for processing
    gray_img = img.to_grayscale()

    # Thresholding to segment the eyes
    binary_img = gray_img.threshold(128)

    # Eye detection using contour detection
    contours = binary_img.find_contours()

    # Filtering for eye candidates
    eyes = [c for c in contours if min_eye_area < c.area()]

    if len(eyes) == 2:
        left_eye, right_eye = eyes

        # Calculate the center of each eye
        left_eye_center_x = left_eye.cx()
        left_eye_center_y = left_eye.cy()
        right_eye_center_x = right_eye.cx()
        right_eye_center_y = right_eye.cy()

        # Calculate the change in eye position from the previous frame
        delta_x = right_eye_center_x - left_eye_center_x
        delta_y = right_eye_center_y - left_eye_center_y

        # Move the mouse cursor accordingly
        mouse.move(delta_x * move_scale, delta_y * move_scale)

        # Update the previous eye positions
        prev_eye_center_x = (left_eye_center_x + right_eye_center_x) / 2
        prev_eye_center_y = (left_eye_center_y + right_eye_center_y) / 2

    # Display the processed image on the LCD (if available)
    if lcd.is_initialized():
        lcd.display(img)

    time.sleep_ms(50)
To connect an ESP32-C3 and an ESP32-CAM: I connected the power the ESP32-C3 with 3.3V and the ESP32-CAM with 5V,connected GND (ground) between both boards, Established UART communication by connecting Tx to Rx and Rx to Tx. And as it shown in the diagram of ESP32-CAM I connected the GND port to GPIO0 in itself.

TO BE CONTINUED...
Despite working on this project continuously for three days, I couldn't reach the final version. Initially, I attempted to use the Arduino IDE by translating the code into C++. Unfortunately, I faced limitations due to the lack of libraries, especially those required for machine learning-based eye detection algorithms. Additionally, I assumed that a Wi-Fi connection was necessary, but later discovered that USB communication with my computer was sufficient. I encountered issues with broken links provided by ChatGPT, hardware connections, and other challenges along the way. Subsequently, I decided to explore MicroPython as a new language and IDE, hoping to find compatible libraries. However, I still faced issues as these libraries didn't work with MicroPython.
What mistakes did I make?
- I should have asked about unfamiliar aspects before making assumptions, which would have saved time.
- I should have thoroughly researched the microcontroller architectures before diving deep into the project.
- I attempted to use Python code, assuming it could be translated into C++ seamlessly.
Despite the mistakes and the considerable amount of time I invested, I gained valuable insights into microcontroller architectures, pin setups, connections, coding in various languages, and different IDEs. This project broadened my understanding of the topic. Therefore, I consider it a successful learning experience.
Group Assignment
This monday, Danny and I delved into a comparison of various microcontroller chip architectures. Our exploration included the Seeed XIAO RP2040, Raspberry Pi Pico, Seeed Studio Xiao ESP32-C3, ESP32-WROOM-32, ATTiny45, and ATSAMD11. During this exercise, I discovered certain limitations of the boards I was working with. I initially attempted to use MicroPython on the ESP32-C3, only to find out that it wasn't supported. Fortunately, I recognized this issue and adjusted my approach accordingly.
