Idea
I wanted to mold a character. I looked into various models, but eventually chose the Chick with Knife meme. Another experimentation is to make enamel pins and test how small can the features be for the mold.
CAD
I grabbed the model from Thingiverse and imported it to
Fusion360 as a mesh. As you can notice, it will be hard to mill the duck holding the knife so I have to split them.
I started learning more about meshes and how to convert them to shapes while still maintaining the shape.
I cadded the knife because mesh auto repair didn't mesh it successfully because it connected vertices to its nearest neighboor. Here is the process as a quick video:
Link to Fusion360 Project File
CAM
Setup
Since I created the box, I had to simply choose the dimention (3"*7"*1.5") and align the stock with my box. Before creating the box in CAD, I thought I can simply use the Manufacturing tap to create the walls. It doesn't. Also, I had issues aligning the stock with my models. One tip is to choose the models before adjust the stock setting.
I started experimenting with various clearing options by choosing the ones that relates to my design. At the beginning, I had a very low resolution result even though I used 3 processes with different mills. I asked Anthony for help and I learned about a lot of parameters that I didn't pay attention to. For example, in Rest Machining, pay attention about the scale of what the material ignored. The number I inserted was too big, thus the processes didn't remove the material. Another number was the height of each pass, which I had to lower too. Another improvement was to use the ball end mill to achieve the smooth surface of the duck. As a side note, the information of the speed, feed rate, flute numbers does not effect the cutting simulation rather than the time estimate.
With Anthony's help, I ended up with the following process. First, I started with adaptive clearing that removes a huge amount of the block, thus you should choose a big mill (1/4" Flat End Mill). After, we used pocket clearing which also removes large amount of material, but with a different technique compared to adaptive clearing. If you hover on the clearing method in Fusion, it gives you helpful summary of the method along with an illustration. I used parallel clearing to have smooth surfaces and pencil clearing to sharpen the outlines of my object, both with 1/8" ball end mill. At the end, I added a contour clearing to enhance the outlines and details of the duck feet.
After this process, I realized that the material between my model and box wall was not cleared because the mill couldn't reach that area, thus, I went back to my model, changed the placement to ensure enough clearance between the model and the walls. Here is a picture of the model connected to the wall.

CNC
The way this class approached creating the mold is by machining the wax box, you make the mold from this wax box, then you make your model out of the mold.
First, we exported the CAM as a F3D file from Fusion360. Anthony converted the file to G-code file. It was interesting to see how big the file is! ~120,000 lines! After, we opened the g-code from the machine software to machine our design. We made sure all the necessary components are working, I learned more about mills like upcut and downcut mills. I still don't see the difference clearly but I understand the functionality. Then we adjusted the xyz reference and started the job. After getting the result of the CNC, I noticed that the knife side and pegs are not cut well, but non_milled pigs made it easier actually to ensure the alignment, and the knife side if fixable in post-processing.

Molding
To make the mold, I needed: measurement and mixing cup, oomoo kit, pop-sticks, your wax block, time and patience. If you are opening a new kit, make sure you mix the oil layer in. After, measure with water the amount of material that you need. After you know the volume of the mix you need, we will prepare the Oomoo mix with that volume with 1:1 ration of the A and B materials. Mix it slowly (avoid adding air bubbles) for a few minutes until it is homogenous.
Pour in the Oomoo. If you have any fine details, take a brush and cover the surface of your mold. try to pour on teh edges and let the material slide onto the object to avoid bubbles. Scrape the surface if there is any excess to have a flat-surfaced mold. Wait for it to solidify for 2h.


There are some bubbles in the mold, but nothing too significant and not fixable after casting.
Casting
Hydrostone
Tools needed: Hydrostone powder, water, cups, pop-sticks
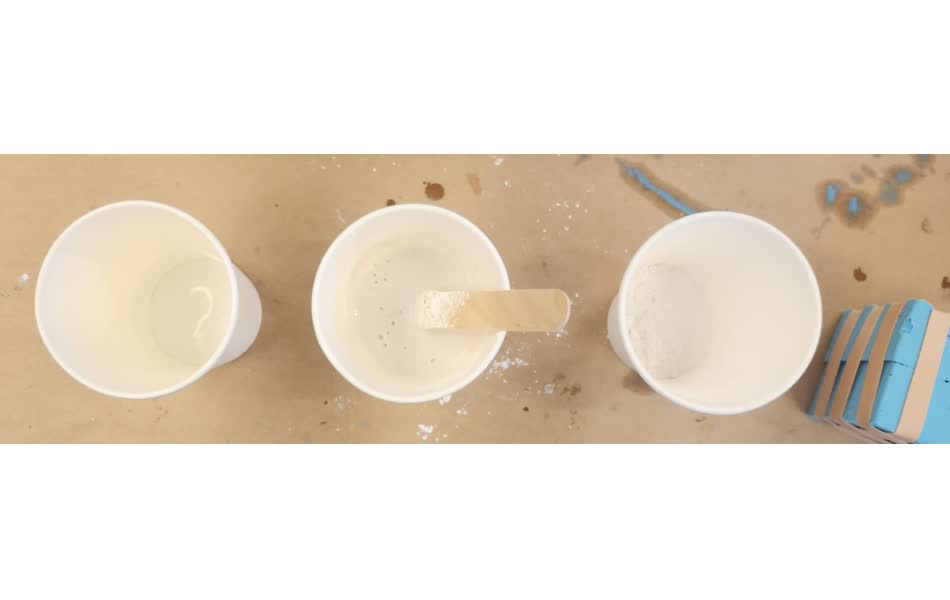
The mixture consists of water and Hydrostone powder. The ratio varies in the internet, but we used 3:1 powder to water ratio roughly since it is generally forgiving. After, create a mixture inlet cut into the mold, seal it with rubber bands, pour the mix into the mold, let it sits for 15 - 30 minutes, depending on how runny the solution is. After, remove the rubber bands and the oomoo mold and let the model oxidize and solidify. The following are some pictures of the process.


The duck had a lot of bubbles for some unknown reasons, but most likely because its head is boiling from anger.

Roto281
Metal casting is super cool! It was one of the things I always wanted to try. Roto281 makes it very convenient since the melting point is relatively low. We "toasted" the Roto281 in a toaster oven (not used for food, ofc), wore safety gear (face shield, gloves, closed shoes, long sleeve and pants). Powdering the mold with talc helps with a better surface result, so I powdered the mold and dumped any excess powder.

sealed the mold again, but I made the hall bigger and a wooden piece to the bottom since the bottom wall was too thin. We placed the mold in plastic container to contain the metal casting spillage. The container had a metal piece that sinks the heat. Once I had the gear on and the Roto was melted, I took it with a tong and used it to pour in the metal casting. After a bit, we removed the mold and let the model cool down. Here is the duck taking a nap
Now, I have a cool and heavy metallic angry duck!
Future Work
Experimenting with making pins.
Assignment Description
Individual Assignments:
- design a mold around the stock and tooling that you'll be using, mill it (rough cut + three-axis finish cut), and use it to cast parts
- extra credit: use more then two mold parts
Group Assignment:
- Review the safety data sheets for each of your molding and casting materials, then make and compare test casts with each of them
- Extra credit: try other molding and casting processes