How to Make (Almost) Anything
Question: What does it do, and who's done what beforehand?
For the final project, I am designing and manufacturing a user interactive ferrofluidic based automated magnetic display box. To control the magnetic field I am using electromagnets with a microcontroller (XiaoRP2040 2040) and custom made PCB for power management and external components such as sensors, buck converters, mosfet board. Motivation behind of the project is to create a interactive tool that user can actually take part of to control it and visualize the magnetic field.
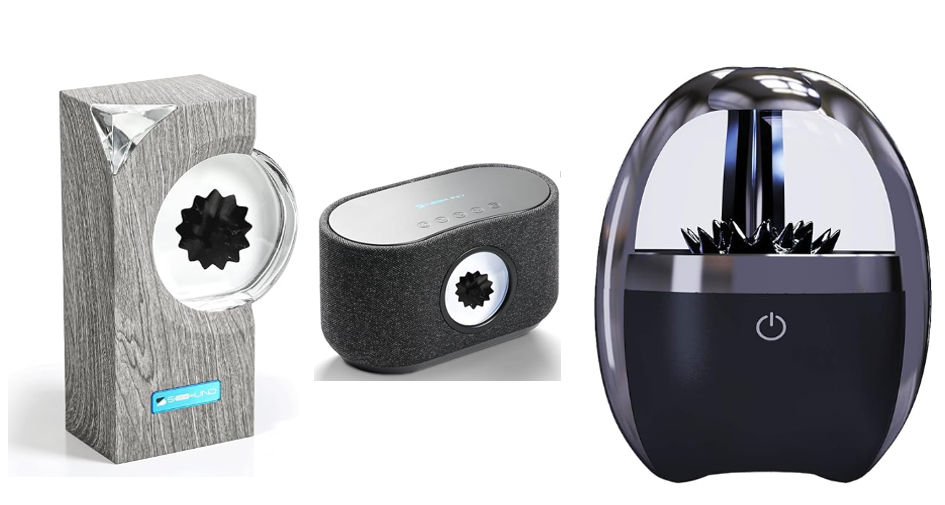
Ferrofluidic displays are very famous and can be found even in Amazon as a desk toy [13, 14, 15] in a speaker form factor mostly, however one thing I realized not many people focused is, user interaction, so I decided to let the user play with the magnetic display.
Question: Materials and components used?
Bill of materials, links (references to buy them), quantity used in the project, and cost:
- Ferrofluid (dense magnetic particle fluid) [1]
- Electromagnets x2 (to control the magnetic field) [2]
- Servo motor x1 (to move the electromagnets) [3]
- XiaoRP2040 x1 (as a microcontroller) [4]
- Adjustable Power supply x1 (to connect the device to wall power) [5]
- Force resistive sensors x2 (to build user interactivity) [6]
- Buck Converter x1 [7]
- Mosfet board x1 [8]
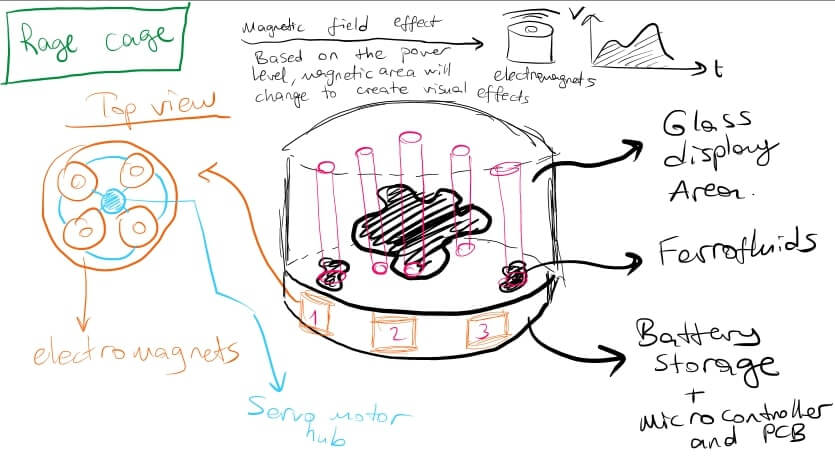
For the concept design, below is the hand sketch with possible materials highlighted:
Question: What did you design?
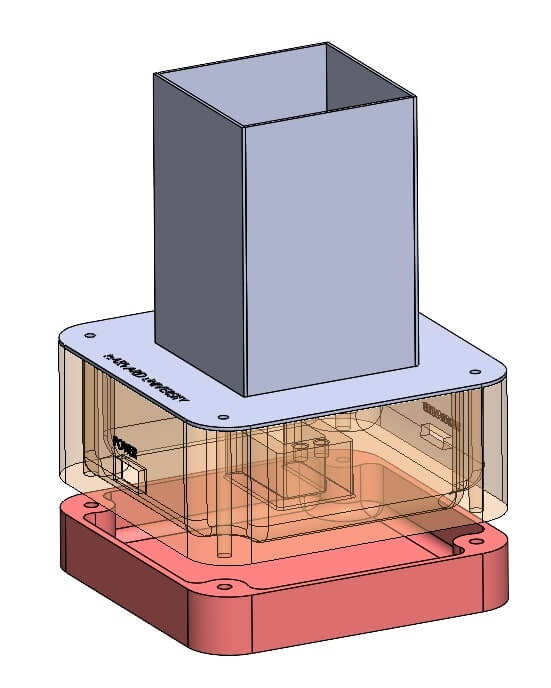
I designed 3D printed parts, 2D laser cut acrylic parts, PCB and electronics design. First, I created below conceptual CAD model for the final project in Solidworks [9], Design has 3 CAD parts, acrylic liquid storage, servo and electromagnet holder, and lastly lower case for storing the electronics.
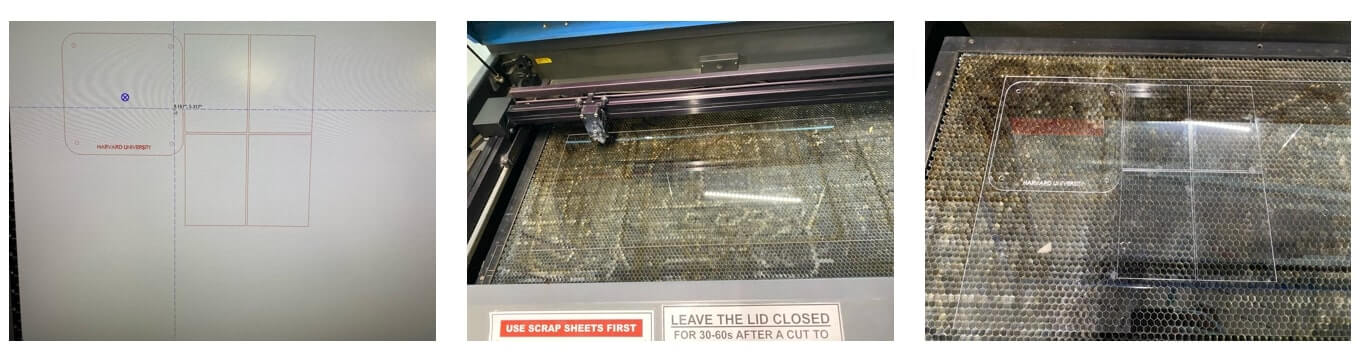
First, I laser cut the acrylic pieces, type: clear acrylic 1/8' inch thickness.
Then I used Bambu Carbon X1 [10] to 3D print the cases, as a benchmark, Prusa calculated the print time for the servo holder case (orange part in the CAD view) for 11 hours and Bambu printer printed the case in 3 hours. Below is the video from machine:
Question: What parts and systems were made, what processes were used?
Overall 60% of the parts are made (printed, cut, designed, fabricated) and some power electronics are purchased, off-the-shelf (wall power supply, mosfet board, buck converter, etc.), I used 3D printing, laser cutting, and soldering mostly in the project as fabrication methods.
After printing the cases, I used M3 heated inserts to assemble the parts together (for top acrylic case and lower 3D printed case). For this process, I used solder iron, heated the insert for 5-7 seconds and slowly push through the hole in the part.
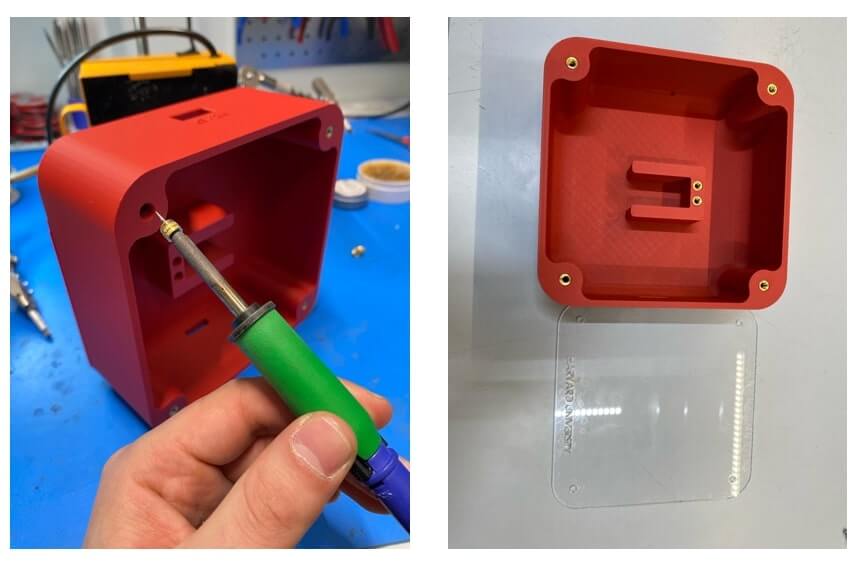
Below is the picture from first assembly trial for the case and acrylic cover and acrylic liquid cup.

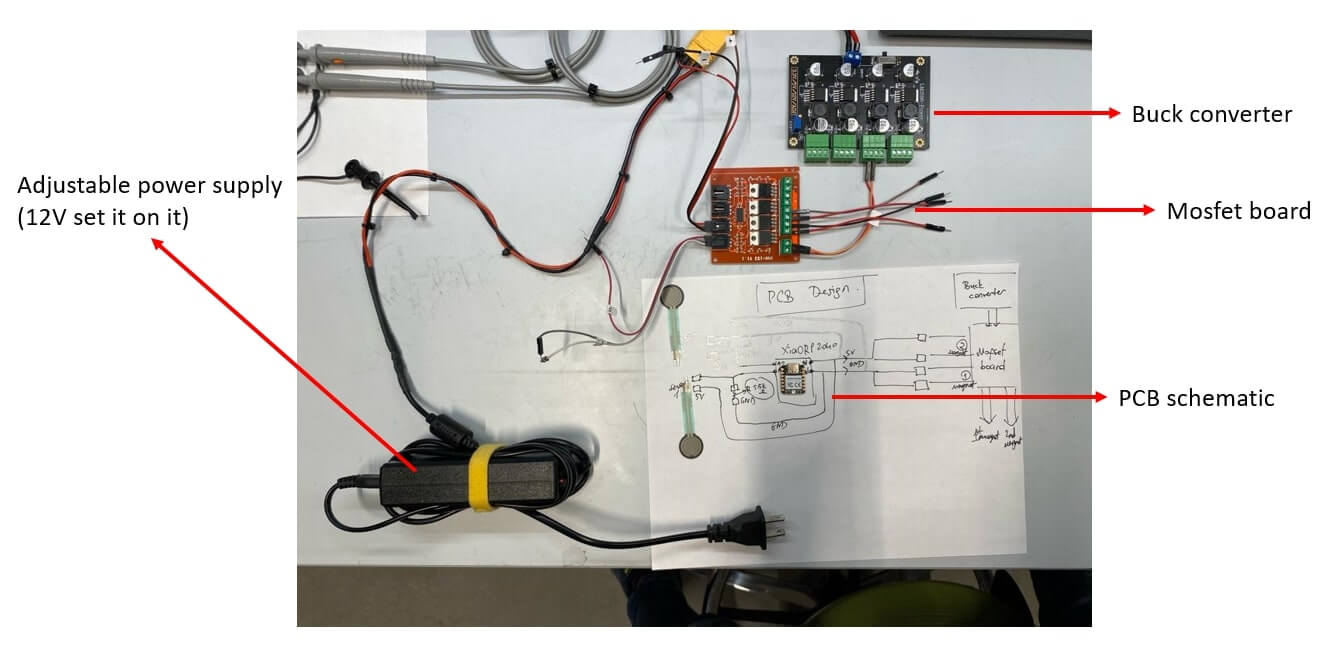
For the electronics, I decided to use adjustable wall power supply and buck converter which has multiple of outpus so that I can power the electromagnets and PCB at the same time. In order to control the electromagnets I used mosfet board, below is the picture from electronics conceptualization and PCB sketching design.
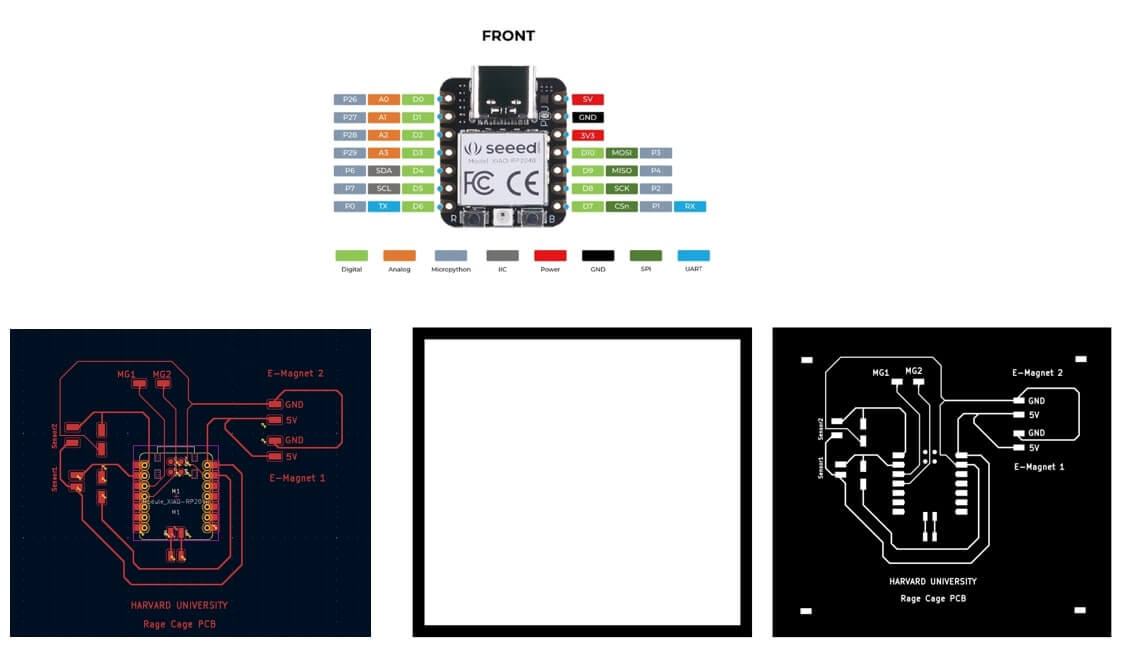
After deciding the electroncis package, I started to design the PCB board around the XiaoRP2040 (KiCAD [10] is used for PCB design), PCB has 2 force resistive sensor connection, 2 electromagnet signal control connection, and power supply to Xiaorp2040 from buck converter.
Below picture is the pcb manufacturing steps, I used Roland SRM [11] to mill the PCB.
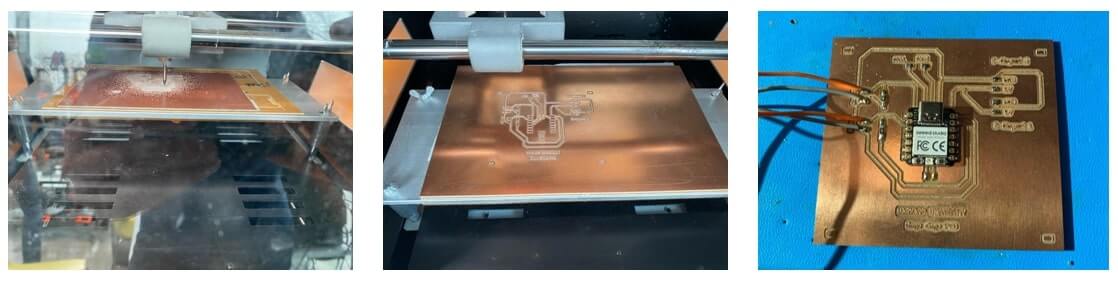
After I soldered the XiaoRP2040, sensors, pull up resistor (5.5k ohm) to the PCB, I connected to wall power to see if Xiao is getting powered up or not.
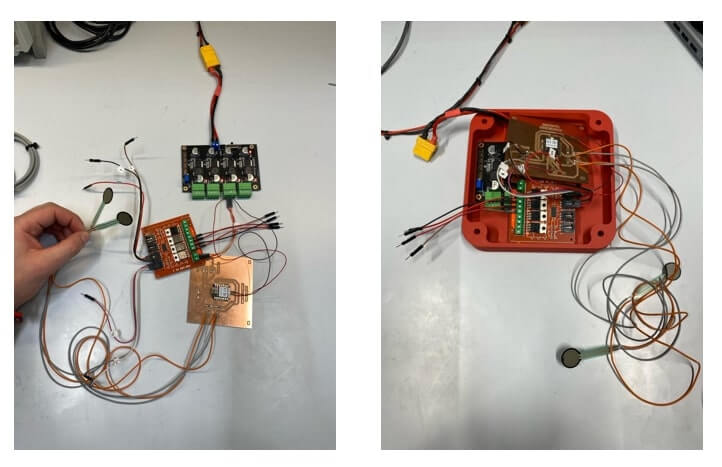
Then I checked the packaging of the electronics in the 3D printed case to make sure if everything nicely fits and cables are organized.
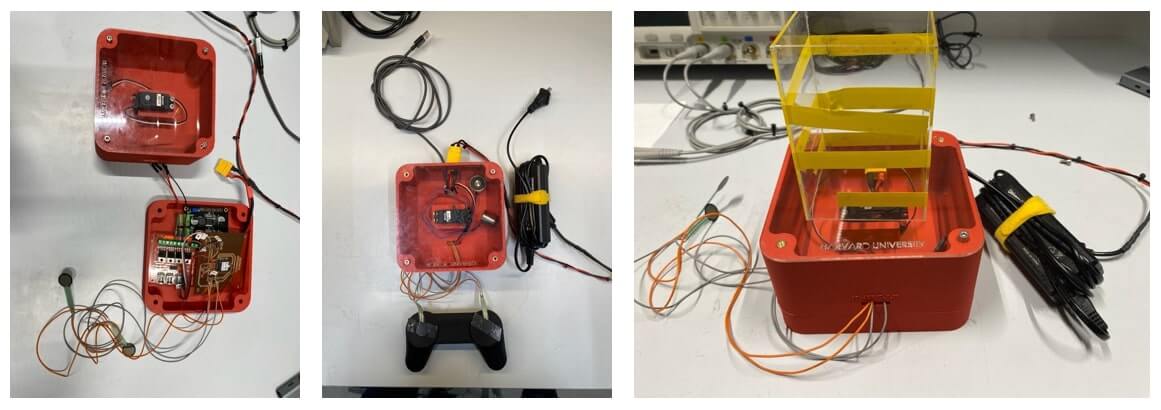
The most important aspect of the project is the user interface, so I 3D printed joystick to place force resistive sensors on it so that user can interact easly.
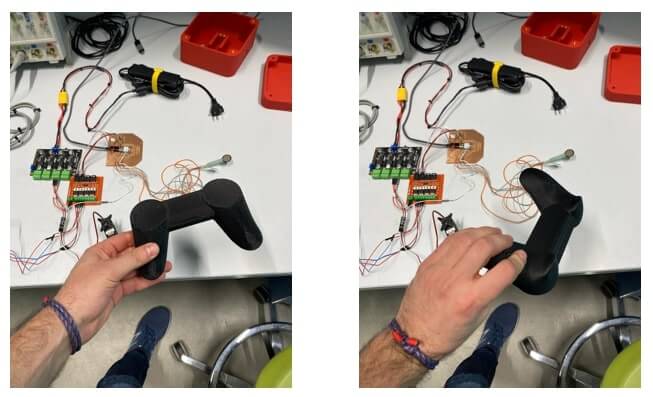
Below is the video of the first test of force resistive sensor and electromagnet test, after pressing the sensor, electromagnet is activated.
Question: What worked? What did not?
After that I wanted to do a small test with ferrofluid to see if the magnets are able to activate it, at this point I understand the water-ferrofluid solution is not transparent as I expected and magnets are working but now powerful enough. Also one thing did not work as I expected, when pour the ferrofluid to the water, it sticked to the walls so I could not see clear view since the walls of the cup was black.
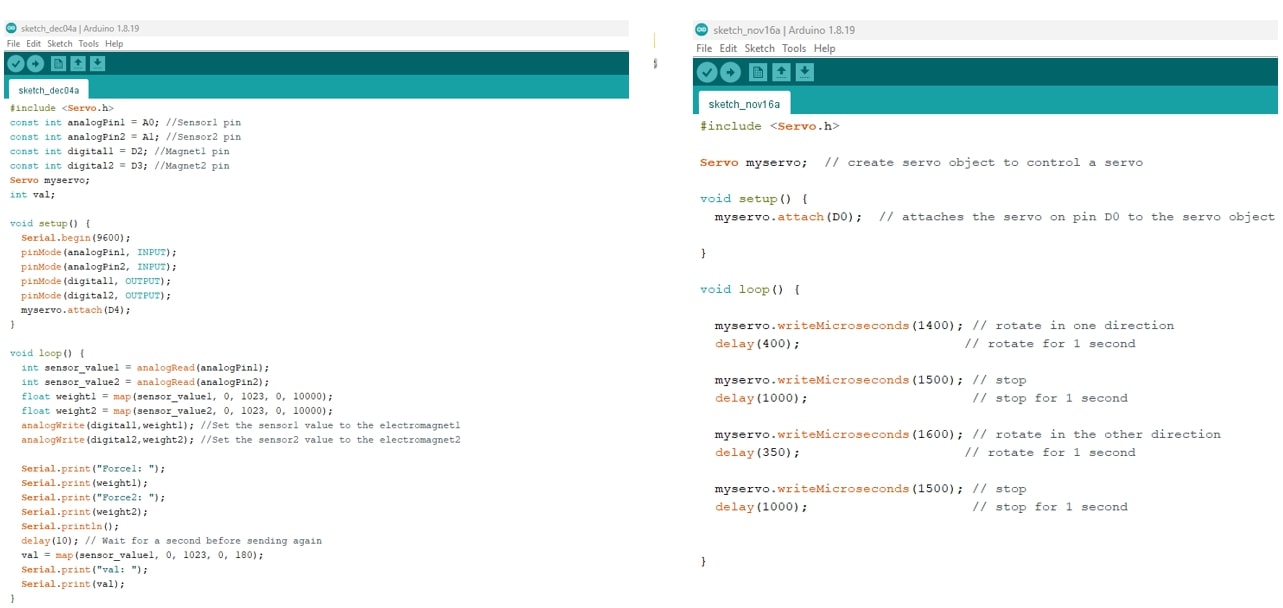
I used Arduino IDE [12] for coding, below is the code for controlling the electromagnets, sensors, and servo motor.
Below is a simple test to see the electromagnets are working or not.
Below is the test for fully working system, except the visual display unit, testing the kinematics.
After the mechanism and hardware is finished, I started to prepare ferrofluid suspension, below is a video from only ferrofluid itself.
In order to to have a nice looking view, I learned that glass container must be cleaned well, so I cleaned the container with IPA and dry it, then I used DI water and table salt to prepare the suspension, below is the video pouring the ferrofluid to suspension.
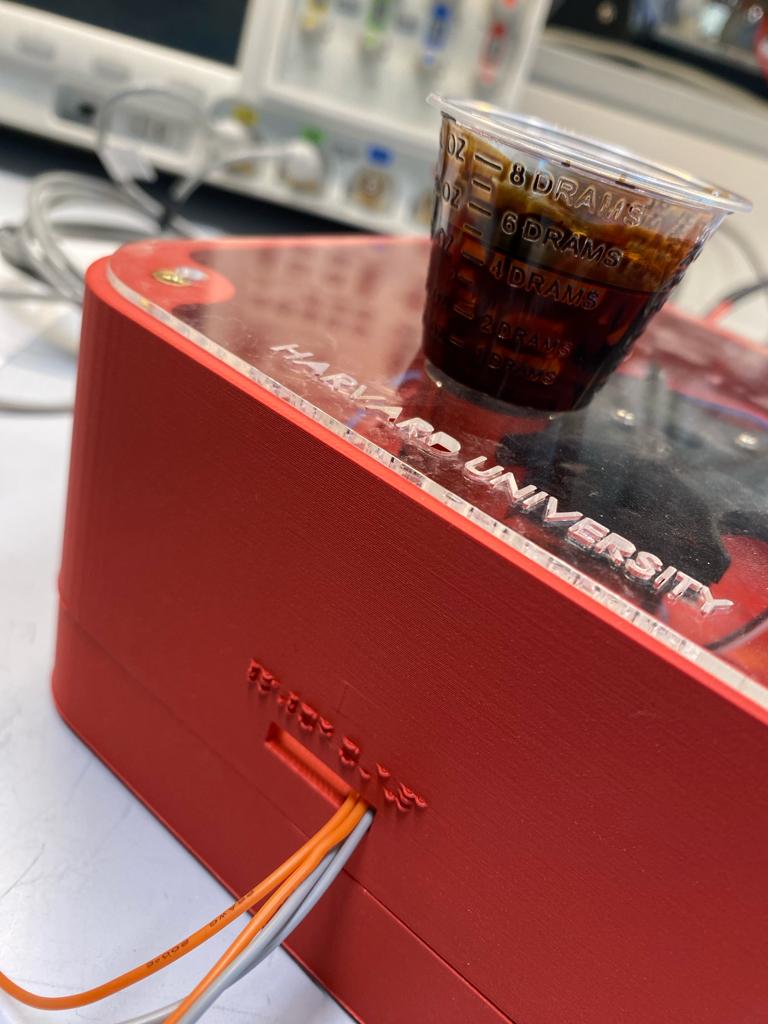
Now it is time to test the complete system!
I ended up not a very flat glass container that is why I am not able to showcase the whole range, also the power of the electromagnets might not be enough to push the ferrofluid more into water, however here is the video showing how it works.
References:
[1] https://www.amazon.com/Magnetic-Ferrofluid-Classroom-Supplies-Projects/dp/B0CLBG6NJR/ref=sr_1_7?keywords=ferrofluid&qid=1702666747&sr=8-7
[2] https://www.amazon.com/uxcell-Electric-Lifting-Electromagnet-Solenoid/dp/B01N3387AA/ref=asc_df_B01N3387AA/?tag=hyprod-20&linkCode=df0&hvadid=241981689490&hvpos=&hvnetw=g&hvrand=17484032218263101224&hvpone=&hvptwo=&hvqmt=&hvdev=c&hvdvcmdl=&hvlocint=&hvlocphy=9002000&hvtargid=pla-451865363690&psc=1&mcid=5802cca19da93189842f5cfbc94c1af6&gclid=Cj0KCQiAj_CrBhD-ARIsAIiMxT8nlmdy6qeuXIY5y6LPrLfLdhqbPYY5o3CLjgzUXHC41tMxd5KLA6oaAiBlEALw_wcB
[3] https://www.amazon.com/YEJMKJ-Digital-Airplane-Helicopter-Projects/dp/B0CKLKP1JX/ref=sxin_15_sbv_search_btf?content-id=amzn1.sym.5795aee5-71f0-4369-b632-e8c78407f2cf%3Aamzn1.sym.5795aee5-71f0-4369-b632-e8c78407f2cf&crid=31BKGK4NLL5EE&cv_ct_cx=servo+motor&keywords=servo+motor&pd_rd_i=B0CKLKP1JX&pd_rd_r=9851b05c-7005-4bf4-9513-3f14045bd438&pd_rd_w=hrL7o&pd_rd_wg=uqrRS&pf_rd_p=5795aee5-71f0-4369-b632-e8c78407f2cf&pf_rd_r=0MGPJRCGB2R4BAJA22DX&qid=1702666799&sbo=RZvfv%2F%2FHxDF%2BO5021pAnSA%3D%3D&sprefix=servo+motor+%2Caps%2C87&sr=1-1-5190daf0-67e3-427c-bea6-c72c1df98776
[4] https://www.amazon.com/Microcontroller-Dual-Core-MicroPython-CircuitPython-Interfaces/dp/B09NNVNW7M/ref=asc_df_B09NNVNW7M/?tag=hyprod-20&linkCode=df0&hvadid=647248209079&hvpos=&hvnetw=g&hvrand=8988953766038134353&hvpone=&hvptwo=&hvqmt=&hvdev=c&hvdvcmdl=&hvlocint=&hvlocphy=9002000&hvtargid=pla-1597861491481&psc=1&mcid=bfb78aa043b8338d8a6f985daa51a66d
[5] https://www.amazon.com/SHNITPWR-Universal-Adjustable-Switching-100V-240V/dp/B08N4R48LJ/ref=sr_1_16?crid=2QE7ZUXU2P4GI&keywords=adjustable%2Bpower%2Bsupply&qid=1702666897&s=electronics&sprefix=adjustable%2Bpower%2Bsuppl%2Celectronics%2C95&sr=1-16&th=1
[6] https://www.amazon.com/Sensitive-Resistor-Force-sensitive-Pressure-Resistive/dp/B09C2CYFCG/ref=sr_1_5?crid=3UPK6K2E6KFCK&keywords=force+resistive+sensor&qid=1702666944&s=electronics&sprefix=force+resistive+sensor%2Celectronics%2C83&sr=1-5-catcorr
[7] https://www.amazon.com/LM2596-Converter-Module-Supply-1-23V-30V/dp/B008BHBEE0
[8] https://www.amazon.com/NOYITO-4-Channel-MOSFET-Isolated-Arduino/dp/B07CRJLJWY/ref=sr_1_4?crid=2M5K4KKTX1MB4&keywords=mosfet+board&qid=1702667012&s=electronics&sprefix=mosfet+board%2Celectronics%2C76&sr=1-4
[9] https://www.solidworks.com/
[10] https://www.kicad.org/
[11] https://www.rolanddga.com/products/3d/srm-20-fresadora-compacta
[12] https://www.arduino.cc/
[13] https://www.amazon.com/Sovenomund-Dancing-ferrofluid-Ferrofluid-Teenager/dp/B0B8PWJSL9/ref=sr_1_28?keywords=ferrofluid&qid=1702833828&sr=8-28
[14] https://www.amazon.com/gp/aw/d/B0C2BXMP4C/?_encoding=UTF8&pd_rd_plhdr=t&aaxitk=0a6ae054ac004a7db9cb776970dddf84&hsa_cr_id=0&qid=1702833828&sr=1-1-9e67e56a-6f64-441f-a281-df67fc737124&ref_=sbx_be_s_sparkle_lsi4d_asin_0_title&pd_rd_w=4DSfq&content-id=amzn1.sym.417820b0-80f2-4084-adb3-fb612550f30b%3Aamzn1.sym.417820b0-80f2-4084-adb3-fb612550f30b&pf_rd_p=417820b0-80f2-4084-adb3-fb612550f30b&pf_rd_r=8Z1KPMB7KVMBGJT55QHC&pd_rd_wg=eazGS&pd_rd_r=f91efc9e-860a-4d72-aab5-bf070ea48a4a&th=1
[15] https://www.amazon.com/sovenomund-Ferrofluid-Speaker-Bluetooth-Adjustable/dp/B0CHJ247ND/ref=sr_1_21_sspa?keywords=ferrofluid&qid=1702833828&sr=8-21-spons&sp_csd=d2lkZ2V0TmFtZT1zcF9tdGY&psc=1