HTGAA: Biodesign
- George Church (Harvard)
Class Material
Hands-on activity: Identifying an Unknown Antibiotic Resistance Gene
Alex Mijalis, Li Li, Jessica Weber
Introduction
The traits of an organism are determined by the genes contained in its DNA. How can we figure out which genes code for particular traits of interest, though? How can genomic DNA be sequenced? In this lab you will play the role of DNA detective, sequencing part of a bacterial genome and attempting to identify an antibiotic resistance gene. The methods in this lab are commonly used to prepare, amplify, and sequence genomic DNA. These methods are also used to identify antibiotic resistance genes in unknown soil bacteria!
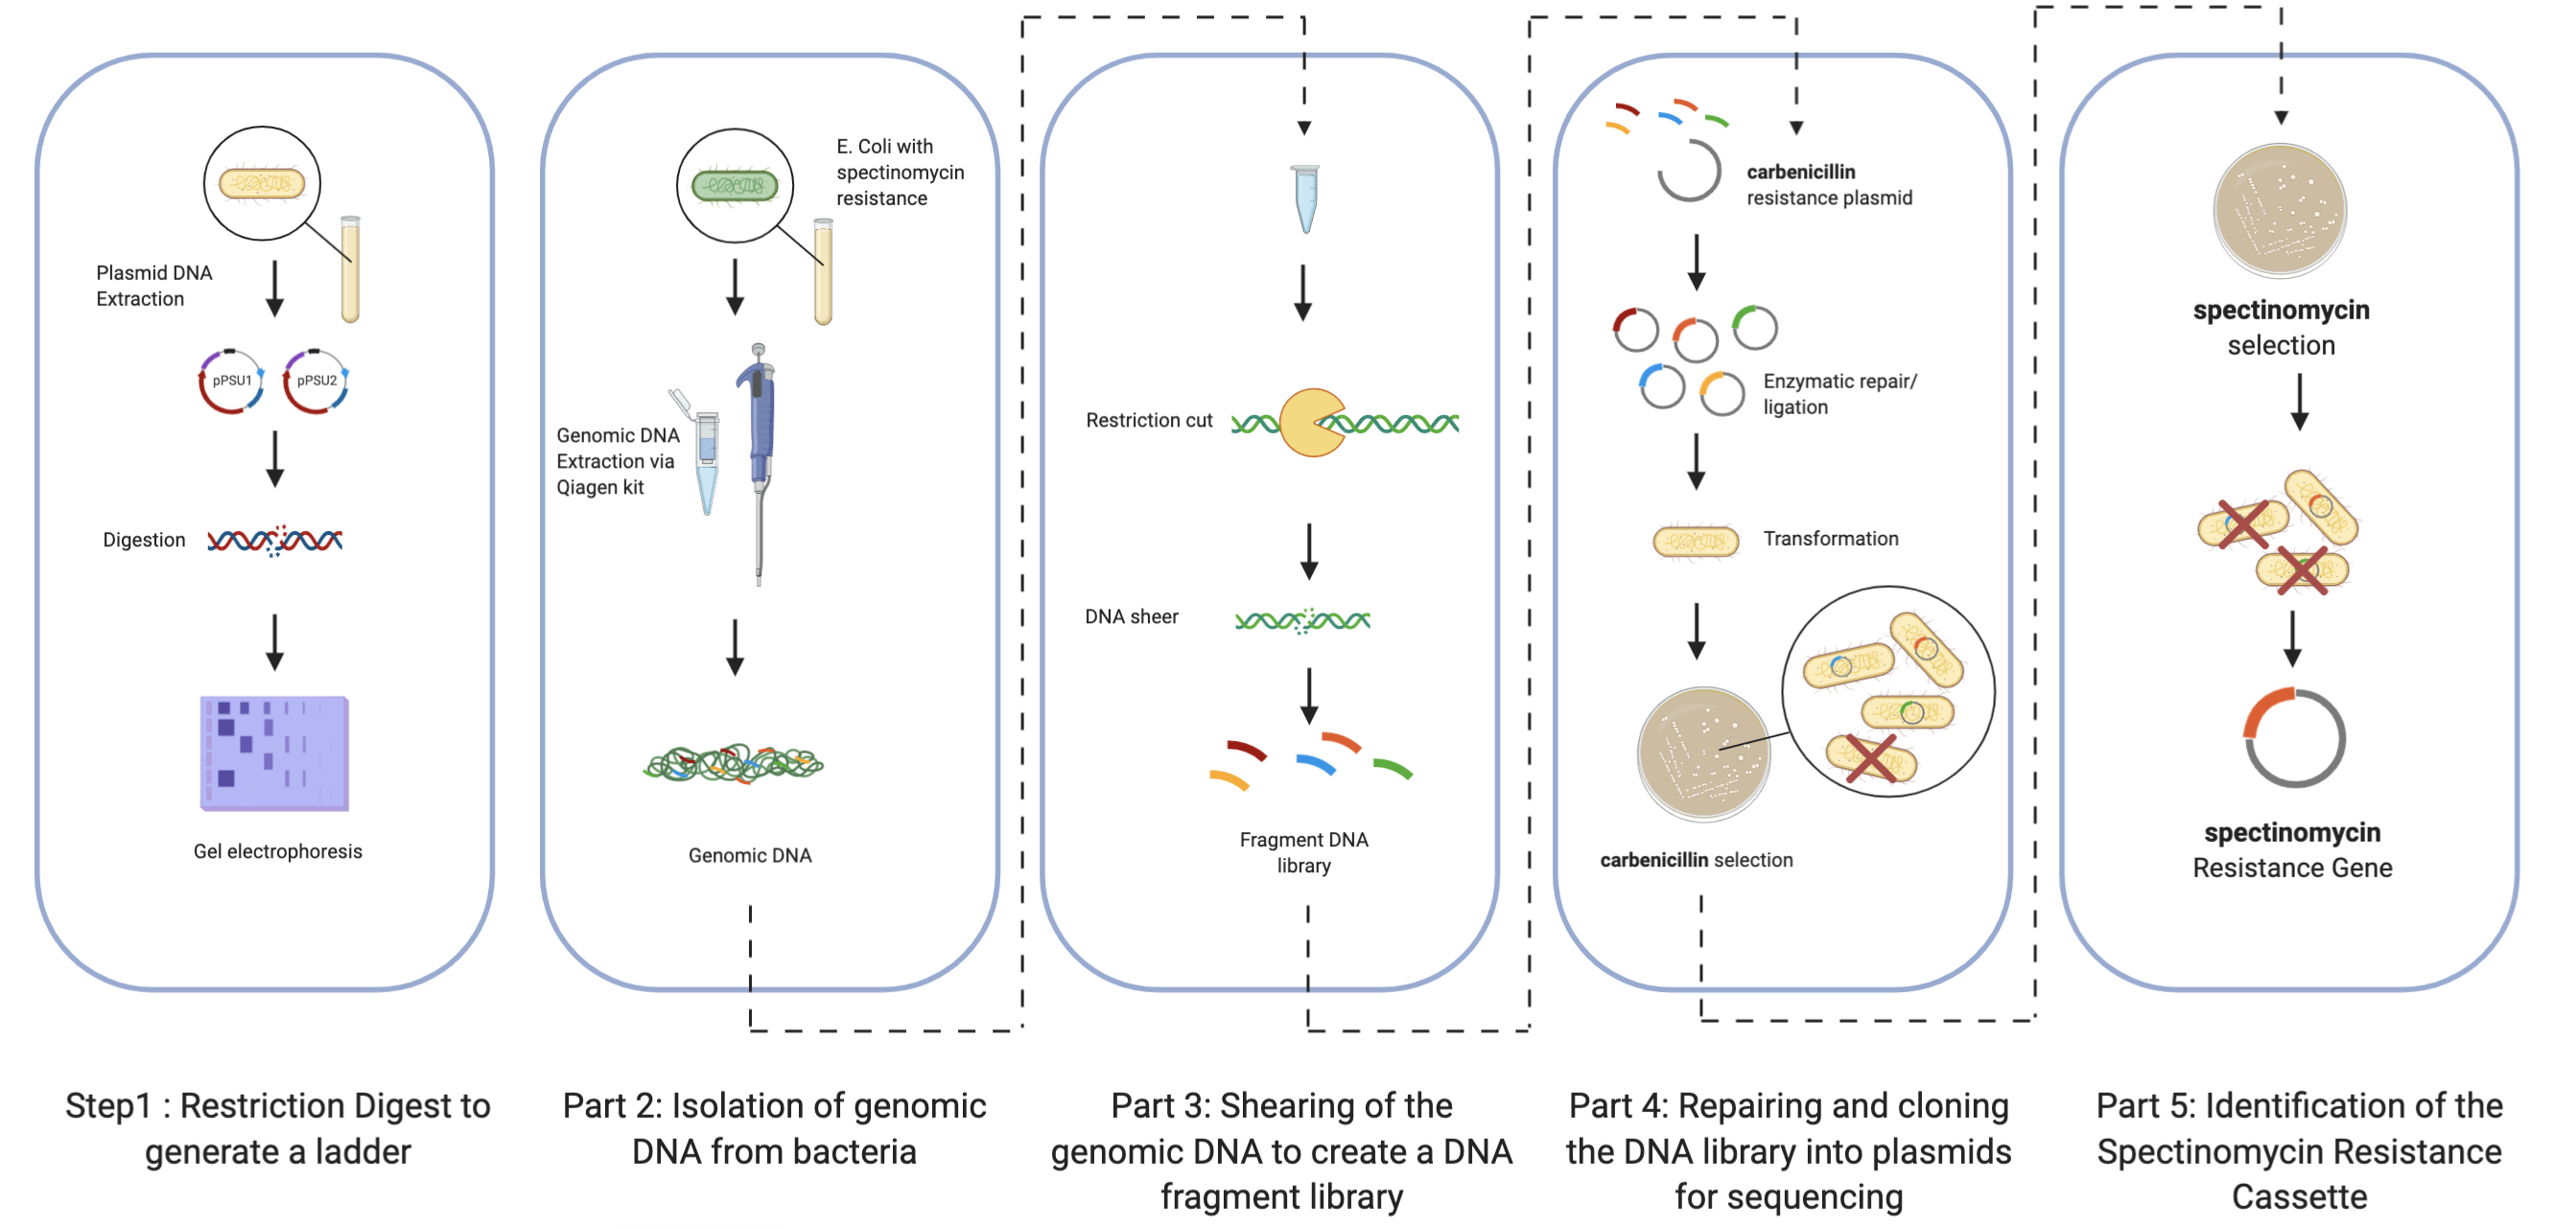
Part 1: Restriction Digest to generate a ladder
In part one of the lab, you will get your bearings in the lab, isolating the plasmids pPSU1 and pPSU2 from E. coli culture and digesting them to make an open-source DNA ladder for gel electrophoresis.
Part 2: Isolation of genomic DNA from bacteria
In part two of the lab, you will use your ladder from lane 1 to help isolate genomic DNA from a strain of E. coli which contains a spectinomycin resistance cassette of about 1.2 kb. You will use this genomic DNA to prepare and sequence DNA libraries in parts 3 and 4. As opposed to /plasmid/ DNA, which is around ~10 kb in length, the E. coli /genome/ is much longer, around 4-5 Mb in length. You will isolate this DNA using a Qiagen genomic DNA extraction kit.
Part 3: Shearing of the genomic DNA to create a DNA fragment library
In part three you will use sonication shear the genomic DNA to prepare a fragment library. Sonication creates tiny air bubbles in solution that cleave long pieces of DNA into fragments when they collapse. You will optimize the time and sonication energy to obtain a fragment library with average size of 2-3 kb.
Part 4: Repairing and cloning the DNA library into plasmids for sequencing
In part 4, you will repair and clone the fragments into a plasmid vector to both sequence the fragments of the E. coli genome and identify the DNA sequence responsible for antibiotic resistance.
Because shearing is an uncontrolled mechanical process, it leaves the DNA with uneven ends. You will perform enzymatic repair on these DNA ends using the NEB DNA Blunting Kit to ensure they are blunt and double stranded before ligating them into plasmid DNA for cloning. You will ligate the double stranded DNA into a linearized plasmid vector which contains an ampicillin/carbenicillin resistance gene. Then, you will transform this vector into E. coli, plate on an LB-agar plate containing carbenicillin, and sequence the single colonies using Sanger Sequencing
Part 5: Identification of the Spectinomycin Resistance Cassette
Finally, you will re-transform your vector preparation and plate onto LB-agar plates containing both carbenicillin (to select for bacteria that contain the plasmid) and spectinomycin (to select for plasmid vectors that contain the isolated antibiotic resistance gene). If you’re lucky, you’ll get a colony! This is a numbers game, so don’t be discouraged if you don’t find it.
Achievements!
- Miniprep the pPSU1 and pPSU2 plasmids, perform the restriction digest, and analyze by gel electrophoresis. Image the gel.
- Isolate genomic DNA from the Spec strain of E. Coli.
- Shear the genomic DNA and optimize the shearing to generate fragments with average size of ~2-3 kb, as determined by gel electrophoresis.
- Pro Challenge Concentrate and gel extract the DNA library.
- Pro Challenge Ligate the DNA library into the NEB plasmid backbone. Send three colonies off for sequencing.
- Pro Challenge Isolate an E. Coli clone that contains a plasmid with the spectinomycin gene. Verify by Sanger sequencing.
Documentation
We expect that you document what you do in the lab. You should do this either in a physical lab notebook or on your Benchling. At the top of each page, put today’s date and a description of what you are working on.
For common protocols, such as minipreps, feel free to refer to the Qiagen protocol, but note if you make any exceptions to the protocol. Always record data, for instance, the concentrations of plasmid you obtain after a miniprep or a gel image, or protocols that aren’t documented elsewhere. Turn your lab notebook in at the end of the homework period.
A note on kits and protocols
We will be using several “kits” to help us perform certain processes in the lab. These kits prepackage enzymes, purification columns, buffers, and have detailed, optimized protocols as well as quick guides. We have reproduced the protocols here, where needed. Always feel free to look up a kit online for the protocol, and please ask if you have any other questions.
Learning Objectives
At the end of this lab period you should have experience with the following techniques:
DNA extraction and preparation - Genomic DNA - Plasmid DNA - DNA Shearing and Library Preparation Analytical Methods - Gel Electrophoresis - Nanodrop / Absorbance Spectroscopy - Sanger Sequencing Enzymatic Reactions on DNA - Restriction Digest - DNA End Repair - DNA Ligation Bacterial Methods - Transformation by electroporation - Plating - Culturing in liquid suspension - Antibiotic Selection
Prelab Questions
- Restriction Digest
Download and review the genbank sequence files for pPSU1 and pPSU2.
Use Benchling to upload these plasmid sequences.
Use Benchling to simulate PstI and EcoRV restriction digests of the two plasmids. See this Benchling tutorial for instructions.
Where do PstI and EcoRV cut within their recognition sequences?
What gene is encoded into the plasmids?
How many copies of the plsamid would you roughly expect in each cell? What information did you use to determine this?
- DNA Libraries
- How big is the E. Coli genome?
- The spectinomycin gene cassette of interest is 1.2 kb. What is the probability of finding that gene in a sheared E. coli gene fragment of 2,000 bases?
- How many E. coli transformants would you have to screen through to have a 99% probability of finding the spectinomycin gene?
Step one: Preparation of an Open Source DNA Ladder
Materials
| Function | Wetware |
|---|---|
| Plasmid harvesting from E. Coli | Qiagen Plasmid Miniprep Kit |
| Plasmid source | pPSU1 and pPSU2 Bacterial Strain from Addgene |
| Restriction Digest of Plasmids | PstI-HF and EcoRV-HF from NEB |
| Gel Electrophoresis | TAE (Tris-acetate-EDTA) buffer, Agarose, Loading Dye, DNA stain |
| Function | Hardware |
|---|---|
| Temperature control for enzymatic reactions | Thermocycler, water bath, incubator, or heat block |
| Electrophoresis gel prep | Microwave, balance |
| Electrophoresis | Gel box and power supply |
| DNA Visualization | Blue LED or UV Transilluminator |
| Analysis of DNA Concentration | Spectrophotometer |
| Function | Software |
|---|---|
| Benchling | Analysis of plasmids and restriction digests |
| ImageJ (Freeware) | Processing of Gel Images |
Harvest pPSU1 and pPSU2 DNA from overnight E. coli culture using a Qiagen Miniprep Kit and elute with water. Use the paper protocol found at each wet bench or find the PDF here.
Measure the concentration of your pPSU1 and pPSU2 DNA preps using the Nanodrop spectrophotometer.
Clean stage with Kimwipe soaked with DI water.
Wipe stage with dry Kimwipe.
Add 2 uL DI water on stage and make blank measurement.
Wipe stage with dry Kimwipe.
For each DNA sample, add 2 uL and measure and record the concentration (ng/uL). Wipe stage dry with Kimwipe between measurements.
To finish, clean stage with Kimwipe soaked with DI water and then wipe dry.
In separate digestion reactions with either the NEB enzymes PstI-HF or EcoRV-HF, cut both pPSU1 and pPSU2 DNA.
- If plasmid yields are greater than 500 ng/uL in concentration, prepare a dilution of your plasmid with water to a concentration of 100 ng/uL and total volume greater than 10 uL. If a plasmid yield is less than 2 ug in total yield (concentration x volume), either repeat the prep or use as much as you have available for the two digestion reactions and uncut controls.
| To Reaction | Volume (50 uL Total) |
|---|---|
| 1 ug pPSU1 DNA | X uL |
| 1 ug pPSU2 DNA | Y uL |
| DNase/RNase-Free Water | 43 – x – y uL |
| NEB Buffer CutSmart | 5 uL |
| NEB EcoRV-HF | 2 uL |
Prepare reaction with EcoRV-HF in a PCR tube (add enzyme last):
Prepare reaction with PstI-HF in a PCR tube (add enzyme last):
| To Reaction | Volume (50 uL Total) |
|---|---|
| 1 ug pPSU1 DNA | x uL |
| 1 ug pPSU2 DNA | y uL |
| DNase/RNase-Free Water | 43 – x – y uL |
| NEB Buffer CutSmart | 5 uL |
| NEB PstI-HF | 2 uL |
- Incubate reactions at 37C for 15 minutes in thermocycler.
Run the reactions alongside 100bp and 1kbp DNA ladder and uncut plasmid controls on a 1% agarose gel stained with SYBR-Safe at 120V for 1 hour. Scale down steps (i) and (ii) below by 1/3 if you are using the smaller gel box.
Weigh 1.0 g agarose and add into 100 mL 1xTAE. Microwave until agarose completely dissolves. Be careful: The agarose is prone to boiling over and making a mess in the microwave.
Add 10 uL of 10000xSYBR-Safe DNA stain. Use heat-resistant glove to gently swirl to mix (careful of burn hazard). Pour into rotated gel box tray (check beforehand that seal is watertight and do not fill past the bottom of the comb slots) and insert comb.
Wait 45-60 minutes for gel to set.
Remove comb and rotate tray so lanes are closest to cathode (black cable). Fill gel box with 1xTAE until gel is submerged.
Load the following into separate lanes.
| To Lane | Pre-Mix |
|---|---|
| NEB 100 bp Ref Ladder | 2 uL 100 bp DNA Ladder (500 ng/ul) + 48 uL water + 10 uL 6xGel Loading Dye |
| NEB 1 kb Ref Ladder | 2 uL 1 kb DNA Ladder (500 ng/ul) + 48 uL water + 10 uL 6xGel Loading Dye |
| Uncut pPSU1 Neg Control | X uL for 1 ug pPSU1 DNA + 50-X uL water + 10 uL 6xGel Loading Dye |
| Uncut pPSU2 Neg Control | Y uL for 1 ug pPSU2 DNA + 50-Y uL water + 10 uL 6xGel Loading Dye |
| EcoRV-HF Digest Reaction | 50 uL of Digest Reaction + 10 uL 6xGel Loading Dye |
| PstI-HF Digest Reaction | 50 uL of Digest Reaction + 10 uL 6xGel Loading Dye |
- Insert gel box lid, connect cables to power supply, and run at 120V for 1 hour.
Image the gels with a transilluminator and analyze the banding patterns.
Save gel image for further analysis.
Plot the distance each band traveled (relative to the largest fragment) versus the lengths of the DNA fragments. See FIJI gel analysis tutorial below for help. If your gel image is difficult to analyze, you are welcome to ask a classmate for their image or perform your analysis on Fig4 from Henrici et al.
For the banding from the EcoRV-HF digestion, explain the relative brightnesses of the 500 bp and the 5 kb bands.
For the banding from the PstI-HF digestion, explain the relative brightnesses of the 500 bp and the 600 bp bands.
Step Two: Isolation of genomic DNA from bacteria
The full Kit Handbook and Quick-Start Protocol can be found here: https://www.qiagen.com/us/products/discovery-and-translational-research/dna-rna-purification/dna-purification/genomic-dna/blood-and-cell-culture-dna-midi-kit/#resources
Grow up an overnight liquid culture of the spectinomycin-resistant E. coli, or use the supplied liquid culture. Inoculate ~6 mL of LB with a small (~50 uL) amount of liquid starter culture supplied to you.
The next day, add 7 μl of RNase A solution (100 mg/ml) to a 3.5 ml aliquot of Buffer B1.
Pellet bacteria from your culture by centrifugation at 3000-5000 x g for 5-10 min.
Resuspend the bacteria pellet from 3.5 ml of Buffer B1 (with RNase A) by vortexing at top speed.
Add 80 μl of lysozyme stock solution (100 mg/ml), and 100 μl of QIAGEN Protease or QIAGEN Proteinase K stock solution. Incubate at 37°C for at least 30 min.
Add 1.2 ml Buffer B2, and mix by inverting the tube several times or by vortexing for a few seconds. Incubate at 50°C for 30 min.
Equilibrate a QIAGEN Genomic-tip 100/G with 4 ml of Buffer QBT, and allow the QIAGEN Genomic-tip to empty by gravity flow.
Vortex the sample (from the last step of the specific sample preparation and lysis protocol) for 10 s at maximum speed and apply it to the equilibrated QIAGEN Genomic-tip. Allow it to enter the resin by gravity flow.
Wash the QIAGEN Genomic-tip with 2 x 7.5 ml of Buffer QC.
Elute the genomic DNA with 1 x 5 ml of Buffer QF.
Precipitate the DNA by adding 3.5 ml (0.7 volumes) room-temperature (15-25°C) isopropanol to the eluted DNA. Recover the precipitated DNA: mix and centrifuge immediately at >5000 x g for at least 15 min at 4°C. Carefully remove the supernatant.
Wash the centrifuged DNA pellet with 2 ml of cold 70% ethanol. Vortex briefly and centrifuge at >5000 x g for 10 min at 4°C. Carefully remove the supernatant without disturbing the pellet. Air-dry for 5-10 min, and resuspend the DNA in 0.1-2 ml of a suitable buffer (e.g., TE buffer, pH 8.0, or 10 mM Tris·Cl, pH 8.5). Dissolve the DNA overnight on a shaker or at 55°C for 1-2 h (resuspend the DNA pellet by rinsing the walls to recover the DNA; pipetting the DNA up and down to promote resuspension should be avoided).
Alternate Step 2 Protocol: gDNA Extraction with the DNEasy Kit
Harvest ~1.5 mL of culture into two 1.5 mL centrifuge tubes and pellet at ~5,000g for 5 min. Carefully remove and discard the supernatant.
Resuspend each pellet in 180 uL Buffer ATL.
Add 20 uL proteinase K. Incubate at 56C for 30 min.
Vortex for 15s.
Add 200 uL Buffer AL to each sample and mix by vortexing.
Add 200 uL absolute ethanol to each sample and mix by vortexing.
Pipet this mixture onto the Dneasy Mini Spin column in a 2 mL collection tube. Spin at 6,000g for 1 min and discard the flow-through and collection tube.
Place the spin column into a new 2 mL collection tube. Add 500 uL buffer AW1. Centrifuge for 1 min and discard the flow-through and the collection tube.
Place the spin column into a new 2 mL collection tube, add 500 uL buffer AW2 and centrifuge for 3 min. Discard the flow-through and the collection tube.
Transfer the spin column to a new 1.5 mL centrifuge tube (where you will store the DNA).
Elute the dNA by adding 200 uL buffer AE to the center of the spin column membrane. Incubate for 1 min at room temperature, then centrifuge for 1 min.
Quantitate the concentration of the DNA.
Step Three: Shearing and Gel Electrophoresis Analysis of Genomic DNA
Analyze the concentration of the gDNA on the nanodrop and compute your total amount of DNA. To perform the four digests below you will need a total of 8 micrograms of DNA. If you don't have this much, feel free to only perform a subset.
Set up a restriction restriction digest with 2 micrograms of the genomic DNA sample in Cutsmart buffer with EcoRI-HF, EcoRV-HF, and PvuII-HF. Use the recipes in part 1 to guide your triple digest reaction. Let the reaction go for 1 hour at 37C.
Set up three more restriction digest with the restriction enzyme Sau3AI. Because Sau3AI is a promiscuous restriction enzyme with a 4-base-pair recognition site, we will use various concentrations for these digestions as described below...
3a. Prepare 1x CutSmart buffer by diluting 1 part 10x Cutsmart into 9 parts water. You will probably need ~200 uL of 1x CutSmart for these dilutions. You can prepare these dilutions in a PCR strip tube.
3b. Prepare a 1:10 dilution of Sau3AI by diluting 1 part of the stock enzyme into 9 parts 1x CutSmart buffer from step 3a.
3c. Prepare a 1:100 dilution of Sau3AI by diluting 1 part of the 1:10 enzyme dilution again 1:10 as above.
3d. Finally, set up 3 different digests with the different enzyme dilutions. In the first digest, use 1 uL of the stock Sau3A enzyme. In the second digest, use 1 uL of the 1:10 dilution of Sau3AI. In the third digest, use 1 uL of the 1:100 dilution of Sau3AI. The rest of the components (buffer, DNA) should be the same.
Note: In these digests, make sure that the 10X cutsmart buffer is 10% of the total volume of the reaction. For the triple digest, don't increase the concentration of buffer, even though you are using more enzyme.
Run half of each restriction digest on gels alongside a ladder to assess the efficiency of the reactions.
Perform a gel extraction of the fragments from ~1.5 kb – 3.5 or 4 kb using the Qiagen Gel Extraction kit supplied in lab. The protocol is printed out but reproduced below. Quantitate the concentration of the purified product on the nanodrop.
5a. Put your gel on the blue light transilluminator. Looking through the orange screen, slice out your desired molecular weight range, using the ladder as a guide.
5b. Estimate the volume of the gel slice and add 3x the volume of buffer QG (gel dissolving buffer) to the tube. If you estimate that the gel slice is more than 400 microliters, cut it into two pieces and continue with two tubes. Incubate the gel slice in the 50ºC bath for ~10 minutes and vortex. If the gel is not dissolved, keep incubating and vortexing until it is. Don’t use more than 4 columns for your gel extraction, or we won’t have enough for everybody
5c. Place a QiaQuick spin column in a 2 mL collection tube and add the dissolved gel mixture. Centrifuge for 1 minute and discard the flow-through. If you have more than 800 microliters of sample, perform this step multilpe times to bind your sample.
5d. Wash the column with 750 microliters of buffer PE and let the column stand for ~5 minutes. Then centrifuge for 1 minute.
5e. Discard the flow-through and spin the column again for 1 minute to remove excess wash buffer.
5f. Elute DNA by adding 30 microliters of buffer EB to the column, waiting for 1 minute, and spinning for a minute. Quantitate the yield on the nanodrop.
Step Four: End Repair and Cloning of the Sheared Genomic DNA
You will be using the NEB quick blunting kit (https://www.neb.com/products/e1201-quick-blunting-kit) and the NEB PCR Cloning Kit (https://www.neb.com/products/e1203-neb-pcr-cloning-kit-without-competent-cells) to perform this step. This protocol is copied from NEB’s website.
Protocol for the Quick Blunting Kit (E1201)
- Mix the following components in a sterile microfuge tube:
| Reagent | Volume |
|---|---|
| Purified DNA (up to 5 μg) | 1–19 μl |
| 10X Blunting Buffer | 2.5 μl |
| 1 mM dNTP Mix | 2.5 μl |
| Blunt Enzyme Mix | 1.0 μl |
| Sterile water | variable |
| Total volume | 25 μl |
Reactions containing restriction enzyme digested DNA are incubated at room temperature for 15 minutes. Reactions with sheared/nebulized DNA or PCR products are incubated at room temperature for 30 minutes.
Immediately inactivate enzyme in the blunting reaction by heating at 70°C for 10 minutes.
Ligation Protocol for NEB PCR Cloning Kit
- Assemble ligation reactions using the chart below as a guide. Mix the first 4 components before adding 5 μl of the cloning mix consisting of 4 μl Cloning Mix 1 and 1 μl Cloning Mix 2, for a total of 10 μl per ligation reaction. This ensures the ligase is not allowed to recircularize the vector backbone before this insert is present. It is recommended that first-time users of this kit perform the positive control ligation reaction.
| Reagent | Volume |
|---|---|
| Linearized pMiniT 2.0 Vector (25 ng/µl) | 1 μl (25 ng) |
| Purified or Unpurified, end-repaired genomic | 1-4 μl |
| Fragmented DNA from above | 1-4 μl |
| h30 | to 5 µL |
| Cloning Mix 1 | 4 uL |
| Cloning Mix 2 | 1 uL |
Incubate at room temperature (25°C) for 5–15 minutes. While 5 minutes is recomended, 15 minutes will increase transformation levels for inserts suspected as being difficult to clone.
Incubate on ice for 2 minutes.
Transform by electroporation into E. Coli.
Recover cells for 1 hour
Plate 50 uL of the transformation onto an agar plate prepared with Carbenicillin. Incubate overnight at 37ºC. The next day, choose a few colonies to send to Genewiz for Sanger DNA sequencing, circling and numbering them on the back of the plate. Wrap the plate in parafilm. The TA's will help you set up this order.
Step Five: Isolation of colonies with Spectinomycin Resistance
Plate the rest of the transformation onto ~10 Agar plates prepared with both Ampicillin (or Carbenicillin) and Spectinomycin.
Incubate at 37ºC for ~12-18h. Any colonies that grow should contain the antibiotic resistance marker you isolated from the DNA library! Congratulations! Circle one or two of these colonies and send them to Genewiz for Sanger sequencing.
Related Readings & References
- 2003 Mitra et al. Fluorescent in situ Sequencing on Polymerase Colonies. Biochem. (FISSEQ)
https://www.sciencedirect.com/science/article/pii/S0003269703002914?via%3Dihub
- 2004 Tian et al. Accurate Multiplex Gene Synthesis from Programmable DNA Chips.
https://www.nature.com/articles/nature03151
- 2009 Multiplex Automated Genome Engineering. Nature
https://www.nature.com/articles/nature08187
- 2018 Chan et al. Multiplexed testing of pooled donor cells using SNPs and NGS. Genome Medicine
https://genomemedicine.biomedcentral.com/articles/10.1186/s13073-018-0541-6
- Barcodes: Church…1988 Science
https://science.sciencemag.org/content/240/4849/185.long
- Gene assembly: Tian…Nature 2004
https://www.nature.com/articles/nature03151
- shRNAi: Chang…Nature Methods 2006
https://www.nature.com/articles/nmeth923
- Targeted Sequencing: Porreca…Nature Methods 2007
https://www.nature.com/articles/nmeth3110
- Epitopes: Larman…Nature Biotech 2011
https://www.nature.com/articles/nbt.1856
- gRNAs: Mali…Science 2013
https://www.ncbi.nlm.nih.gov/pubmed/23287722
- gRNAs: Shalem…..2014
https://science.sciencemag.org/content/343/6166/84.long
- Cis-regulatory: Goodman ...Science 2013
https://science.sciencemag.org/content/342/6157/475.long
- Accelerated evolution: ..Nature 2009
https://www.nature.com/articles/nature08187
- Nature Biotech 2011, 2013 Zhu, Larman, Laserson, Elledge, et al.
https://www.nature.com/articles/nbt.1856
https://www.nature.com/articles/nbt.2539
- Goodman, Kosuri, and Church (2013) Science
https://science.sciencemag.org/content/342/6157/475.long
- Isaacs et al Science 2011
https://science.sciencemag.org/content/333/6040/348.long
- Ellis et al PNAS 2001
https://www.pnas.org/content/98/12/6742
- Harris Wang et al Nature 2009
https://www.nature.com/articles/nature08187
- Ostrov, Norville, Guell, et al.
https://science.sciencemag.org/content/353/6301/819.long
- PEG-pAcPhe-hGH Ambrx, Cho, Schultz et al. higher serum stability
https://www.pnas.org/content/108/22/9060.long
- Ugwumba et al 2010 JACS
https://pubs.acs.org/doi/abs/10.1021/ja106416g
- Mandell et al Nature
https://www.nature.com/articles/nature14121
- Ma & Isaacs (2016) Cell Syst. 3: 199–207.
https://www.sciencedirect.com/science/article/pii/S2405471216302149?via%3Dihub
- Rees H, Liu DR (2018) Base editing: precision chemistry on the genome and transcriptome of living cells. Nat Rev Genet.
https://www.nature.com/articles/s41576-018-0059-1
- Kalhor, Mali, Church 2016 Nature Methods 2015 Science
https://www.nature.com/articles/nmeth.4108
https://science.sciencemag.org/content/361/6405/eaat9804.long
- Engineering and optimising deaminase fusions for genome editing. 2016 Yang et al. Nature Communications
https://www.nature.com/articles/ncomms13330
- Programmable editing of a target base in genomic DNA without double-stranded DNA cleavage. 2016 Komor et al. Nature
https://www.nature.com/articles/nature17946
- Programmable base editing of A•T to G•C in genomic DNA without DNA cleavage. 2018 Gaudelli et al. Nature
https://www.nature.com/articles/nature24644
- Boeke et al. Science 2016
https://science.sciencemag.org/content/353/6295/126.long
- Ostrov et al. Science 2019