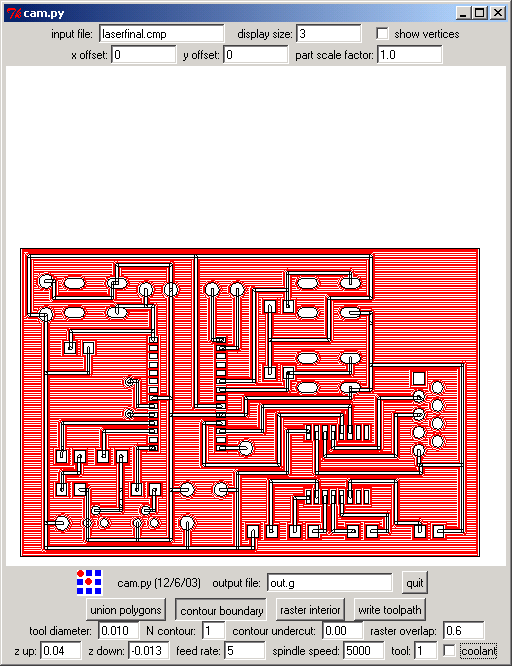
this document assumes that you have created your circuit layout similar to the way described in the modeal circuit milling page. here, we will only describe the specific cam.py parameters for the haas operation.
this can probably not be said enough: you will be software-driving a very
strong, very heavy, very fast tool that can easily kill people, including yourself,
and damage itself and other equipment around it. accordingly...
learn the location of the emergency stop
button blind.
do not do anything without the mill-door closed.
always wear safety glasses.
acquire the patience needed for dry runs and simulations.
finally, always keep in mind a picture
of yourself with a giant hole in your forehead.
Run the current cam.py script, and set the parameters to the ones in the screenshot below

cam.py should output the correct G-Code when the output file has a ".g" extension.
Take a look at the G-Code in a text editor and make sure that the basic sanity checks hold true:
O1234
T1M06
G90G54 should indicate that you're using absolute part coordinates
S and F respectively)
the choice of tools is very important. the haas mill is not very smart about knowing its own limits (in more ways than one). you definitely do not want to think you're using tool nr.1 - a small 10mil mill, while your G-CODE actually points the mill to use a 5'' drill.
at this point you might want to add a comment in the gcode to mark your file as yours (comments are any text enclosed in parantheses, like this very sentence), this way you can make sure you're running the right file when you load it onto the haas
now save your file onto a diskette and go towards the mill
thanks to zeynep for her original step-by-step guide
POWER UP RESTARTbutton.
EDIT mode.
MEM mode
SETNG GRPH(or something similar) twice to
get into simulation mode.
EDIT mode (i think)
DISPLAY
CURRENT COMMANDS
for a new view of all the parameters,
and hit CYCLE START
at any point you can increase or decrease the feed rate and spindle speed by a percentage
You can always stop and air the board to see the progress. Otherwise it's hard to see while it's operating. The following are the steps to stop and check: Press Feed Hold. Press spindle stop. Press Edit. Open the glass window and blow some air. To restart make sure you press spindle CW (clockwise) first and then press start cycle.
So there is good news and not so good news regarding board milling on the HAAS. Good news is that the final product looks great. (or will do...it's still going - half way through rastering) Very clean contours and rasters. None of the unexpected tapering of lines or messy rastering. The not so good news is that it doesn't take that much less time than modela, at least with the feeds that Manu and I used. So here are a few tips:
for those who will be milling boards on the haas: it seems like there may be a problem with doing more than two contours on cam.py - Jamie tried N=4 or 5 (don't remember) and had broken traces. Ben (dalton) tried N=4 and had some broken traces. I made two boards, the first was with N=2 and rastering, it came out fine. the second one had N=4 + rastering - that one had broken traces. The moral of the story: Don't do more than two contours.
my five cents
160% feed rate for the rastering, with 0.75 raster overlap works well.
in this case, that's 160% of 5.000 (i.e. effective feed rate: 8.000)
If the endmill breaks in the middle of the operation you can just erase the part of the G code it already went through (I left the very first few lines, though). the location information is absolute (with respect to the origin you set), and not relative to the previous location, which allows you to do that. easiest is to do it on the computer, resave onto the floppy and run the new code. deleting on the HAAS takes ages.
jamie water-jet cut a new aluminum block onto which you can double-side tape your board.