Week 6: Electronics Design
I have created schematics and traces a few times before, but not for 10 years or so, so I am functioning as a novice. Perhaps if I record some of my learning points as I go along it will be of use to other novices.
I plan to use Eagle to create a schematic of the echo hello-world board, export the png files of the traces, and machine a board as we did in week 3.
- Setting up and using Eagle
- Download the fab library from: http://fab.cba.mit.edu/classes/MAS.863/tutorials/Eagle/fab.lbr and/or the libraries here which have useful things like resistors and capacitors.
- To make these available in Eagle, Library->Use... or simply move these files to the Eagle 'lbr' directory.
- Some tutorials of use:
- http://www.instructables.com/id/Turn-your-EAGLE-schematic-into-a-PCB/?ALLSTEPS
- http://www.cadsoft.de/wp-content/uploads/2011/05/V6_tutorial_en.pd
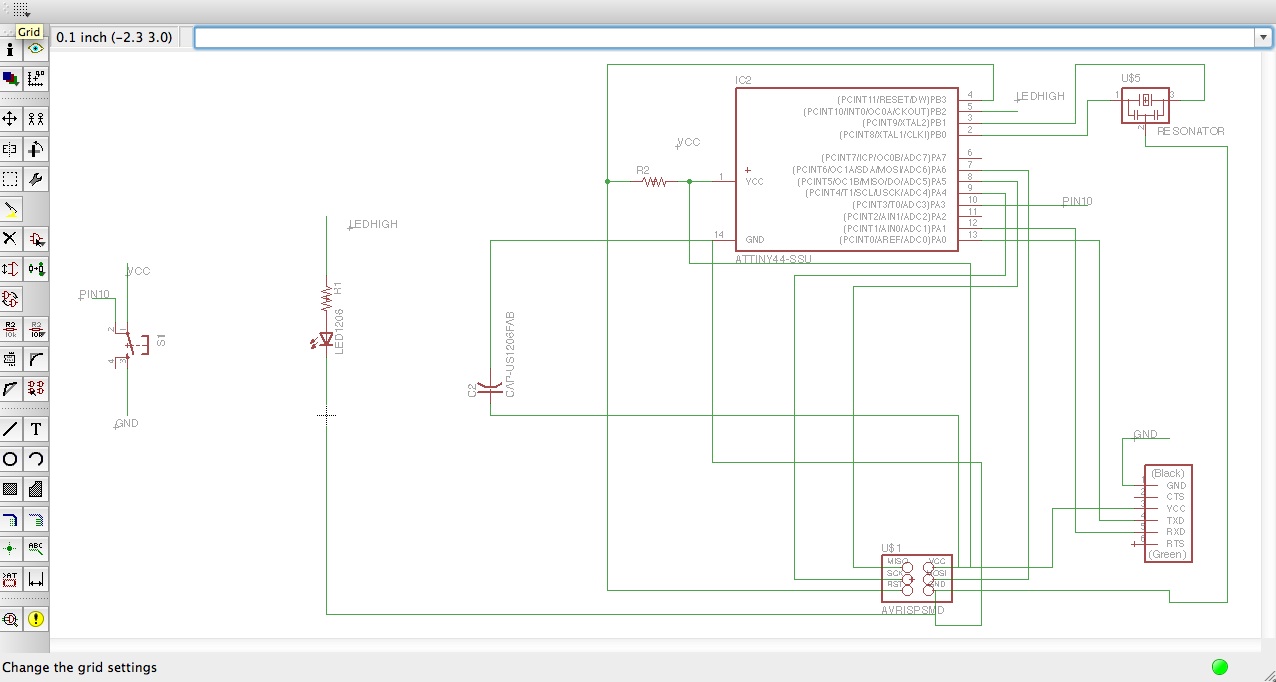
- When you hit the add button, a list of libraries appears. scroll down to fab library, and open. Double-click on an item to select part to move to schematic.
- To use the search function in the Add dialog box, use wild cards. For example, "*TINY*" (then return), to find ATTINY44-SSU, which is the surface-mount version of the microcontroller chip.
- Move parts to the schematic sheet and draw wires (Draw menu) to connect.
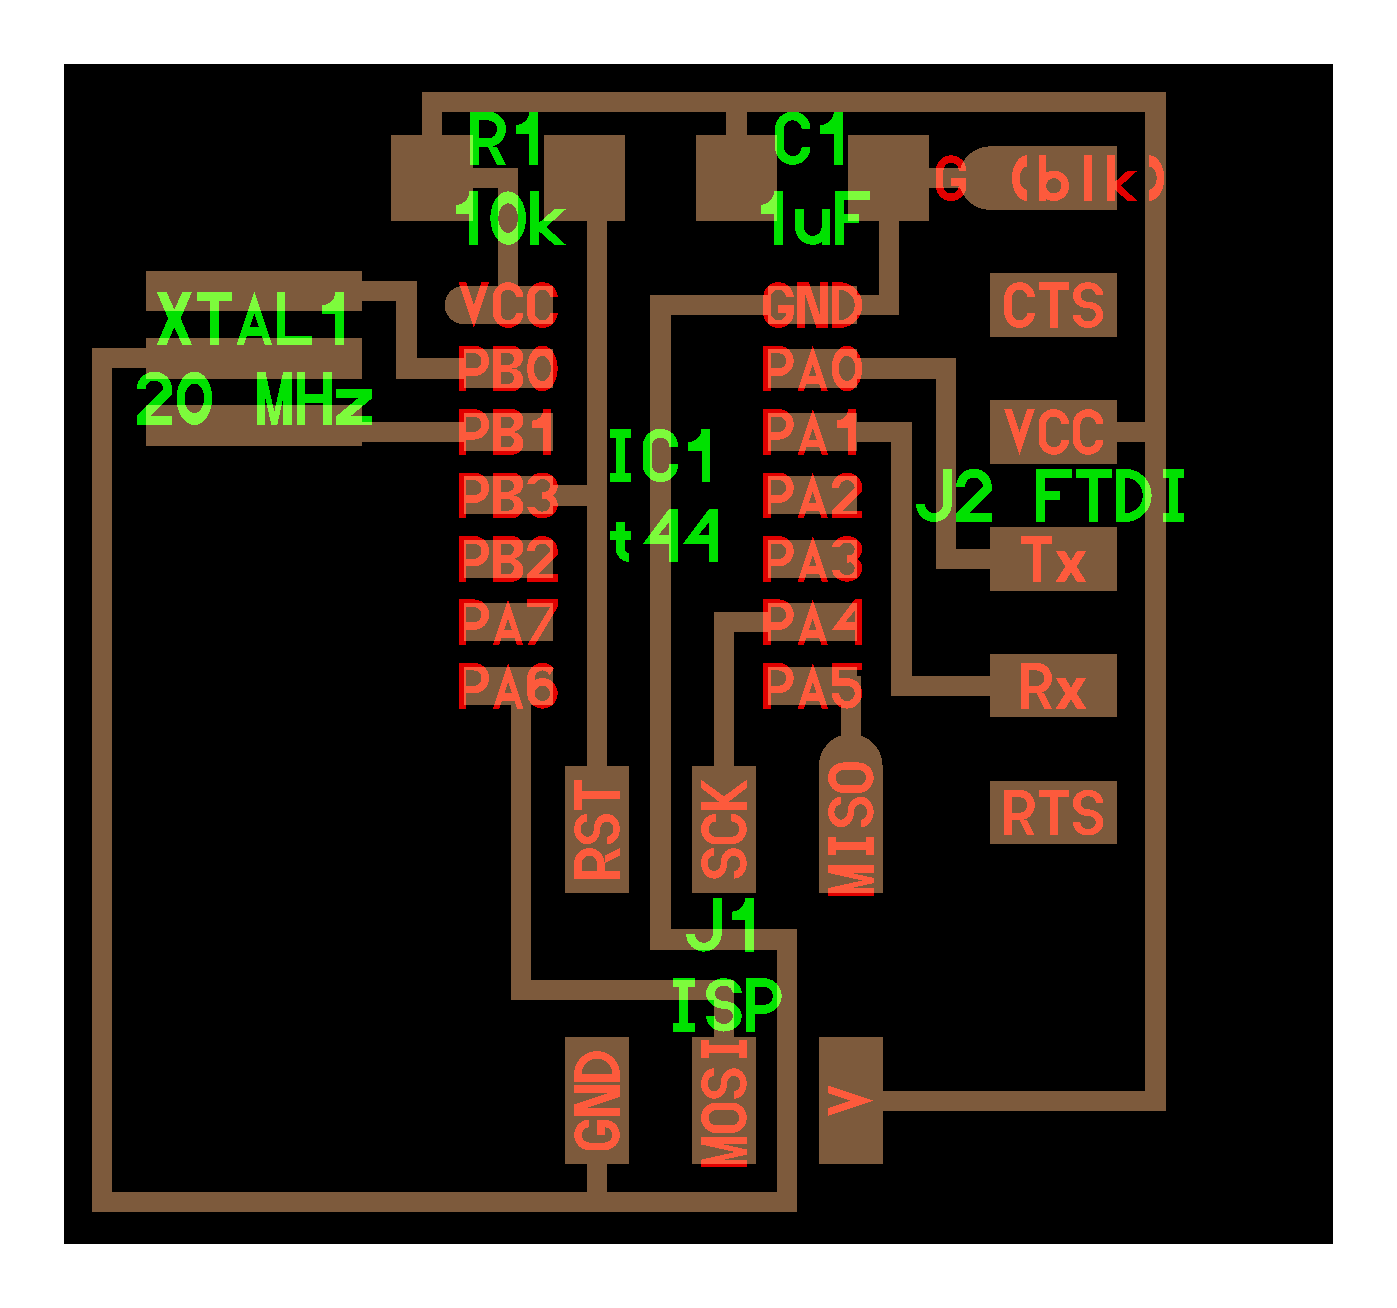
I need to know what some of these pins do in order to figure out where to hook up an LED or switch ( to do something). Refer to the data sheet, numbering pins ccw from upper left...... Whoa! It's not that simple. These pins have many functions, depending on how the thing is programmed!
- 1. VCC Supply V.
- 2. XTAL1 in our case.
- 3. XTAL2 in our case.
- 4. RESET
- 5. Free, as part of PortB. This can be used to source current, I think.
- 6. Free as well. Could put a second LED here.
- 7. Labelled MOSI (Master out slave in!) Not for us to play with. It is the input pin when the microcontroller is a target for programming.
- 8. MISO (Master in slave out) Sends acknowledgment signals to the master controller.
- 9. SCK Serial Clock - has to so with synchronizing data transfer.
- 10. PA3 looks like it's free as an I/O port. Can put a switch here.
- 11. PA2 looks free as well.
- 12. PA1 is being used for something calledRx.
- 13. PA0 is being used for Tx.
- 14 GND is ground.
During wiring:
- One way to wire is to run wires around to all the parts. Don't be concerned about the order of wiring - it all gets sorted out during routing.
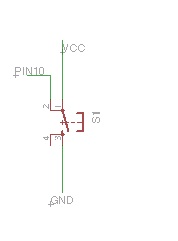
- The clearer way to do this is to name the nets and connect them without direct wires. For example, below is the way I wired the switch (after many consultations): The three connections to the various nets do not have to be made explicitly by drawing wires. They are, as NovySan says, "magically connected" when you go to the board. This is done with the commands"NET", drawing a net wire, "NAME", naming the net, and "LABEL", labeling the net wire.
- I found in at least one case that I had changed the grid spacing during wiring, and as a result had parts placed that would not join up with wires. It was necessary to go to a small grid (0.005") and zoom in to connect wires properly. Probably best to stay at one grid size!
- Run Electrical Rule Check. This will find connections that are not properly made, wires that go too far, and so on.
Routing:
- We want traces only on top, so mark bottom as "NA"
- Yellow traces unrouted, make routes manually. As routes are made, yellow lines should disappear.
- Run Design Rule Check.
- Adjust View -> Layer settings to give:
- Only top layer on gives traces (Export image, png, monochrome, use 2000 dpi).
- Only Dimension layer (20) on gives outline.
- Use a combination of auto- and manual routing. For this one, I placed parts and routed manually. See comments below on my amplifier project, where I used the autorouter.
Pictures from the Eagle project:
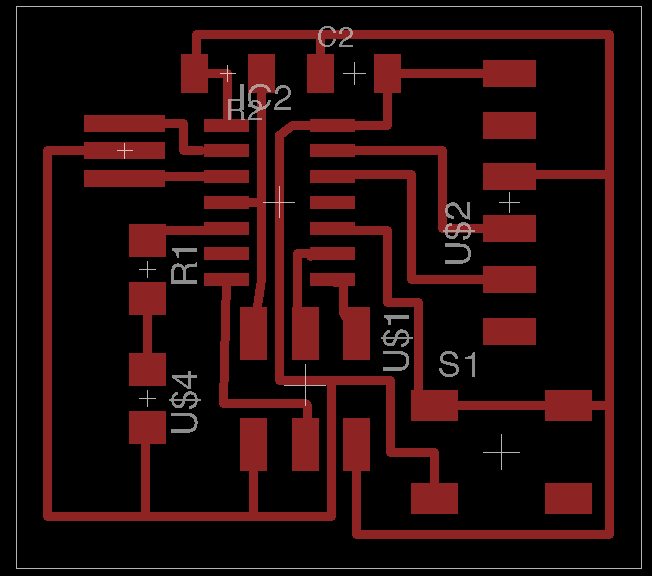
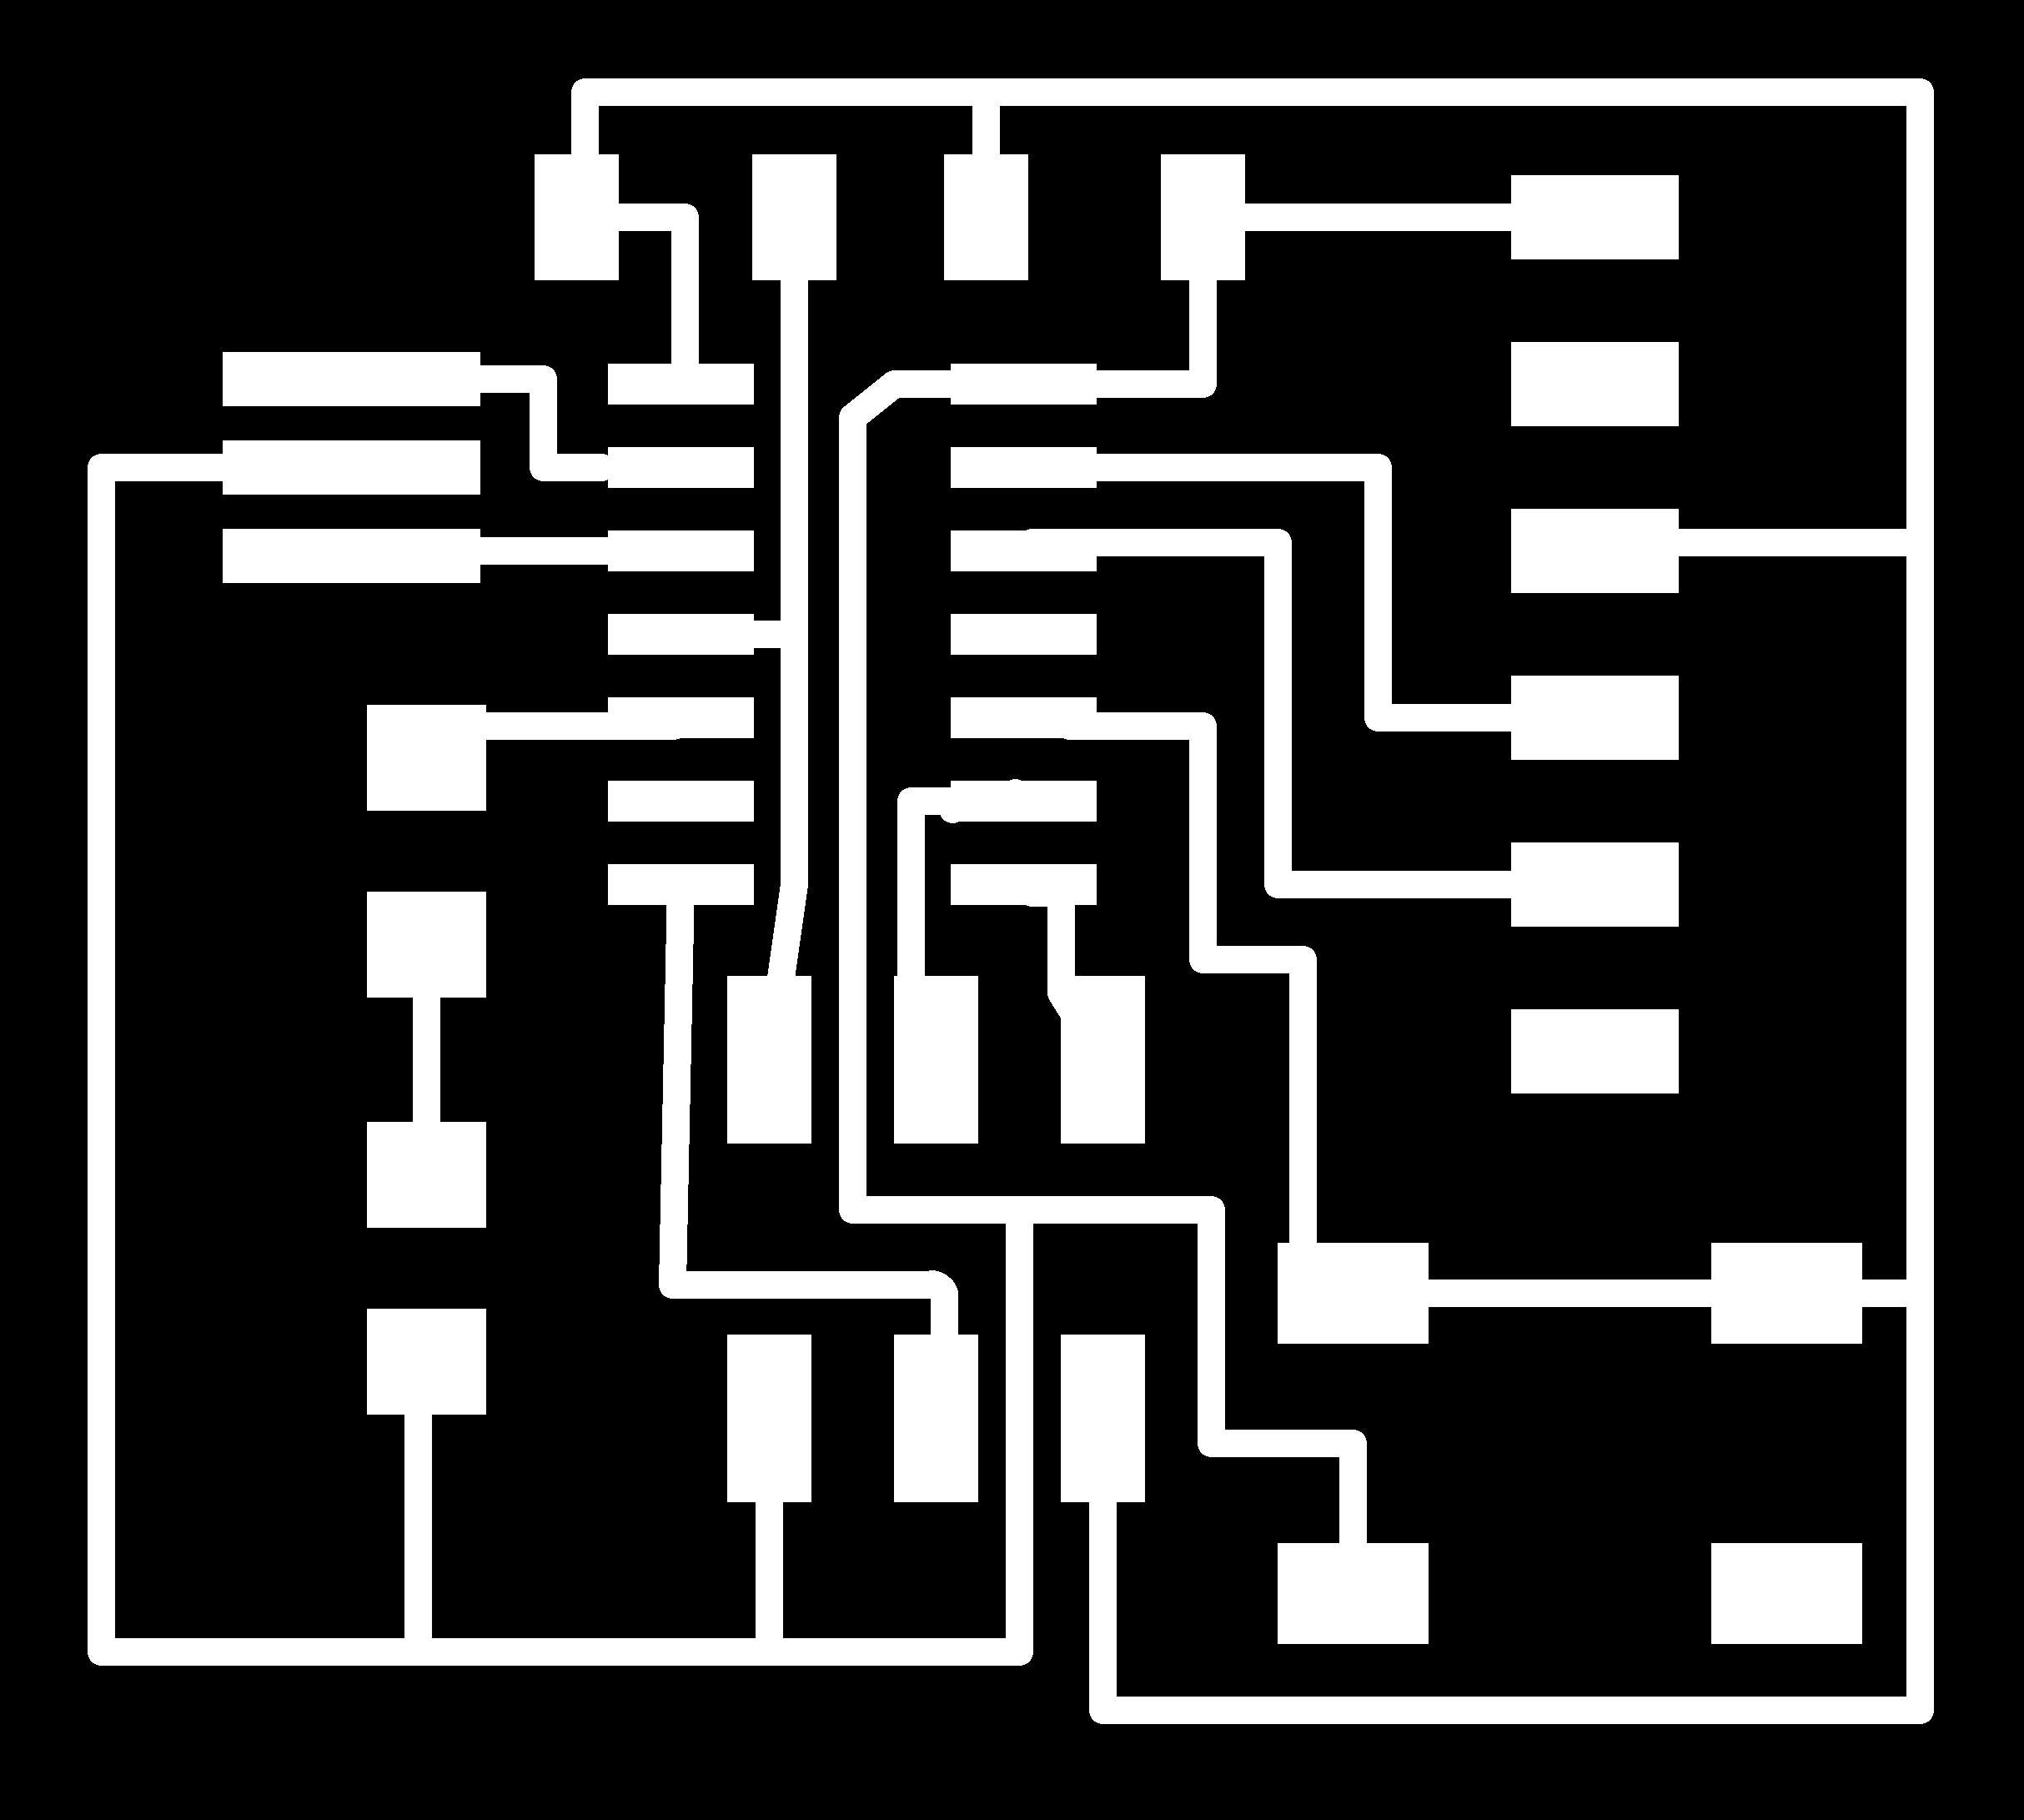
The project files for the board and the schematic. I drew a line around the periphery of the board on another layer (the bottom) and exported a monchrome to make a toolpath in the fab module. The layer on Eagle marked 'dimension' did not export a png that could be used this way - too thin a line? The resulting board is below.

Here is the populated board. The tutorial that is very useful for running the modela from the fab modules is here. I used a fresh 1/64" mill, and chose to run at 3.5 mm/sec rather than 4.0, since Rob H. told us in week two that new mills need to go a bit slower for a few boards.
Does it work? Haven't gotten to program it yet.
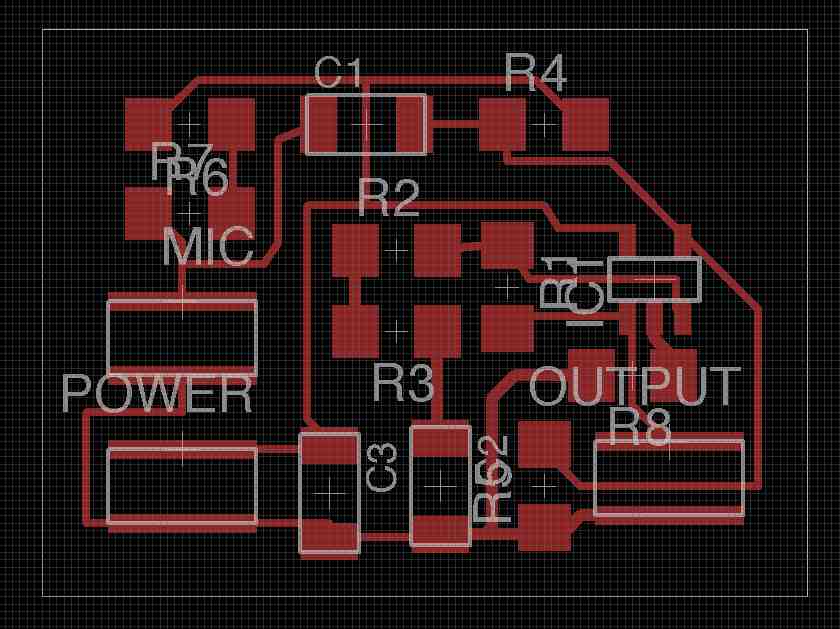
Amplifier project
I wanted to make a simple board from start to finish, with no pattern to copy during routing. I chose an amplifier circuit from Paul Horowitz and Tom Hayes's electronics course in the harvard Physics department. This is a circuit that I use to amplify microphone signals when I want to observe them on an oscilloscope.
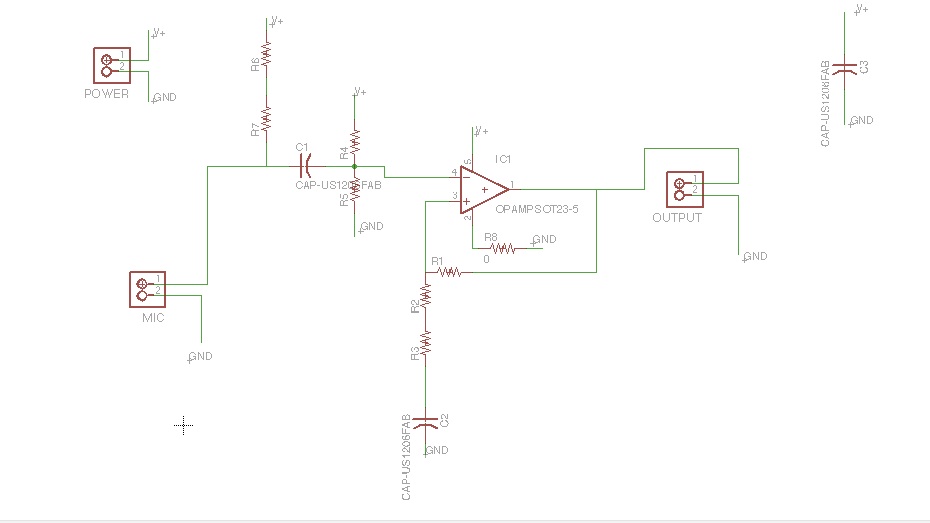
- Schematic went quickly. I decided to use simple pads and make my connections by soldering wires. I'll get fancier later, but for now wanted a quick cycle.
- Routing was more difficult than I expected. After a long time of moving parts and routing by hand, I got to within two unrouted paths of completion, then un-routed all the traces and hit 'autoroute'. The router did a bit better than I, and came within one trace on the 0.015" grid setting. On the 0.010" grid, which allows traces to be separated by 0.010" the router got it done. There were two traces under the op amp - did not look very possible, especially with a 0.015" diameter end mill.
- I tried starting again from the schematic, arranging the parts in a way that more closely corresponded to the schematic, and let it autoroute. This time Eagle was not able to solve the problem - two traces left.
- Back to the previous solution. I stayed on the 0.015" grid and added a zero-ohm resistor to the schematic (R8) in a place that let me bridge a trace, and was able to get something that might work. Looks like a combination of manual and autorouting can work.
- Conclusion is that I should be able to get fast enough at this to do a board like this in a couple of hours. For much of what I do, quantities of ten or less are needed. This may be useful. I'll make this board as soon as I can.
- Why not use the uncut bottom plane as a a ground plane, drilling hole and soldering wires where pads connect to ground? Or even divide the bottom plane between V+ and GND! This would take away one routing constraint and add just a little more work.
Notes from class 10/16 on electronic board design.
- Leigh's website has more good Eagle notes.
- cwwang made a two-sided board! Line up two layers by using cutout from the board. Drill vias.
- Neil suggests using vinyl-cut layers with holes instead of vias. Then solder on top. See my drawing.
- David Yamnitsky described a Sparkfun kit for building a 3D milling machine to make his board.. Neil says, powersupplydepot good vendor for PSupplies (MPJA).
- Rotem Abeles. Neil says that GIMP is good for dealing with png's
- Ways to
Progress on Project development.
Ideas that could lead to projects:
- Scaled set of Viols - parametric design - one design for several instruments in which parts of instruments scale according to design rules - not the same scaling in all parts. Bent 2D parts for sides backs and bellies, string tension supported by composite rod rather than by the bod, sensors for measuring frequency response.This idea is explored a bit in my Week 2 rambles.
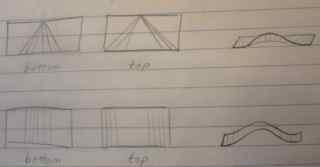 A sketch showing how to make a compound flex by angling cuts on top and bottom of strips (eg cardboard on the laser cutter). This could be used to make the strips for the sides and soundboards of the instruments.
- A nice project, but too ambitious in scale and limited in scope?
- Adjustable lenses for eyglasses - looks like this is almost commercial already - might be a good thing for molding week. A useful item, but not broad enough in skillsets.
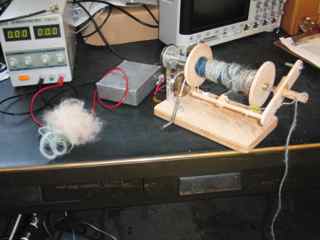
- Spinning machine. My first suggestion still looks likely.
- This is something I'd like to use, give to my friends, and use for instruction. I want it to be cheap enough for me to make ~10.
- It covers a range of the course topics. More details below.
- It is a machine that makes something...
Spinning machine.
- My prototype. I made a working model last year. It works, and provides some design information. I will also use it as a test bed for parts of the new one.
- There are at least two similar machines out there. OK, actually there are loads of them, including at least one project of the sort I'm considering.
- Some tentative specifications:
- Minimum speed 100 RPM. Typical 600 RPM. Maximum speed 2000 RPM for the spindle.
- For my motor and controller, typical load is 0.3A at 3V, maximum expected load 0.5A at 6V.
- Battery capacity should be about 15 Watt-hours. This is about four times my cellphone battery.
- Here is a sketch, and following, some details of what I'll need to develop:
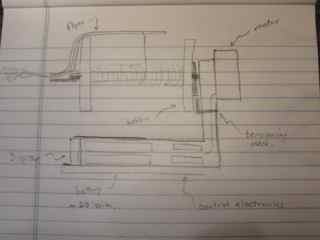
- Electronic
- Motor choice for effiiciency and noise. My motor is good, but too exepensive.
- Motor speed control.
- Dial to set motor speed setpoint.
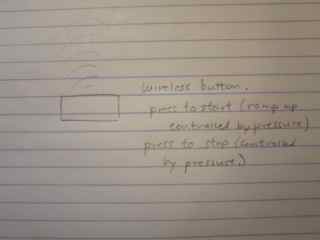
- Foot pedal for acceleration and deceleration. Wireless?
- Battery charging and management. Borrow from laptop or other device?
- Display of motor speed. Modulation of motor speed periodically to give information about number of turns.
- Mechanical
- Can the whole thing be supported as a cantilever? Simpler, but maybe needs more support.
- Good bearings needed.
- Make a smooth, low mass flyer with adjustable yarn feed onto the bobbin. Can I mold this?
- Tensioning device that controls differential torque between bobbin and flyer. Make this machine convertible between bobbin-driven and flyer-driven. This is usually not possible on one machine, and requires two different spinning wheels.
- Packaging and support
- Box and supports made from laser-cut acrylic or wood.
- I might make a small table (Shopbot) to hold this machine for use while standing.
Notes from class 10/16 on others' projects:
- Kristin Zimmerman walking furniture. Videos of walking wind-powered sculptures.
- Kenny makes composite materials that are arrays of carbon fiber structures. Neil on Maxwell paper on constrained and overconstrained lattice. Sam (student in this class) makes robots out of flexible deformable structures. Maybe walking couch could be made in this way.
- David Yaminsky shows video of position-correcting router that was a project in the machine building course.