Week 8
Embedded programming.
An Inexpensive DAQ with the ATtiny44
Introduction
This week's assignment was to read a microcontroller datasheet, and to program a board to do something. For another project of mine, I wanted to be able to read in data from an analog joystick to control a steerable catheter. I decided to make a data acquisition (DAQ) device with the ATtiny44 to help with this project. For proof-of-concept, I attached a potentiometer to the DAQ, measured the signal coming from the pot, and plotted the results real-time in MATLAB.
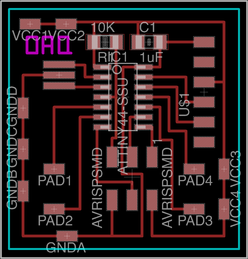
Design
I designed the board based off of my hello world board from Week 6. Instead of an LED and a switch, this board offers soldering pads for convenient access to pins with the analog to digital (ADC) capability as well as power supply. Without removing the ISP headers, the board can take in up to three inputs, perfect for measuring the signals from an analog three-axis potentiometer joystick.

Make
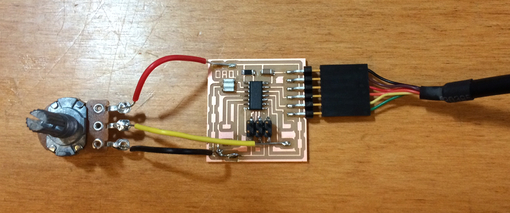
Here's the PCB after milling and stuffing the board and connecting a 5K linear potentiometer.
Program the Attiny44
First, I set the fuses for the ATtiny44. Fuses are configuration parameters for the microcontroller. It is important that you set the correct fuses for your intended application. For example, I had a problem of not being able to read data at the baud rate I set. I found out that the fuses I had set prescaled the baud rate by 8.
You can use a fuse calculator to determine what settings you want. I set the fuses by command-line, since I was not sure how to do so via Arduino IDE.
I wrote a blank program with the following Makefile:
PROJECT=read_data
SOURCES=$(PROJECT).c
MMCU=attiny44
F_CPU = 20000000

CFLAGS=-mmcu=$(MMCU) -Wall -Os -DF_CPU=$(F_CPU)

program-usbtiny-fuses: $(PROJECT).hex
  avrdude -p t44 -P usb -c usbtiny -U lfuse:w:0xde:m -U hfuse:w:0xdf:m -U efuse:w:0xff:m
I then connected my programmer to my board and typed the following commands. I believe setting the fuses requires the hex file from the blank program, but in the end, I upload a different program on the ATtiny44.
CORRECTION: Setting the fuses does not actually require a hex file. You can simply type the command for setting the fuses.
Compiling the program:
make -f Makefile
Setting the fuses:
sudo make -f Makefile program-usbtiny-fuses
Then, I followed the tutorial Programming an ATtiny w/ Arduino 1.0 to program my Attiny44 using the Arduino IDE. Here's my code:
 /**
 * arduino_read.c
 * Vincent Chow - 10/28/14
 *
 * Programs ATtiny44A to read data from ADC input pin and send over serial to computer.
 * Make sure fuses set correctly - should not divide clock by 8, else baud rate/8.
 *
 */

#include <SoftwareSerial.h>
#define RX 0  // set PA0 as RX
#define TX 1  // set PA1 as TX
#define PIN 3 // set PA3 input pin for measuring signal

// use SoftwareSerial library to setup serial communication
SoftwareSerial DAQ = SoftwareSerial(RX, TX);

void setup() {
  pinMode(PIN, INPUT);  // set ADC pin as input
  DAQ.begin(38400);     // set baud rate (had trouble with faster baud rates)
}

void loop() {
  int val = analogRead(PIN);   // read value from ADC conversion
  DAQ.println(val);            // report value over serial
}
Visualizing the Data Via MATLAB
I wanted to visualize the signal coming in from the potentiometer, so I plotted the data real-time in MATLAB. I used code from prior projects I have worked on. So as not to inundate this page with code, here's a link to my GitHub repository: Servo Motor Code.
Understanding the Underlying C Code
I took sometime this week to decipher the C code that David Mellis (co-founder of Arduino) wrote. By digging deep into the files underlying the Arduino IDE app, I discovered the C code behind functions such as "pinMode()" or "analogRead()". I wrote some code that documents what I've learned from Neil and David Mellis' programs about setting the registers on a microcontroller. The code is not ready for upload to a microcontroller quite yet. I plan to learn how the Arduino serial port functions work in the near future. Configuring Microcontroller Registers.
Lessons Learned
1) Check the code that people give to you and do not take it at face value. Make sure you understand how the code works. For example, I ran into the problem of having the fuses at the wrong setting (by reusing the echo hello world code), and I obtained strange behavior with a prescaled baud rate.