6. Molding and Casting
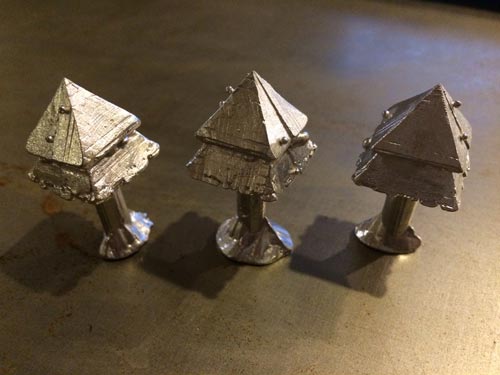
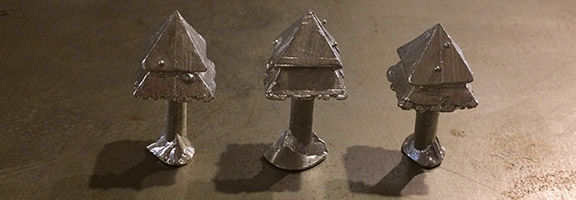
A little metal forest, to be sent around the country.
 This spring and summer I will be hiking the PCT with a couple of friends from MIT. We'll be taking the next semester off and walking all the way from Mexico to Canada over about 4.5 months. I decided to use this week's assignment to cast some simple metal pendants for necklaces out of trees to give to my family when I leave in April. Though my parts ended up being a little bit larger than I would have liked them to be, I think it's probably the thought that counts!
The Positive Mold
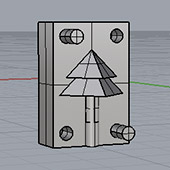 I started in Rhino by desiging a simple, geometric tree and a mold form that would fit around it to be milled out of wax. I had to keep the tree large enough to be machined using either the Roland Mill or the ShopBot, but small enough to fit into our wax stock and to function (at least in some respect) as a necklace. Once I had the CAD done, I started working in Mastercam intending to use the ShopBot to machine the wax. I thought this would be best because it would be easier to program in bits smaller than 1/8" to increase resolution. I ran into some issues here, of course, so I decided to try using the fab modules instead to see how that would go.

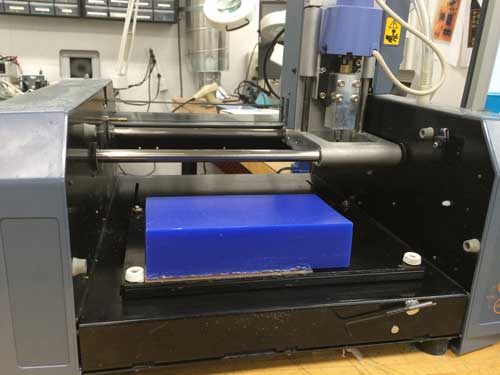

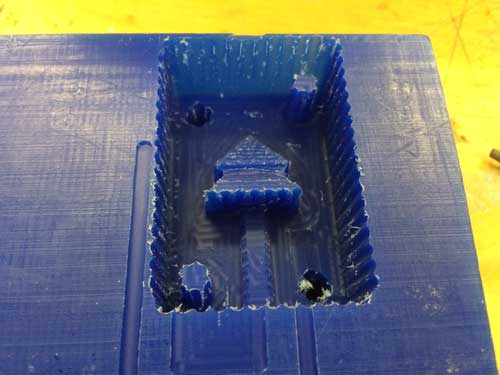
Setting up the fab module was easy enough, I simply loaded in my .stl, converted it to a height map, and calculated the path for the 1/8" bit rough cut. Following the instructions from class, I hot glued my block of wax onto the mill, zeroed the bit, and set the machine running. I had some trouble at first with lining the path up. I tried changing some of the paramters within the fab modules, but it still decided to start the cut much further off of the home corner than I was expecting. After a few rounds of trying to get this lined up, I got it about right. I thought the pattern was getting a little close to the edge of my wax, but I didn't think it would be bad enough to reposition for the third or fourth time. After the rough cut, I cleaned up the part (without moving it from the bed), and ran the finish cut pass. This left all kinds of bumps around the edges, and didn't really do much to clean up my part due to its geometry. I tried running this same process with the 1/16" bit, but the shaft being a larger diameter than the cutting tip caused some problems on the edges of the wax. I could have played with the constraints in the fab modules, but I decided to get the resolution I was looking for I would just do some simple hand filing.
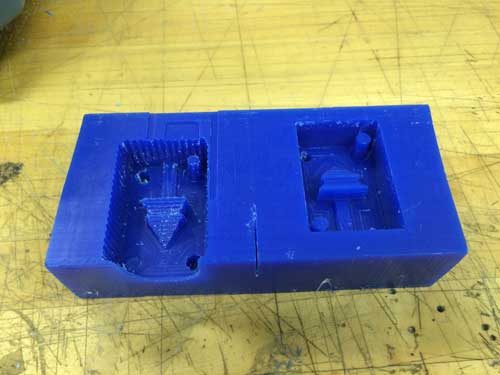
I moved my stock around and ran just the rough cut for the second part, then decided to take it out of the mill and do some filing. As I was trying to remove my wax from the mill, I grabbed in the wrong place and broke the wall of one of my cuts. Note: watch how much hot glue you use on the milling bed, running along a single edge will be sufficient to hold the stock in place. Now I had to grab a small block of wax to remill the second half of the mold since the MoldMax 60 takes 24 hours to set, so I wouldn't be able to just make both halves from the same mold. So I machined the second, and filed them both down to be fairly smooth and uniform. While filing, one of the pegs for aligning the molds broke off, so I hot glued it in place, figuring that as long as it was close, I would get a large enough boss for alignment. Ready for the casting of the negative molds!
Casting the Negative Molds
I had to use MoldMax 60 in order to cast the low temperature metal in the molds. The mixture requires a ratio of A:B of 100:3 by weight, so I had to set a cup on the scale, zero it, pour in 100g of the silicone base, then pour in 3g of the hardener. I was sure to be careful while mixing to prevent the development of air bubbles, and having a working time of 40 minutes, I let the mixed MoldMax sit for about 10 minutes to settle out most of the air bubbles. Pouring this stuff was tough though. First of all, the MoldMax is very viscous, and did not want to pour in a thin stream, especially at the beginning of the pour. On top of that, my molds were fairly small, so getting the mix into the right corners and cavities proved challenging. Eventually I got both of the molds filled, and let them sit overnight. I knew they wouldn't come out perfect, but I figured I could clean up the final parts after casting if need be.
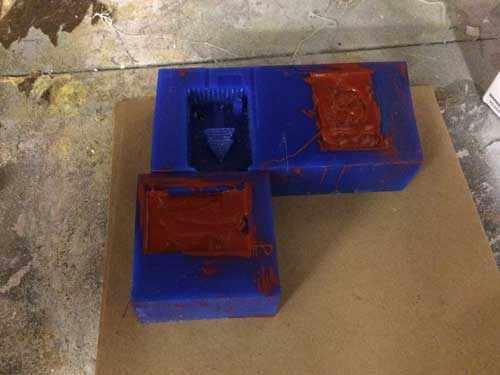
After 24 hours I was able to remove the molds from their molds (confusing terminology). As I expected, the pegs for alignment broke out in removing the molds, and the MoldMax wasnt able to get too deep into the cavities for the alignment pins on the final molds either. On the bright side, there was enough of a pin and hole to allow the halves to line up, which is all I needed. The molds had a few air gaps and bubbles in them, but nothing too terrible. As I said, I can file down the metal if I need to anyway.
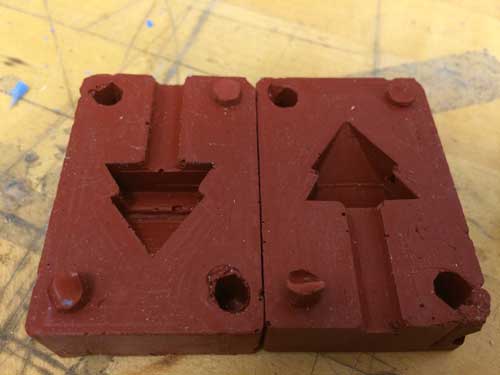
Casting the Final Parts
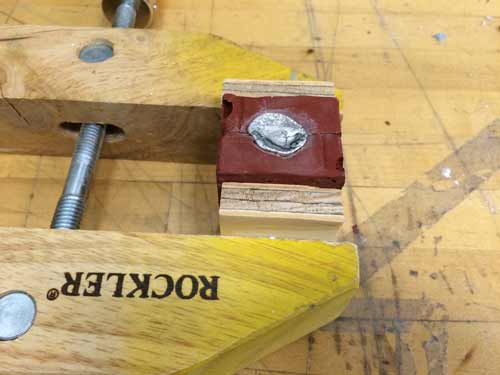
I started by trying to cut down the backs of my molds to get a more flat and even surface for clamping for casting. Once I got these down flat, I cut a couple of small pieces of wood to clamp around the mold since clamping directly onto the silicone would've led to much less even force and would've deformed the mold. Next I cut a spout into the top of the mold to allow the metal to be poured in more easily, used some baby powder on them to ensure the metal didn't stick to the silicone, and clamped the mold together using a large, flat-faced wood clamp. All the while, I had the toasted oven set to 350 degrees F to melt the block of metal in the crucible.
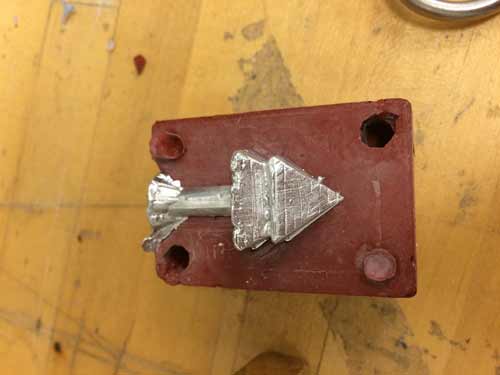
The first pour didn't go so well. The metal got stuck all around the top of the spout, and was barely able to fill the mold. I realized that I had forgotten to powder the spout at the top of the sprue after cutting it a little larger, which caused the metal to stick around the entrance. After this, I widened out the sprue and made sure to powder every surface the metal could touch on the mold. I melted down the failed part, and got ready to try again.
The second mold went great! I poured the metal in just up to fill the sprue and let it sit for about 5 or 6 minutes before demolding. The great thing about this low temperature metal is how short the setting time is, especially compared to our stone casting options! I ran through this process another three times to get my own little mini metal forest. All I have left to do now is to go in and clean up the parts, then drill holes and string them onto necklaces.
I would've liked to possibly 3D print the original shape and then make the molds directly from that to increase the resolution of the final part. My geometry wasn't too complicated, and I was able to get around the constraint of the 1/8" end mill by filing down the wax, but creating the molds in a different manner could've also solved this problem.