// Cambridge, MA
week 7: molding and casting
my assignment this week was to design a mold, mill it (rough cut + three-axis finish cut), and use it to cast parts.
i decided that this would be the perfect opportunity to make a coin. i've been obsessed with coins (aka numismatics) for a long time. my first ever job was appraising and selling ancient coins for a local estate shop, which helped me start my own collection of ancient coins that i keep to this day. the piece-de-resistance in my collection is a silver drachm of alexander the great, circa 333 BCE. this coin has historical significance as it's the first Western coin to depict a ruler in the flesh, a tradition we continue to this day. it also has personal significance to me for a variety of reasons.

what you're seeing on this design: the front of the coin has Alexander himself, wrapped in the skin of the Nemean lion to evoke a connection to Heracles. on the back, Zeus is sitting on his throne (Alexander considered himself the son of Zeus), eagle in one hand, royal staff in the other. the letters on the right read "alexander," and the mark on the left is the indicator of which mint this coin was struck at.
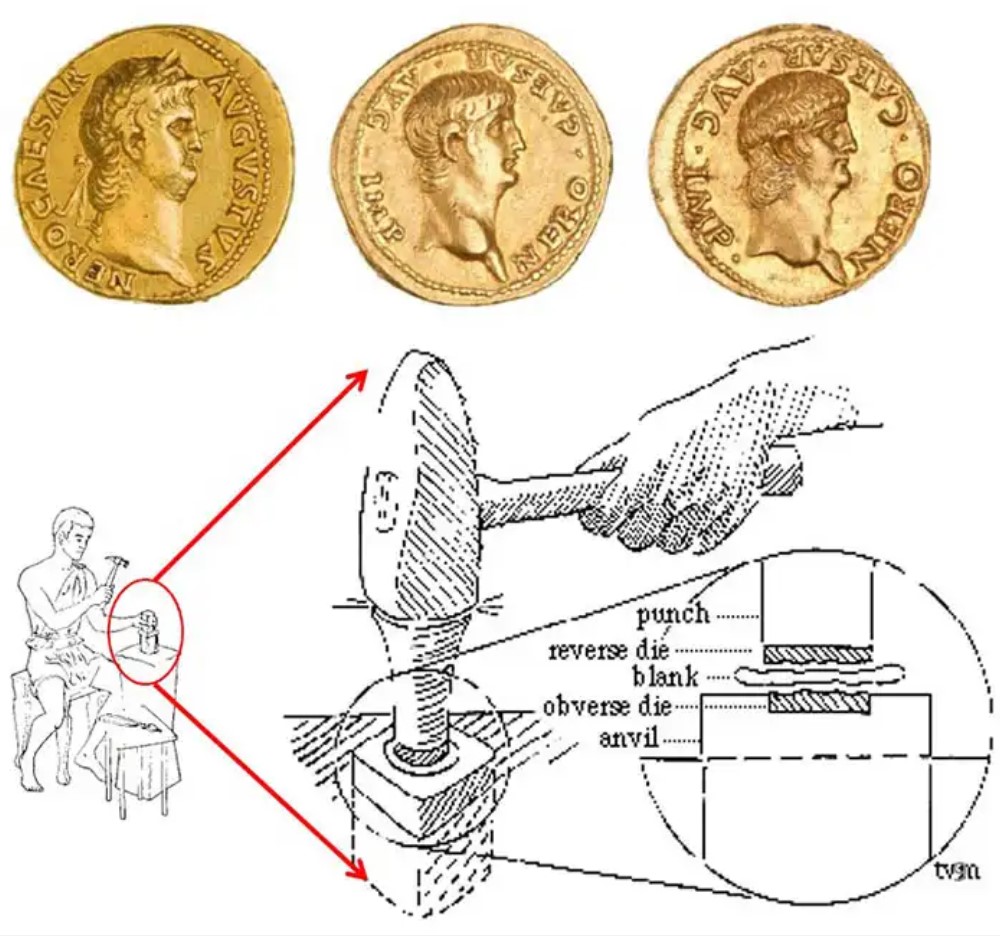
this coin was originally made in antiquity using an ancient version of molding and casting. an ancient greek mint worker would carve the negative obverse (front) and reverse (back) design of the coin onto two die, typically made of a hard metal like cast iron. then, they would make a series of flat circles of silver/gold/bronze/the desired metal (a blank). finally, these blanks would be slightly heated so as to be maximally soft, and then struck via the below method to have their final design:
i of course followed a different process--if only Alexander the Great had had access to Fusion360, his empire would have spanned the globe.
to start out, i took the image of the coin and made a black-and-white immage trace in adobe illustrator.
i imported this as an svg into fusion 360, and was pleasantly surprised with the result.
i completed a sketch inclusive of all the other elements i would need in my mold:
and then extruded everything to the proper height as calculated by my advanced scribblings.
after getting some feedback that the detail was too fine for the 1/32 inch tool on the roland srm-20 i would be using, i decided to start from scratch and redesign the mold to just fit the size of the wax block i'd been given. here's my final design i went forward with, vents and sprues included:
i did the first pass using a 1/8 inch bit on the roland srm-20 in the harvard REEF; not a lot of detail came out in this pass, which was expected.
the second pass with the 1/32 inch bit and 0.5 stepover turned out pretty well; it's definitely missing some of the detail, but there is beauty in imperfection.
i then made the negative of my mold using oomoo, which was extremely fun to work with.
unfortunately, our lab did not have the means to heat up the bismuth/tin alloy i wanted to use. so i decided to go with drystone since it was already open and readily available; if the lab gets a crucible, i'll come back and make some metal coins (or make a diy setup). there was a bit of overflow of the drystone, but i rigged up a little contraption to keep it stable.
the big reveal! the drystone is pretty fragile, and didn't capture every bit of the mold. but i'm still pleased to have a final result!
and here's the original again for reference:


