This week we learned how to program micro-controllers
This week, our goal was to take our Hello World board from Week 4 and to make it do something.
Before I started, I went through some online reading on programming AVRs and began to read through the ATTiny44A datasheet. I didn't finish reading this before starting, but I did find it helpful to read along through the datasheet as I started programming.
The first step was open up the makefile and c file from week 4 to understand what each line was doing. I have some experience coding in C, so I generally knew about makefiles, but it was new to me to use makefiles to do more than just compile and link programs. After reading through the makefile from week 4, I decided that I didn't need to make any changes to it beyond changing the project name (and changing the filename so I could just use the simple 'make' command I'm used to), so I moved on to the C file.
Partly because I thought that interrupts would be a good way to combine asynchronous button and serial inputs and partly because I wanted to understand the avr interrupt system better, I decided to use the template provided by the hello.ftdi.44.echo.interrupt.c files on the course website. This turned out to make life a bit difficult, but I do think I ended up learning a lot.
My board was already set up with the basic Hello World program, so I already knew that I could program it with the FabTinyISP and that the fuses didn't need to be set again. Therefore I went right into modifying the C code.
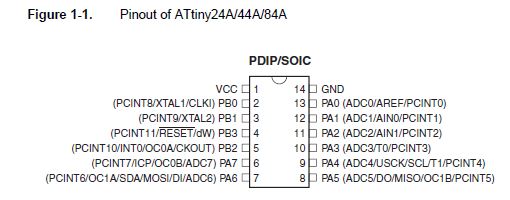
I started by playing with the LED output on pin 6 of my board. (This is the LED at which I forgot a resistor and had to stick it in after soldering the other components on). From the pinout, I could see that this pin is actually PA7 (7th bit of data register A).
I therefore created a macro called 'led_pin' defined as as a one bit left-shifted by PA7 (which is a macro defined in a header file that translates to an integer). This led_pin could then be used to do operations on the correct bit of data registers using bitwise operations. For instance, I could turn on the LED with the command PORTA |= led_pin (set the PA7th bit of PORTA register to 1) and turn it off with PORTA &= (~led_pin) (set PA7th bit of PORTA to 0). I put some of these commands in the code so that the LED would turn on while characters were being sent. At this point, I was able to see the LED turn on at the right time, but it was really dim. After some online research, I discovered that the output pins have to have their direction set as output before they will be able to source current. This can be done by setting the proper bit in the DDRA (Data Direction Register A) with the command "DDRA |= led_pin".
I was now able to control the LED from software, so I moved on to detecting and using button input. Checking the pinout again, I saw that my button
was connected to pin PB2. I therefore defined button_pin as 1< I could have set up the main while loop at this point to check for a low pin, but I wanted to try to use interrupts. In order to set up the button
pin to create an interrupt, I followed the outline given by the serial pin interrupt given in Neil's template. First, I looked at the pinout to
figure out that the PB2 pin corresponds to the PCINT10 pin change interrupt pin. I therefore set button_interrupt_pin as 1< By default, pin-change interrupts (like all interrupts) are disabled and have to be individually enabled. In order to enable pin-change interrupts from port B,
I put the command GIMSK |= button_interrupt into the main program (This sets the correct bit in the general interrupt mask to enable port B interrupts). Then I
specifically enabled the PCINT10 interrupt with the command PCMSK1 |= button_interrupt_pin (set the bit in pin change mask 1 so that a change on PCINT10 will raise
an interrupt). Finally, I had to create an interrupt handling routine for the button. I did this by creating a function starting with ISR(PCINT1_vect) {, which tells the
assembler that this routine should handle PCINT1 interrupts. I started out by making this handler send a certain message to the computer. When I disabled the serial interrupt (or just made sure not to press any keys on my computer to trigger the serial interrupt), the button interrupt
worked great, and I could add in instructions to turn on or off the LED upon button presses without any problem. If I first triggered the serial interrupt,
however, the button interrupt stopped working! In order to troubleshoot, I inserted some instructions in the main loop that would count the number of times the main while loop executed. I expected
that this number should increase very quickly when the chip wasn't talking to the computer. Strangely, however, after the first serial interrupt, the counter
never increased, showing that the program was getting stuck in the serial interrupt handler and not returning to the main function. After more research and thinking,
I discovered the key: Neil had written a bug into his program--the serial interrupt handler is triggered upon any pin change at the serial input pin. This means that the
handler is first called when the computer starts sending a byte. The serial interrupt handler then handles the receipt of a whole character, in the process of which
the serial input pin changes state many times. This means that the serial interrupt flag is guaranteed to be set during the serial interrupt handling routine. Therefore,
as soon as the handler has finished its work and returns, the serial interrupt is raised again so the CPU goes back to the serial interrupt handler. This time, however,
there is no data being transferred, so when the handler calls getchar(), the getchar routine gets stuck waiting for the start bit and doesn't return until it gets a character. In Neil's unmodified code, this was a silent bug since the user would either eventually send another character, which would be read by the getchar() routine, or would
unplug the chip, resetting the program. In my program, however, this prevented any other interrupt from being called since interrupts are globally disabled when an interrupt
is being handled. The fix was to clear the serial interrupt flag before returning from the interrupt handler (in general, this should be done for all interrupt handlers
that should only respond once to an input that may not be single). This can be done with the instruction GIFR = serial_interrupt_flag, which writes a 1 to the serial interrupt
flag and a 0 to the other flags. This actually clears the serial interrupt bit while leaving the others unchanged. Side Note: This instruction is counter-intuitive. Firstly, in order to clear the flag bit, we must write a 1 to it, not a 0. Writing a 1 to an interrupt flag tells the processorNormally
to clear it, while writing a 0 tells it to leave it unchanged. Secondly, you would normally set a given bit with an instruction like GIFR |= serial_interrupt_flag. This doesn't work for interrupt flags because the |= instruction
requires the GIFR register to be read. Reading the interrupt flag register clears all of the flags, which might clear flags you don't want cleared. You therefore have to write a 1
to the desired bit without reading any of the other bits. This would normally be hard, but because writing a 0 to a flag leaves it unchanged, we can just write
a 0 to all the bits we don't care about and a 1 to the bit we want to clear. This fixed my code, so that my chip could respond to interleaved button and serial interrupts. I was then able to set up the code to give my final
desired functionality: In the end, I programmed the board so that the LED turns on when the buffer is full. The user can also at any point erase the buffer by pressing the button, which
causes a "buffer cleared" message to be sent to the computer. Because I use a pin change interrupt instead of a rising or falling edge interrupt,
this button clear is called twice (button press and release) for each press and release cycle. I could fix this by configuring a more flexible general interrupt,
but it doesn't really matter for my application that it clears twice, so I left it as is.
The Result:
Files