For week 2 we’ve been tasked with making something parametric on the laser and vinyl cutters + building our (this) tracking page!
ORU makes a really interesting foldable kayak that shrinks down to duffle bag-size and can easily be carried/stowed (perhaps in a small Cambridge apartment). I’m imagining the process of making one would be relatively straightforward with access to a tool like the ZUND. The kayaks are cut from chloroplast sheet, which is a corrugated PP or PC plastic commonly used by sign makers, and is available from the home depot for $20 in 4’x8’ sheets. This week I intend to do some initial exploring with the origami and folding part, and will hopefully get the kinks sorted out in cardboard before making taking a stab at it on a bigger machine in week 4.
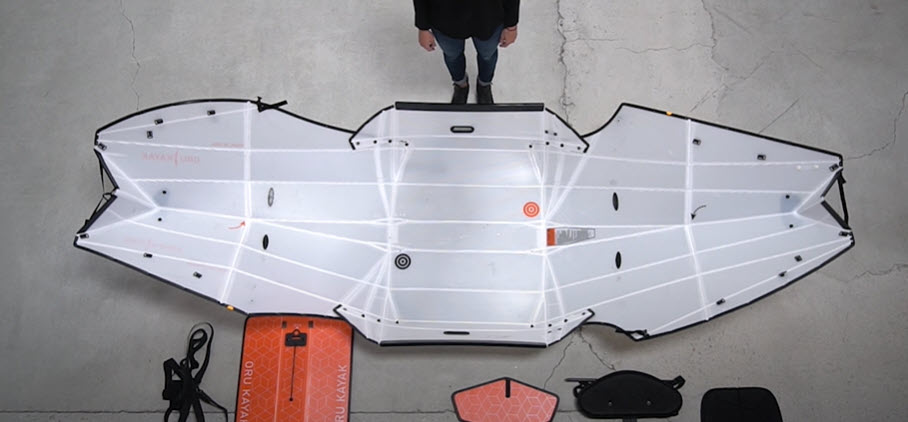
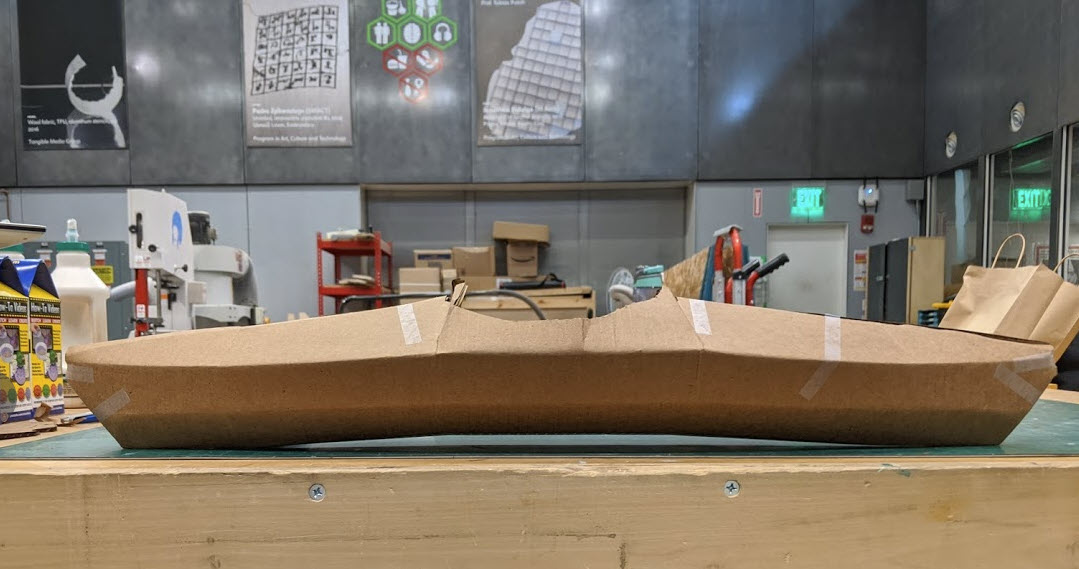
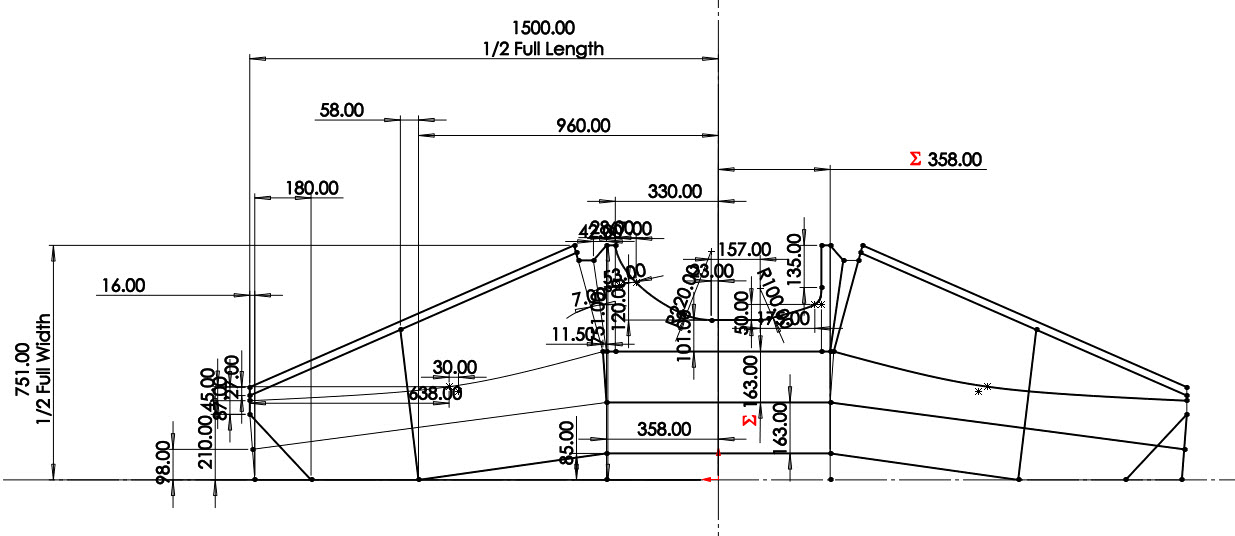
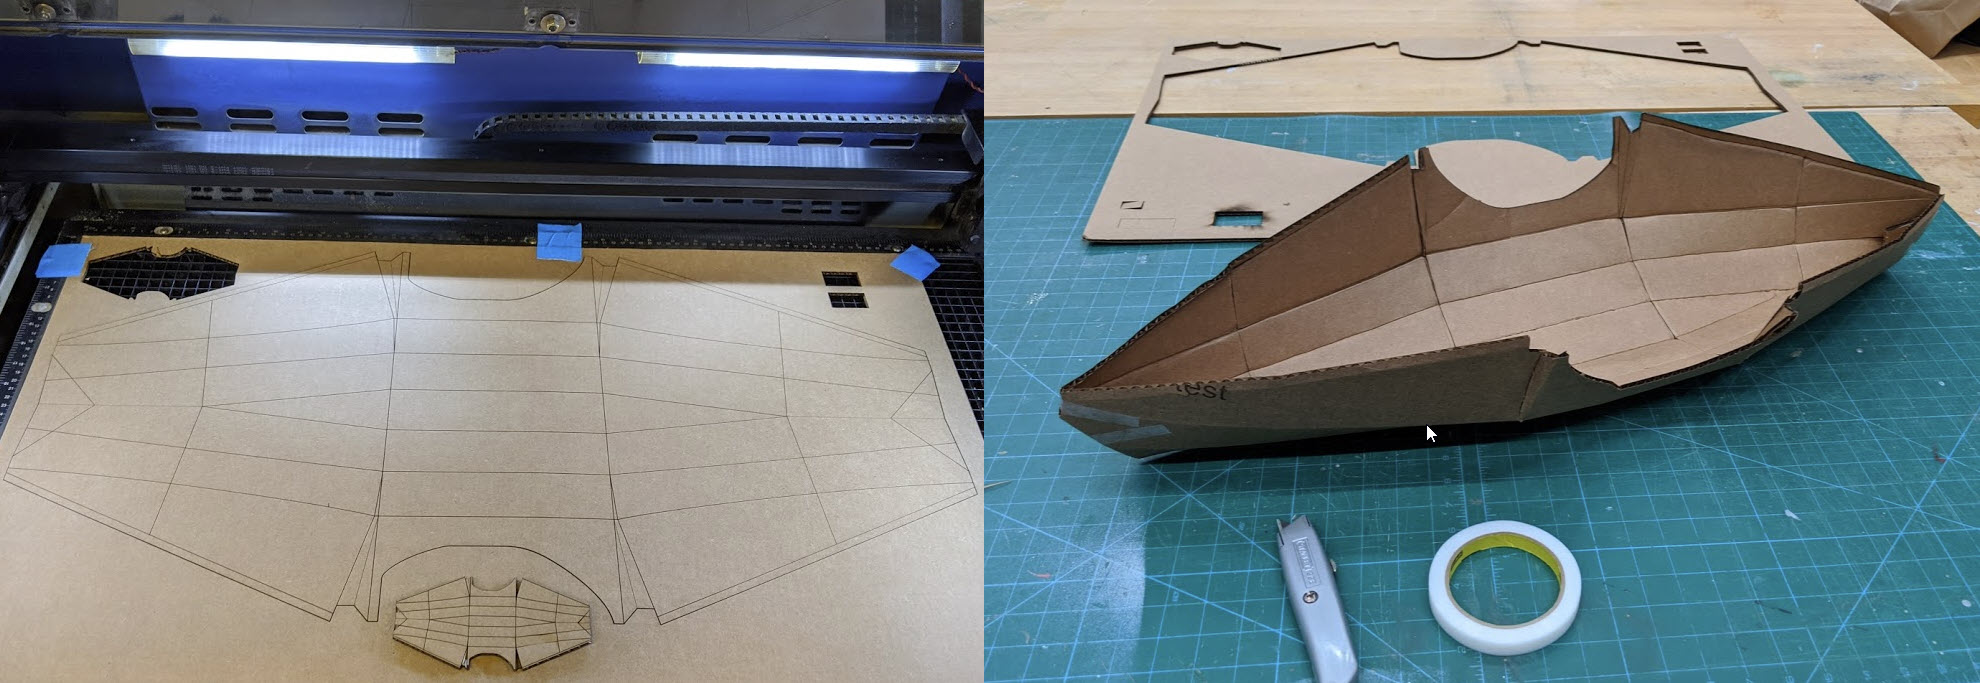
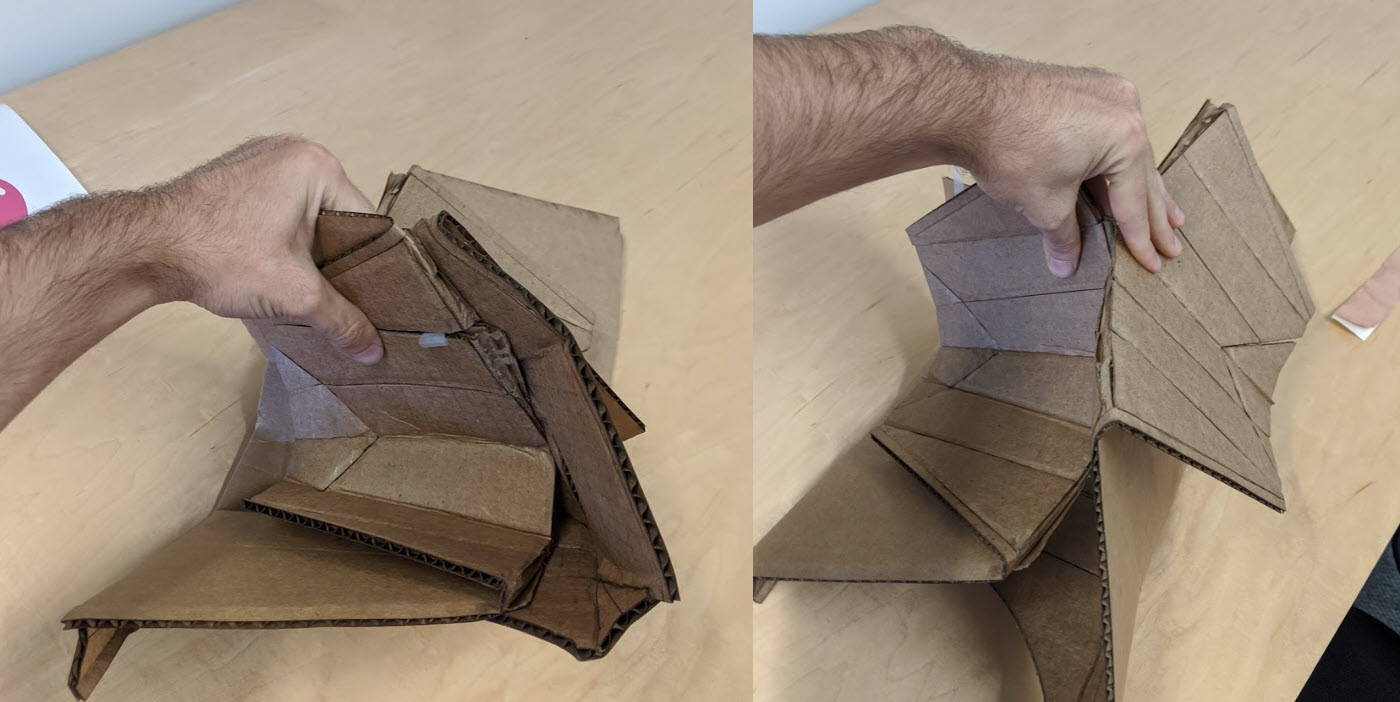
I have a suspicion that this geometry is outside the capabilities of Solidworks’ sheet metal tool… although I have heard that Rhino is very good at parsing functional representations of folded geometry. Rather than model in 3D, I decided to just draw the flat pattern, and fortunately I am not the first to have tried this. I used a pdf template from that video in combination with the ORU flat pattern as a reference for CADing the parametric version below. Aside from the cockpit area, the geometry above is symmetric across 2-axes, and so I was able to dimension only one side and mirror twice to get the full kayak. Below are some progress pictures. I started by cutting a small version to get a sense of the setting I needed to “score” where the bends go without fully cutting through the cardboard. When done on a CNC this will be done with a V-bit, as opposed to an endmill for the through cuts. By following up the scoring with a scrape from a Philips head driver, I was able to successfully bend together a roughly kayak-looking shape, despite the cardboard being much thicker than desired relative to my mockup (which was limited by the size of the laser cutter). You can see that the cardboard suffered some irreparable damage when getting folded up, so I wound up cutting two to get the before and after picture.
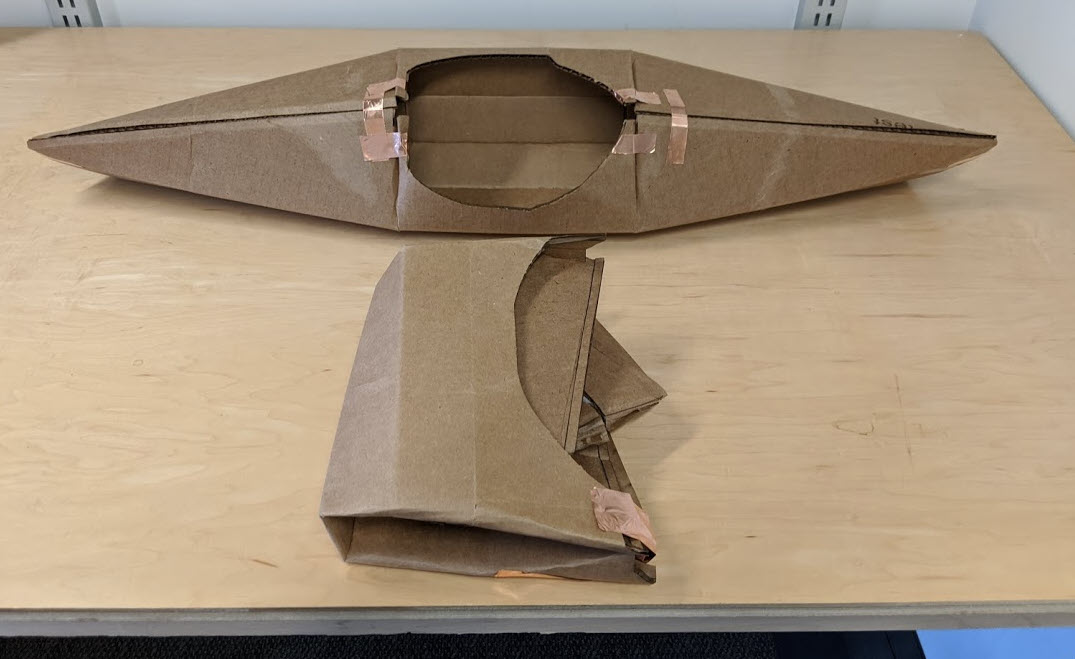
Okay so it isn’t exactly a construction kit… To remedy that I parameterized the pieces of tape I used in various locations as modular straps. All of the straps are identical, and keep the kayak together through simple tension. It’s reconfigurable in the sense that it can go from folded to unfolded, but I am celebrating a slightly different interpretation of the word here. In a final version I would like to implement either some of those industrial buttons used on lifejackets, or potentially use acetal clips-buckles (the kinds used on backpacks). This would allow for lightweight teardown and assembly. What’s really exciting about this project is how a very complex geometry can be held together like a tensegrity structure, and also be super functional. I am sure there are more practical things one could make using the chloroplast + elements in tension method. When week 4 rolls around I will revisit and start worrying about how to put this together in such a way that I will be confident getting in it!
Oh and I had a nice couple of hours on Friday with Justin and Andres playing with laser parameters. Turns out in the end Tom and John really know what they’re talking about! Deviating even a little from their recommended feeds and speeds resulted in not fully cut cardboard, and we opted to only lower parameters to avoid lighting something on fire.
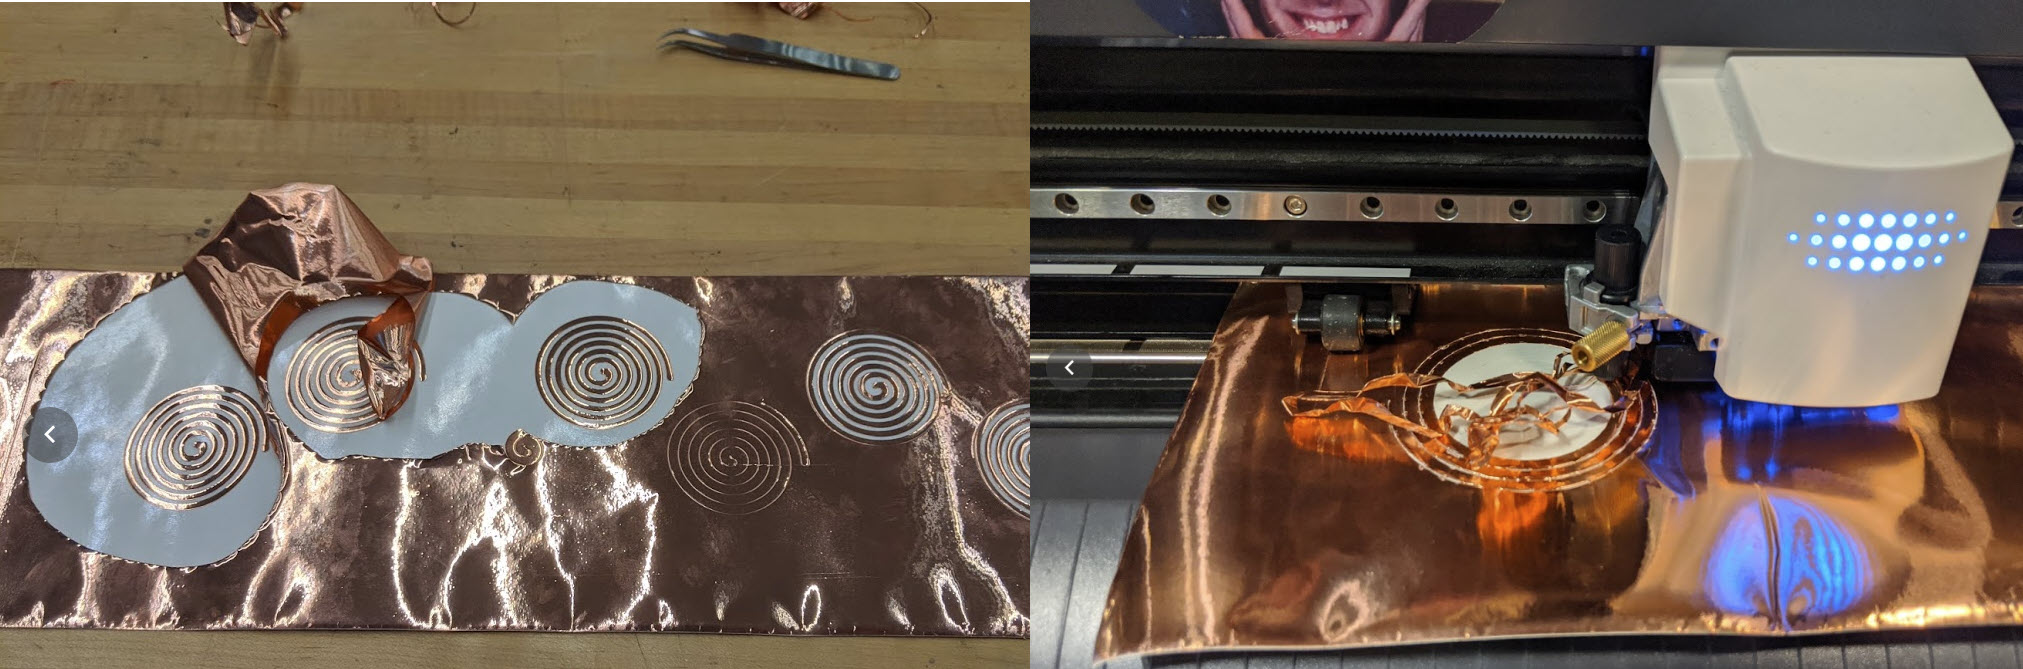
For past projects I have tried winding inductors with magnet wire, as well as getting them etched in PCBs. Etching in particular suffers from manufacturing limitations, including being limited to commonly used weights of copper + caps on trace width and trace-to-trace distances. After hearing about folks from past classes cutting copper tape on the vinyl cutter I wanted to try making some inductors and hopefully plugging them into a power supply. Vinyl cutting is likely to have even more vigorous design constraints, but could still be a useful tool for getting a lot of copper onto a substrate in helical form.
Settings I used for cutting copper are below. They resulted in really clean cuts that allowed me to pull out the waste spiral very easily (although the machine insisted on doing 2 passes so lots of stop and go.
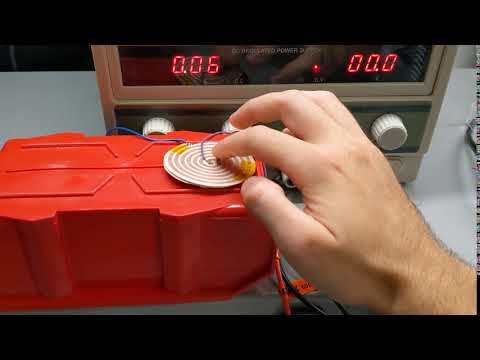
After getting the parameters dialed in, I soldered up a stack of 4 in parallel and made the little electromagnet shown below. If I had more time I would love to try cutting a long series of inductors in series, and then folding them over on another to avoid the soldering. This could be a really powerful way to create flat inductors without following the design rules of PCB fab.
Returned to vinyl cutting copper in the basement of 023. 50g still worked great and upped speed to 10 cm/sec. Switched to a workflow that goes: export a .dxf from solidworks, bring it into aspire and move stuff around as desired. Export a .svg from aspire and open it with LibreDraw (Libre Office's version of illustrator). In LibreDraw move around the part such that its aligned with the top left corner of the workspace. Make sure you have CAMM1 (Roland's printer driver for the GS-24 installed) and select the Roland, then open the properties window and check "get paper size from machine" while the Roland is plugged in. This works suprisingly well given how clunky the rest of this workflow is. When you turn on the machine, flip up the lever in the back, move the rollers to the correct white bars with nurling, feed in your material and clamp the lever back down. Then hit menu and set the machine to piece (unless using a roll) and it will auto-find the edges of the piece.
I decided to learn to use Jekyll for HTMaA, but it wasn’t because I was being lazy! I’ve built a website from scratch in the past, and while I like how it wound up looking, it would probably make any decent web developer want to curl up into a ball. Also this way I will be able to do all of my documentation in luxurious markdown as opposed to HTML. Nice!
I spent Saturday learning my way around jekyll + loading themes and layouts. The process was surprisingly easy, but it turns out that Gitlab doesn’t take kindly hosting a bunch of markdown files ~5 layers deep into a git repository, and won’t be capable of loading assets/themes without some direction. Fortunately Erik was innocently sitting at the CBA’s pick and place, and was kind enough to guide me through the ~1.5 hour process understanding what was wrong and how to fix it. You may errr, notice that my tracking page looks suspiciously similar to his from nmm…. On the bright side it isn’t using a theme, and so I will actually be capable of getting in there and moving stuff around to hide my shame. Thanks Erik!