Computer-Controlled Machining
This week, we got an introduction to creating toolpaths for machines with endmills to cut material, focusing on cutting completely or partially through flat stocks. Thus, while we did learn about 3-axis and even 5-axis milling machines, we will be focusing on 2.5-axis milling this week.
The first step after getting trained by Tom was to characterize the ShopBot. You can see the parameters we tested here. Now that I know the ideal cutting speed, gap width, approximate number of tabs per cut piece, etc., I can get to my design for the week!
Our task this week is to "make something big." I rackied my brain for a while trying to think of something that was 1) big, 2) useful, 3) could still actually fit in my apartment. I currently have two ideas: a "little" table and rocking chair for my daughter, or a shoe shelf with multiple compartments for my closet. Depending on how big or small the designs are, there's a chance that I could potentially make both. We'll just have to see...
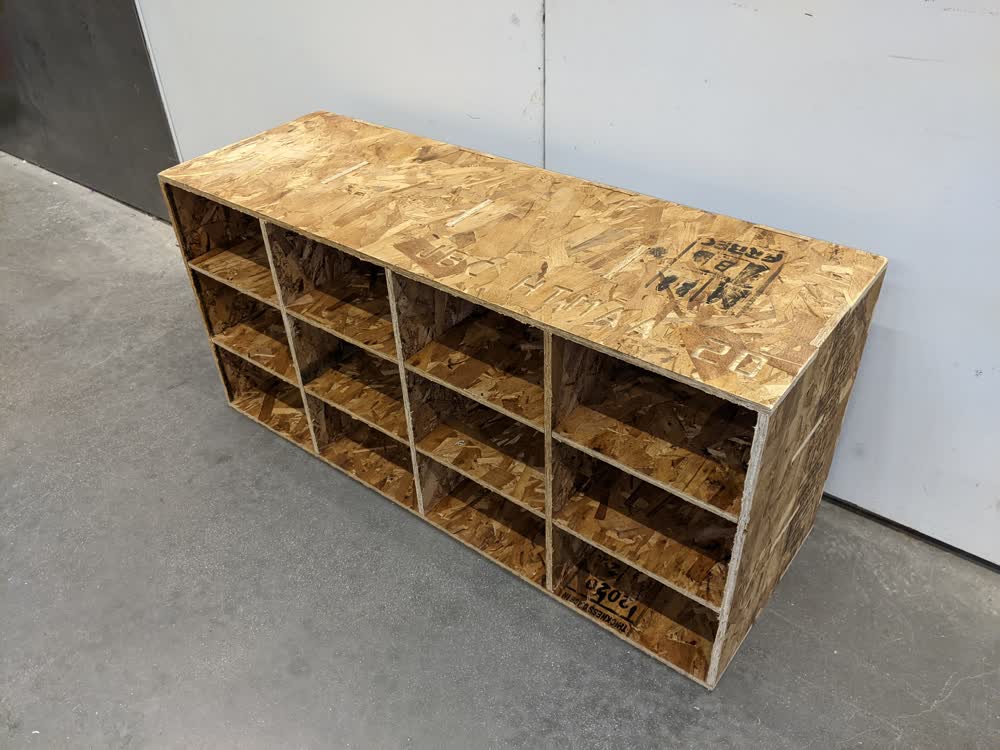
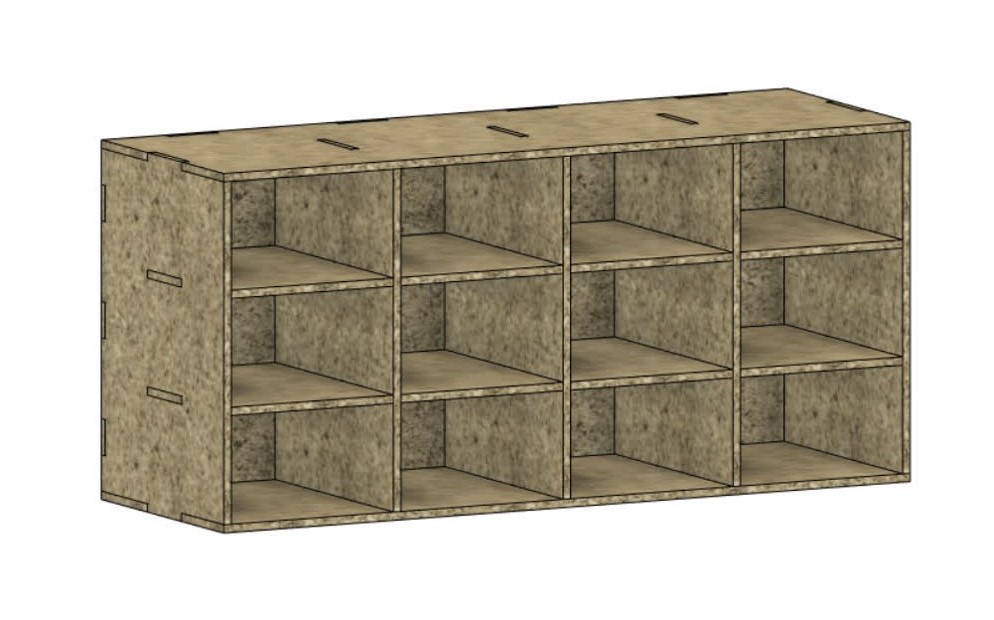
I ended up going with the shoe cubby. Because of the poorer quality of the OSB plywood we are using, I didn't want something that would need a whole lot of post-processing to make it usable and splinter-free. A shoe cubby can just go right in the closet, be covered with a blanket, and be ready to go.
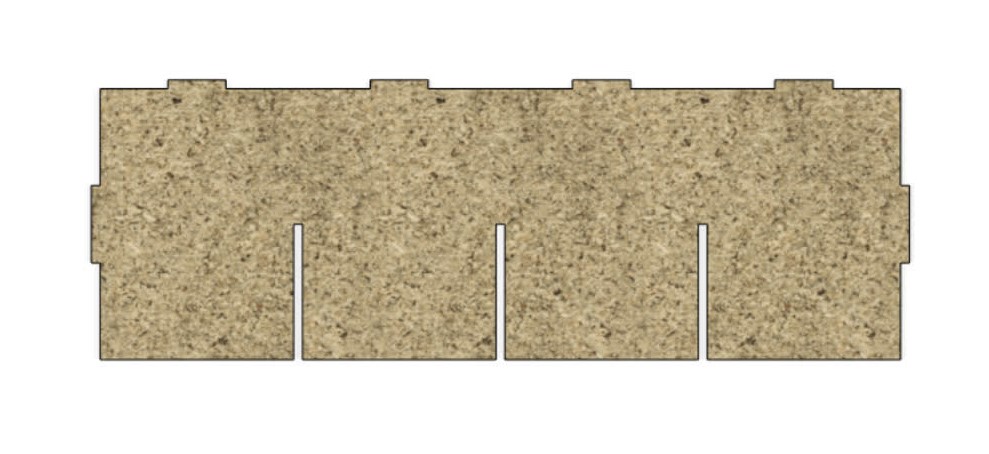
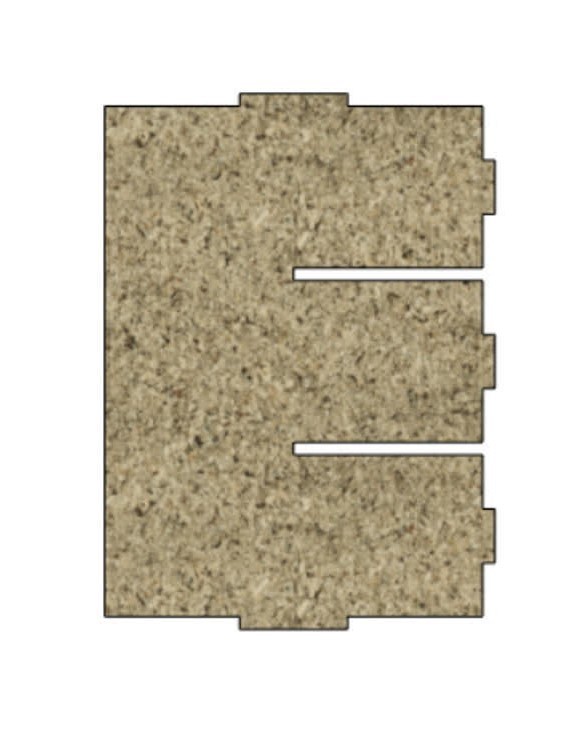
After extensive measuring of the space inside of the closet, I had some parameters set and was ready to design. The geometry of the overall structure is very simple, but I needed to figure out the joints. I had originally considered experimenting with wedges to hold the sides, back, and top to the rest of the structure. However, that would really constrain the size of the cubbies, so I had to choose either narrower cubbies or less of them horizontally. I was leaning more towards having more cubby space and one more column of cubbies, then when I talked with Tom about feasible joint types, he suggested I test a simple slot test. The results of that slot press-fit test can be seen on the group page. He told me that that should be enough to hold everything together, even without wood glue, screws, etc. This sealed the deal for me, so I just needed to align all of the slots and insert tabs, as well as make them the correct size. One huge thing to note is that I still don't know of a clever way to keep finger joint notches and holes constrained after trimming the overall rectangle away to make the actual notch or hole. Whenever I trim it, the constraints disappear, so when I go back and change parameters, I have to backtrack and reconstrain/retrim pieces. It's really obnoxious, and I just don't know of a more clever way to do it. The best I've got is to save the trimming step until right after you've got your dimensions locked in. Or you can at least save a copy at that point and then trim on the copy so you don't have to backtrack. You'll still have to do the trimming again, but at least you don't have to essentialy start from scratch. This issue burned some time this week, much like it did during laser cutting week. Hopefully I can find a better solution...
After getting everything designed, I verified that it could be assembled as I had thought by testing out the joint and assembly features in Fusion 360. This was a good sanity check, and after verifying my design and considering the results of the characterization test, I was ready to go.
After exporting the different cuts as DXF files, I imported them to VCarve Pro, and began setting up the toolpath for my cuts. I learned a lot of interesting things in the software, such as how to properly scale your files manually from inches to millimeters if the software didn't do it for you. (You can change Fusion to design in inches, rather than millimeters, but in VCarve Pro, if your imported design was in millimeters and therefore appears to be huge, you can scale the files by 3.93701%, which is derived from the millimeters to inches conversion). I made sure to add T-Bone fillets to all of my slot and insert cuts. Note that if you group objects together so that your outside cut won't leave the slot cuts within the piece and make them out of alignment, you will need to ungroup them in order to add fillets, then you can group them again. I also quickly added some text to be pocket cut into the top piece of the unit, making sure the width of the lines of the letters was at least as wide as the end mill diameter. It took a bit of playing around, but I finally got everything ready to go and was ready to cut. I used the same settings we had found from our characterization test to make the toolpaths. I saved the toolpath as an SBP file for the ShopBot to read, then got ready to make the cuts.
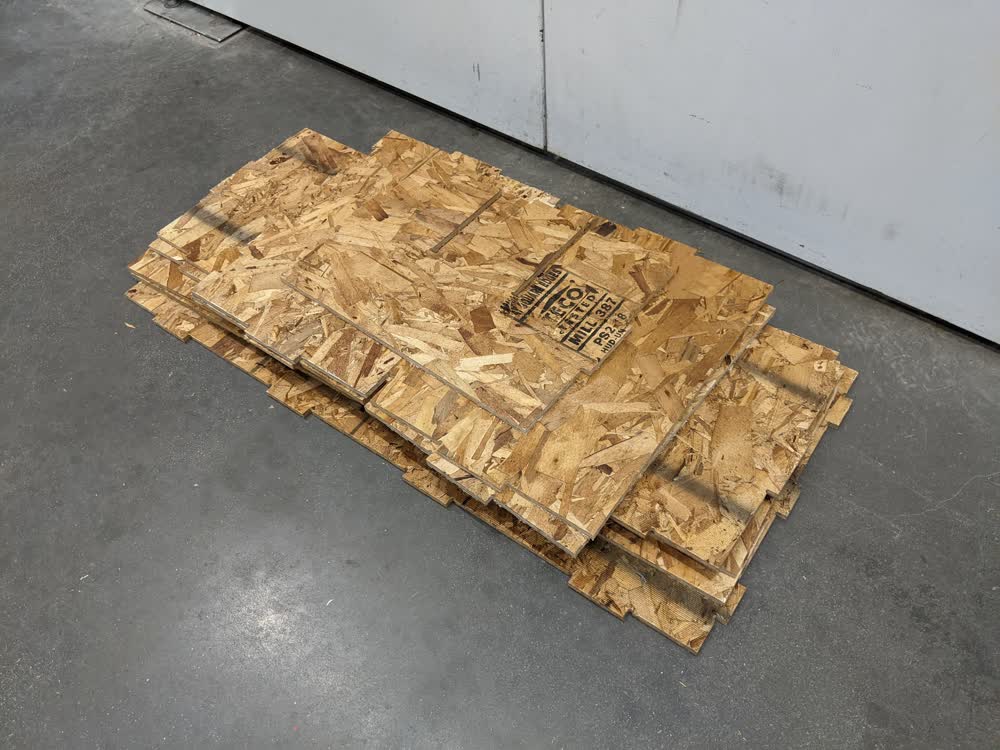
When I was initially designing the cubby shelf, I was concerned about not using the whole sheet of plywood, and so I was considering of adding something else after. However, if I would have just done some simple area calculations, I would have realized that I had the opposite problem... One sheet wasn't quite enough for my design. I was able to fit the back, top, bottom, and two horizontal shelves onto one sheet, but then needed to use the excess space from the test sheet in order to cut the sides and the three vertical shelf spacers. This took quite a bit of figuring out, but Cody helped a ton to measure out how much space I had to work with. Thanks, Cody! It was still cutting it pretty close for one or two pieces, but I was ready to go.
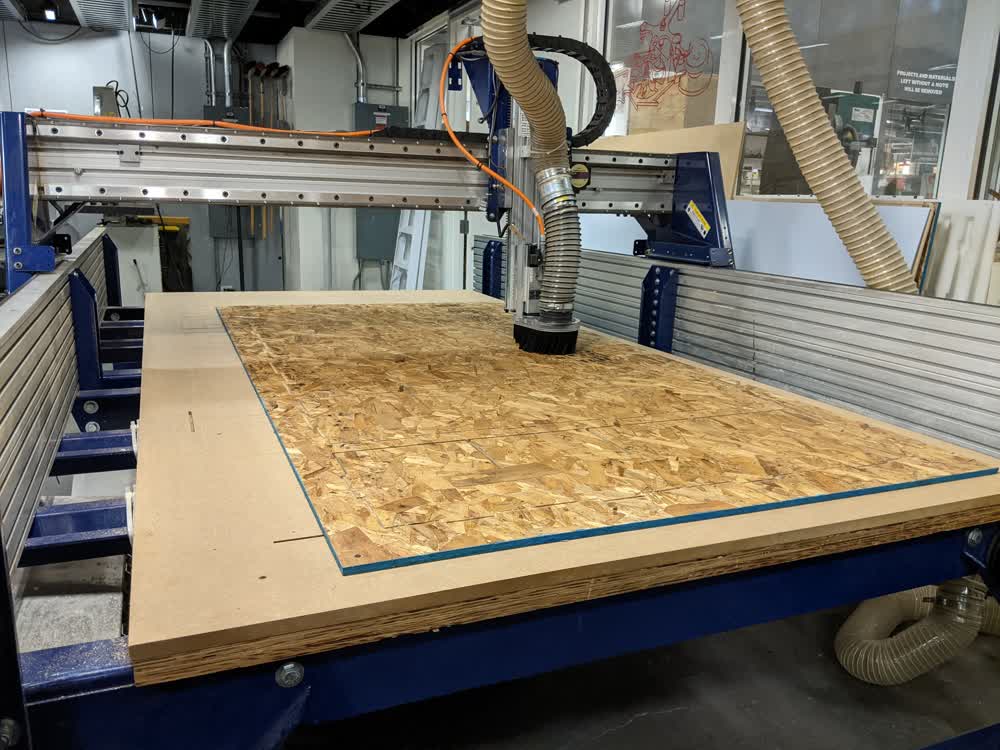
The first sheets worth of cuts went without a hitch! The scrap sheet, though, had a couple of hiccups. First off, I needed to move one of the screws holding the sheet down to the sacrificial layer so that I could have just enough room to make one or two of the cuts. Everything seemed to be going well, but then all of a sudden, the machine just stopped on the last cut. Apparently CBA's ShopBot has a random error that will just stop it from cutting even after it's been successfully cutting for hours. After a reboot of the whole system and checking everything, however, we were set to go. We lost the zero information, though, so we moved the screw one more time, and cut the final piece in a different location. It was pretty close to the edge and even got dangerously close to a screw, but no major mishaps occurred. In the future, I will definitely be more considerate of how much space I have to worth with and be much more deliberate in measuring out cuts to make sure there aren't any accidents.
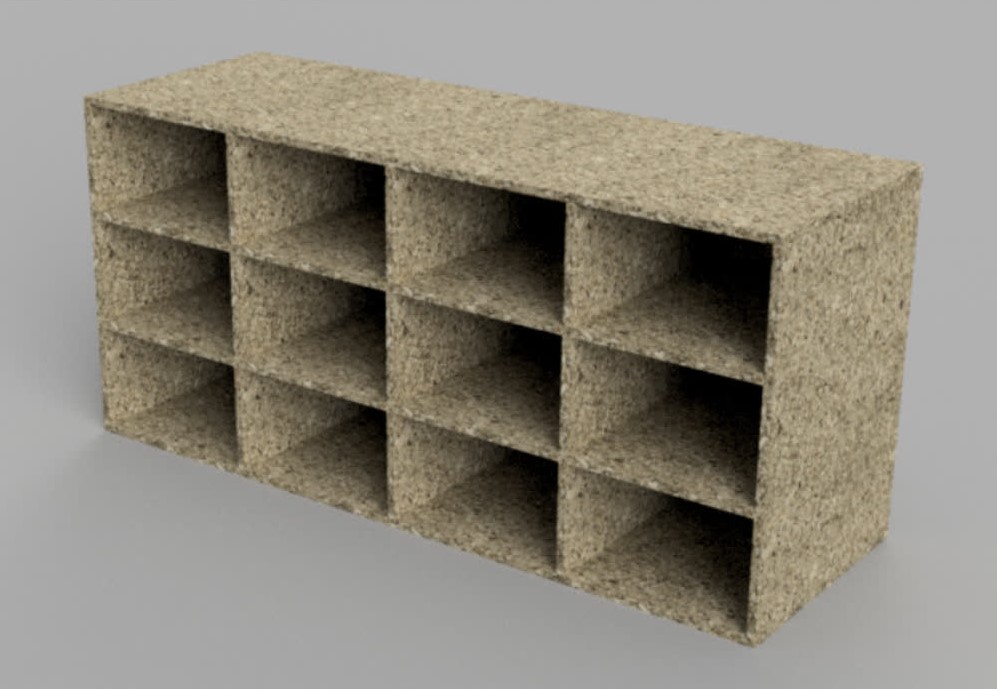
Now that I had all of pieces cut, it was time to assemble! The assembly process wasn't too bad, especially after realizing that a mallet works a lot better than my hand/fist in nudging pieces into their respective slots. It is a bit noisier, though, sorry about that everyone haha. I did end up having a bit of extra time, so I took the file and some sandpaper to the outer faces and edges a bit, just to make it a bit less rough.
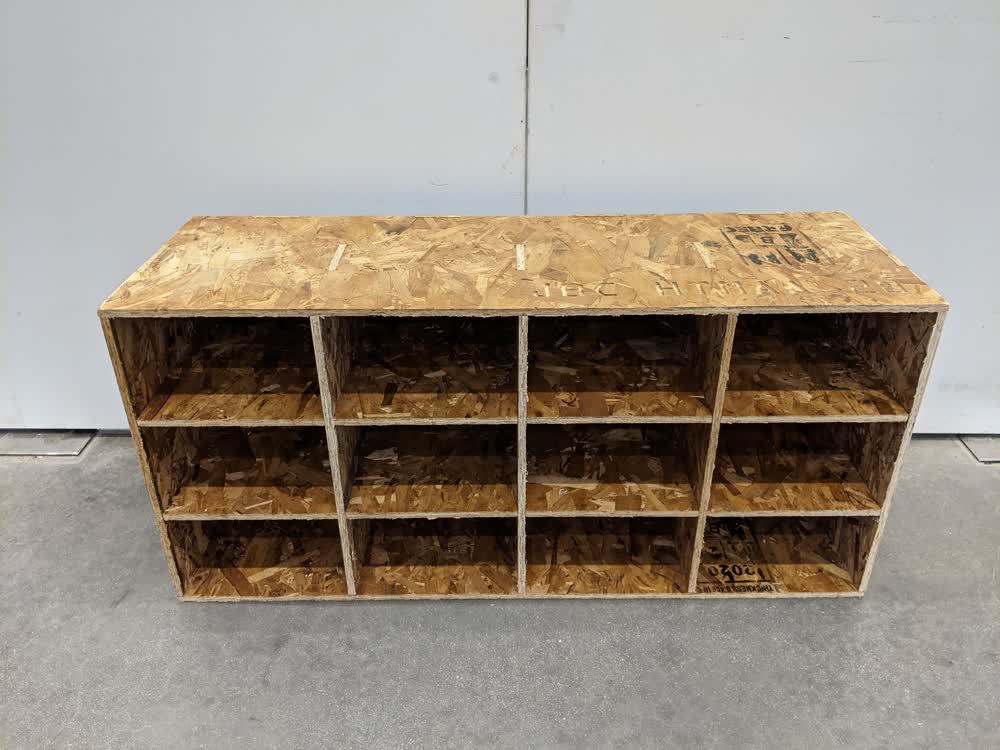
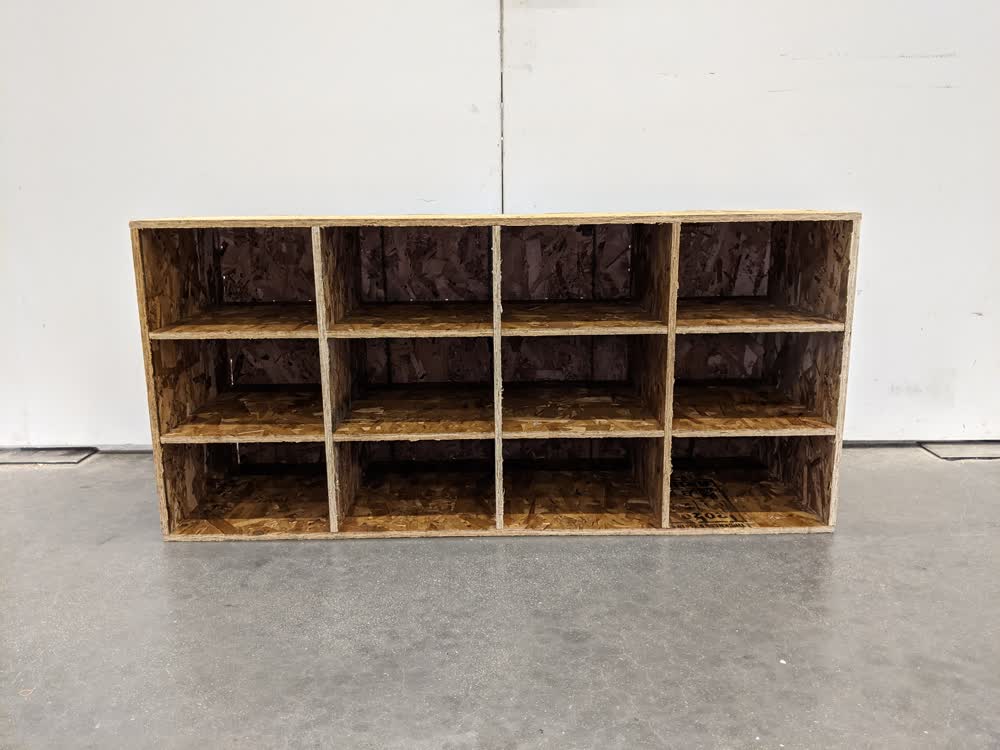
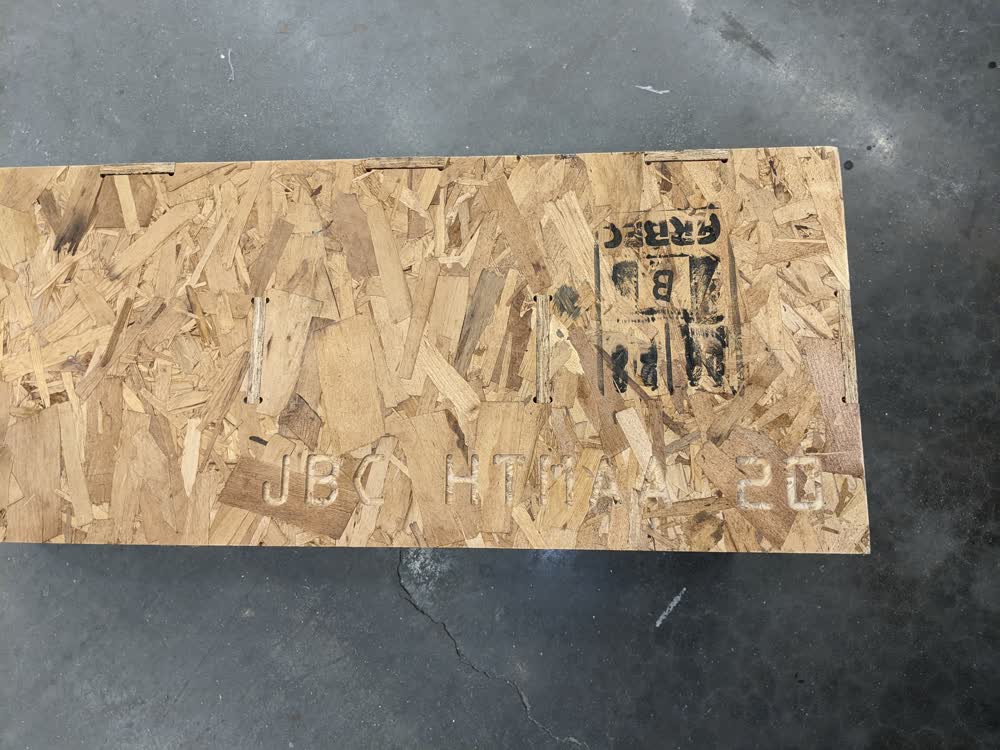
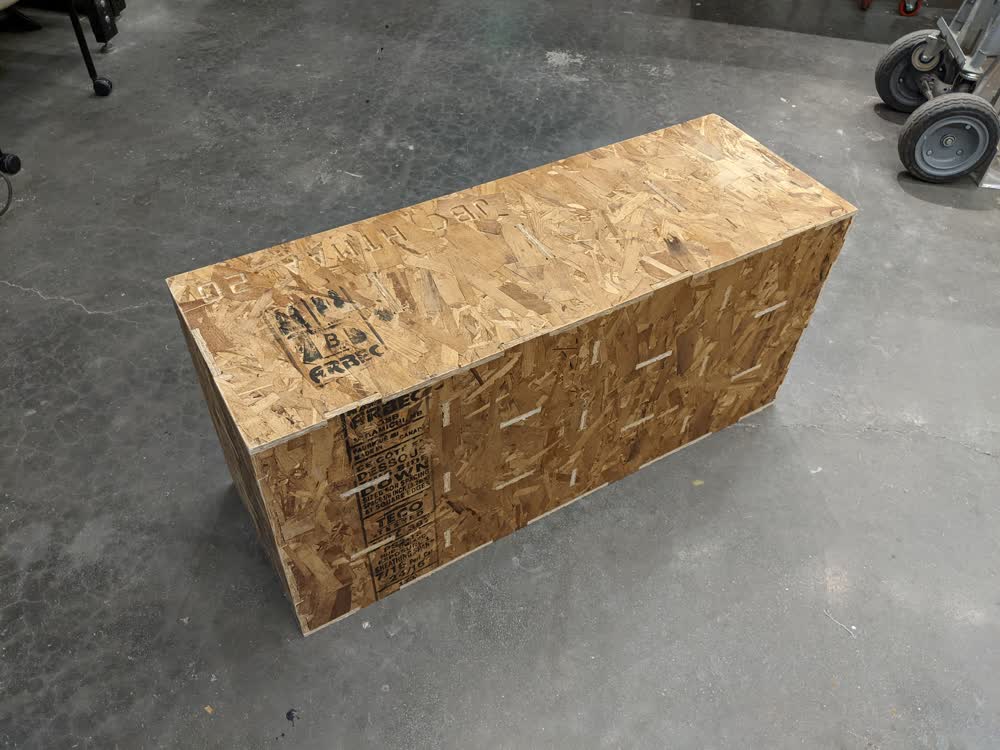
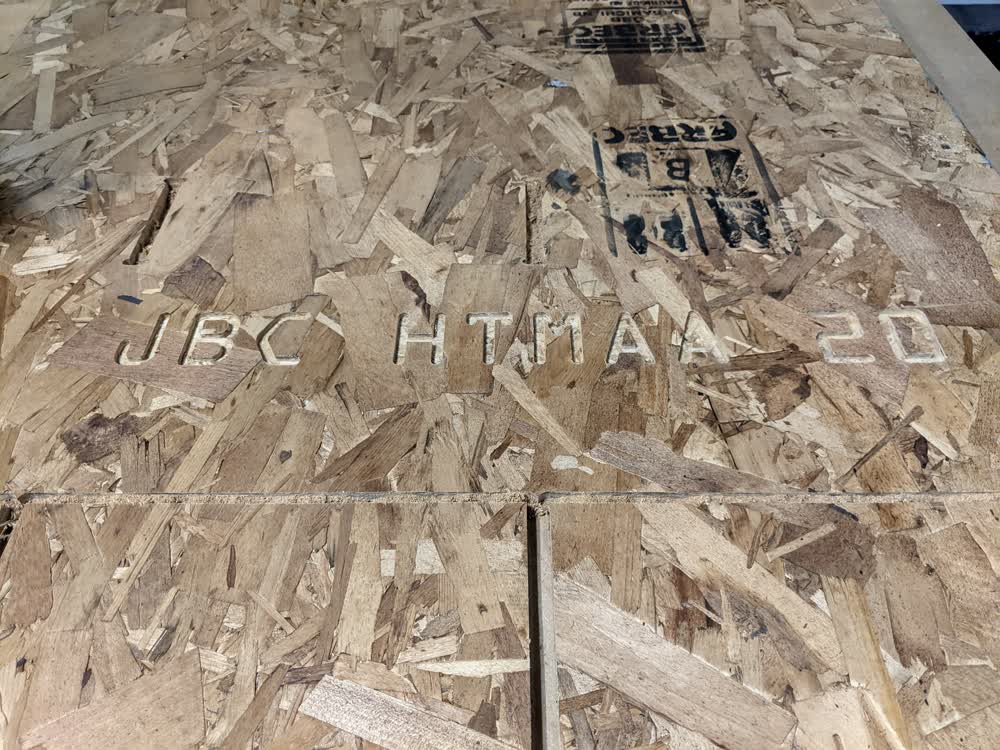
I was pretty happy with how easy it was to assemble once I figured out the best strategy to do so. Once all the pieces were together, it was super sturdy, too, which was awesome! I noticed that the text I had added turned out really well, except for two small errors. First, the inner triangle of the second "A" came off, but not for the first "A", which is probably just because the OSB isn't completely homogenous. Second, the angled lines in the "M" didn't quite work as anticipated. The mill just made three dots instead of continuous cuts. I wasn't sure why other than maybe the text needed to be just a bit thicker, but it doesn't bother me too much. But it assembles very nicely, and looks really good, I think! Now I just needed to get it home...
Transporting it home wasn't actually too bad. I had my wife and daughter come and meet me outside of the lab. I just carried the pieces out to them, and put them in our fairly robust grocery wagon/cart thing we have. All of the pieces fit pretty nicely into the wagon. And what was even better is that the shuttle came by and we were able to just wheel it all on there and get dropped off pretty close to our apartment. After one last haul up the stairs, the shoe cubby was ready to be put in place in its new home! I unfortunately did not get any pictures of the transportation process, or of the strange and curious looks we got from people on the shuttle.
It was just as easy to assemble at home, but then we hit a problem. The whole thing was designed to fit nicely with some clearance in the bottom of the closet, but it wasn't designed with considerations of how to actually get it in the closet in mind. After emptying the closet and trying all sorts of rotation angles for the unit, I realized that the only way to do it was to assemble it directly in the closet. Even after realizing this, I tried to assemble it in a different orientation, then rotate it, but there simply wasn't enough room to do that. So, I just assembled it in its exact final orientation piece by piece. It was a bit harder to do this because I was only working with the final resting clearances, but everything went together pretty nicely. I did notice that after assembling and disassembling a couple of times, the joints felt slightly looser. But once the whole thing is put together and you're not moving it around a whole lot, it is more than stable and sturdy enough.
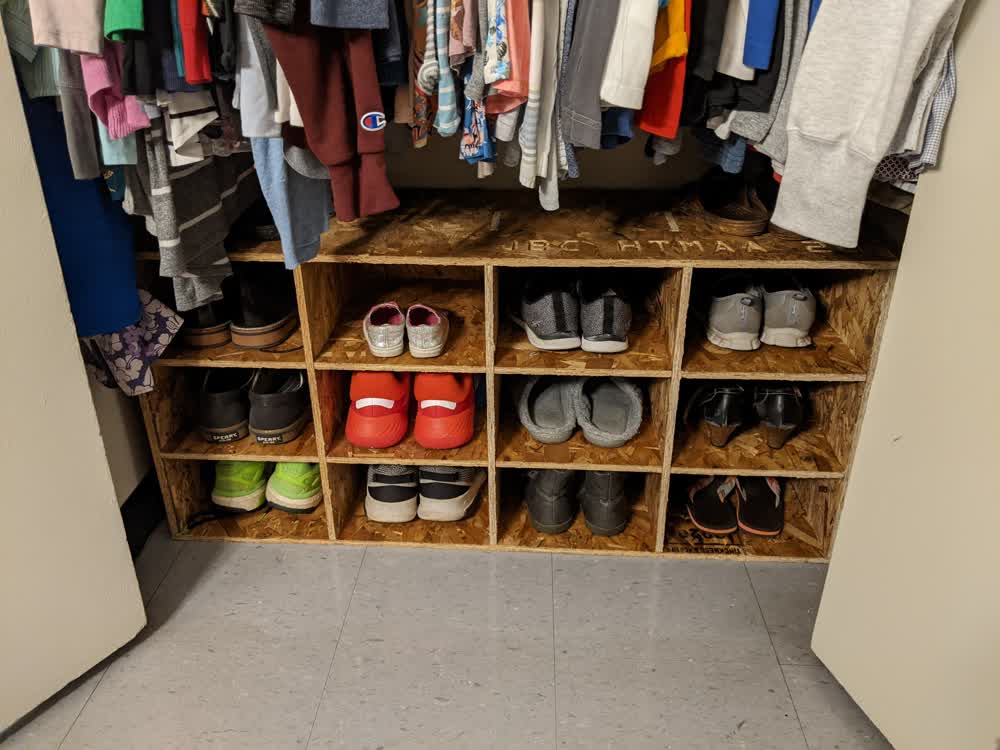
I really love how it turned out! We were able to put pretty much all of our most-commonly worn shoes in there (my daughter decided she needed to add her shoes in there, too haha). It would be nice to sand it more, line the insides with some sort of felt or other fabric, and strengthen the joints with a couple of easily-removable screws, but again, I'm really satisfied with how it turned out, especially with how easily everything went together from the first design. It definitely did not go that smoothly when I was working with the laser cutter for other projects, especially not on the first iteration.
Here are the files I generated for this week (not including the .sbp toolpath files for the ShopBot due to their size):
- shoe_cubby.f3d - Shoe Cubby Model Fusion 360 File
- shoe_cubby.step - Shoe Cubby Model STEP File
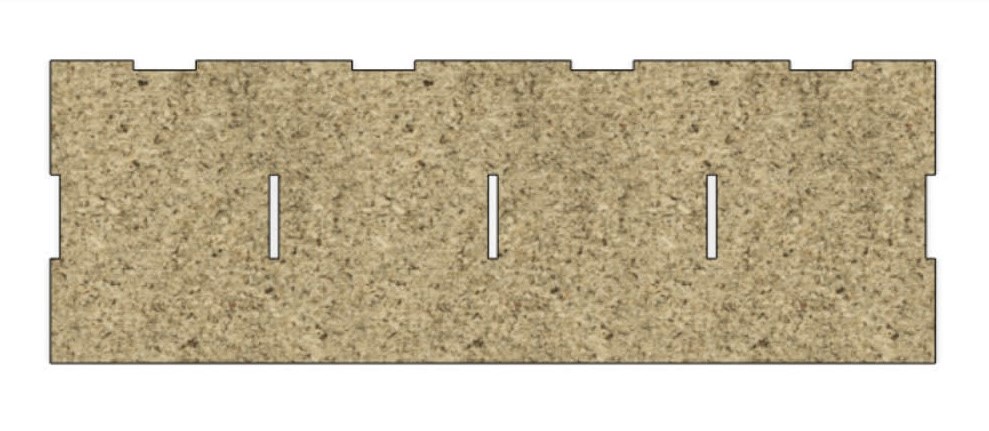
- back.dxf - Shoe Cubby Back Cut DXF File
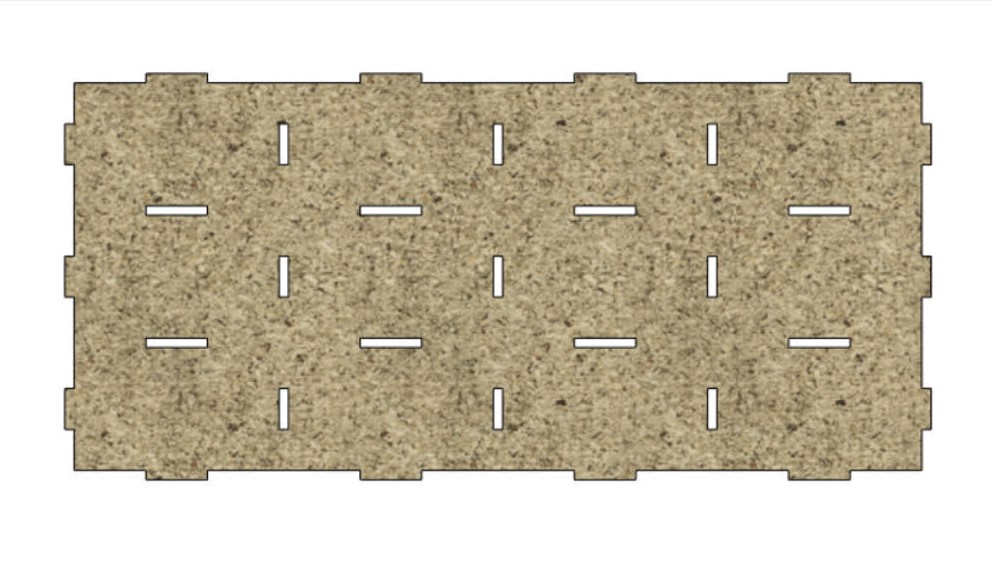
- top_and_bottom.dxf - Shoe Cubby Top and Bottom Cut DXF File
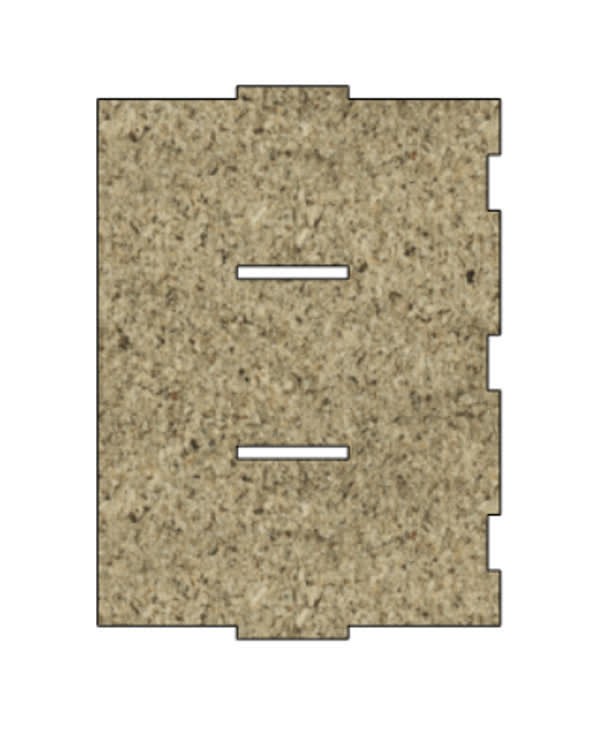
- sides.dxf - Shoe Cubby Side Cut DXF File
- horizontal_shelves.dxf - Shoe Cubby Horizontal Shelf Cut DXF File
- vertical_shelves.dxf - Shoe Cubby Vertical Shelf Cut DXF File