week 1: computer-controlled cutting
September 16, 2020
assignment
1. Cut something on the vinyl cutter.
2. Characterize your lasercutter's focus, power, speed, rate, kerf, joint clearance and chamfer.
3. Design, lasercut, and document a parametric construction kit,
accounting for the lasercutter kerf,
which can be assembled in multiple ways,
and for extra credit include elements that aren't flat.
version control
The first half of this week’s lecture was on version control and how to use GitLab to upload our portfolio websites to the
class website. I’ve had to use git for the past couple of years so I was familiar with the material. We also were tasked with developing a
website to display our progress throughout the class. I found this as a great opportunity to improve my HTML and CSS skills, so I started
creating my website from scratch. I watched some youtube tutorials for inspiration and ended up with the current website you are viewing!
One of the coolest features that I was able to incorporate was the website’s responsive design. I always found that websites that weren’t
mobile-friendly were especially annoying, so I made sure I learned how to make my website mobile-friendly. As you can see on the gif below,
the main page (as well as all other pages on my site) should be mobile-friendly to support those that are viewing my website on a mobile device!
My responsive website
using the vinyl cutter
Another one of the assignments was to use the vinyl cutter.
The Lakers have been honoring the late Kobe Bryant by wearing a commemorative patch. Since both the black, yellow, and white vinyl was available to me in the EECS shop, I figured it would be cool to make a sticker out this patch for my laptop. This design should be nice because it has closed edges for the vinyl cutter to follow.
To use the vinyl cutter, I used the mod software developed by Professor Gershenfeld. I simply uploaded the png of the patch and voila! I could immediately send the job to the vinyl cutter.
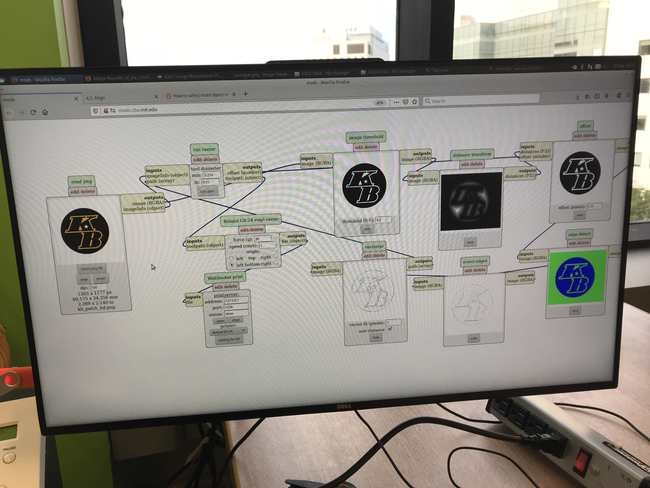
My mods setup for the Vinyl Cutter
After talking with some of my peers and some experimentation, I found that power 80 was sufficient to cut the vinyl so that it could be peeled off fairly easily.
I also messed with the dpi because I wanted a 2.5-inch x 2.5-inch sticker.
Luckily, things went smoothly with the vinyl cutter and it only took about 15 seconds to cut the design. After it finished, I went ahead and peeled all the black areas on the patch to be left with the yellow outline.
Luckily, things went smoothly with the vinyl cutter and it only took about 15 seconds to cut the design. After it finished, I went ahead and peeled all the black areas on the patch to be left with the yellow outline.
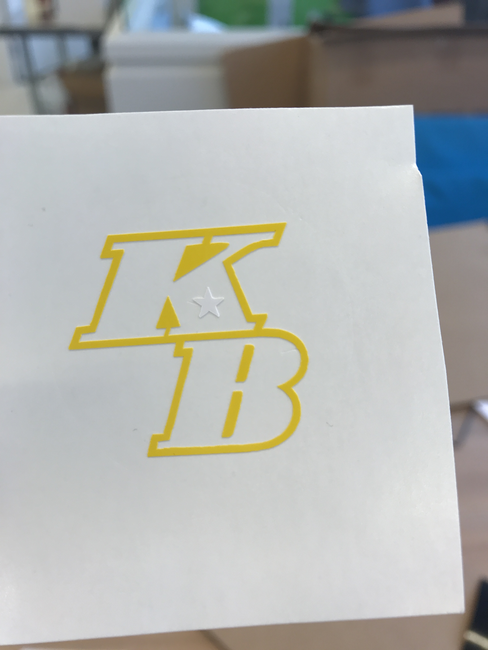
Stencil for the sticker
I then cut the same design but only extracted the white star (which is in the K). I carefully placed it in the correct location and then
grabbed some transfer paper and stuck on my vinyl cut to the transfer paper. The vinyl sticks to the transfer paper (since the transfer
paper is sticky), so I pushed pretty hard to make sure the vinyl stuck and used a piece of plastic to remove any bubbles that formed
between the vinyl and transfer paper. Once it was on the transfer paper, I cut out another small 2.5-inch x 2.5-inch black circle to
place the stencil on. After, I placed the yellow stencil in the middle of my circle cutout. I used the plastic again to make sure the
yellow stencil stuck to the black vinyl when it came time to peel off the transfer paper.
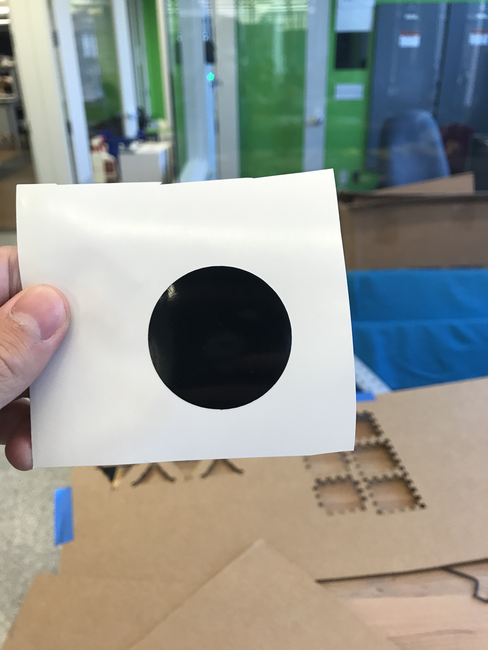
Black Circle Sticker Base
I put the finished product on my laptop I think it turned out nicely! I’m glad I had all of the colors I needed.
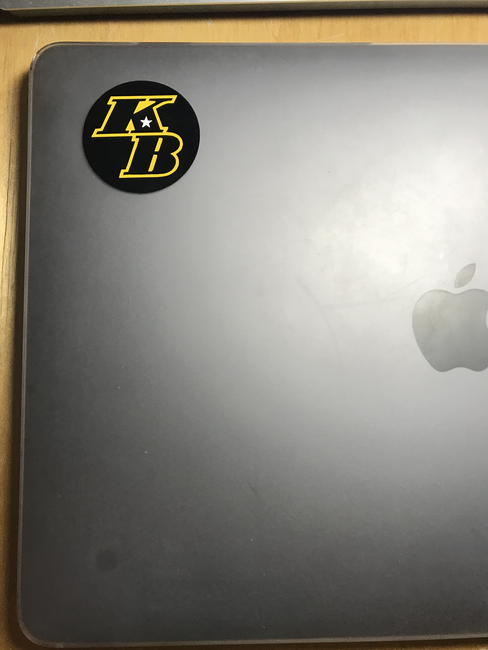
Final Product on my Laptop Case
characterizing the lasercutter's attributes
I worked with a classmate to characterize the laser cutter’s attributes. Our section leader advised us to start at low settings and
slowly move up so that we didn’t start a fire (yes the cardboard can catch on fire due to the laser).
So we grabbed some cardboard that was around 9.4 mm thick and started to cut some squares with some different settings. We started at power 50, speed 20, PPI 100, and z-axis .2. We weren’t able to fully cut through the cardboard with any of the initial settings when incrementing the power up by 10. Therefore we knew we had to switch some other settings. We figured a slower speed would perhaps help us solve our problem since a slower speed meant the laser is spending more time in the same spot.
We started at speed 15 and slowly moved down, and got some promising results when we reached speed 12. It didn’t fully cut through the entire square when we used speed 12 and speed 11, but with a little help from our fingers, we were able to push the square out. However, once we used speed 10, we got a clean cut! It’s hard to see in the image below but the square labeled 10 had the cleanest cut, while squares 11 and 12 barely had some excess cardboard on the side.
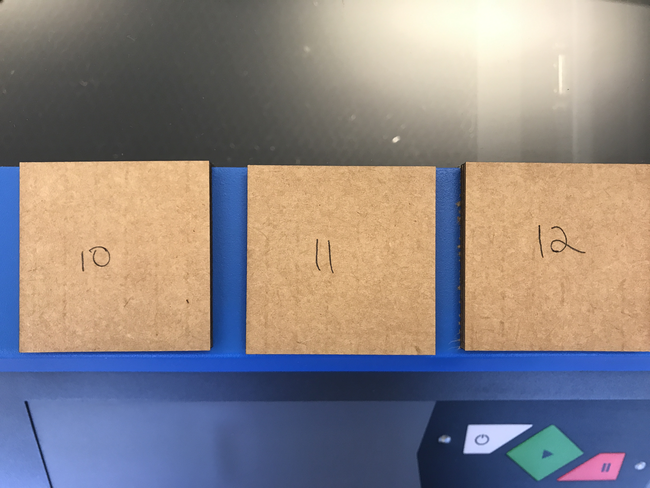
3 squares we cutout with speeds 10, 11, and 12 respectively
Aftermath of our experimentation
Therefore we found the settings needed to cut the cardboard we would use for this week’s assignment.
parametric construction kit
For this week’s assignment, I wanted to create a construction kit that could create a bunch of different shapes. So I decided on making
a 3D cardboard Tetris kit! Given the laser cut cardboard pieces, one could assemble all of the different Tetris pieces. I first started
with the CAD.
I parametrically designed the pieces so I could quickly change single parameters that applied to many different parts in my design instead of changing each dimension. Alfonso’s recitation on parametric design was extremely helpful when applying parameters with Fusion360. This recitation was actually one of my motivations for using Fusion360.
My CAD for the 3 pieces that constructed all the Tetris pieces are below.
The three joints I used for this assignment
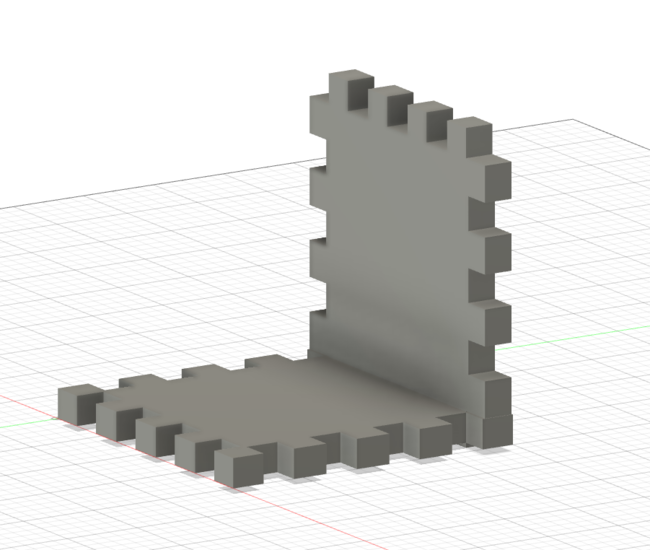
Some joints locked together in Fusion360
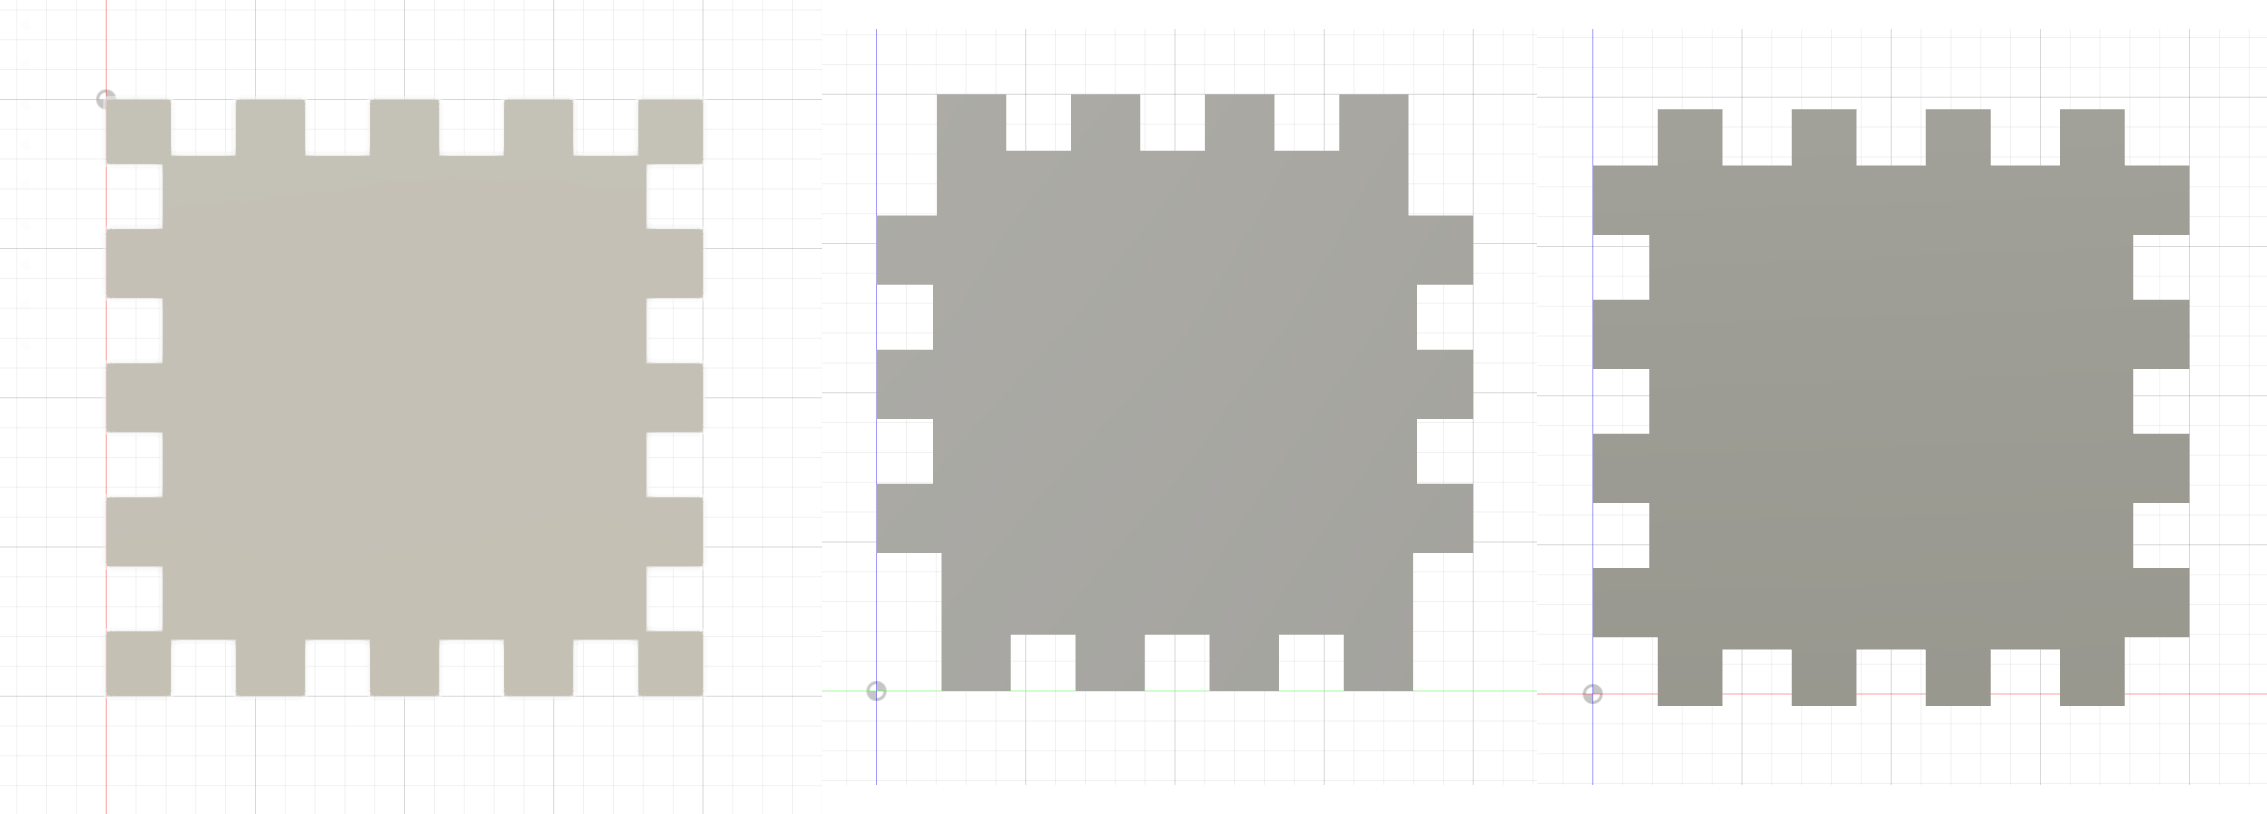
Also displayed below are the parameters that I used when designing the Tetris pieces. It was fairly straight forward since I wanted all
pieces to be squares, and I calculated the length of each finger (the pieces that would stick out of my cardboard) by simply dividing the
total length of my side by the number of fingers I wanted on each side.
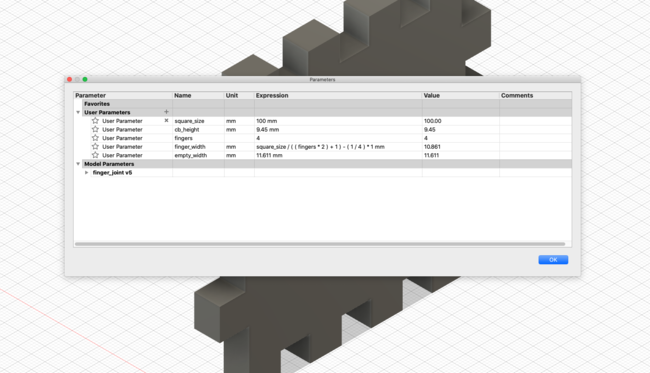
My Fusion360 parameters for the joints
One thing I experimented with before I started cutting out my pieces was how two joints that were laser cut would fit. I originally thought
that the cardboard was 9.4 mm thick so I quickly cut cardboard with a joint width of 9.4, however, it was very loose!
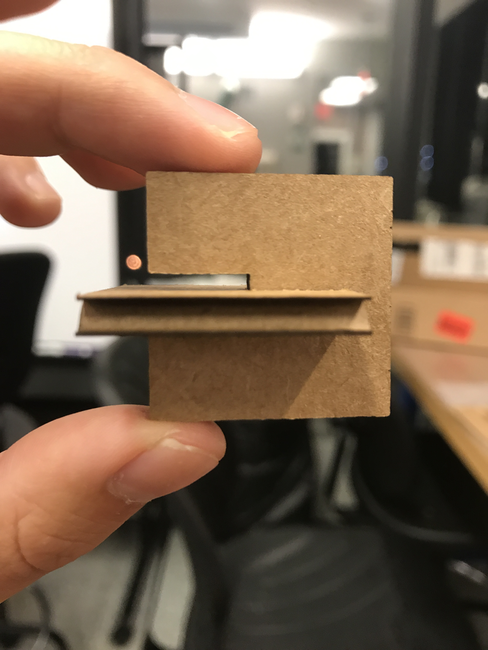
The original joints I experimented with
Luckily I re-measured and found that the cardboard was more around 9.14 mm. However, this wasn’t enough. After talking to some of my
peers, I discovered that I need to consider the kerf, or the thickness of the laser itself. This would play a role in how my pieces fit
together. I didn’t consider this until after I cut out my cardboard pieces.
After the first cuts, the pieces actually fit pretty well together. Right off the bat, I was able to create a little box with my parametric design.
After the first cuts, the pieces actually fit pretty well together. Right off the bat, I was able to create a little box with my parametric design.
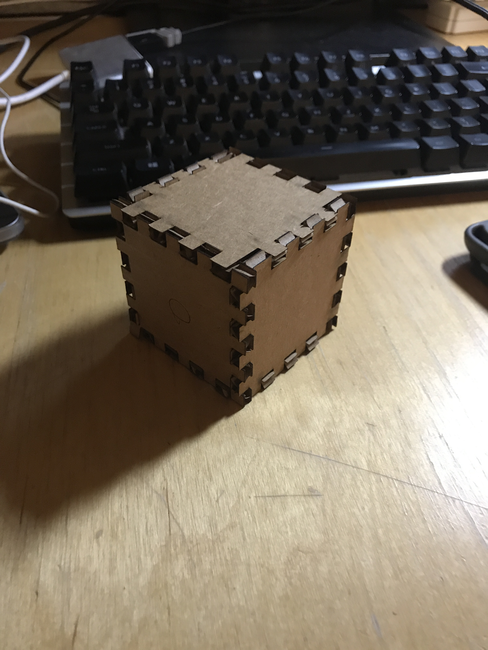
The first box I made with my joints
Even though the fit was quite nice, it wasn’t tight enough. When I lifted and shook the box, some of the other pieces would come off.
I had to consider the kerf when cutting my “fingers” of my pieces. To measure the kerf, I cut out a piece that should have been 100mm
wide. When I measured the piece after the cut, it was only 99mm. Therefore, to account for kerf, I decreased the size of the finger
width by 1mm/4 (since there are 4 fingers) and got a much better fit between pieces. I also made sure the the "fingers" (pieces that were sticking out
of my pieces) were wider than the indents in which they fit in. You can see, the joints were pretty tight which
is exactly what I wanted.
The difference in strenght of the two boxes before and after accounting for kerf
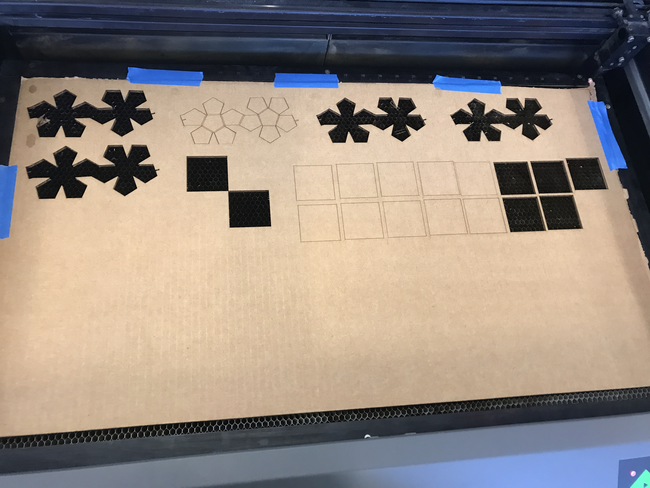
Here are all the Tetris pieces I constructed!
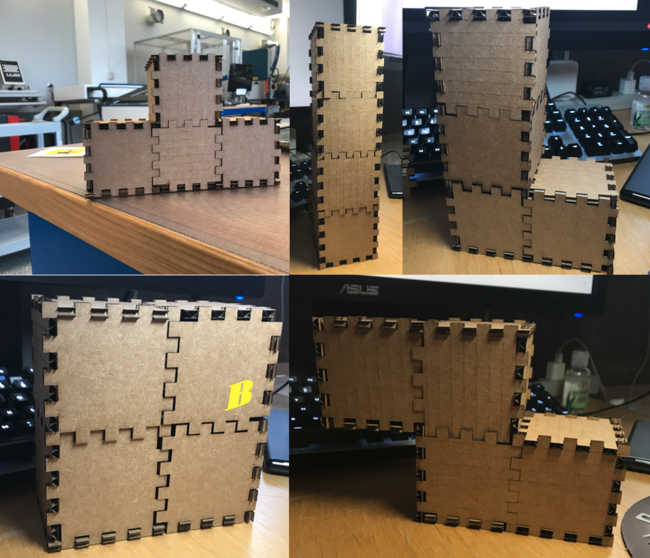
All the Tetris pieces I created
I only used 30 pieces (7 pieces with 5 fingers on each side, 9 pieces with 4 fingers on each side, and 14 pieces with 3/4 fingers on
each side to bridge the gap of the 5 and 4 finger pieces) to make all the pieces (I often had extra pieces sitting around). The pieces turned out very nice, and thanks to the design, I can build
almost anything with a box shape with these pieces which was pretty cool.
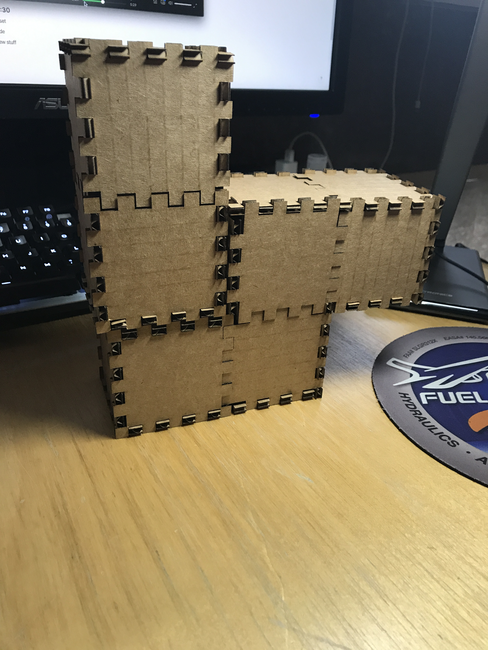
Two pieces stacked on top of each other
NEXT>