Git & HTML
HTMAA 2021 Recitation
9.16.2021 // 5 - 6 PM EST
Camron Blackburn
[camron.blackburn AT cba.mit.edu]
what is git?
an open source distributed version control system that is basically
standard for most software developers
git allows any number of people to simultaneously collaborate on large
projects while easily tracking releases / hotfixes / feature updates and
allowing for nonlinear development without fear of loosing any work!
OK - what does this mean?
imagine a world with no git
let's say you are building a website ...
You spend hours writing all of your website content in a rather barebones,
but functional, website

simple
website
So you're content with the website at first, but a
bit of time goes by, you're more comfortable with html, and want to expand
into some fancier styles with animations and javascript. You realize that
in order for styles and scripts to stay nice and clean it's best to
reorgnaize the head of your html file and expand it into local directories and
files. BUT doing so could break everything that you have now . . .
so you copy the directory with the simple html website and paste it into a
folder called "backup" outside of your current working directory to keep it
untouched and safe
cool, now you can fall down the css/html rabbit hole:
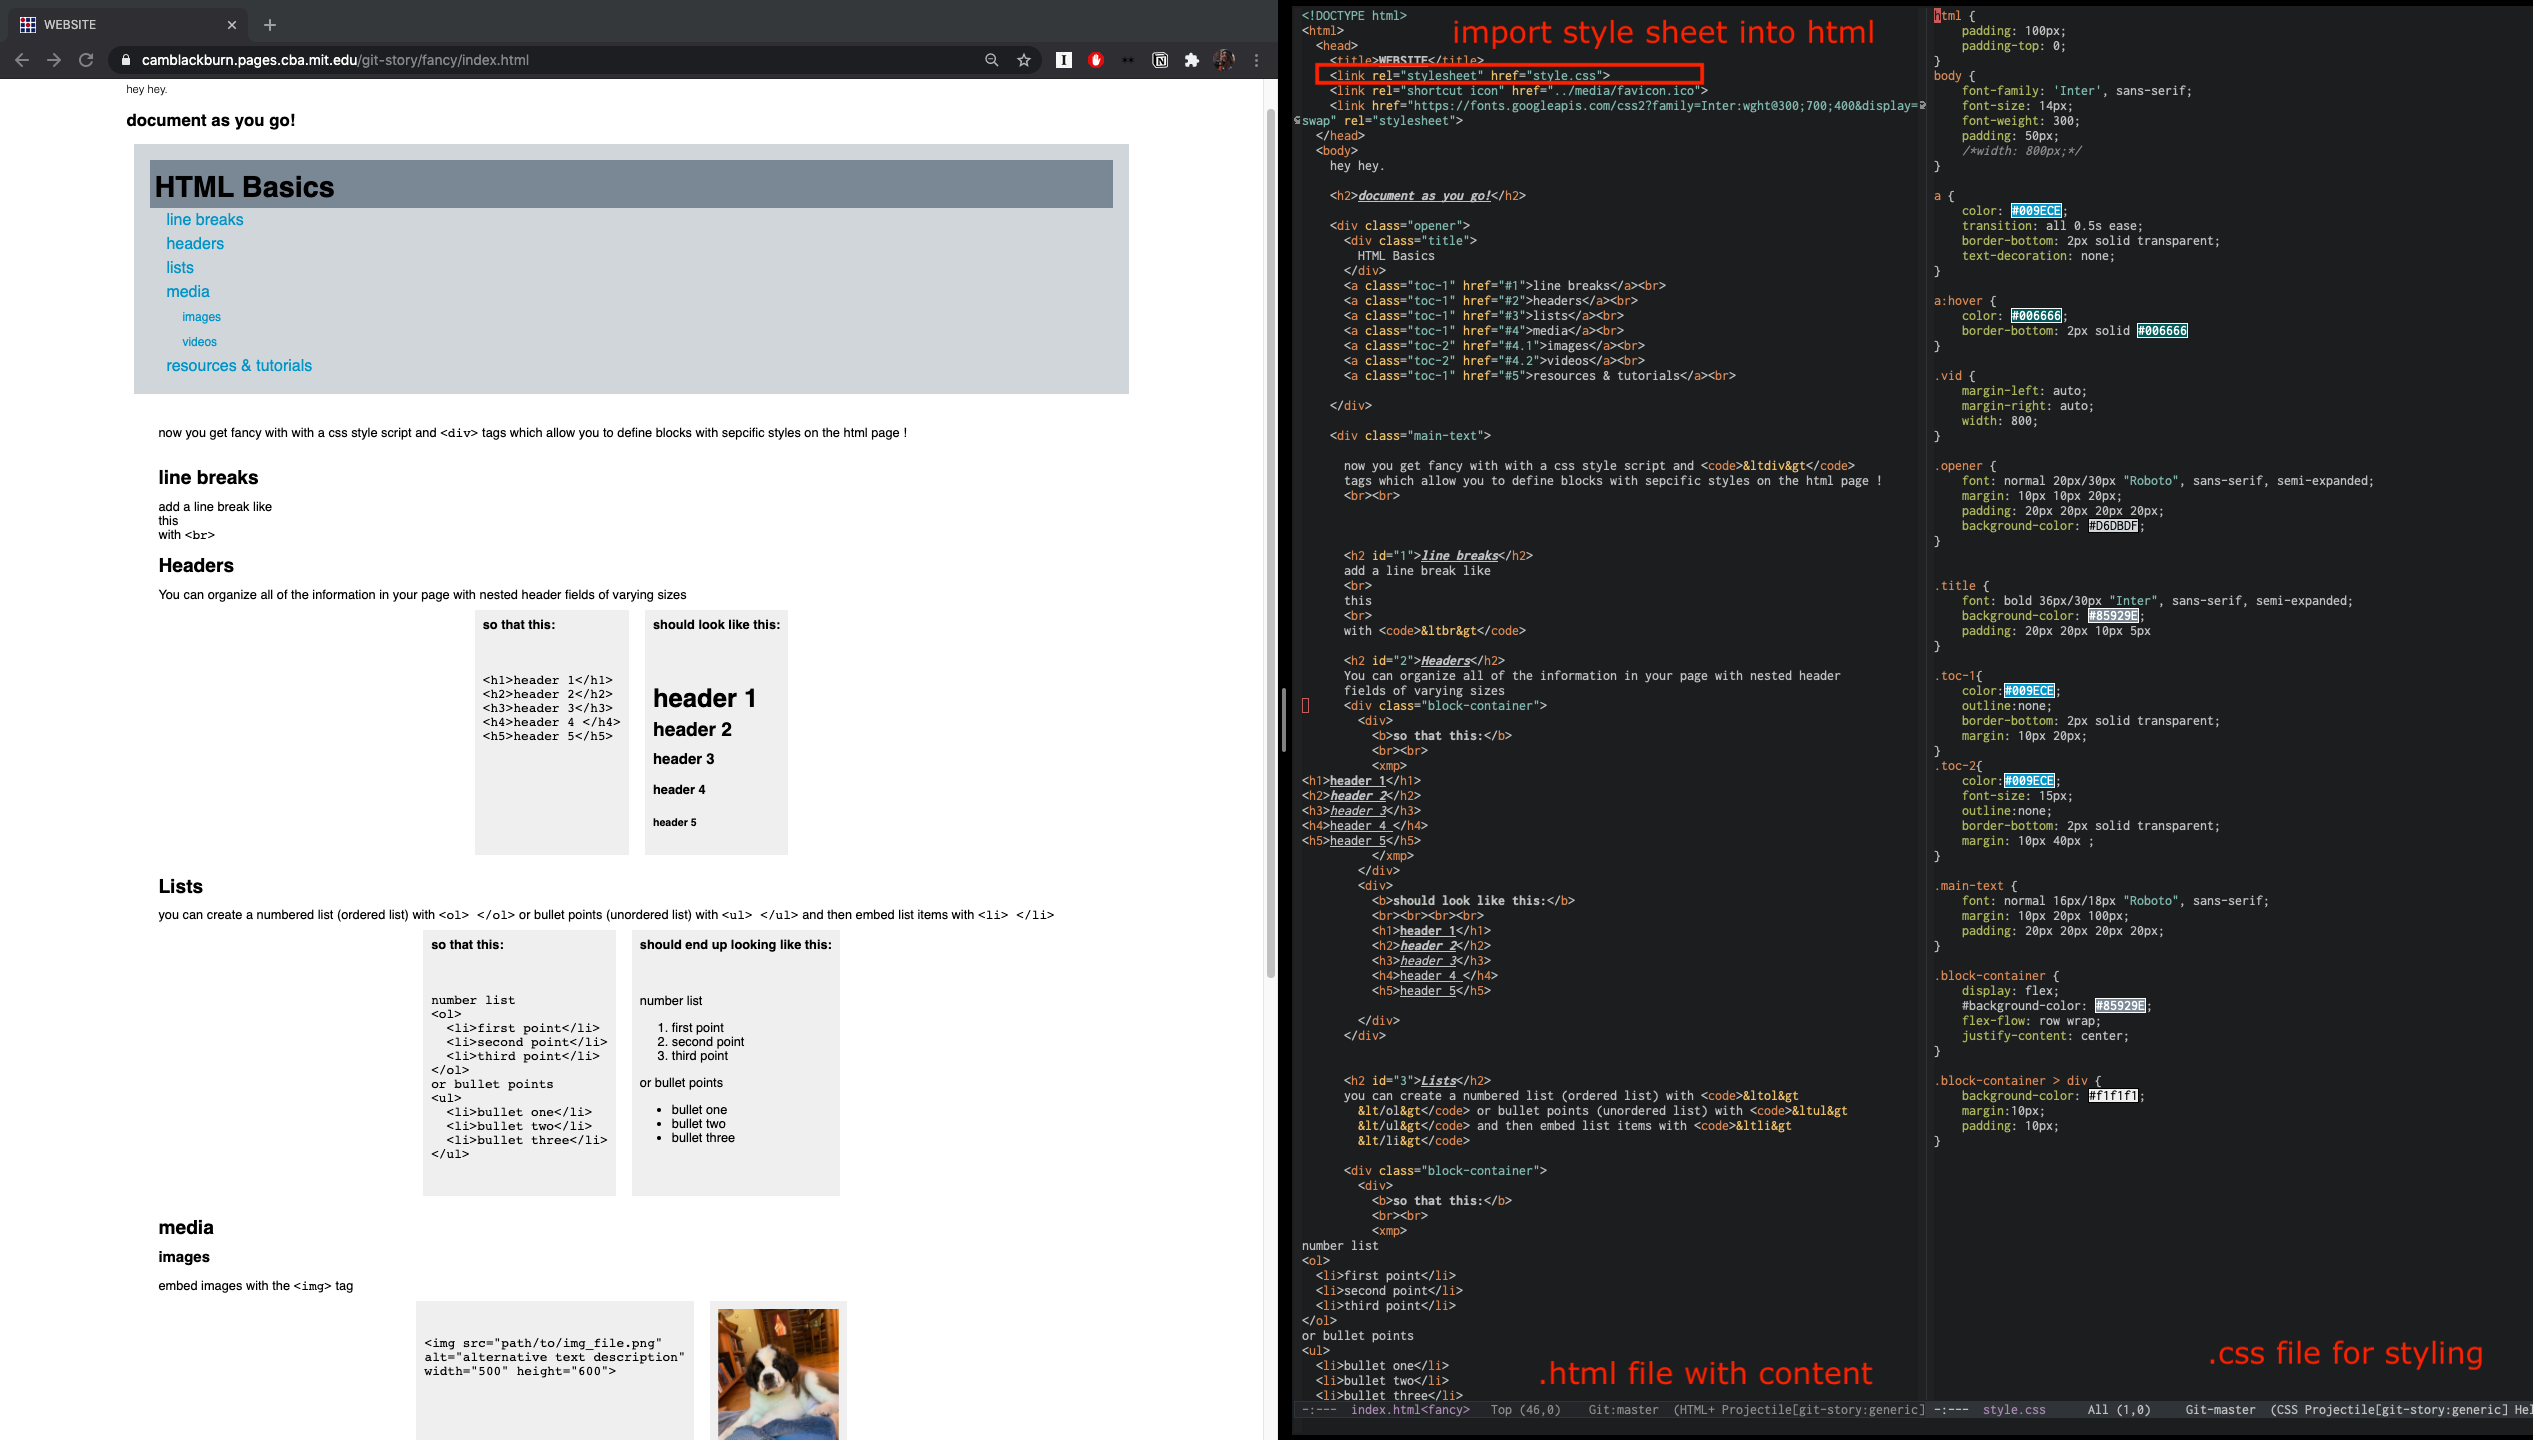
fancy
website
it's beautiful. you're happy. Now you have a
friend who's a badass javascript web developer who wants to work with you on
maintaining the project. You take the
directory you've been working in, zip it up, and email it to your friend.
They quickly download it, make some changes, and send the directory back to
you.
you save their modified directory, review the changes, and decide you're
happy with it all. You move your now outdated directory to the "backup"
folder next to the old simple version, and change your current working
directory to the one your friend sent.
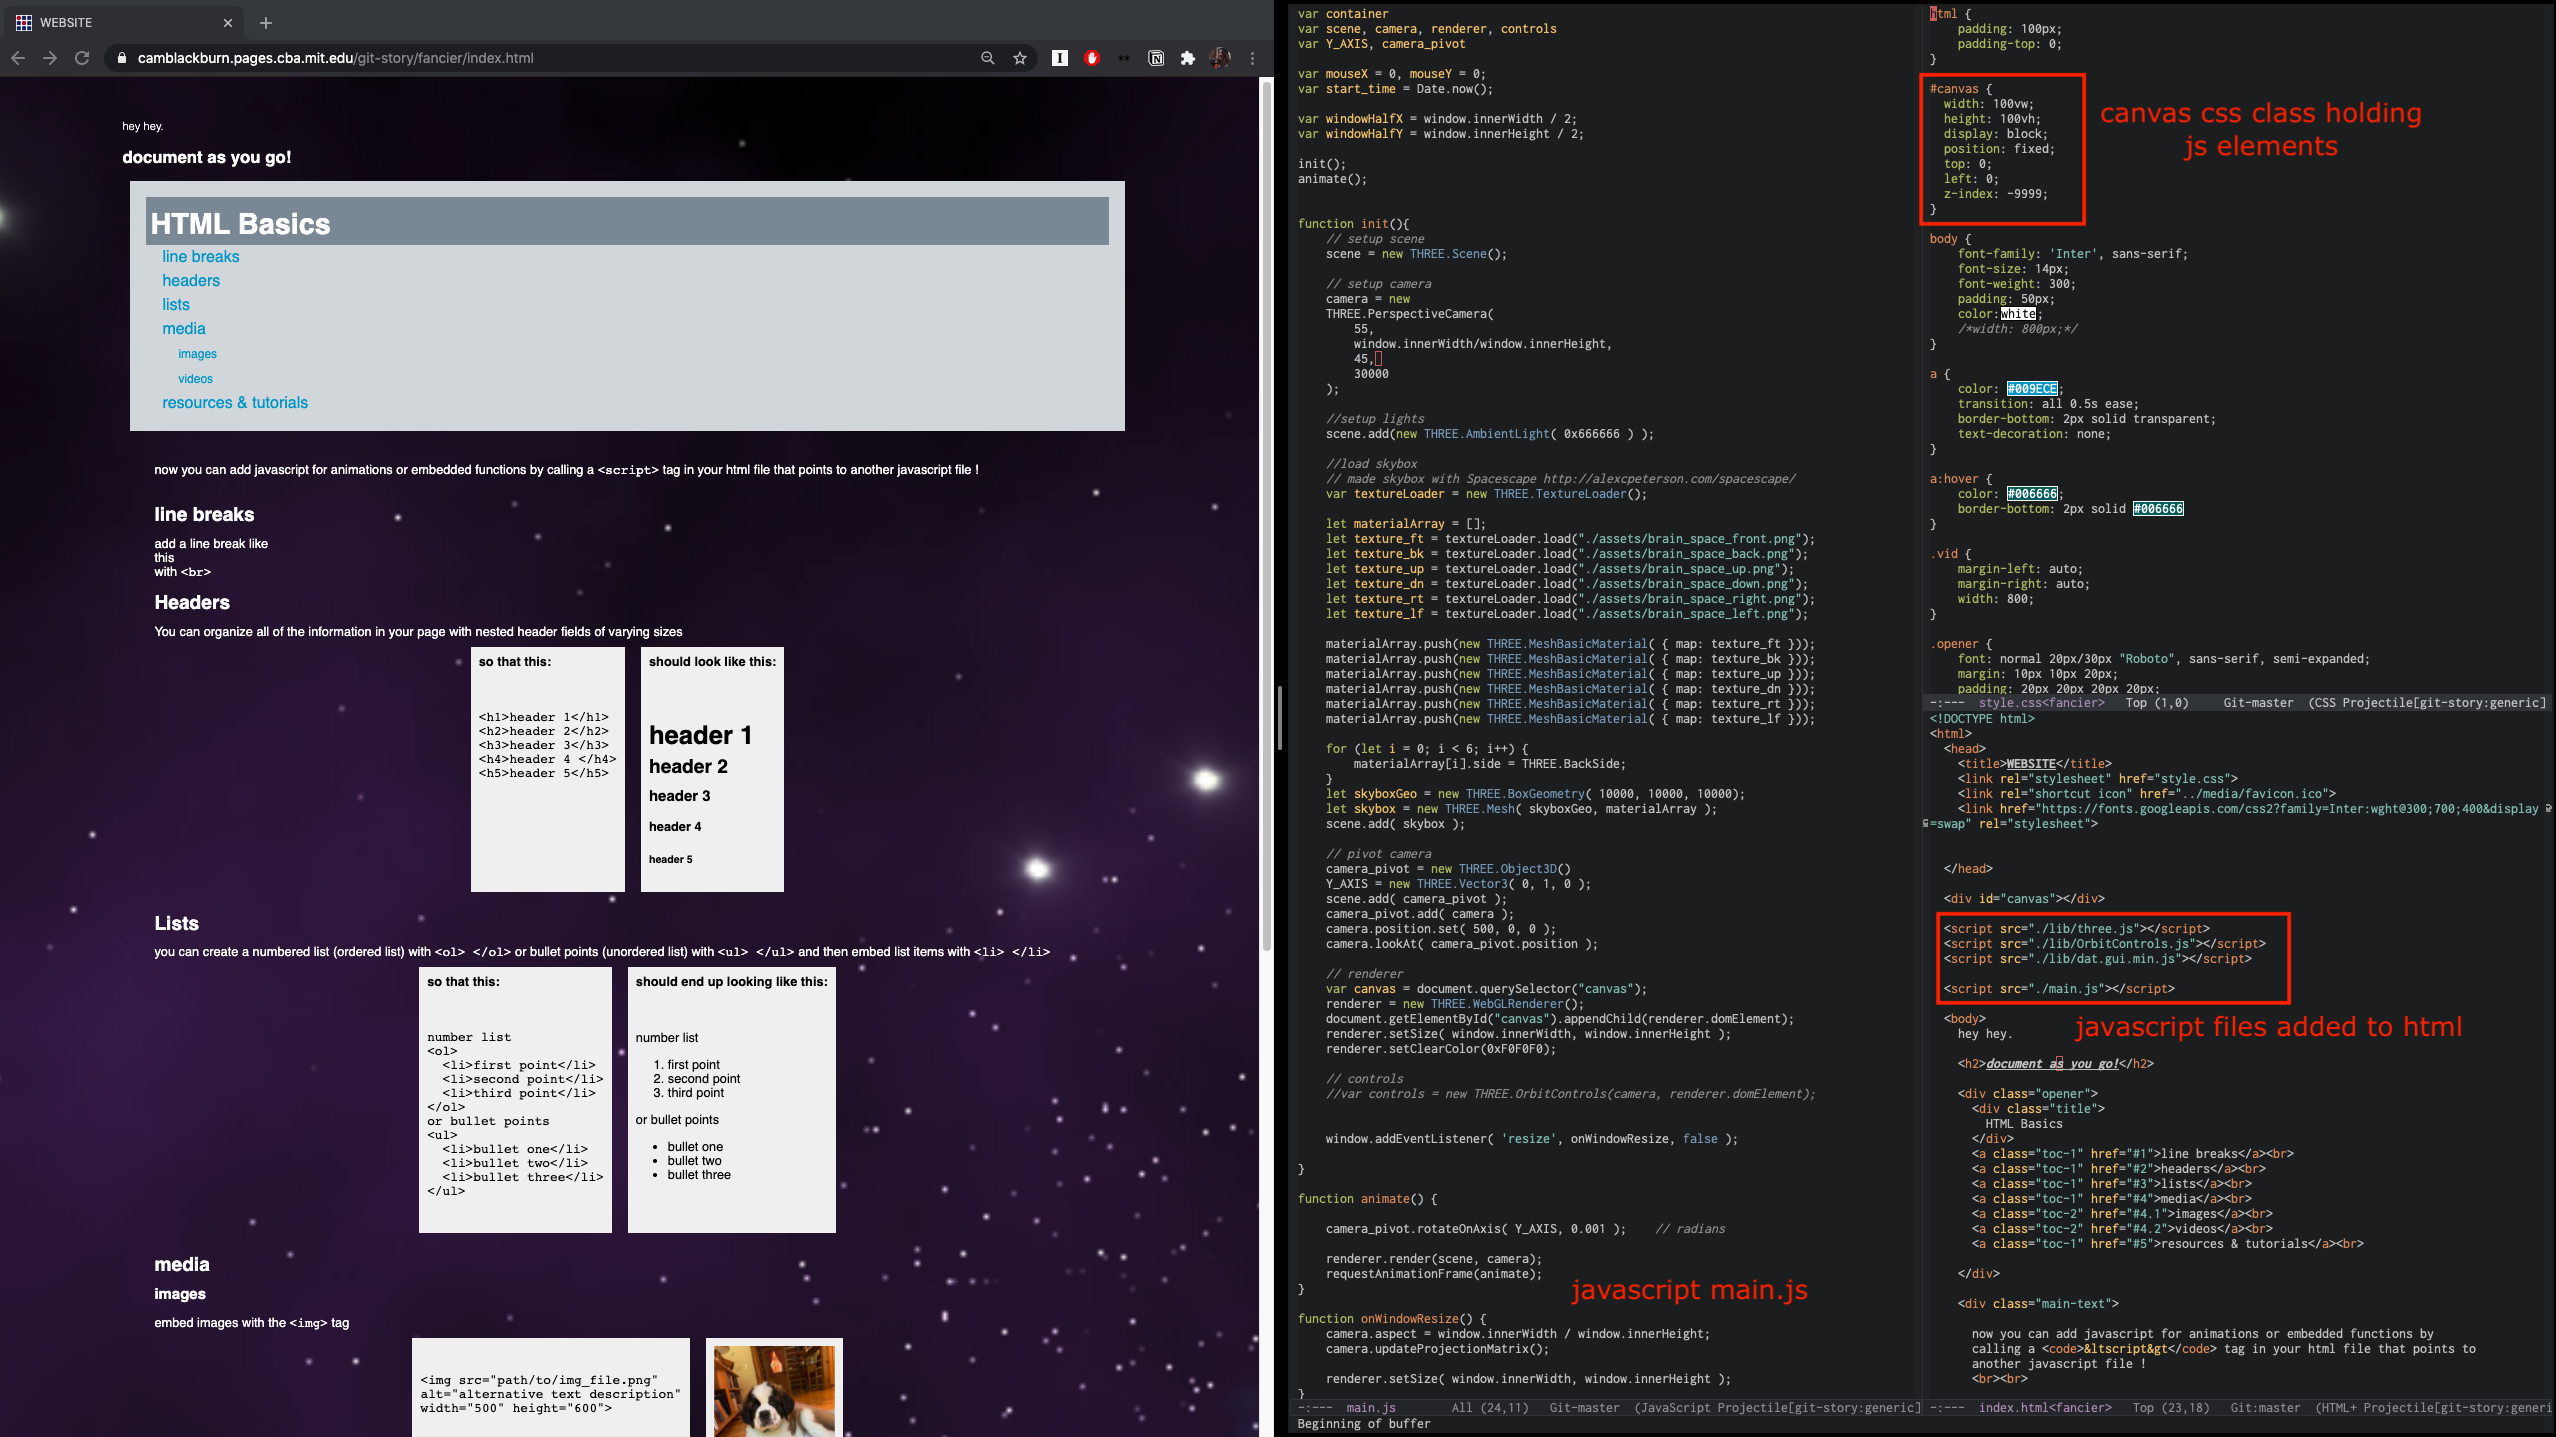
fancier
website
Now you and your friend both have the most up-to-date version of your site.
In the next couple of days, you decide you want to change the format around
the headers and your friend decides to change the borders around the
images. You have both changed the 'styles.css' file! The different versions
of your directories need to be merged! They send you their
changes, you compare the differences, and decide to keep the image borders.
You consolidate your 'styles.css' file to include their change, rezip the
directory, and send them the updated version. They compare the differences,
and match their 'styles.css' file to update the header format. You guys are
both working on the same up-to-date version again - merge conflict resolved
:)
this is a grossly inefficient way of doing conceptually the same thing that
git handles for us!
when you create a git directory on your computer,
you periodically "commit" versions of your directory as a
snapshot stored in a
hidden '.git' directory that behaves like the "backup" folder from our story
example - but it stores all these version waaay more efficiently than just
copy/pasting by deduping and compressing. Each commit is identified with a
unique hash, author name and date, and commit message. The commit message
allows you to store a quick summary of the changes that where made within
the version, which is helpful when later reflecting on project development
or reverting to an older version.
so then what is GitLab (or GitHub / BitBucket / etc. )
Gitlab is the web-based git manager that allows the project to be hosted in
the cloud or on a secure server for global access as opposed to sending
directories back and forth between a group everytime there is a change.
Gitlab also has a ton of other features to manage all sorts of DevOps
functions like issue trackers, wikis, CI / CD piplines, and user priviledge
management.
OK - how do we use it?
GitLab GUI
if you reaaalllyyy want, you could manage all of your HMT(a)A documentation
from the GitLab browser ... I don't recommend this but, ah, you could. To
demonstrate just how to setup your website do the following:
- Go to your section page:
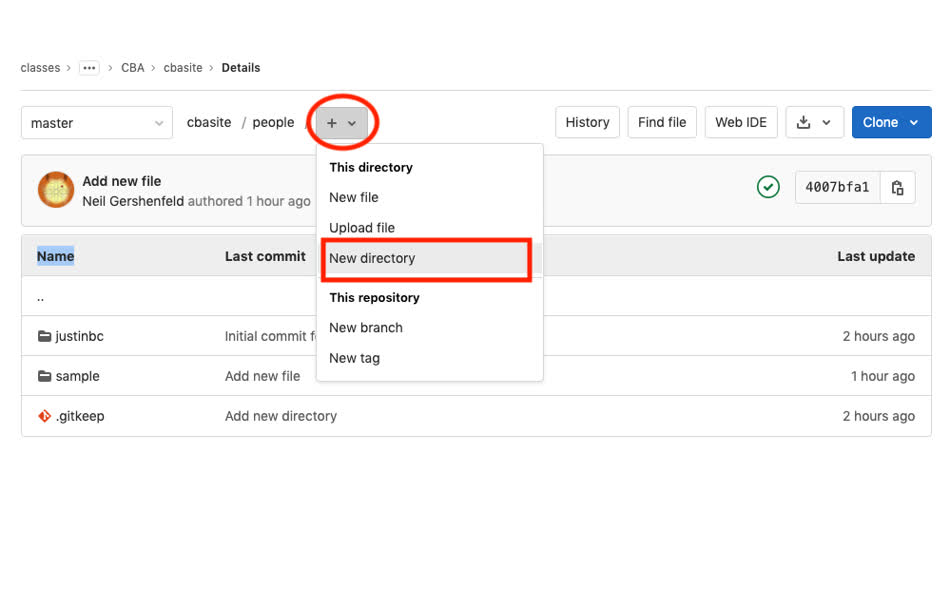
- Click into the "people" directory. Click the plus on the top right,
and create a new directory with your name.
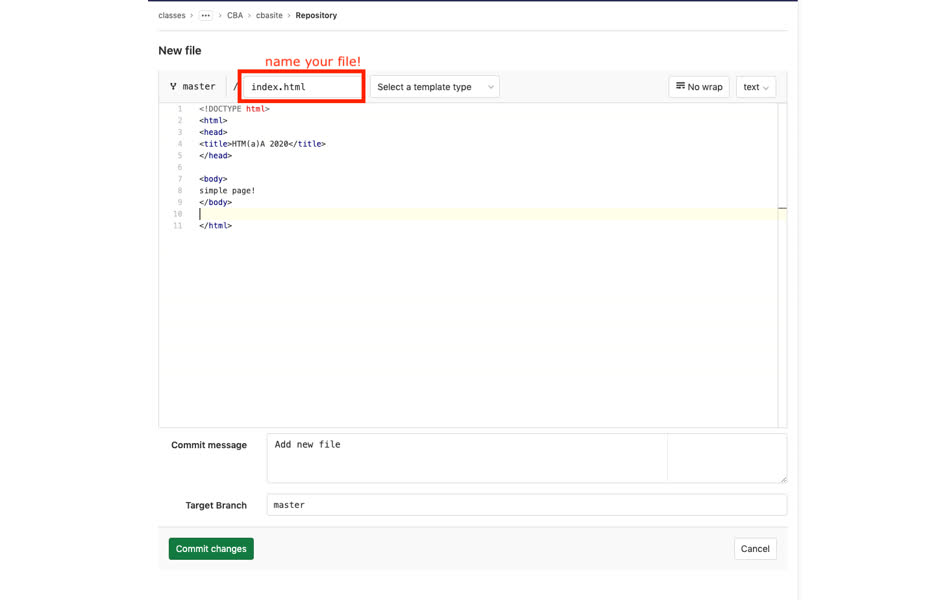
- Inside your directory, make a new file called
"index.html".
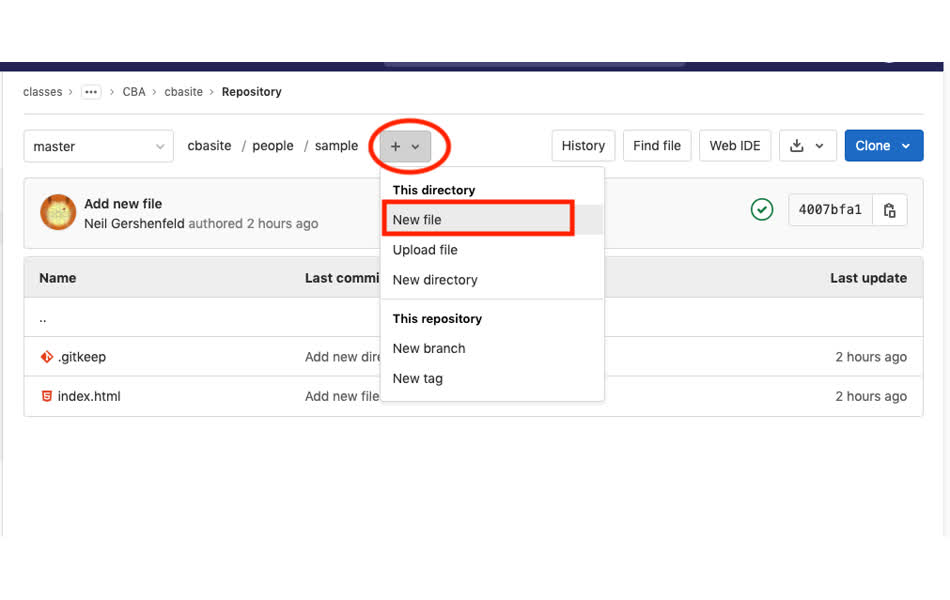
and this will be the main page of your website. Here's the simplest
html page you can write:
- Now you need to edit the main section page so that your individual
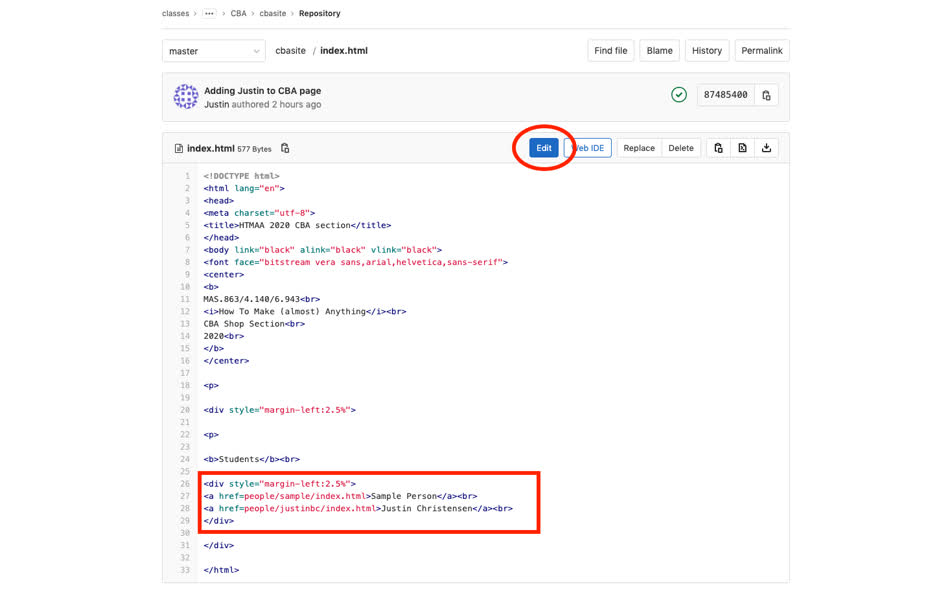
site is linked. Go to "index.html" on the section page, and click
"Edit". Then add a line to the list of people like the following:
<a href="people/your_directory/index.html">Your
            Name</a>
You should now see a link pointing to your webpage appear with your
name on your respective section
sites: Architecture,
CBA,
EECS,
Harvard
Note that you do not need to edit
the global
people page - only staff has access to this repo.
Local Git
Now using the GitLab GUI from your browser is managable, but it's not
harnessing the full power of git and you're stuck writing all of your code
in the browser without useful debugging capabilities AND you must always be
connected to the internet ://
To fix this, it's best to copy, or "clone", a local version of the repo to
your computer where you can then do all your development in an editor of
your choice, easily test and view your changes, and then "push" these edits
back to the global repo. Most of these steps require the command line, so
if you're not familiar with using it at all try checking out
this tutorial,
or
this one.
to start, some simple git vocabulary:
- clone: copying a global repository from GitLab to your local
directory
- pull: update your local branch to match the changes that have
been made in the global repo
- branch: a moveable pointer to designate the linear history of
one working version of the current project. this won't be super important
for this class, since you will be doing all of your development on the
master branch.
- staging/add: the limbo state when files have not yet fully been
commited to a branch, but a snapshot of their current state has been
saved. the
add command is used to add files to the staging
area
- commit: the snapshot that is saved to the git history. it is
designated by a hash, author, date, and commit message
- push: send local commits to the global project. whatever you
push will be visible to everyone and downloaded onto everyone else's
computer on their next pull!
configure git
You most likely have git installed on your computer already. Check by
opening the command line and running git --version.
if you do not, follow the
instructions here
to install it.
There are endless resources online to help you get familiar with git from
the command line,
the GitLab
guide is a good place to start.
basically, you will create a global configuration for your local git using
your GitLab username and email. This will allow all of the commits that you
create to be tagged with your user so that a clear history tree can be
created for the project.
Now, GitLab needs to be able to authenticate your access to the repo every
time that you pull or push globally. This can be done two different ways:
- https authentification: git clone the repo with HTTPS - this will
require you to input your credentials (gitlab username and password)
every time that you clone, push, or pull. This is fine, but it gets a
little tiring to enter your password every time, so it's recommended to
use vvv
- ssh authentification: you setup a secret key which is added both
your computer and in your gitlab account. then when you clone, push, or
pull, git checks the path where you have saved the ssh key to verify your
credentials. a guide on how to set this up can be found
here.
A note for more advanced git users :: if you already have an ssh key setup for
another git client (like GitHub), you can configure two SSH keys on the
same machine which point to different hosts - here's
a helpful
guide, but
feel free to reach out to me if you run into issues.
git clone
Now you have git configured! Go to your section repo and at the top right
corner click "Clone" and copy the path that matches the authentification
method you decided to use. Then, in the command line, navigate to the
directory that you want to clone the class repo to and run
git clone path/copied/from/clipboard
obviously, replacing the path with your copied value.
Now you have a local version of the section website!
local editing
You are free to edit outside of the gitlab browser! You can open the files
in whatever editor you are most comfortable in (if you are unfamiliar with
all, I reccomend Atom or VSCode). The changes are on your local copies of
the files and will not be visible to anyone else in the class until you
stage--> commit --> push them.
Once you are happy with your changes ALWAYS run the git status
command. This will tell you what files you have changed, how far ahead you
are from the remote repo, and what will be added to staging.
If you are happy with the files listed as "modified" or "untracked" from git status, then
run git add . - this will add all of those files to the
staging area.
then run git commit -m "type out commit message" to make a
commit on your local branch.
finally, run git push to push your latest commit to the
remote repository for everyone else to download in their next pull.
MOST important git rules
Don't push large media files!
as we've learned, everything that you push to the remote repo is downloaded
onto everyone else computer. As Neil will point out many times, if everyone is
pushing large image or video files (> a few hundred KB) to each week's
page, this quickly adds up to a huge amount of storage, not to mention it's
unnecessary for web-resolution images. Be sure to compress your image files
before adding them to the staging area. ffmpeg is a good tool to do this. Neil has a cheat sheet of ffmpeg commands here.
for those who are python savy, I wrote a python command line script that runs ffmpeg to
automatically compress and overwrite images in a given directory - feel
free to modify it for your needs. img_format.py
ALWAYS run git status
it's just a good habit to always check what will be staged, what is left
out, how many commits ahead you are from the last time you pulled, etc.
For example, on MacOS there are typically hidden directory metadata files
called ".DS_Store" which can unecessarily sneak into git commits. they can
be added to .gitignore (more
info here),
but it's always good practice to check for things like that.
you will run into a merge conflict
you will most most likely run into a merge conflict at some point
throughout the semester. This is like the last part of our intro git
analogy when you and your friend both made changes to the same file at the
same time. This happens when you pull the latest version of the remote
repo, and in the amount of time that it takes you to stage and commit and
push your changes, someone else has already push the remote branch to a
newer commit. To avoid this, it's best practice to always run a git
pull right before running git commit (after staging
with git add ). But when you inevitably clash with someone
else, it's not a problem - you'll just need to work through a merge request
which shouldn't be an issue since each person should be making their
changes in their unique directory. Follow the git warning/error messages to
resolve the conflict or learn
more here.
someone will probably break a repo
it's ok. the beauty of git is that nothing can really be deleted or lost
(only hidden in a complicated net of old commits) and arguably the best way
to learn git is to seriously screw it up once and have to dive deep into
debugging :-)
Making a website
The on-going assignment of the course is to be building a documentation
website. The git motivation story also gives a quick guide to building
websites from scratch with html, css, and javascript. The link to each of
these websites are underneath the image and you can find the repo for the
source
code here.
At the bottom of each of the websites are links to tutorials and resources
for learning html.
It's also helpful to look through previous year website to get inspiration
and see how other people set up their directories. Instead of crawling
through the old gitlab repositories, you can quickly see the source code
for any website by right clicking and selecting "View Page Source" (at
least for Chrome, but it should be similar in other browsers as well).
There are also a lot of free website templates online,
like Bootstrap templates,
or more blogpost/marketing style ones
like this. They
can
offer a good starting point to expand your site with more javascript
functions.
If you like typing all of your documentation in markdown and want to
automatically convert your markdown into a website with Bootstrap themes,
then Strapdownjs does exactly that!
If you want to get fancier with your markdown documentation, you can use a
static site generator like Jekyll or
Hugo.
Erik's 2019
git recitation site goes into more detail on these options.
More Resources


