Week 7: Molding and Casting
Group Assignment
Group assignment answers can be found here: Group Assignments
CAD
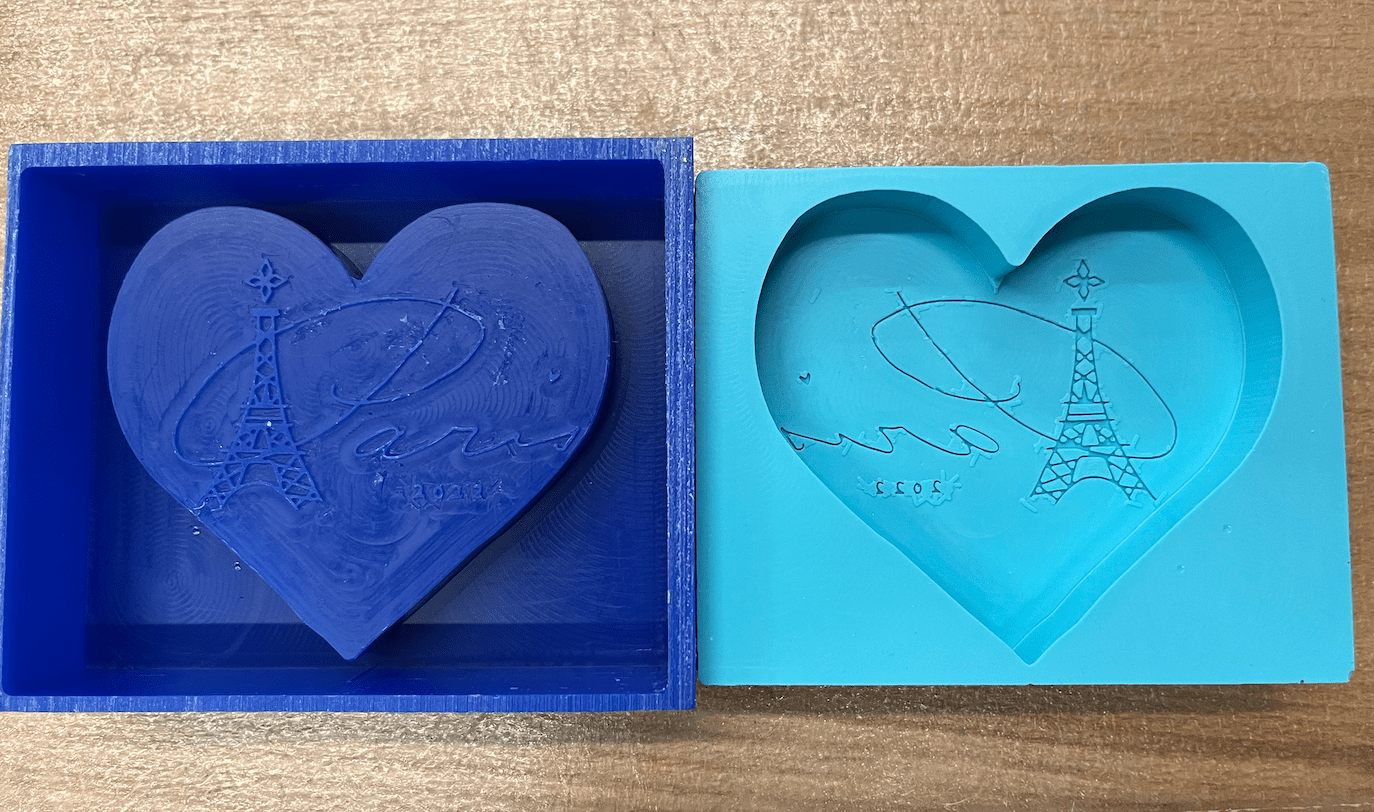
This week, our assignment was to mold and cast an object. After much debating, I ended up deciding to do another Paris-themed thing - an eiffel tower (with a snowflake on top) and the word Paris on a heart-shaped block. Before I started drawing, I measured the mold of a coin from a previous year to get a sense of the minimum thickness a line could be to still survive (to determine the line thickness of my drawing). I determined that the thinnest lines on the coin were 0.2 mm (but they were very flat) and then there were also lines that were 0.62 mm thick and 0.83 mm thick. I first started tracing the design over an image I found online in my Notability app. However, after I finished, I realized I wasn't going to be able to export it as an svg to import as a sketch into Fusion (rip). So I ended up downloading the Vectornator app so I could draw the sketch as a vector and then save it as an svg. When I drew the sketch, I first used 3pt font (I had Googled the thickness and it was within the range I had measured from the example). Once I finished the sketch, I imported the image into Fusion and then did some measuring there, but then I decided the thickness of the lines was too thick. I ended up going back into my sketch and changing the lines to 2pt thickness and then re-imported the sketch.
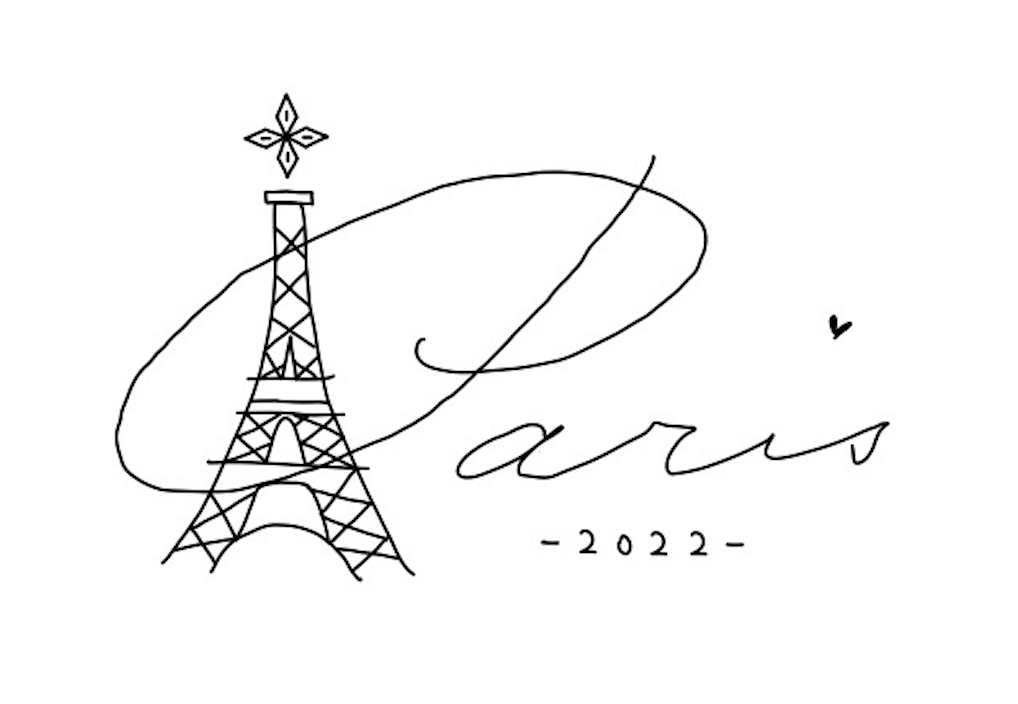
I then extruded the sketch, created a heart and also extruded that. Then, I started playing with the overall size so that it would fit the constraints of the Othermill (since the finer mill bit would be required for the detail of my design). Once I had finished resizing and changing the ratios etc. though, I realized that the sketch lines ended up being thinner than I had realized. I had forgotten to measure the original size of the image, so when I had to shrink the image so it would fit within the size constraints, it became quite thin. However, it was still thicker than 0.2mm so I was hoping that it would still be okay when milled. I had the design on top extruded by 1.5mm. The box encasing it had walls of 1/8" thickness, and the base of the box had 1/4" thickness.
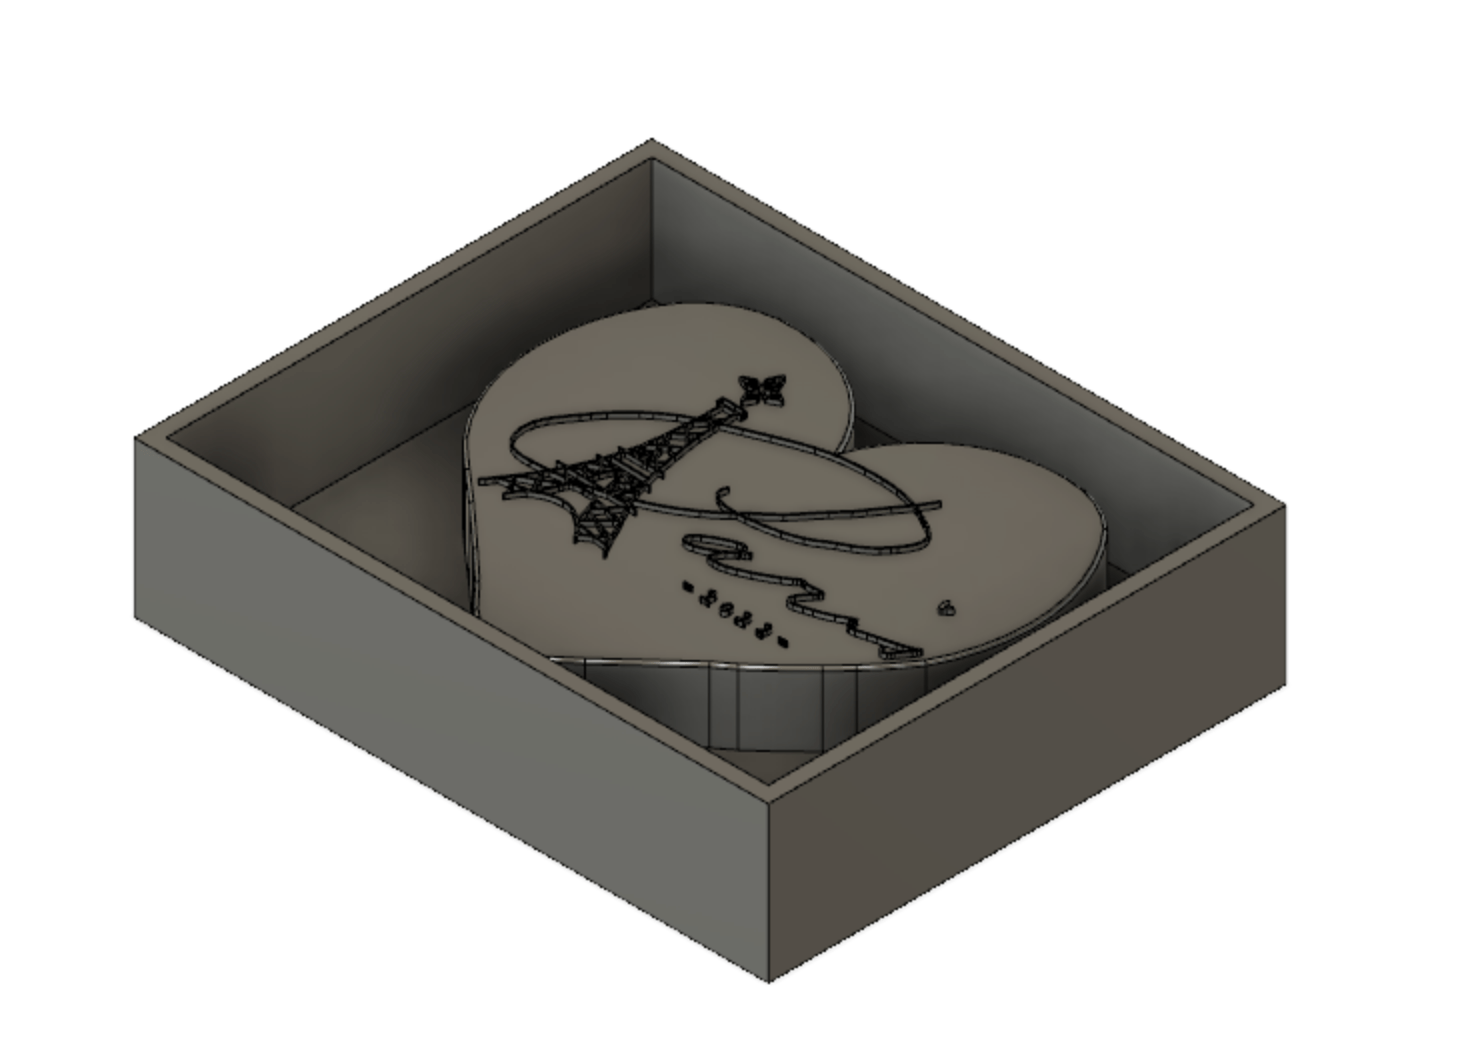
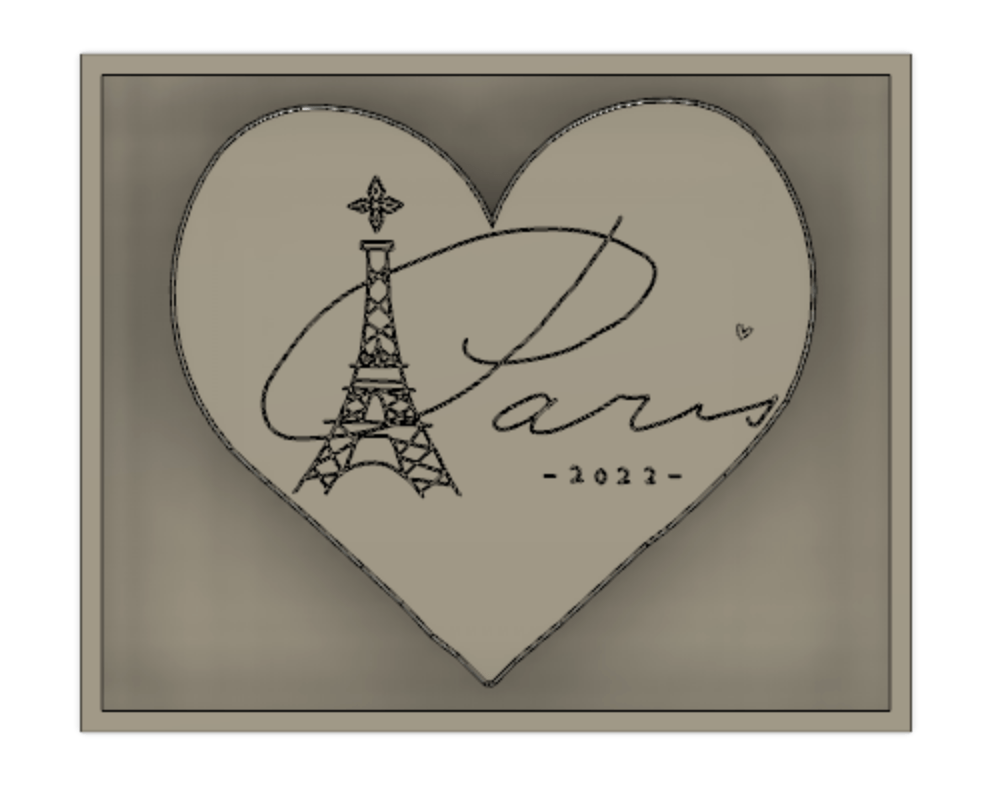
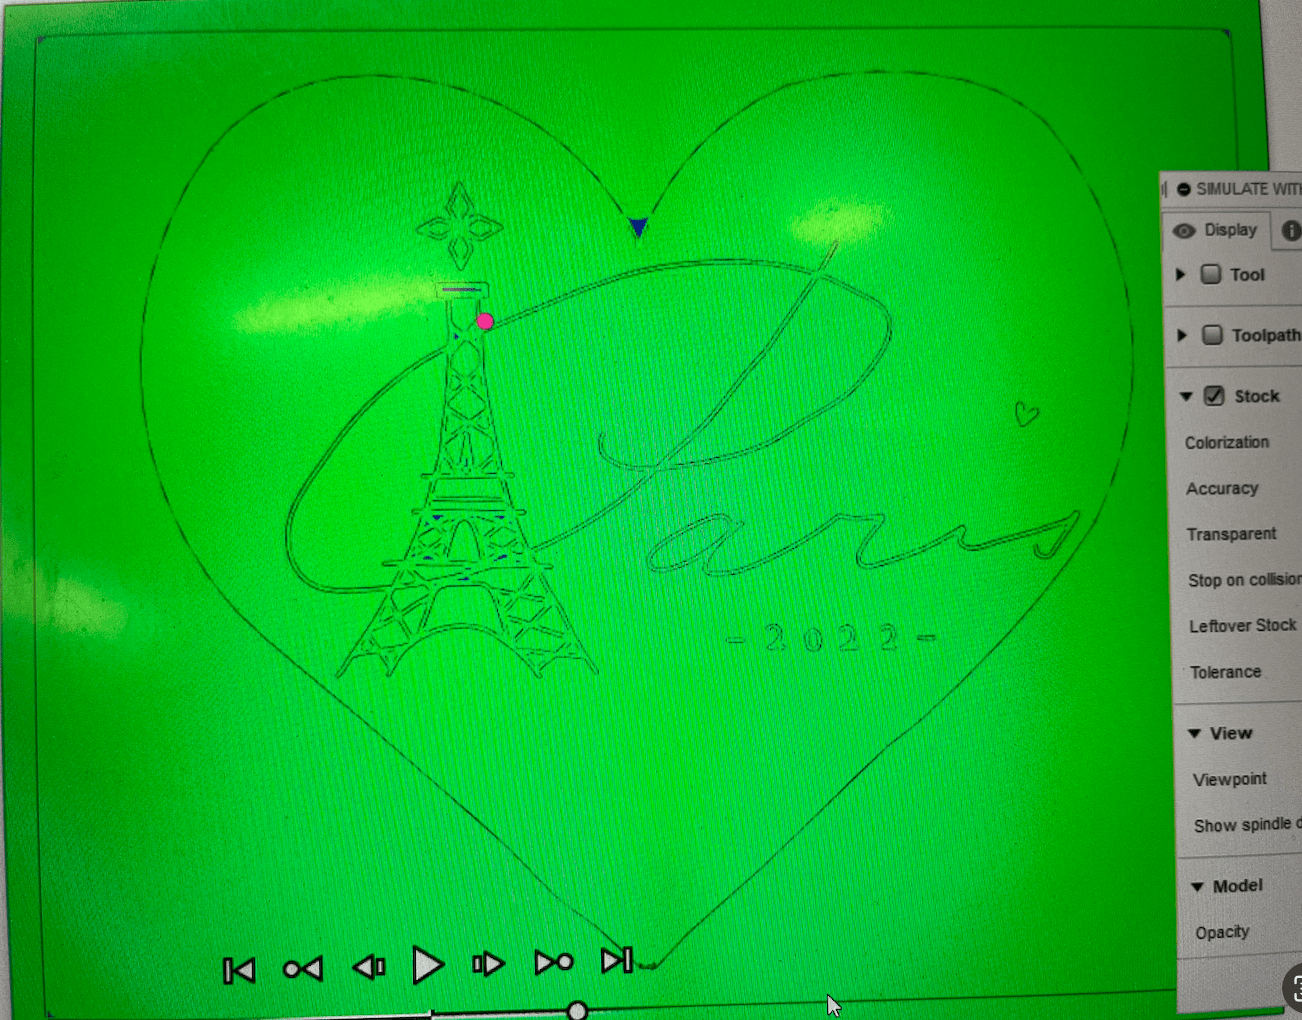
Then, I attempted to do CAM on the design. One of the first problems I ran into was that some of the spaces in my design were too small for the tool to fit, so they wouldn't be milled even by the 1/32" tool (shown by the blue in the image below).

I ended up adjusting some of the scaffolding lines on the Eiffel Tower to try to increase the sizes of the spaces, and I managed to open some of them up enough. It was annoying to fix though because instead of being able to move the lines directly, I needed to make a copy and move the copy (then delete the old line), since the entire sketch had been imported as one svg file. In the end, there were still a few small spaces that couldn't be milled, but I decided it was fine to keep it like that. The snowflake on top originally also had dashes in each petal, but I removed them since they wouldn't have been milled properly. Another thing was that the top of the heart couldn't be milled to a point due to the tool diameter, but nothing could be done to fix that because the thinner tools didn't have enough depth to go all the way to the bottom of the block.
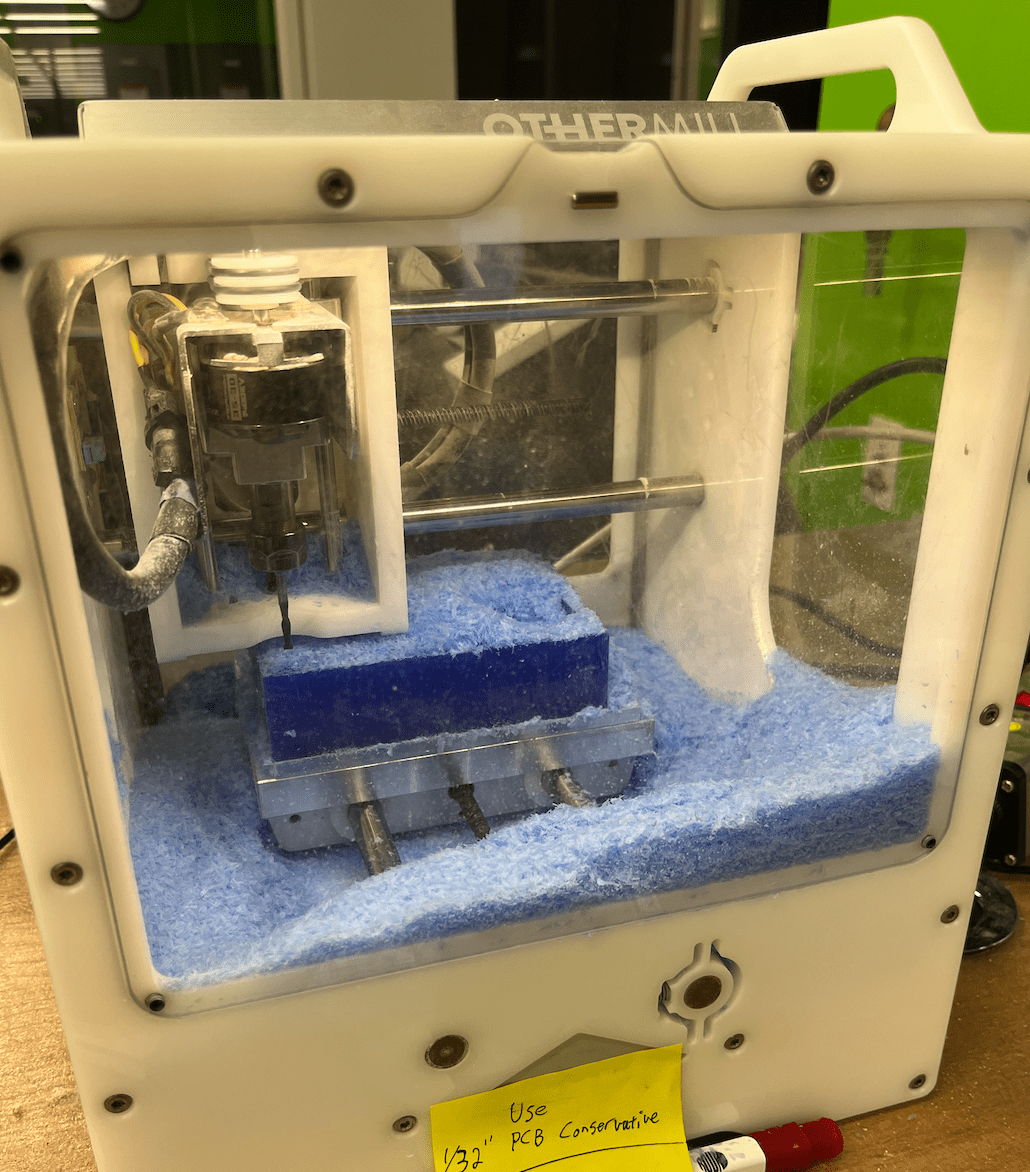
With that, I began the job in the Othermill. We started with the 1/8" tool that did all the large space milling and a bit of the design. Honestly at this point, the design already looked quite cool.
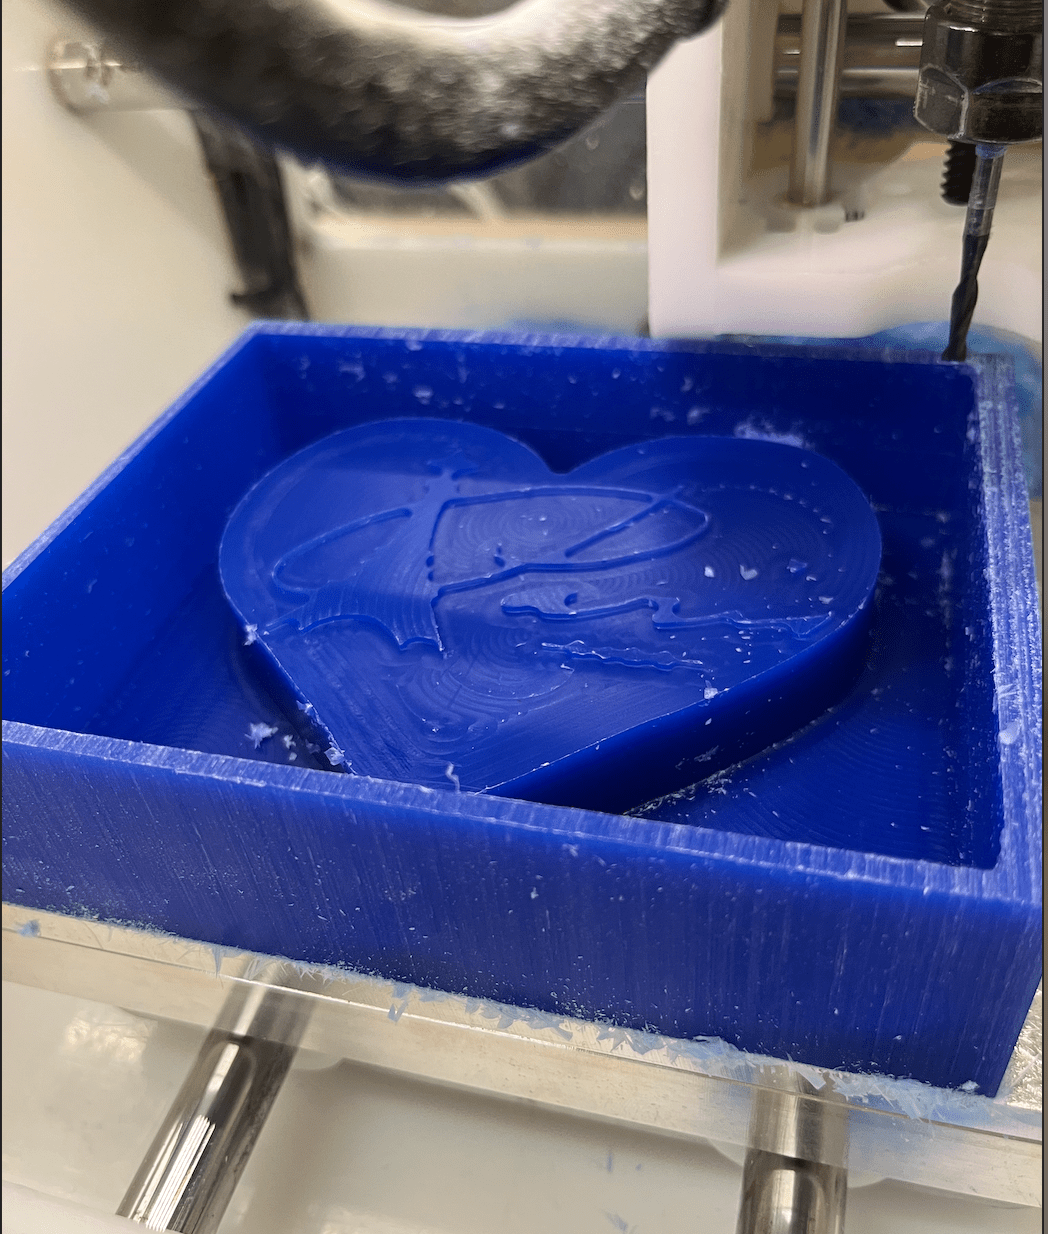
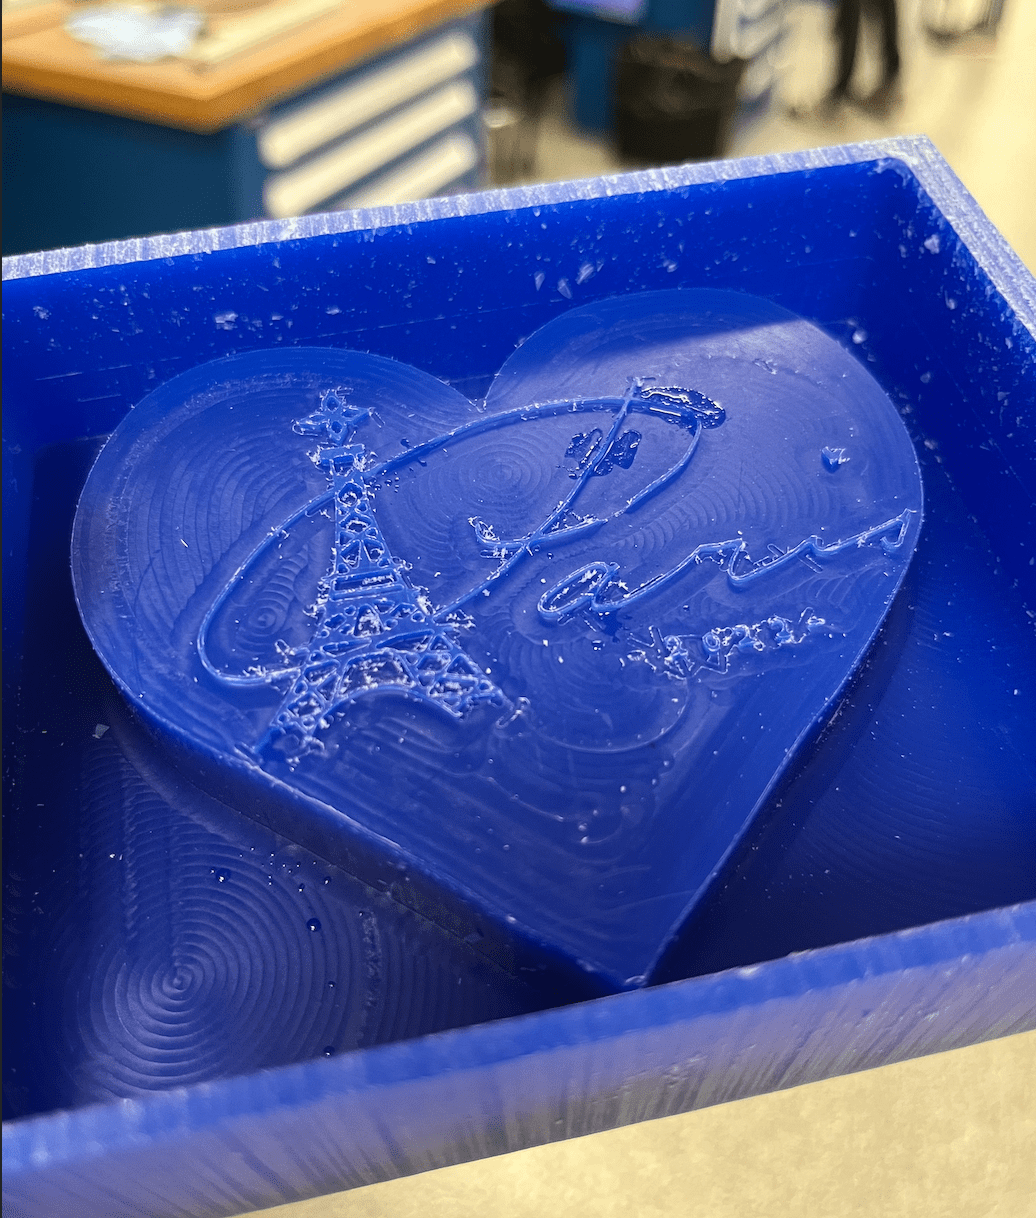
Then, I switched to the 1/32" tool, and it milled all of the finest details. Afterwards, however, I noticed that some parts of the extruded design had broken off or were very close to breaking off (part of the bottom of the p was already missing, and parts of the p and the a were very light blue in color indicating that they were already very fragile and close to breaking off). To help with the fragile parts, Anthony suggested dabbing some super glue over them as reinforcement. Unfortunately, one of the dashes on the two sides of the "2022" had already broken off, so I ended up just taking the other one off as well so it would be symmetrical. I also used tweezers to try to scrape off some of the extra wax that shouldn't be there. I did notice though that there appeared to be some machining marks around parts of the design, but I thought they might just go away during the molding and casting process.
There were a lotttt of wax scraps in the machine once the job was done.
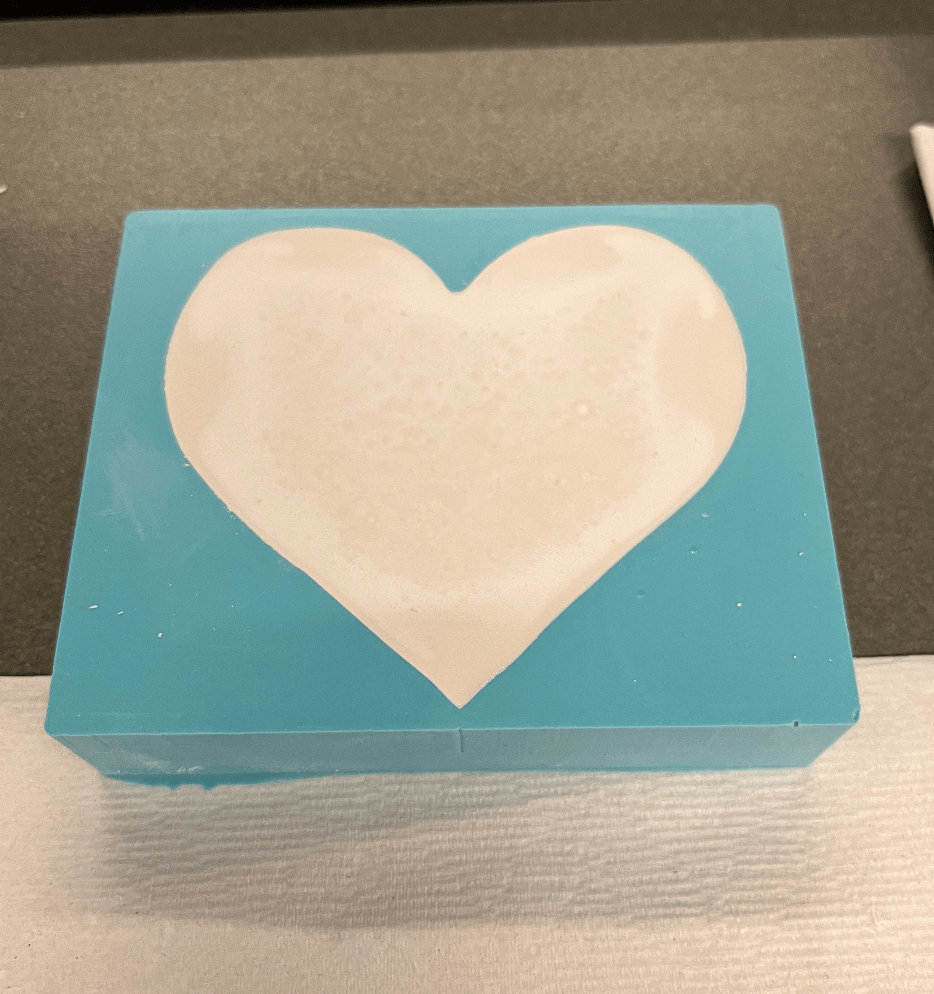
Once I had finished touching up the wax, I made the oomoo and put it in - the cup was deep and there was a lot of oomoo, so some of the oomoo on the bottom didn't get as well mixed as I would have liked (you can see a bit of a swirl at the top) - but everything that came in contact with the pattern was well mixed. Per Anthony's suggestion, I also used a brush to brush the oomoo on over the design before pouring it into the mold.
When the oomoo was done, I took it out and saw that some of the fragile parts of the wax had come out and gotten stuck in the oomoo mold, but they were easily removable. I tried to fix the part of the p that was missing by taking an exacto knife and cutting the oomoo, and then using tweezers to take parts out - and it worked (kind of), though the bottom definitely wasn't even. Here, I noticed that the machining marks had transfered over. Apparently, it was because the 1/32" tool had milled deeper than the 1/8" tool for some reason, and I found out that unfortunately those marks were going to stick around in the final casting too :(
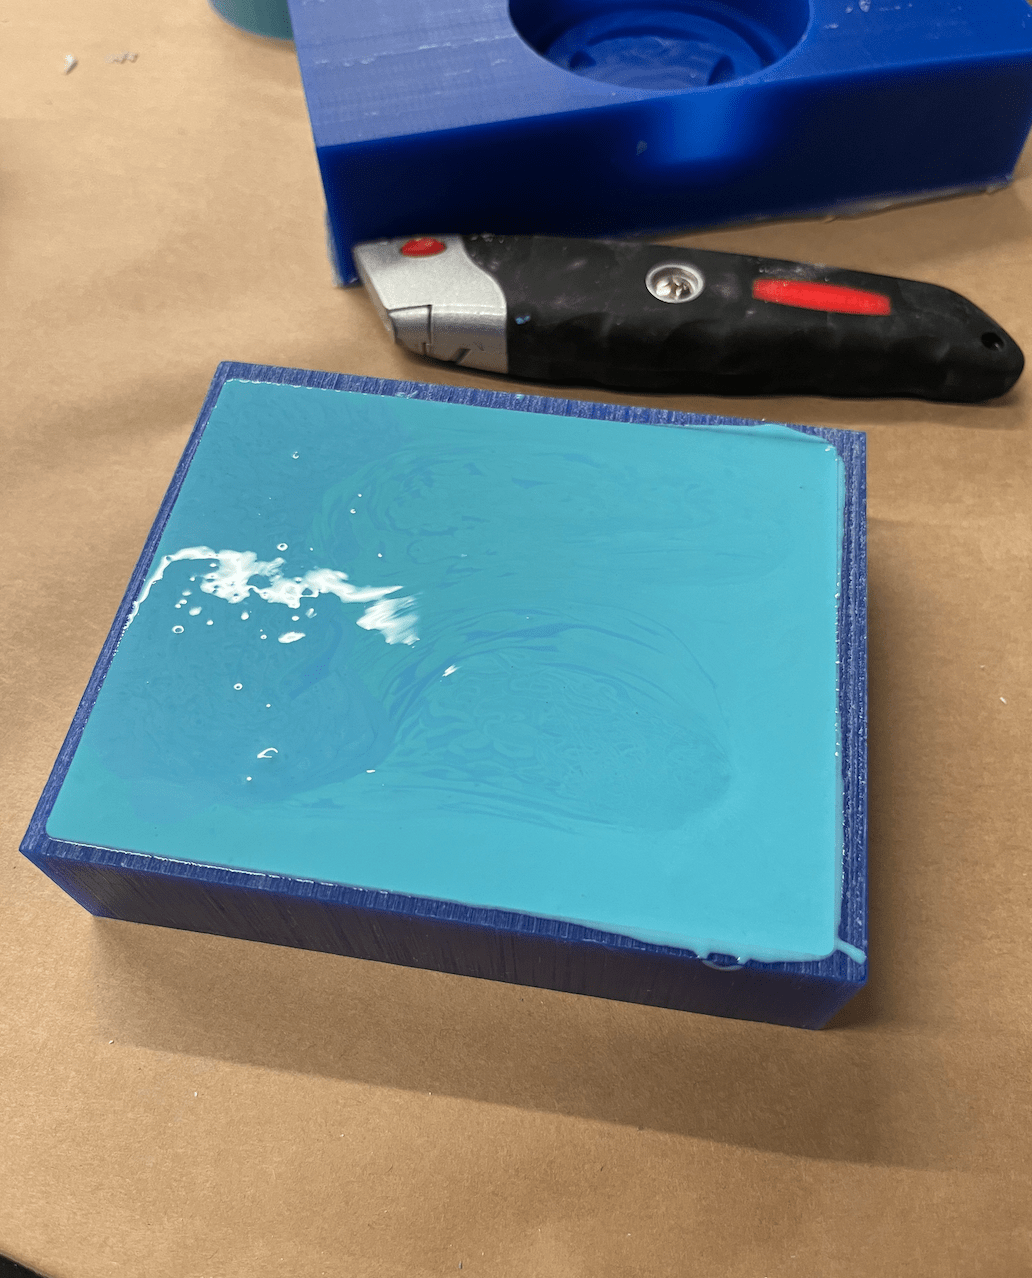
I wanted to cast my heart in metal, but since we were going to do all of the metal at once in one batch, I started with dry stone. Again, I brushed the drystone into the mold over the design to try to minimize bubbles before pouring the rest of the drystone over. I tapped the mold a bunch to try to get rid of bubbles.
When the drystone came out, I saw that there were bubbles along parts of the design - though not too many. I wasn't quite sure how to avoid them though since the lines in the mold were so thin. The machining marks were also quite visible in the stone. Overall, I thought it turned out decently cute, but I was kind of sad about the many things that were wrong with it.
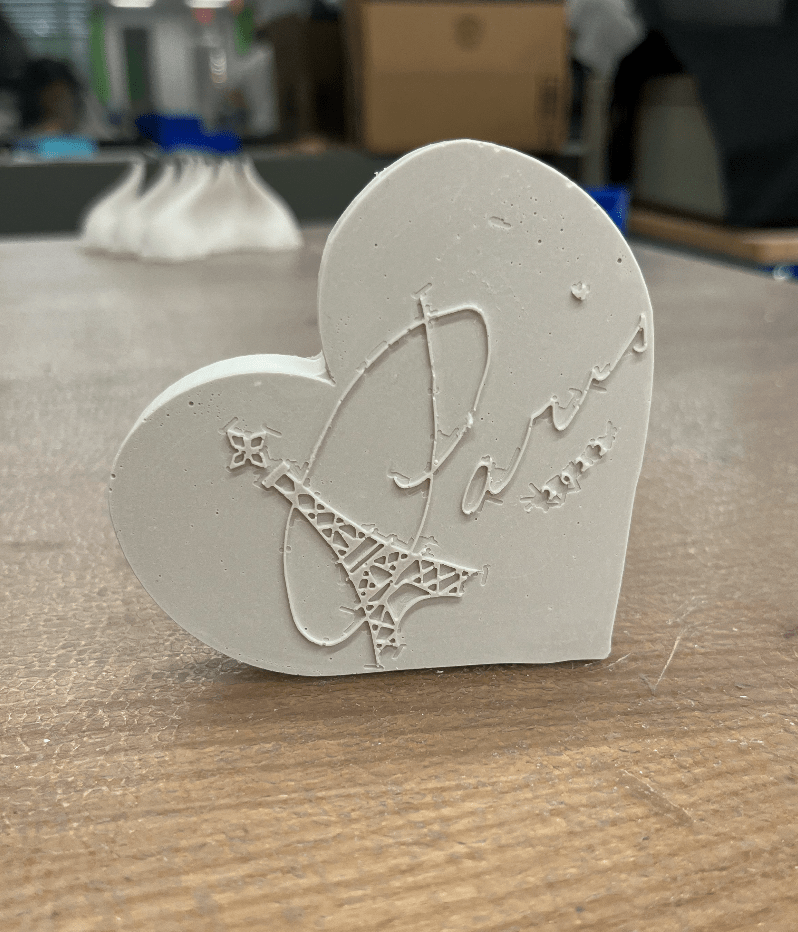
I tried to cast another one with hydrostone and really tried to make sure there were no bubbles in the design, but it honestly didn't turn out any better. Maybe the metal will at least be bubble-less (even if the machining marks are still though) though!
Lessons Learned: there are many limitations on how detailed a machine can go when it comes to milling, and things like size really need to be taken into consideration. Also, it's not great to be too ambitious with thin details - honestly thicker is probably better. Molding and casting was very fun and cool though!