Idea
Just before the end of last semester, I participated in an exciting competition at Harvard's School of Design, hosted by the GSBees club:
a competition to design a bee hotel for native pollinator bees. Note that these are NOT the typical honeybees that produce honey in large colonies. The bees
I am talking about here are usually living alone, in little cracks and corners of building walls. This does not make them less interesting at all – in fact, they are very
much important for pollination. Unfortunately, their native habitat is on the decline and so are they. As I am a bio-enthusiast, I spend a lot of days
in Harvard's laboratories, in particular at the new Science and Engineering Complex (SEC) in Allston, MA. We engineer and experiment with nature inside these laboratories
every day, and it's also right in front of the glass windows that line the walls of our labs. This motivated me to think about a bee hotel that would re-use
some of the waste equipment we use in the lab (like pipettes) and put it "back" into nature. What I want to get to is a minimalist modular observational bee hotel that uses both
natural and synthetic materials. This here is my first attempt at modeling what I am thinking about, and I hope to build the structure in a later week.
Bear with me as I try to learn how to model in Fusion 360!
How To Model (Almost) Anything
I decided to use Fusion 360 by Autodesk for my model. As this is literally the first time I open this program, and am far away from my first model,
I did not bother about starting my project just yet. Instead, I went ahead to the platform that taught me almost anything so far – YouTube – and started following along
this simple tutorial by 3D Gladiator, who modelled a moka pot! The object is surprisingly versatile, so
I learned all the basic functions of 3D modeling in CAD (including sketching with dimensions, extrude, revolve, basics of parametric design). If you are a bloody beginner,
I highly recommend to start with a YouTube modeling video and follow it along, since it takes some hours to get used to the software.

3D Gladiator's modeling tutorial of a moka cup helped me on my first steps in Fusion 360
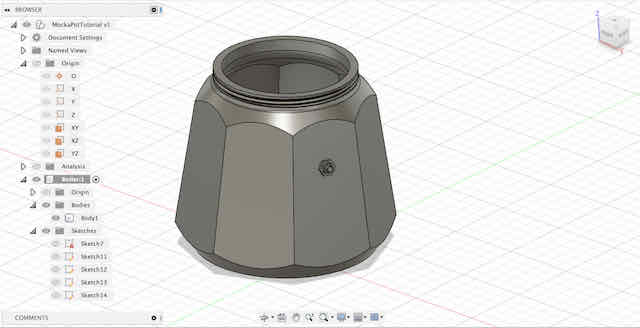
The bottom part of my moka cup model

The sieve of my moka cup model as a separate component
After playing in Fusion 360 for about an hour, I felt confident enough to continue modeling my final model. I started a new project in Fusion
and started my modeling. This will be two parts: First, I will model the existing physical parts of my bee hotel that I will use (glass pipettes from my laboratory in different
sizes and bamboo pipes from Home Depot). Afterwards, I will model modular connectors that allow us to connect the pipettes and bamboo pipes together in such a way that it
creates a unique and minimalist bee hotel.
Modeling the Pipettes and Bamboo Pipes
Once again, I first modeled the physical components I wanted to use in my bee hotel with their accurate dimensions, to later model the connecting
pieces around them. I started with 3 laboratory glass pipettes (5 ml, 10 ml, 25 ml) I still had at hand from our lab. I measured their diameter using a caliper and their length
using a ruler, and then modelled them accordingly in Fusion. For each pipette, I created a new sketch on the XZ plane, and created a center-point circle with the respective diameter I measured
previously. I then extruded the circle using the thin extrude feature with a wall thickness of 0.5mm in Fusion along the X axis, to create the middle part of the pipes. I also used the taper angle
feature to create a conical extrusion of the ends of the pipettes.
After modeling my 3 glass pipettes, I also modelled 2 bamboo pipes with the respective dimensions I measured from two examples I had. I used the taper angle feature to add some more detailed features
to them, like their connections. This was easy enough. In the end, I had modeled 5 pipes with dimensions similar to what I observed in real life.
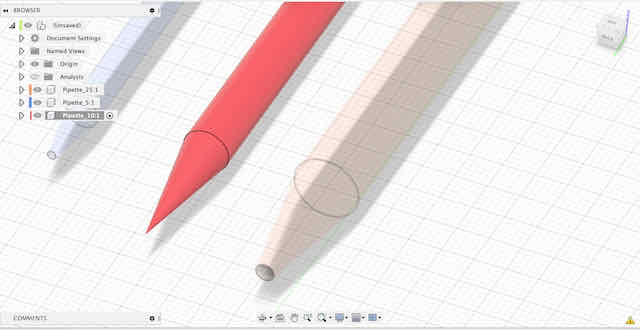
The three extruded glass pipettes
A detailed view of the connection points on the bamboo pipes

The final pipes
Modeling the Connecting Puzzle Pieces for the Pipes
So far, I only created a virtual representation of the glass pipettes and bamboo pipes I want my bee hotel to be composed of.
However, how are these components going to be connected to each other to form one structure? The idea I had in mind was to connect these
pieces by very simple connector pieces that work similar to antibodies or y-adapter pieces. My hope is that by connecting three adjacent pipes at a time, and
doing this throughout various points in the 3D structure of my bee hotel, I will be able to build a modular hotel that can be expanded
or built to any size and shape.
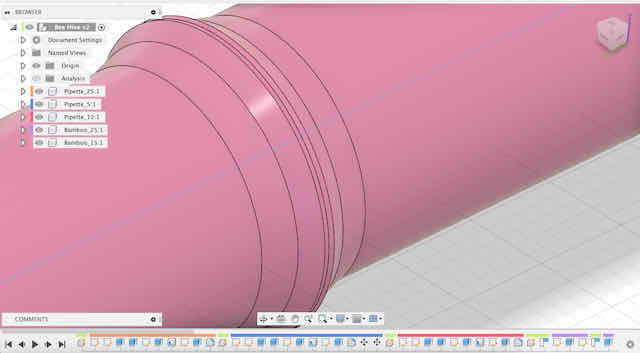
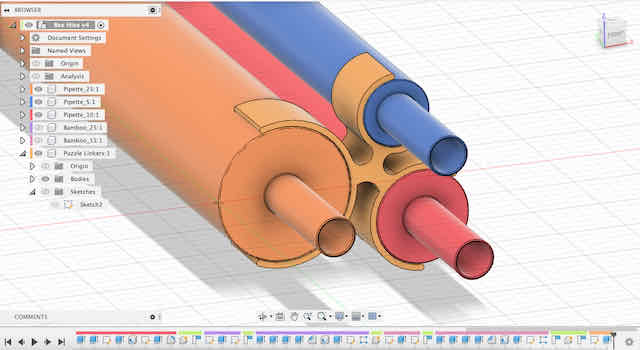
In order to model the connecting pieces to just fit my tubes and pipes, I first projected their cross-sections onto a new sketch plane. Part of the circles (circumferences)
of my pipes will become the inner part of the connector pieces, as they literally have to match and connect to the outside face of the pipe. I then offset these circles to create
a second circle around them, which defines the width (and, thereby, strength) of the connector pieces. Last, I added some arcs to connect three adjacent circles to each other,
thus giving me one final 3-pipe-connector. I modeled three different versions (to accomodate three different setups of pipes), and extruded them to give me
my final puzzle pieces. The screenshots do a much better job at explaining what I mean than my text, so, please, see below!
The projections of my pipes with an offset circle around them for the thickness of my connector pieces

Connecting the area between some of the circles connects the pieces together
After extruding one piece, this is what a typical connector piece looks like
Connecting Many Pieces to a Bee Hotel
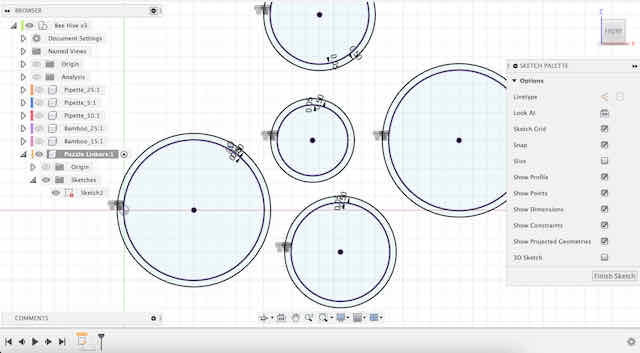
After I finally had my puzzle piece to hold together three pipes at a time, I created a few more with different
diameters. Note that these basically give us different puzzle pieces of different sizes and with different orientations for a
modular assembly of our final bee hotel. I hope that by producing enough different parts, this hotel can be used and extended to accomodate
many different bamboo pipes and pipettes in any kind of arrangement. Basically, a modular bee hive.
The arrangement of three pipes with a fitting connector
In order to visualize one possible arrangement and see what the final hotel would look like, I decided to create several copies of
pipes and of their connecting pieces. Starting from one pipe with one connector attached, I then used the align function to put the tubes in place.
For every empty / unfilled slot on a connecting piece, I used the align function, and first selected the respective curved face on the
connector piece, and second the respective outside curved face of a fitting pipe. This way, Fusion puts the fitting pipe right in place where it needs
to go. After repeating this process for about 10 pipes, I was satisfied with my first bee hotel arrangement.

I first put down connector pieces where I wanted them and then successively used Fusion's align function to move the pipes in place

The first result of a possible bee hotel arrangement
In this case, I modeled the arrangement of my bee hotel from scratch by manually aligning all parts. It is worth
mentioning though that this process could be automated with a custom Python plugin for Fusion. In this case, we could
programatically define the number of pipes of each type to put down, the number of connectors, and Fusion could calculate different
arrangements of the puzzle. However, as I was already 20 hrs into this assignment and still felt like a bloody beginner
when it comes to Fusion, I wanted to save myself something like this for next week.
Rendering my Bee Hotel
I know materials and rendering is a whole science in itself, which I did not intend to completely understand just within a day.
Nevertheless, I wanted to create some rendered result, to understand the basic workflow in Fusion. I started by giving my pipes a
transparent, glass-like material and played around with the smoothness and brightness. I left my connector pieces as metal pieces, since
it complemented the minimalist look of the hive. By moving the camera into the hive in between some pipes, I could get some interesting
results that I decided to keep for now.
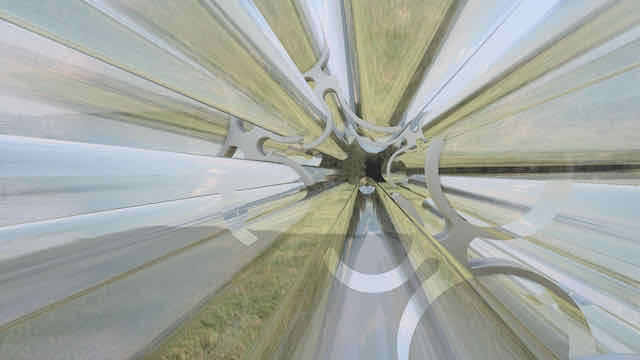
Final rendering of my bee hotel from the inside