Idea
In this post, I will outline my creation of a very basic but fun extension to the board game Monopoly that
allows players to actually build 3D representations of the the houses and hotels they put on their plots of land.
I will go over what I thought about for the game logic, the process of building my 3D game elements in Fusion 360,
and the process of lasercutting them and printing textures onto them. By the end of this post, you will have an idea
for how to build your own board game extension with a laser cutter and some simple material like cardboard.
The idea behind my Monopoly extension is to take players (in the roles of real estate brokers, as they are) not only
through the economic decisions when deciding for the right plot of land to buy, but also through the ups and downs of
actually building the houses and hotels of their real estate empire. I want to make the game more dynamic
and challenging by having players think about the best strategy to maximize their profit. Is it better to build
a larger foundation for a potentially larger hotel - or to build out a smaller plot but get to a profitable hotel
faster? How many rooms? A few large luxury rooms or a motel of hundreds of cheap rooms? And what about the
amenities? I think all of these choices can make the widely popular board game even more dynamic and more engaging.
I spent the first two hours of this assignment thinking about the logic and how I wanted to enable players
to build houses, while keeping the game simple and accessible. I ultimately decided to go with a very simple design of
just three new elements that could be combined to build any kind of hotel setup:
- A foundation tile = an area of land that can be developed
- A floor tile = basis for each floor and/or ceiling
- A wall tile = needed to build out a room
To give the setup a bit more variability (and myself more freedom to explore), I decided to create multiple
versions of the wall tile with different sizes and textures:
- Half wall
- Double wall
- Brick wall
- Wood wall
- Concrete wall
Creating the Pseudo-Randomized Terrain Tiles
In an earlier version of the extension, I wanted the game to be covered with terrain tiles that represented
undeveloped land, until a player bought a plot of land here. Borrowing from Minecraft, I wanted my board game layout
to be dynamic and look different every time my users started a new round. This is where I took a long detour
into the generation of random terrains from noise in Fusion 360 – feel free to skip this part, as it is not critical for the main idea.
I started by experimenting with a few types of noise to generate my random terrain, which should later become the surface
of my terrain tiles. Ultimately, Simplex noise appealed most to me for this project because, when using it with
only a few octaves, it just generates a few dips and hills and no extreme landscapes.
In Fusion 360, I defined a single square tile, defined its constraints, dimensions through variables as parameters, and wanted to use a Simplex noise
surface to cut its surface. After doing some digging, I found out Fusion 360 does not natively offer a way to define parametric curves and apply them to lines or planes.
Luckily, there are some well-documented add-ins available, and I chose to go with Equation Driven Surface. Unfortunately, after some
experimentation with the tool, I found out that it only implements the use of Python's Math package, which cannot generate pseudo-random numbers (let alone noise functions).
At this point, I took a step that cost me a few hours for almost no return: to go into the add-in and create a custom
function to implement the functionality to generate a Simplex-noise driven surface. All in all, I feel like this step was
much overengineered. On the other hand, I'm glad I learned how to go under the hood of Fusion 360 and add custom functions in Python.
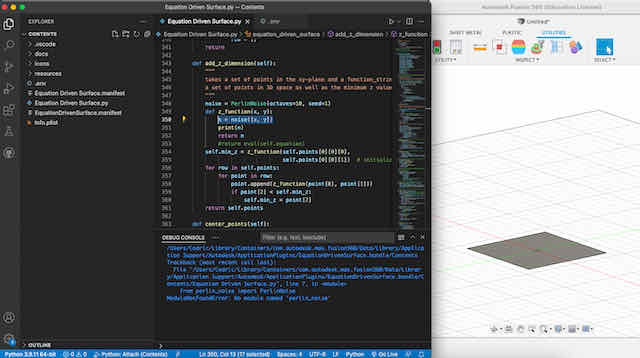
Before applying a custom Python function, a flat surface is generated
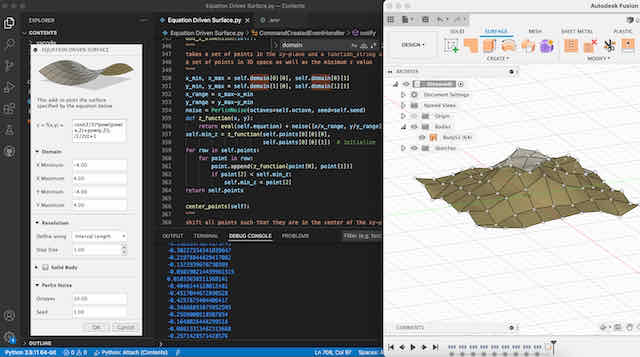
After applying the custom Python function, the surface height (along the z-axis) is pseudo-random
Cutting a single terrain tile from the pseudo-random surface generated
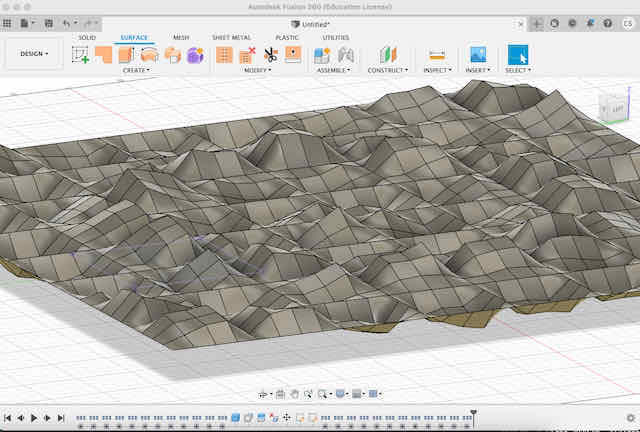
Generating a landscape of pseudo-randomized terrain tiles that can be arranged in any orientation and order
The best part of this implementation is that the landscape we generate is pseudo-random and infinite, giving us
the flexibility to generate an unlimited amount of tiles that look (more or less) unique. Now that we have our
landscape, lets move on to the foundation tiles
Creating the Foundation Tiles
The next tiles we will create are by far the easiest. They serve as the foundation players can buy and turn
undeveloped land into – and build houses and hotels on top. They differentiate themselves from the
terrain tiles because of their flat rather than uneven surface.
As I needed these tiles to be exactly the same dimensions as the terrain tiles (to fit into the game), I simply
projected the relevant edges and dimensions of the terrain tiles to a new sketch for the foundation tiles and
extruded them by the desired height. The beauty of this approach obviously is that whenever I change the dimensions
of the terrain tiles, the foundation tiles will follow. We will carry these projections through the floor and wall tiles as well.
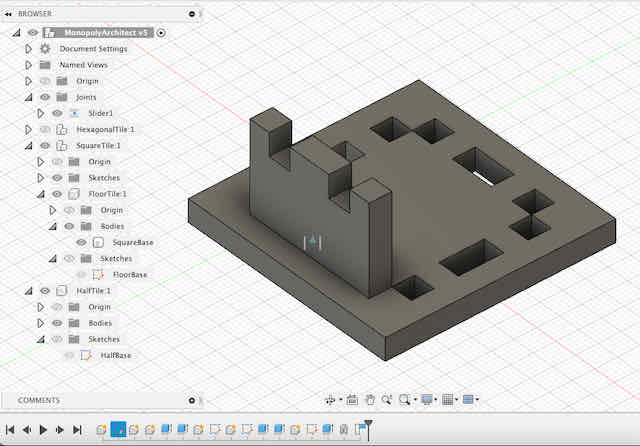
Creating the Floor Tiles
The floor tiles are the basis for any house or hotel and should allow players to put in walls (that stay in place).
I played around with multiple geometries before eventually deciding on the geometry shown below. While it was fairly easy
to come up with ideas for only one side of the floor (one wall), as soon as I mirrored it to all other sides, problems started to appear (especially walls blocking other walls).
It is very easy to believe that anything you can model in Fusion 360 will also work in the real world. In retrospect, I wish I would have just
sketched out my plan for the floor tile on a piece of paper, which would have shown me the problem in under 5 minutes.
Constraints and parameterized relationships were critical to designing a floor tile that could adapt to different
materials with different widths and tolerances, as well as dimensions. Therefore, I defined all sizes through parameters here
and based the design on a mirrored setup. It took me a long time to get the parameters right, but it was worth it
immediately when I tested my prints later and realized I needed to adjust some parameters to the material I was using.

Creating a floor tile from the projected base of the foundation tile, with cutouts for the wall segments. Note that the entire design is just driven by two parameters
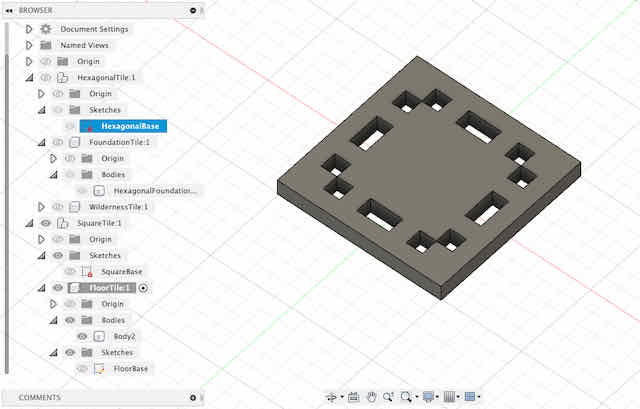
Extruding the floor tile to its desired thickness for illustration purposes
Creating the Wall Tiles
The last type of tile, the wall tile, is built on the projection of the floor tile. Specifically, I wanted my wall tiles to be able to be put into a
dedicated slot in the floor tile, so that players know where they can set up walls. It also makes it much easier to stack the whole setup and build multiple stories.
The projections made the design extremely straightforward, as I had to define no new parameters other than the wall height. From there, we can model the walls.
An important note about kerf: As discussed in the group assignment section, the laser of the laser cutter has a certain width (obviously, we are considering a beam of photons
rather than just a single line of them). This width is what we call the kerf of the laser cutter. It was an important parameter that I had to consider when designing the wall tiles,
if the cutter cuts right on edge of the shapes, it will leave half a diameter gap to the inside of the part. This can mean that our parts no longer allow for a solid press-fit. In my case,
I accounted for the kerf of the laser cutter by offsetting the connector part of the wall tiles that go into the floor tiles by half the kerf, which I found ideal for our laser cutter. It gave
me a nice touch and feel for a good press-fit system while allowing for re-arranging the pieces easily.

Starting to model the wall tile sketch from the projected cutouts of the floor tile. Notice we only need to define one quarter of the design and can use symetrical constraints to define the rest

The entire wall tile sketch with mirrored projections
The wall tile in the desired setup with respect to a wall tile. In this setup, a single floor tile can hold up to 8 wall segments (4 below it, 4 above it)
Because I already had the design defined, and because I wanted to play around with a few more tiles, I decided to create two more (sub-)versions of the
wall tile: A double-wall tile (that spans across two adjacent floor elements) and a half-wall tile (that can be used as a fence). It barely took a minute to design each.

All components aligned and patterned down into multiple copies for export into a laser-cutter compatible file
Laser Cutting All Tiles
The last step was to cut out the tiles from a suitable material using the laser cutter. Fusion 360, as a 3D CAD tool, does not come pre-equiped with a way
to export components into 2D SVG objects. Luckily, Shaper offers a great and free add-in to generate SVG paths from faces of bodies in Fusion. This is exactly what I needed!
I planned to use 4.5mm cardboard for the foundation and floor tiles, as well as 3mm wood for the wall tiles. When I first uploaded my SVG file into Lightroom and prepared the
focused the laser cutter on my material, I had the feeling that probably nothing would fit anywhere. I was genuinly surprised when my cuts came out and I realized that
they actually fit almost perfect! I only now realized how important the beginnings were. Setting everything up through parameters and projections was at first a pain for me as a bloody CAD beginner,
and took much longer than just drawing out the sketches in a vector editor like Illustrator. However, only changing a single parameter would have meant my entire design
would have been broken in a vector editor. Taking a slow start to set up everything neat and tight made prototyping and editing much faster later on!

Setting up the laser cutter file from the imported SVGs in Lightroom

Laser cutting the foundation and floor tiles from 4.5mm cardboard. The laser cutter speed and power were set relatively high, and the material was cut in one pass
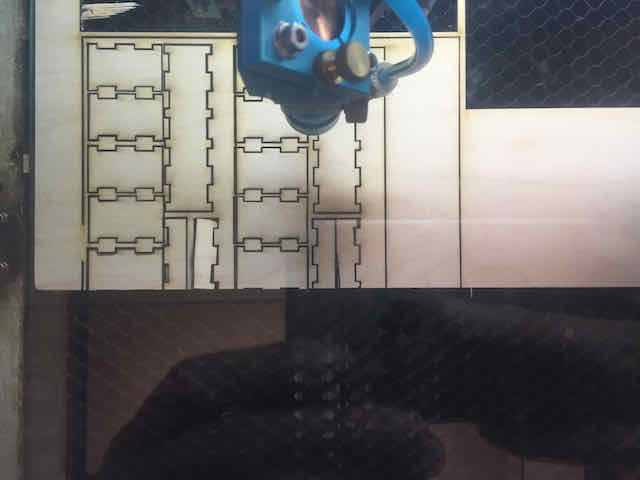
Laser cutting the wall tiles from 3mm wood. The laser cutter speed and power were set relatively low, and the material was cut in three passes. Notice the dark edges surrounding the wall tiles, suggesting to use less power or more speed next time

An initial test of the fit of floor to wall tiles. I reduced the width by 0.1 mm after this and accounted for the laser cutter's kerf
After an initial print of a few pieces, I adjusted the width of my floor tile cutouts to perfectly fit the width of the wood I was using for the walls by also accounting for the
laser cutter's kerf. Afterwards, I cut a larger batch of pieces as my final production. I also realized that I could easily cut cardboard in one pass, whereas the thinner wood was better
cut with less energy and three passes, to prevent it from burning too much. All in all, I was extremely happy with the result I got and the fun of holding
a piece of material in my hands that just existed in a software a few moments ago is hard to describe. I loved it.
Using the Laser Cutter to Print Texture
After having so much fun with the laser cutter, I could not stop myself from playing around with other ideas for it. That was when I realized that my wall
tiles were all blanc and could need an design upgrade. However, I did not want to print on an ink texture, but create a 3D texture that resembled different wall materials.
The idea was fairly easy to implement but had a huge impact. I first found a few textures online and convert them into a simplified SVG file with a small number of paths.
Then, I loaded the texture SVGs into Lightroom and covered my print area with it. To make sure the cutter would not cut the material but just "engrave" my textures,
I de-focused the laser cone (by adjusting it about 2mm upwards from the focus point), increasing the laser speed by a factor of 3x (from usual cutting speed), and setting the number of passes to just 1. Although this
would have still cut cardboard at times, I found the settings perfect for texturing my wood walls. I ended up producing brick, wood, and concrete-textured walls that perfectly blend into the idea of my extension
and are much more fun to use than plain pieces.
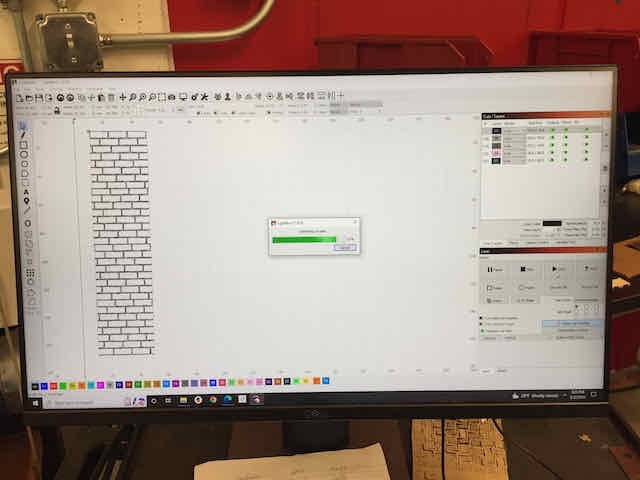
Setting up a brick texture to print onto the wall tiles
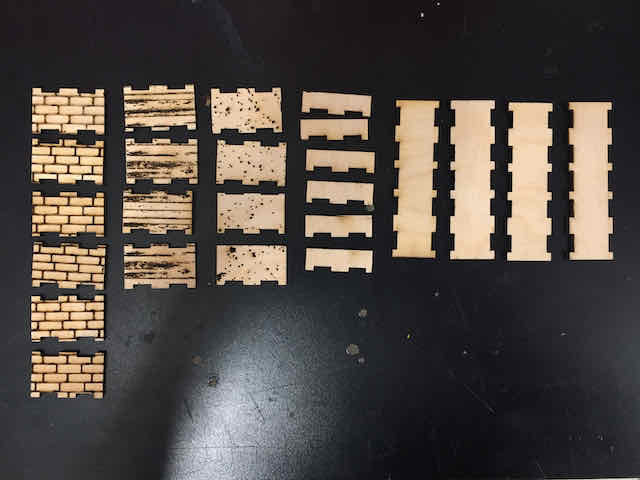
An overview of all wall tiles cut
Summary
All in all, this week really made me realize the power of parametric design. Defining a component with a few key variables going and projecting
through all parts made it extremely easy to adapt the design in later stages – and more modular. On top of that, the laser cutter's ease of use
makes it a powerful rapid-prototyping device that can even mimic the haptics and feel of materials to some extend. I just wish that
I had tested printing out some components much earlier in very simple versions (or literally drawing and cutting them out) to get an immediate feeling for whether some geometry even works, before defining it in Fusion 360.

The first few blocks...
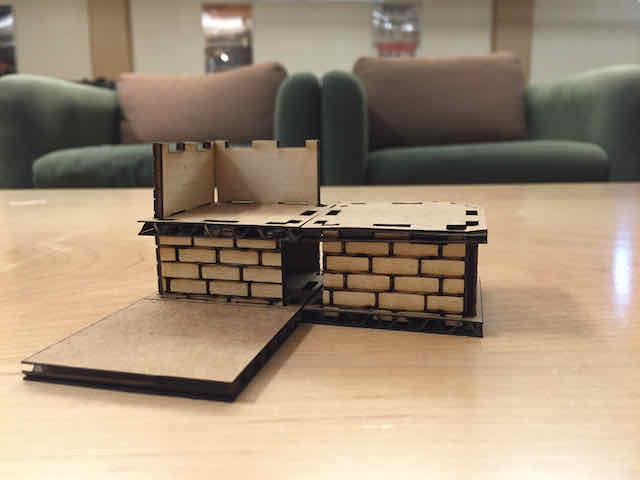
...a few more upgrades...

...and there is a final hotel on Broadway!