Idea
This week is all about molding and casting. As an absolute chocolate lover, it there was no room for questions: I wanted to
make a completely food-safe silicone mold to pour some chocolate pieces (pralines, figures, something like that). My initial idea
was to model a Halloween-themed chocolate figure in Blender. However, I soon realizd I also wanted my pieces to be of use on any
other day than October 31st. Here, I finally came up with my final idea: an edible set of chocolate chess pieces, cast in dark and white
chocolate, that let you eat your opponents figures while you beat her (or see your pieces getting eaten by her). Let's start!
Modeling the Chess Pieces
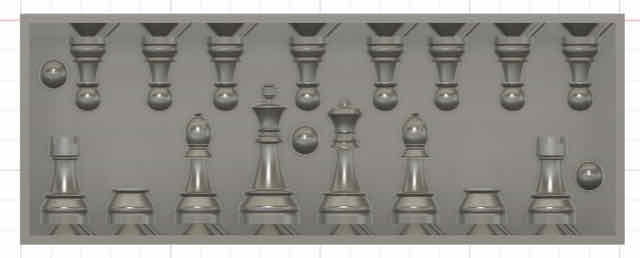
In order to model my chess pieces, I first scanned the internet for pictures of chess pieces to use as a
template to model the figures with. The following online shop had some head-on pictures of classic wooden chess
figures that I liked to go with: link to the online shop.

I found these chess figures in an online store and deemed a chocolate version of them would be chunky enough for me to want to bite into them
I imported the picture into Fusion 360 onto the XZ plane and set the dimensions of the king to be 9.5 cm in height (that is, according to Chess standards, the recommended height for the king).
Afterwards, I created a new sketch on the same plane and started drawing along the outline of the king figure with line and 3-point arc segments. The accuracy does not matter too much here, as the result will just
give you a slightly different-looking figure. After finishing half the profile of the king, I then used the recolve function and revolved the half-profile around the mid-axis of the king, thus
creating a symmetrical 3D figure.

I imported the image as a background canvas image and scaled it to my final dimensions
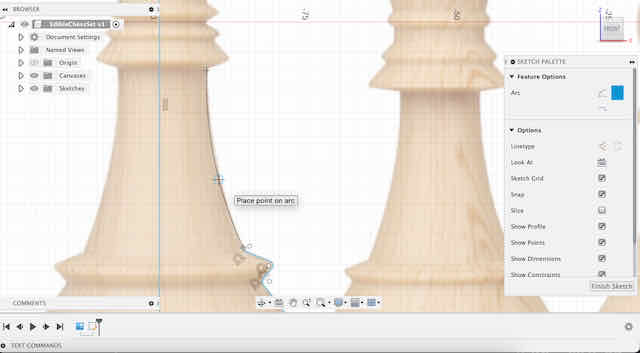
I then created a sketch on the plane of the canvas image and started drawing along the outline of my figures

Finishing the profile of the first figure: the king

Using the revolve feature, I revolved the profile sketch in 360° around its inner axis to create my figure
I did just the same for the remaining five figures, giving me a rough model of all six unique chess figures.
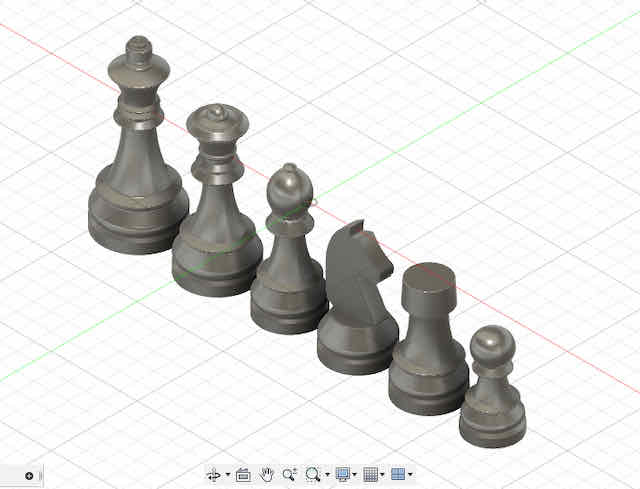
The bodies of my chess figures
After finishing the rough modeling, I wanted to add details to some of my figures (like the bishop, the horse, and the tower). This was
quite easy by first constructing tangent and offset construction planes on my figures and then creating the respective sketch profiles I could use
to extrude cut parts away from my figures. For instance, the bishop was created by just extruding a rectangular box slightly going through the head
of the bishop.
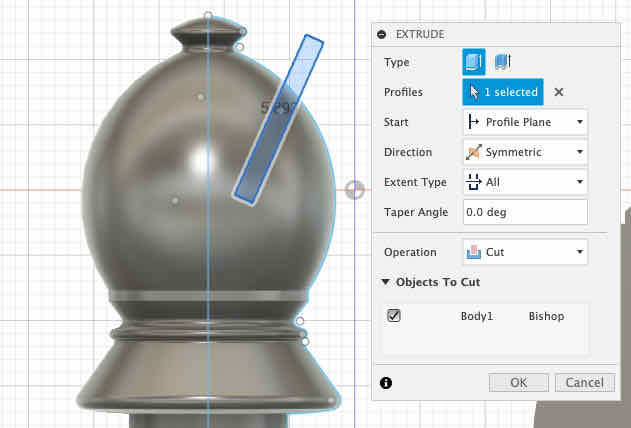
To give the figures more detail where necessary, I created tangent sketch planes at some features and then extrude cut them out

In this case, a perpendicular box at the right spot creates the bishop
Creating the Mold Around the Figures
After my figures were modelled and I arranged them in the way I wanted for my mold, I started working on the mold.
This is an important part to pause and reflect about what we are trying to cast in the end, and then work your way backwards.
In my case, I wanted to cast the positive pieces out of dark and white chocolate later. To cast these pieces, I needed a food-safe silicone mold
that I could pour hot chocolate into. Therefore, my mold would need to be a negative of the pieces. However, I cannot directly print a food-safe silicone
mold with the tools we had. Instead, I could CNC a "mold for the mold" – a positive of the mold from blue machinable wax, to later cast my silicone into.
In other words, the part I am designing now needs to have the positive of the figures and the required structures for my chocolate and
air to flow. I also decided to make a two-part mold for it, so I needed to model the half-base of the structures. I started by modeling a block the same dimensions
as my blue wax block in Fusion, and then created a sprue (to pour material in, in this case, chocolate) and vent (for air to flow out) at the base of my figures.
I thought a lot about the dimensions for these and ultimately decided on a sprue with 5 mm diameter (half the size of the base of my figures) and a vent with a 2 mm diameter
(seemed reasonable for air to go through). I also created spherical registration marks by putting three spheres onto the base of my mold. Last, I added a thin 3 mm wall around my mold.
Modeling the sprue (material) and vent (air) for my figures
Creating spherical registration marks on my mold

Extruding 3 mm thick walls around my mold
Keep in mind that our chess set is not fully symmetrical around the z-axis. Just modeling this one face and pouring two sides from it will not work (for instance,
the horse head would look to the left on one half of the mold and to the right on the other). Therefore, we have to model a mirrored version of the mold (mirrored on the same plane
as the mold) and then mill two distinct mold faces later. The easiest and most consistent way to doing this is by literally mirroring all componnts (the entire mold) along the back plane.
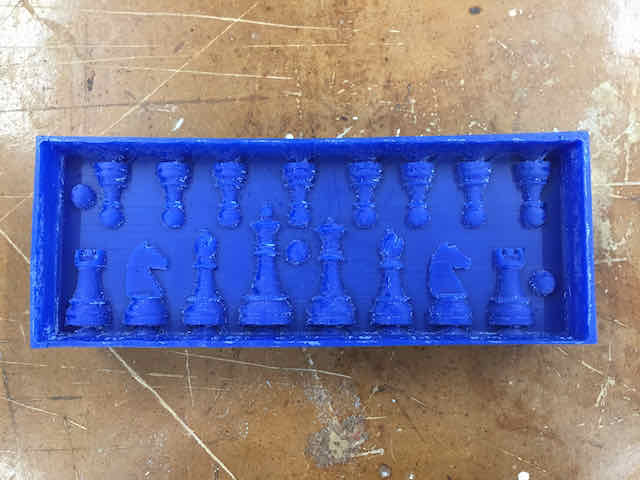
Cutting the Mold from Blue Machinable Wax
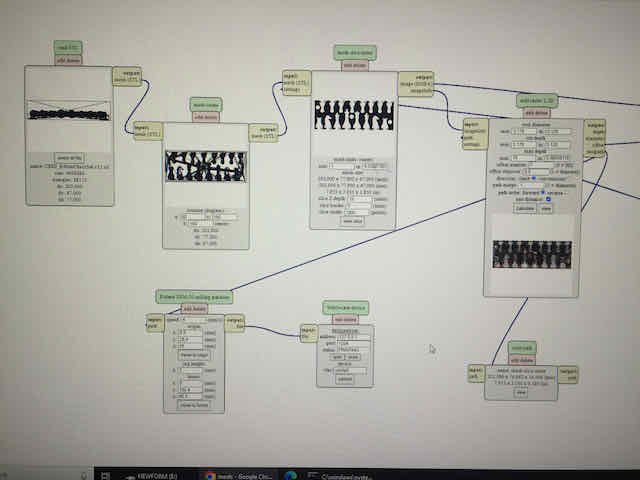
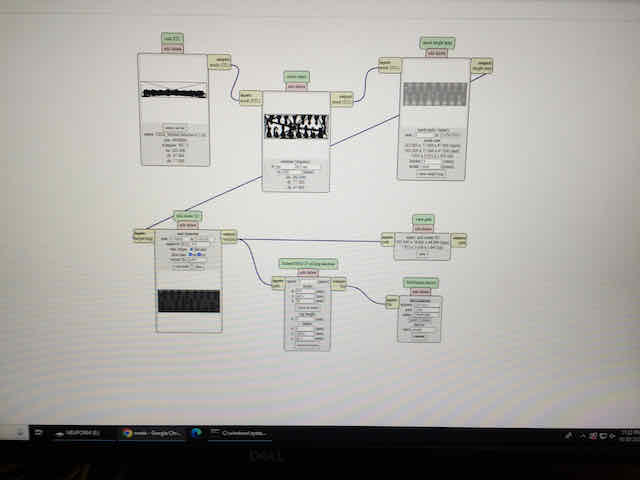
I exported my mold as an STL file. Keep in mind that we have to export the two halves / faces of the mold individually and separatly (having them in the same STL file will just make things more complicated).
In order to export them separately from each other, make the components of one of the mold halves invisible and export the entire file as an STL, then do the same for the other half.
I then went to the endmill to cut my wax block. As in the previous weeks,
I used a Roland SRM-20 as the CNC machine and Mods to generate the toolpaths. I split the milling
into two cuts: a rough-cut and a fine cut.
(1) The idea behind the rough cut is to remove most of the material fast with a large mill and later use a finer mill to create a smooth surface.
I did my 2.5D rough cut with an 1/8" endmill that basically mills most of the material way by milling a defined number of
z-layers (basically cutting in isometric lines around the figures). It took me some time to figure out the right settings for the endmill to
do the 2.5D cut properly. Here's a summary of my settings, as well as a screenshot of them below:
The settings I used for my rough cut with an 1/8" endmill in Mods
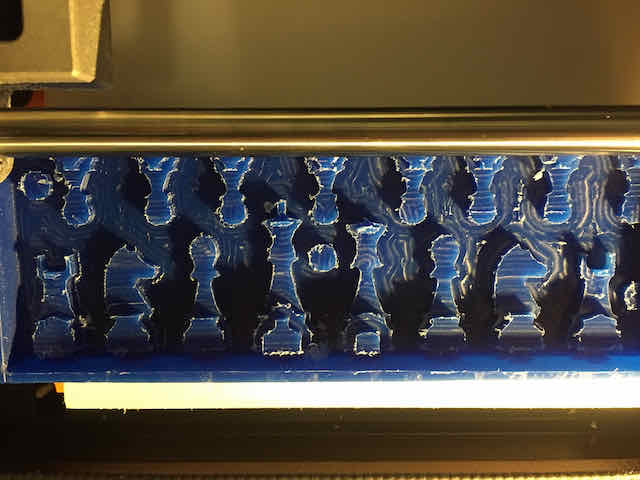
The result of my rough cut with an 1/8" endmill. Although it looks like it completely failed, this is exactly what a rough 2.5D cut should get us
(2) Next, I used a 3D fine cut with an 1/32" endmill that mills in the XZ and YZ direction
(thereby creating an even, smooth curve across the entire surface of the mold). I made sure to use the
same settings as in the 2.5D job. Again, find an overview of my settings below.
- Rotate the imported STL object in such a way that the top is oriented upwards
- Set the tool diameter to the tool I used (in my case, 0.125 inch)
- Set the cut depth to something reasonable around the tool size (I used 0.1 inch). This just influences how many z layers are cut
- Set the max depth to the depth from the top of the block walls to the ground layer of my mold (in my case, 15 mm)
- IMPORTANT FOR ROUGHT CUT: After adjusting the endmill bit to the z value that touches the block of wax, offset it 1 mm above it (by increasing the z-value of the origin by +1 mm). This is important so we don't cut the shapes all the way down
- IMPORTANT FOR FINE CUT: Here, we make sure the bit touches down on the wax block as usual when we set the origin
The settings I used for my fine cut with an 1/32" endmill in Mods
The result of my fine cut with an 1/32" endmill
In total, rough cutting one half of the mold onto one side of the wax block took about 2 hrs, and fine cutting took about 18 hrs. This is much more than I originally
anticipated, but it still left enough time to pour the molds this week. To save on material, I used the other side of my wax block to mill the other half of my mold, which
took as much time again. Overall, I was quite happy with the result, although the surface did not come out as
smooth as I expected it (you can definitely still see traces of the layers the fine cut left). I could have used hot air to even out the surface, but decided
to keep the mold as I had it, since the unsmooth parts added a wood-like texture to the figures, which I liked. I only washed my mold vigorously under water
from the tap for about 10 minutes.
Coating & Pouring a Food-Grade Mold
Now is the time to finally pour the silicone mold into our wax block. If you did not leave walls around your mold, you would first put some wooden frames around the
wax block (the negative for your mold). In my case, I modeled thin walls into my block directly, and they came out sturdy enough that I didn't feel the need to support them with
an extra outside frame. Again, I wanted to use my mold to pour chocolate figures. This meant that I needed to ensure that my mold was completely food-safe. This doesn't just mean that the
mold material needed to be food safe. It also meant that everything that touched the surface of that mold needed to be food safe. This was not the case for my blue wax block (it's made from parafin wax,
poly propylene, and a bunch of additives – not the worst basis, but not enough to be considered food safe). To make the surface of my wax block food safe, I decided to dip coat it in
a viscous food-grade epoxy resin from ArtResin (there are a few on the market). The resin needed 48h to cure in a clean, dry place per the instructions, although I gave it 72h to be safe.
After the epoxy resin was completely cured, I wanted to go ahead and finally pour the mold. I chose Smooth On's Clear-37, a food-grade clear silicone with a
work time of 15 minutes and a cure time of 4 hrs, from which we still had some on stock. Unfortunately,
it turned out that all we had was left open or in partially-cured condition, rendering most of it inusable. To finish at least one pour and see how the silicone performed, I decided to mix as much as I could
(about 60g in total) and pour just two figures of my chess set. I used a hacky construction of two popsicle sticks perpendicular to each other in order to limit the area for my mold.
Because of the high viscosity of the uncured silicone, this worked great. Overall, the silicone pouring went smooth, but keep the following learnings in mind:
- Keep the work time of your polymer in mind! If you have 15 mins, use 10 mins to mix everything properly and 5 mins to pour it into the mold slowly
- Mix the curing agents for much longer than you naturally think. Set a timer
- Mix the curing agents SLOWLY and without introducing air bubbles
- Pour the polymer mix SLOWLY and without introducing air bubbles from one side of the mold
- Shake/vibrate/tap the mold for another 10 mins after pouring it to release any air bubbles rising to the suface
- Give the mold more cure time than the manual indicates. In my case, it said 4 hrs, but I needed to wait at least 6 before everything was cured and solid
- When you remove the silicone mold from the negative below it, do so by lifting one side very slowly. Depending on the material, your mold can break very easily
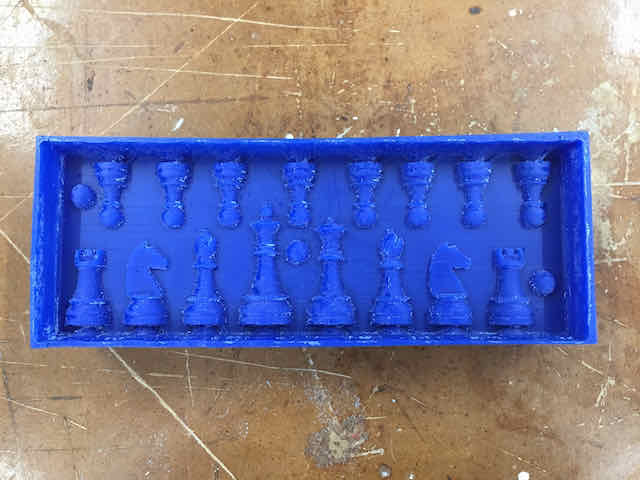
The final cut mold
I chose to only pour a much smaller part of the mold with silicone, as we did not have enough on stock
I let the silicone harden over 4 hrs
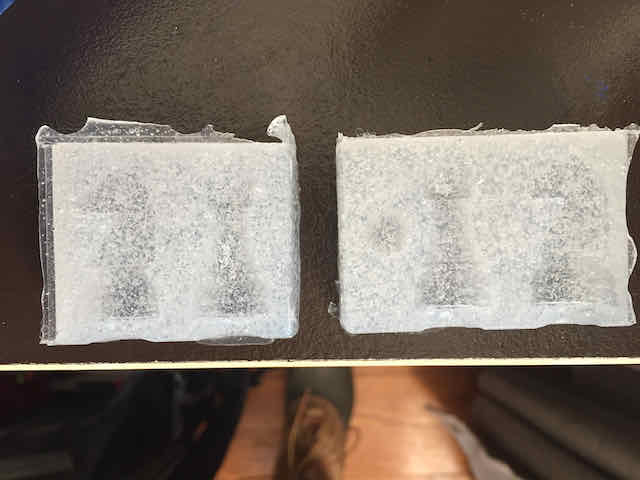
The finished mold
I'll definitely buy a fresh set of food-grade silicone for a complete mold of both sides in a few weeks. Until then, I wanted to
experiment with my existing mold.
Testing the Mold with Chocolate
After letting the silicone mold cure for about 4 hrs, I slowly removed it from one side and with the help of an exactor knife to release parts that did not come off by themselves.
I took it home to my kitchen to pour some chocolate figures. Trader Joe's had some cheap Belgian chocolate bars (150g for $1.79) which I intended to use for this experiment. I heated one 50g
bar in a water bath, athough I ended up only needing about 10g for the two figures I had...which left more for me to snack. ;)
Aligning the two mold haves was obviously a challenge, as there were no registration marks in the small experimental section I poured. However, it was a
far greater challenge to pour the hot chocolate into the sprues (funnels) only and not into the vents, all the while my chocolate was starting to get cold again. In the end,
I could not fill the horse all the way to the top, and some excess air got trapped in the mold, so the chocolate did not fill the mold all the way. The best solution to this problem is
to heat up the mold a bit at a low temperature in the oven, and to keep the chocolate warm. I put it into the fridge over night and was thrilled to see that the chocolate pour actually worked!
All in all, I was vry happy with the result and can't wait to get some more chocolate to pour a full chess set.
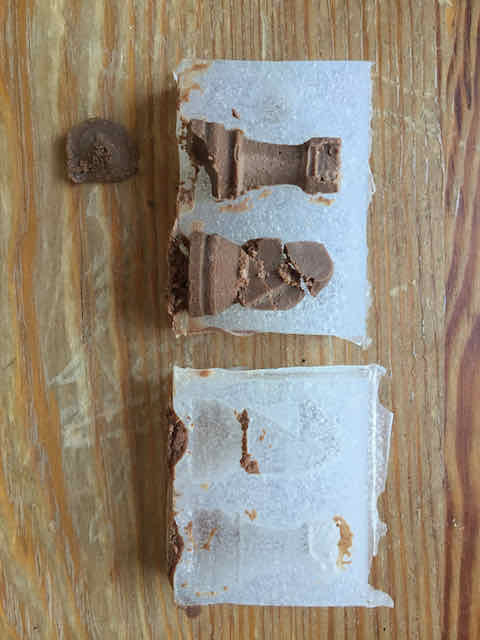
The result of my first chocolate pour into the silicone mold
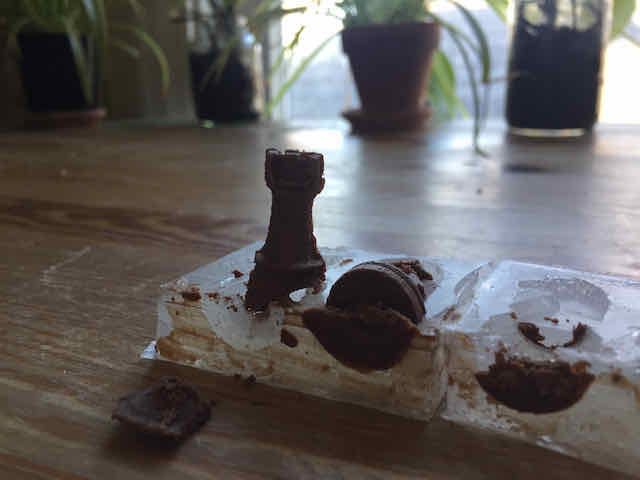
The tower came out just fine (although it was quite brittle due to the high sugar content in the sugar). Unfortunately, the horse did not make it