Week 3:
Embedded Programming
- Group assignment:
- Demonstrate and compare the toolchains and development workflows for alternative embedded architectures
- Individual assignment:
- browse through the data sheet for your microcontroller
- write a program for a microcontroller to interact
- (with local input &/or output devices) and communicate
- (with remote wired or wireless connections), and simulate its operation
- extra credit: test it on a development board
- extra credit: try different languages &/or development environments
EmoCase
This week I ended up building an EmoCase.
The EmoCase recognises facial emotions using machine learning and gives a visual indicator to people about the emotional state of the person it is tracking.
Process:
I looked at the data sheet for the Raspberry Pi Pico https://datasheets.raspberrypi.com/pico/pico-datasheet.pdf which is very human readable. A few cool things I found was that they included CAD files in the datasheet and a [fritzing file](https://datasheets.raspberrypi.com/pico/Pico-R3-Fritzing.fzpz) for circuits.
I then worked with the Wokwi tool to sketch out a basic circuit for a Raspberry Pi Pico. Wokwi is pretty cool as it let’s you know which pins on the Pi are suitable for the relevant pin on a input/output device.
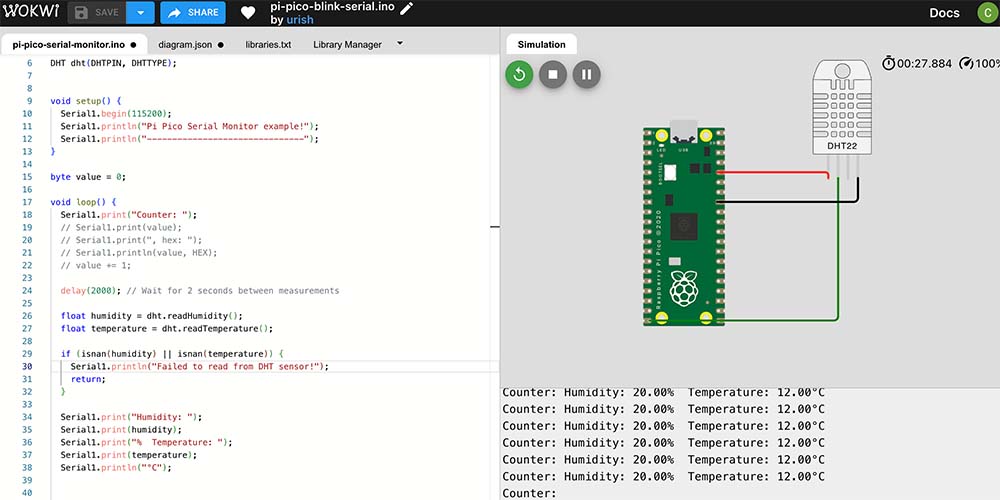
Initially I wanted to explore an idea around plant sensing, so working with things like a humidity sensor. I saw that the Wokwi inputs included one however I couldn’t find much documentation for it working with the Raspberry Pi Pico in Wokwi. It took a lot of trial and error, with perfect code the serial monitor to actually show an output on humidity wouldn’t appear. Eventually found this example which showed that in fact we have to use Serial1 to get the serial monitor to function correctly.
I played around with a few more of the simulation tools and examples. Coincidentally, I'm also getting used to my new lab, and I also then realised that in my lab we have some electronics lying around so I had a rummage around. I couldn't find the sensors I was interested in but found some basic components like LEDs and so thought it might be fun to play with a real microcontroller and create a simple experiment, which eventually became the EmoCase.
For my final project I'm interested in how emotions and memories might be one day stored in a new type of 'personal cloud' powered by dense storage, and I'm intrigued by the new data classes that we might be able to store in that world. So I had the idea for a crude prototype of an input device that is constantly sensing my emotions and recording them, but also making them visible to others and myself.
I was able to get a Raspberry Pi Pico to have a play over the weekend.I tested it out as Quentin had showed us during the group excercise, connecting to my computer while holding down Bootsel, the Pi shows up as a storage device on Mac.
After soldering the board, it wasn’t detected by my Mac anymore!
Debugging:
I thought I had probably made a bad connection as it was my first time soldering in quite a few years. I inspected the board and everything looked good, there was maybe one pin that seemed a bit blobby that could be refined.
- I consulted the internet and saw this thread: https://forums.raspberrypi.com/viewtopic.php?t=335911 which made me concerned that I had shorted my board!
- I then asked chatgpt to give me a debugging list to go through. Third on the list was: Check the BOOTSEL Mode. When I connected while holding down BOOTSEL, it worked again. (This should cause the Pico to mount as a USB mass storage device named “RPI-RP2).
This solved my issue and the board was detected. Next issue I ran into was that my board was no longer being detected in the Arduino IDE. I tried:
- Check all ports and board connection in the IDE (was OK) but not detecting the board.
- Checked the Pico was present in Mac Finder (it was).
- Could run a ‘blink’ program from the Raspberry Pi website (drag and drop into Finder —> Raspi-Pico).
- Couldn’t find a solution, so restarted Arduino IDE (didn’t work).
- Disconnected / reconnected Pico (didn’t work).
- Restarted Mac and restarted IDE —> initially worked.
- However, the Pico board USB connection still wasn’t reliably being detected. So, I uninstalled the Pico library, reinstalled it, and started everything again.
- I could get blink to run, but it was using the wrong port: /dev/cu.bluetooth-incoming-port. This meant that, yes, I could run a program, but I could not communicate with the board after running the program as the serial connection was not established properly.
- Then I noticed the IDE was ‘indexing’ in the bottom left corner. Once that was done, miraculously, the Port connection appeared! Not convinced I changed anything, but it seemed to be correct.
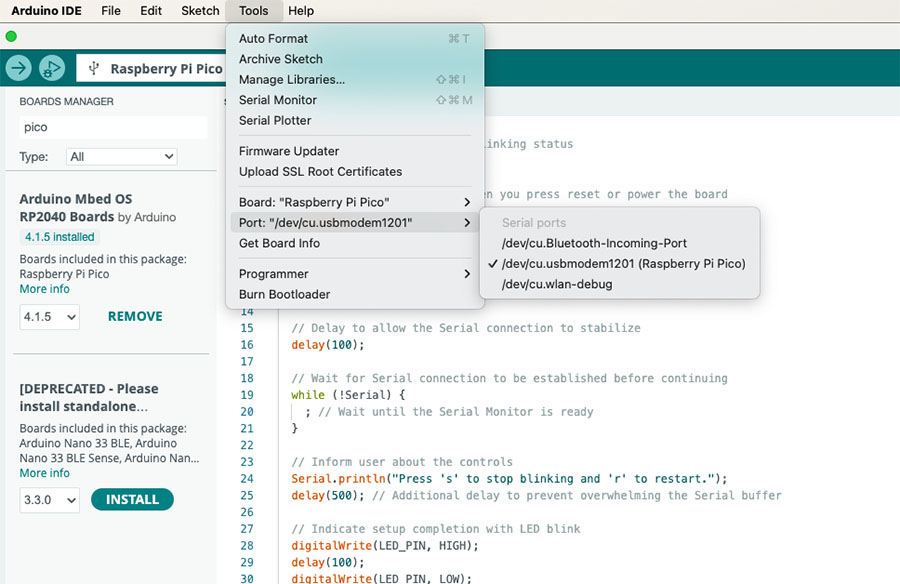
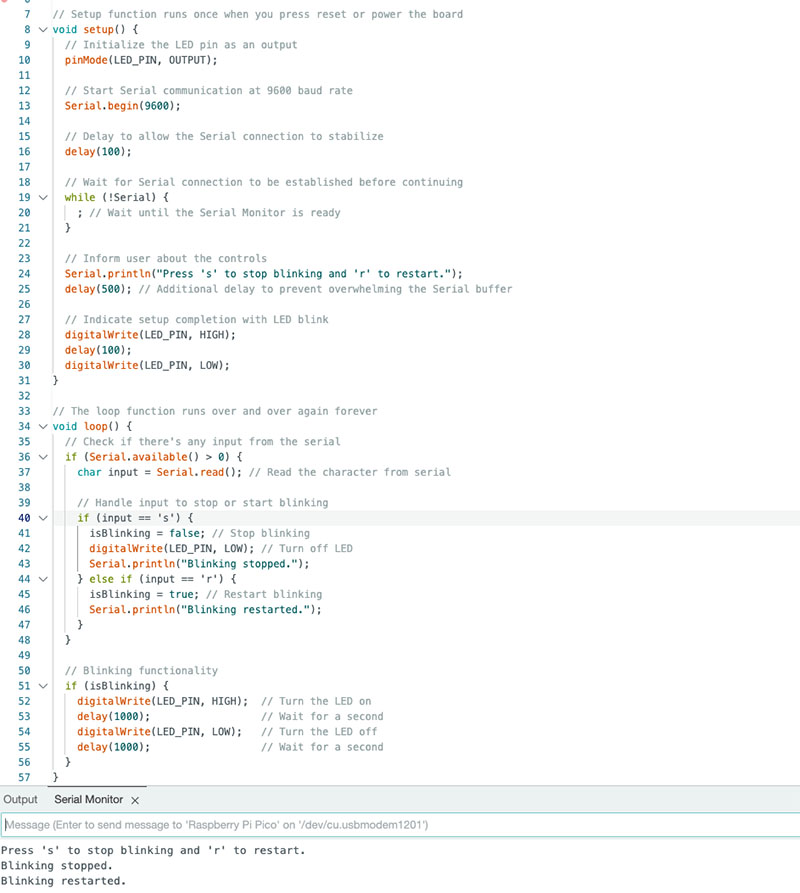
To test, I ran a small program to blink the onboard LED and stop when ‘s’ is typed on my keyboard. This would help me to see if the serial connection was well established after running the program on the board.
Next to make sure everything is still working, I setup a quick blink experiment with an external LED, simple circuit and code simulated in wokwi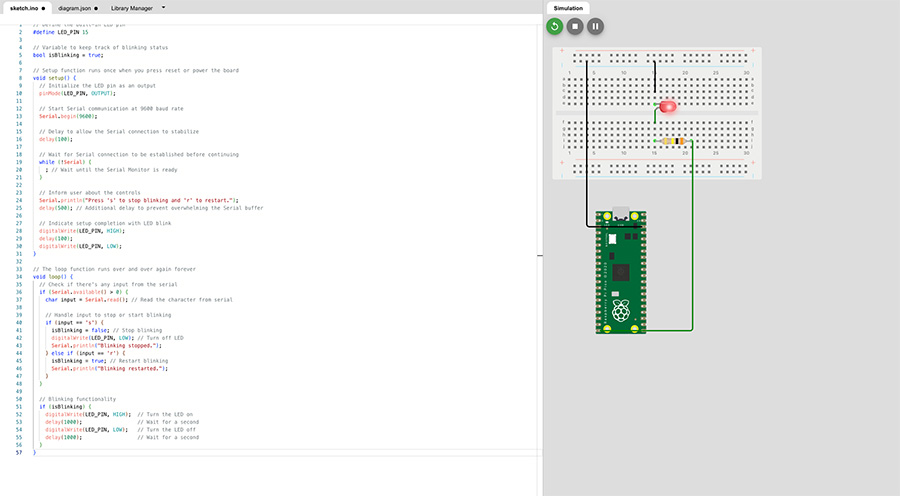
Developing EmoCase
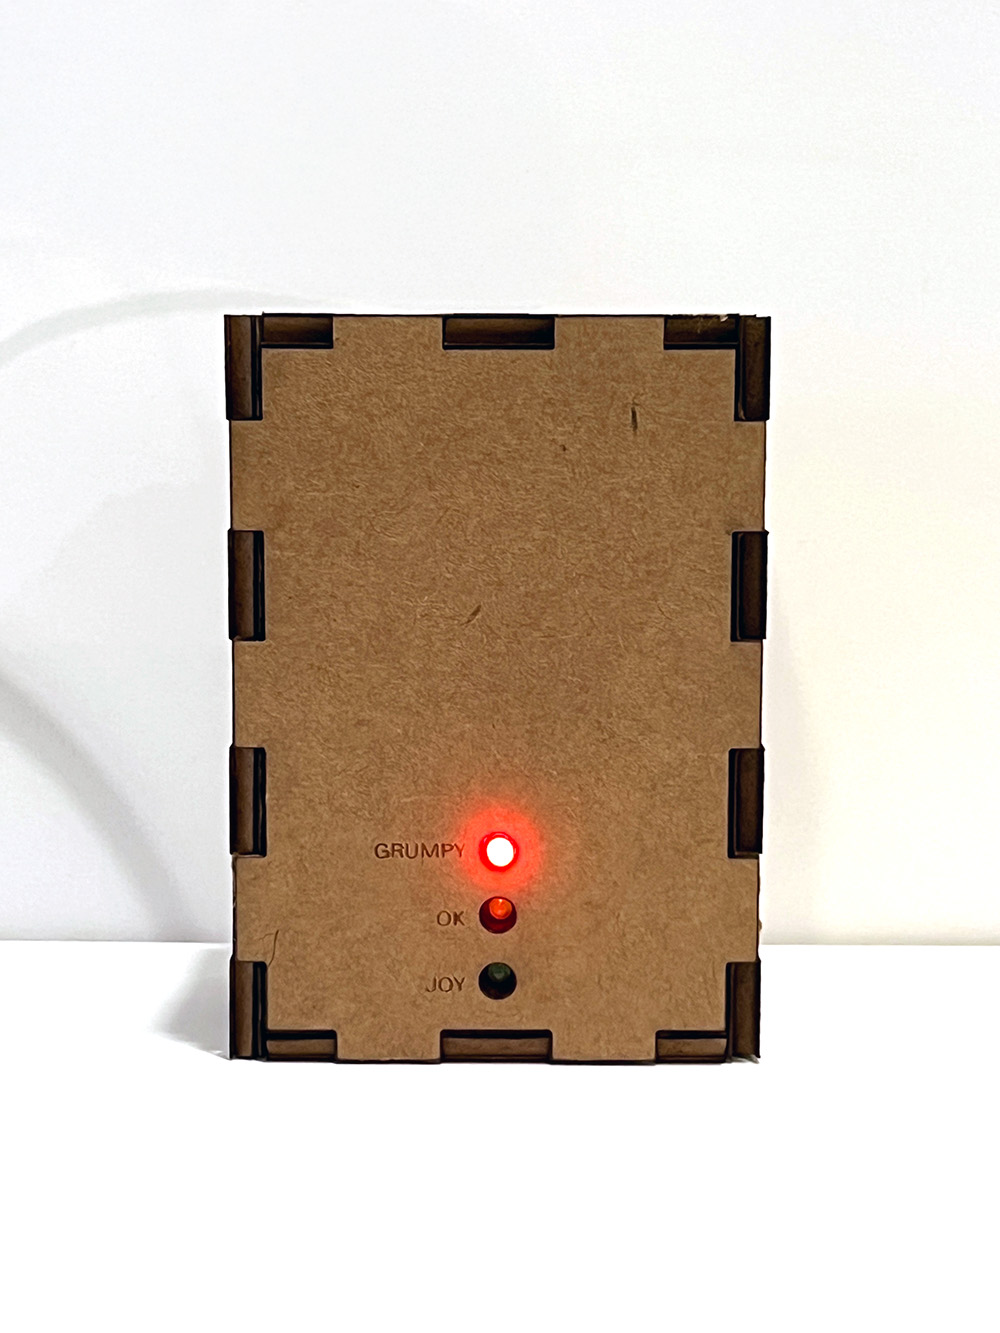
Next, I wanted to try out a simple experiment to build the actual EmoCase idea out. The general premise was quite simple: Turn on a red LED for sad, green for happy, yellow for neutral.
- To prototype this, a few steps:
- First, make it work with simple keystrokes.
- Find a way to track emotions quickly (to test) as an input and stream to the output.
Firstly to make it work with keystrokes, I wrote some quick code based off the traffic lights example, and added keystrokes to be sent via the serial monitor on the Arduino IDE
          // Define LED pins for traffic light
          #define RED_LED_PIN 15     // Red LED connected to GP15
          #define YELLOW_LED_PIN 14  // Yellow LED connected to GP14
          #define GREEN_LED_PIN 9    // Green LED connected to GP9

          // Time variables for alternating tasks
          unsigned long previousMillis = 0;
          const long interval = 2000; // 2 seconds interval

          // Flag to switch between tasks
          bool readFromPython = true;

          void setup() {
            // Initialize the LED pins as outputs
            pinMode(RED_LED_PIN, OUTPUT);
            pinMode(YELLOW_LED_PIN, OUTPUT);
            pinMode(GREEN_LED_PIN, OUTPUT);

            // Start Serial communication at 9600 baud rate for Serial Monitor
            Serial.begin(9600);
            while (!Serial) {
              ; // Wait until the Serial Monitor is ready
            }

            // Inform user about the controls
            Serial.println("Press 'S' for Sad (Red), 'H' for Happy (Green), 'N' for Neutral (Yellow).");
            delay(500);

            // Turn off all LEDs initially
            turnOffAllLEDs();
          }

          void loop() {
            // Get the current time
            unsigned long currentMillis = millis();

            // Check if it's time to switch tasks
            if (currentMillis - previousMillis >= interval) {
              // Save the last time you switched tasks
              previousMillis = currentMillis;

              // Toggle the flag to switch between reading from Python and Serial Monitor
              readFromPython = !readFromPython;

              // Indicate which task is active
              if (readFromPython) {
                Serial.println("Listening for data from Python script...");
              } else {
                Serial.println("Listening for commands from Serial Monitor...");
              }
            }

            // Task 1: Read from Python script (Laptop sends commands)
            if (readFromPython && Serial.available() > 0) {
              char input = Serial.read(); // Read the character from Serial port (Python script input)
              input = tolower(input);

              // Handle input to control the LEDs
              switch (input) {
                case 's': // Sad
                  setLEDState(RED_LED_PIN);
                  Serial.println("Sad (Red LED)");
                  break;
                case 'h': // Happy
                  setLEDState(GREEN_LED_PIN);
                  Serial.println("Happy (Green LED)");
                  break;
                case 'n': // Neutral
                  setLEDState(YELLOW_LED_PIN);
                  Serial.println("Neutral (Yellow LED)");
                  break;
                case 'o':
                  turnOffAllLEDs();
                  default:
                  Serial.println("Invalid input. Use 's', 'h', or 'n'.");
                  break;
              }
            }

            // Task 2: Read from Serial Monitor (Manual testing or other commands)
            if (!readFromPython && Serial.available() > 0) {
              char input = Serial.read(); // Read the character from Serial Monitor
              Serial.print("Serial Monitor input received: ");
              Serial.println(input);

              // Optional: Handle specific commands from the Serial Monitor if needed
            }
          }

          // Function to turn off all LEDs
          void turnOffAllLEDs() {
            digitalWrite(RED_LED_PIN, LOW);
            digitalWrite(YELLOW_LED_PIN, LOW);
            digitalWrite(GREEN_LED_PIN, LOW);
          }

          // Function to set the state of LEDs
          void setLEDState(int activePin) {
            turnOffAllLEDs();
            digitalWrite(activePin, HIGH);
          }
For the emotional input, I have in the past used a webcam-based model to detect emotions: clmtracker. This is pretty old now, so I looked for what is new.
I tested a few things out which didn't really work well. I eventually found this article that detects emotions via Python pretty well. The basic idea was to obtain a emotional state on my laptop and stream this to the Pi Pico for display. The article had most of the code worked out which was very convenient given the time constraints, and I did not fine tune the models or anything like that to work on my particular face.I adapted the code so that when an emotional state was registered e.g. "Happy" it would send a 'h' keystroke effectively re-using my existing code for the Raspberry Pi. Before actually implementing this, I tested that the emotion detection worked reasonably well, I did this with a large Mac display monitor which has a high quality webcam.In the final version, I addded a way for my mac to communicate with the Raspberry Pi Pico over serial using /dev/cu.usbmodem11301', 9600. Now of course this is the same port that the Pi is connected to my mac on looking for keystrokes, so initially this did not work. It did work though as soon as I closed the Arduino IDE serial monitor. So I also added a few lines to the python to display the current emotional state in the terminal.
Full code snippet:
        from fer import FER
        import cv2
        import mediapipe as mp
        import serial
        import time

        # Initialize the FER detector with MTCNN for face detection
        detector = FER(mtcnn=True)

        # Initialize Mediapipe FaceMesh for drawing landmarks
        mp_face_mesh = mp.solutions.face_mesh
        face_mesh = mp_face_mesh.FaceMesh(static_image_mode=False, max_num_faces=1, min_detection_confidence=0.4)
        drawing_spec = mp.solutions.drawing_utils.DrawingSpec(thickness=1, circle_radius=1)

        # Set up serial communication with the Raspberry Pi Pico
        try:
            pico_serial = serial.Serial('/dev/cu.usbmodem11301', 9600, timeout=1)  # Update the port as needed
            time.sleep(2)  # Allow some time for the serial connection to establish
        except serial.SerialException as e:
            print(f"Failed to open serial port: {e}")
            exit(1)

        # Start webcam
        cap = cv2.VideoCapture(0)

        try:
            while True:
                ret, frame = cap.read()
                if not ret:
                    break

                # Detect emotions on the frame using FER
                result = detector.detect_emotions(frame)

                # Convert the frame to RGB for Mediapipe processing
                rgb_frame = cv2.cvtColor(frame, cv2.COLOR_BGR2RGB)

                # Process the frame with Mediapipe to detect facial landmarks
                mesh_results = face_mesh.process(rgb_frame)

                # Draw landmarks if detected
                if mesh_results.multi_face_landmarks:
                    for face_landmarks in mesh_results.multi_face_landmarks:
                        # Properly pass the drawing_spec to both parameters
                        mp.solutions.drawing_utils.draw_landmarks(
                            image=frame,
                            landmark_list=face_landmarks,
                            connections=mp_face_mesh.FACEMESH_CONTOURS,
                            landmark_drawing_spec=drawing_spec,
                            connection_drawing_spec=drawing_spec
                        )

                # Draw the detected emotions and bounding boxes
                for face in result:
                    # Unpack the values
                    box = face["box"]
                    emotions = face["emotions"]

                    x, y, w, h = box
                    cv2.rectangle(frame, (x, y), (x + w, y + h), (0, 255, 0), 2)

                    # Find the emotion with the highest score
                    emotion_type = max(emotions, key=emotions.get)
                    emotion_score = emotions[emotion_type]

                    # Display the emotion type and its confidence level
                    emotion_text = f"{emotion_type}: {emotion_score:.2f}"
                    cv2.putText(frame, emotion_text, (x, y - 10), cv2.FONT_HERSHEY_SIMPLEX, 0.9, (0, 255, 0), 2)

                    # Print the current emotional state in the terminal
                    print(f"Detected Emotion: {emotion_type} with confidence {emotion_score:.2f}")

                    # Send the appropriate command to the Pico based on the detected emotion
                    try:
                        if emotion_type == "sad":
                            pico_serial.write(b's')  # Send 's' for Sad (Red LED)
                        elif emotion_type == "happy":
                            pico_serial.write(b'h')  # Send 'h' for Happy (Green LED)
                        elif emotion_type == "neutral":
                            pico_serial.write(b'n')  # Send 'n' for Neutral (Yellow LED)
                    except serial.SerialTimeoutException:
                        print("Timeout while sending data to Pico. Pico might be busy.")

                # Display the resulting frame
                cv2.imshow('Emotion Detection with Landmarks', frame)

                # Break the loop on 'q' key press
                if cv2.waitKey(1) & 0xFF == ord('q'):
                    break

        except KeyboardInterrupt:
            print("Interrupted by user")
        finally:
            # When everything is done, release the capture and close the serial connection
            cap.release()
            pico_serial.close()
            cv2.destroyAllWindows()
Finishing touches:
I decided to make a little case for the EmoCase, so I laser cut a box very quickly with some very appropriate measurements as I did not have calipers. I continued to have issues with cutting cardboard, even on the settings that worked well through a previous run, on my first run the laser did not cut the full way through and on the second run started cutting at a different location(!)
Eventually I managed to cut a box with some finger joints that fit.
I then recorded some videos of the EmoCase and compressed my documentation with FFmpeg and a double pass to get the file size down from 50MB to 2.5MB.
