Week 2: Embedded Programming
Setting up Hardware
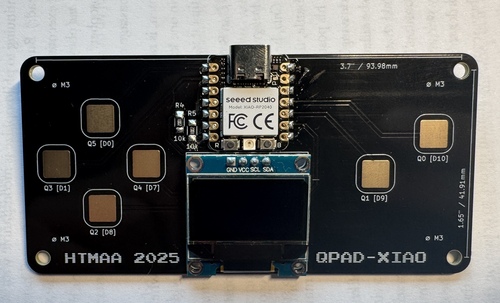
This week, we are focusing on learning embedded programming on microprocessors. To do so, one of our TA's, Quentin Bolsee, designed a few different versions of PCBs to teach people how to solder as well as create a functioning arduino equivalent to program to. There were a few different versions of the boards, one using the ATSAMD21E18, the other using a Xiao RP2040. The SAMD21 pcb was more complicated to solder as you had to add all of the additional components you would need. The Xiao RP2040 board was almost entirley self contained and all you had to add was two 10 k resistors and a screen. I chose to use the Xiao RP2040 as I was short on time and thus couldn't make the more complicated board. I do have some past experience soldering though and so the process was quite quick. Below are the schematics and the board design itself, you can look at all the documentation yourself on Quentin's gitlab page here.
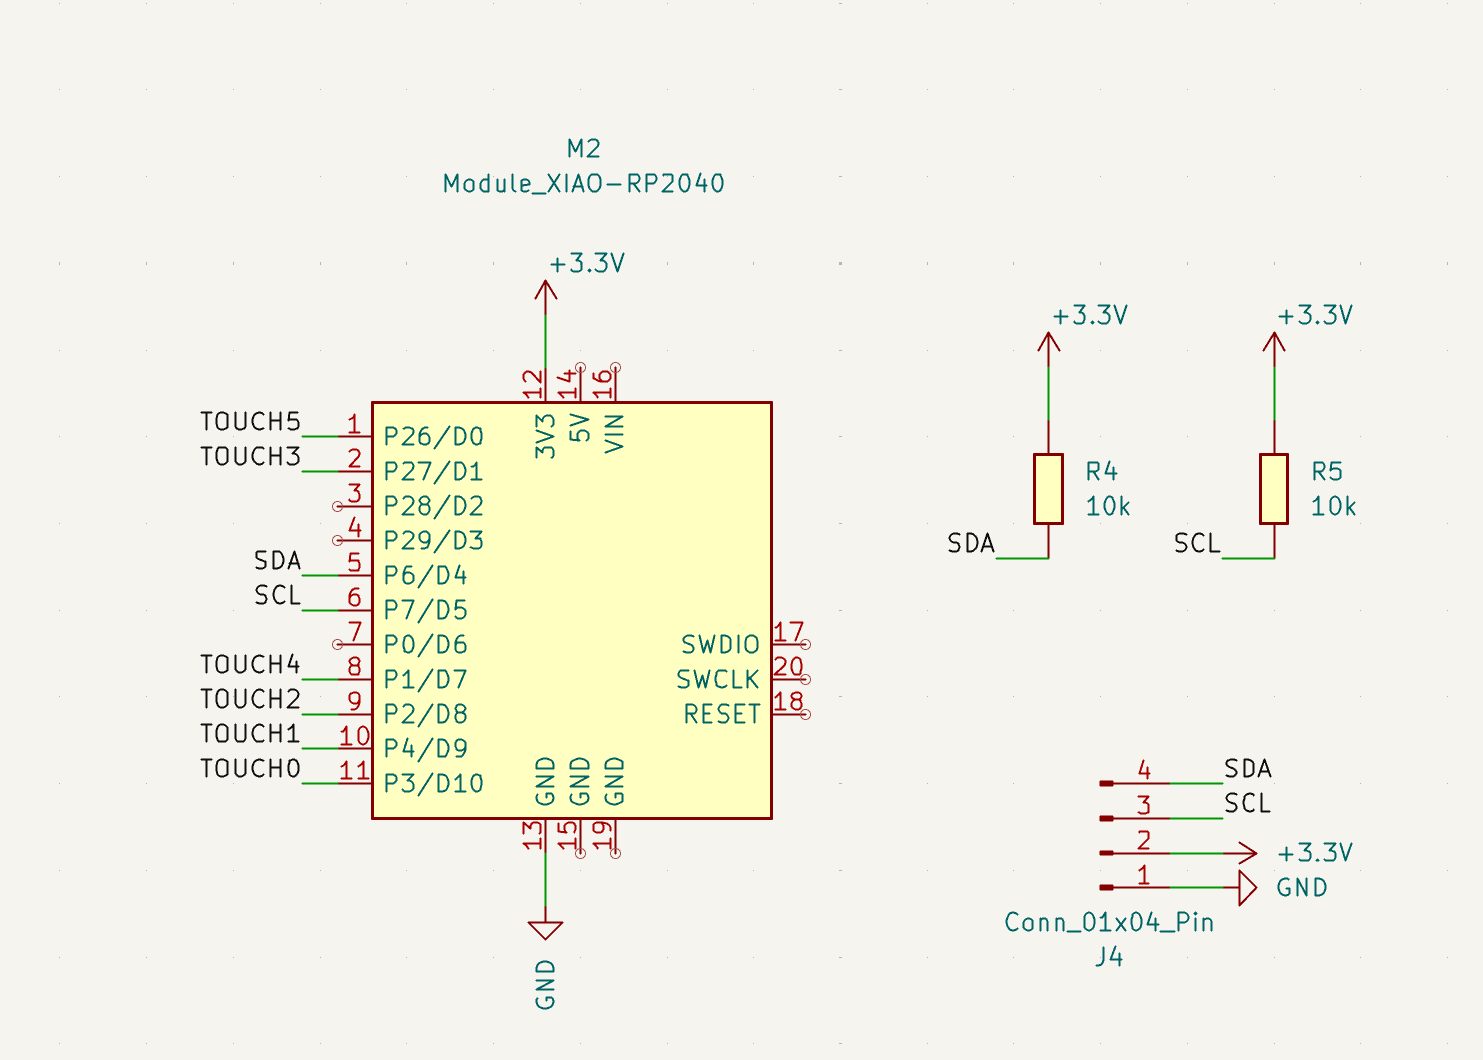
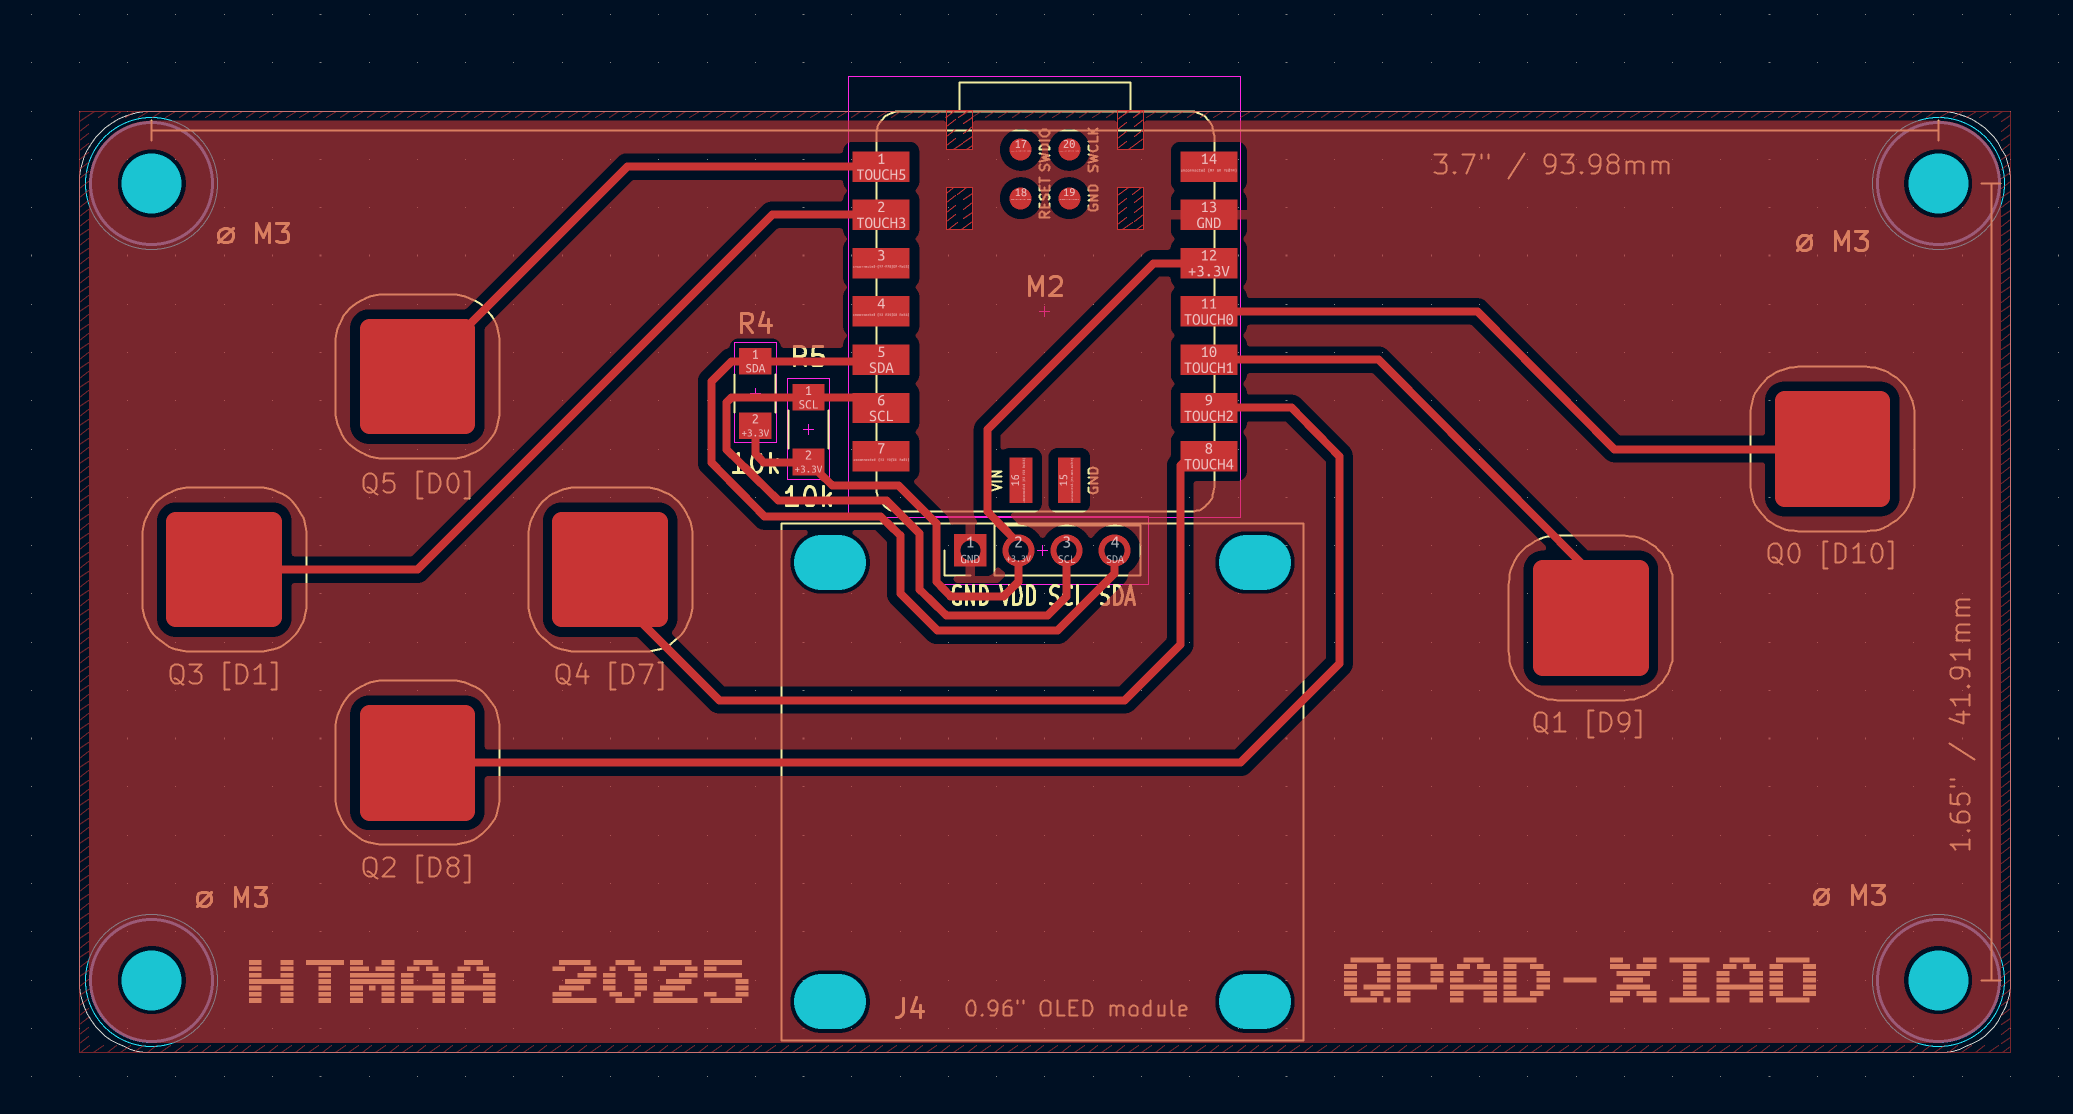
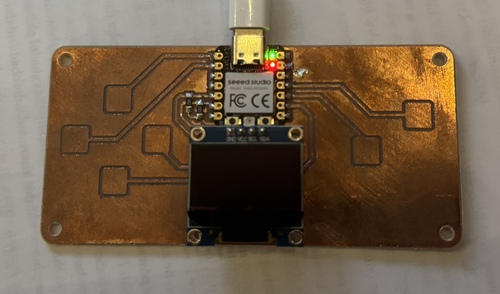
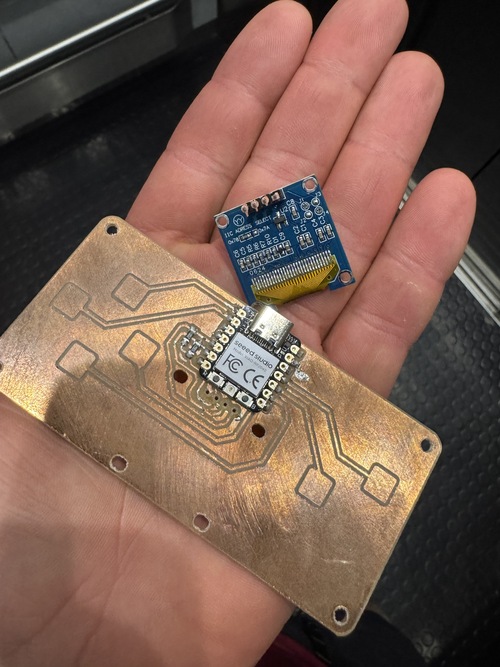
Using these references, I made my boards. I ended up having to make two as the first one broke. I was working on a desk and the cable was bumped and the pcb fell off the desk, knocked the screen, and delaminated the copper from the pcb and it fell off. I then reused the old screen, got a new Xiao, and made a new board using the more reliable boards once they came in.
Quentin was also very kind in giving us some sample code to flash onto the board to see if it was working. One file was simply blinking an LED. Another was to test the screen, displaying "Hello World." The final was to test the capacitive touch buttons built into the board. All of these files can again be found on his gitlab page here. I tried each file to make sure everything was working before I started my project.
Project Plan
I would like to try and program Conway's game of life. I want it to be able to randomly generate start states and play them out according to the rules of the game. I think it would also be cool to give the users a small menu to change some of the settings of the game, or restart. If I am able to make that work, it would be cool to allow the user to customize the start state and choose individual pixels to run.
If you are unfamiliar with the game, I encourage you to try it out here. The rules of the game are as follows:
- Any live cell with fewer than two live neighbors dies, as if by underpopulation.
- Any live cell with two or three live neighbors lives onto the next generation
- Any live cell with more than three live neighbors dies, as if by overpopulation.
- Any dead cell with exactly three live neighbors becomes a live cell, as if by reproduction.
Note on the use of ChatGPT
Due to a lack of experience in C, I will be using ChatGPT to assist in the fundamentals of the code and I will try and design and write the higher level structures of the code. The conversations had with ChatGPT will be linked at the bottom of this page along with all of the files used during testing.
Execution
There are a bunch of different things that I'll need to do inorder to make this happened
- Figure out how to light individual pixels
- Encode the rules of the game
- Test each state to find the next game state
- Create and display the next game state
- Randomly generate start states
Using Quentin's code as a starting point, I used ChatGPT to learn how to turn on an individual pixel which was quite easy:
                    display.clearDisplay();

                    display.drawPixel(x, y, COLOR)

                    display.display();
With that working, I quickly moved on to turning on random pixels within the 128x64 pixel grid on the screen using the built in random() function. I gave ChatGPT this promt.
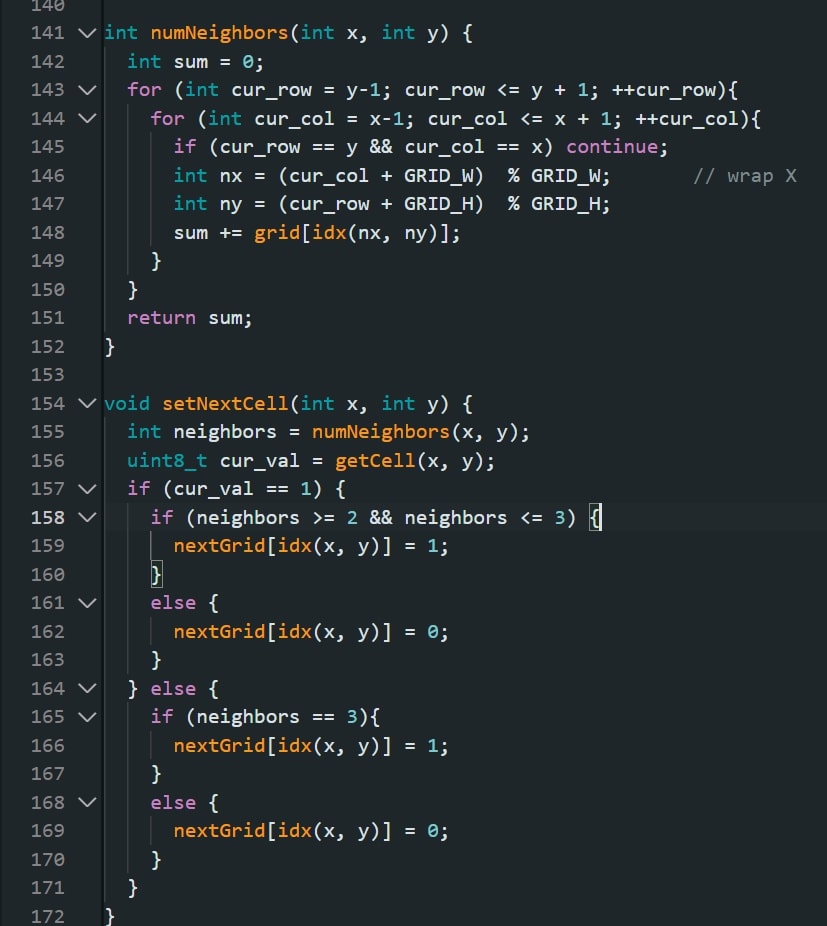
ok the long term goal is that I want to program Conway's game of life. I DO NOT WANT YOU TO WRITE ALL THE CODE RIGHT NOW. I want to work with you and incrementaly implement stuff so I can learn as we go. That being said, you can direct the conversation so that I can effectively work towards that goal.In response it spat out a block of code that I chose to retype entirley as opposed to copy and pasting so I could actually learn from it. What the code is doing is initializing an array, the length of the number of cells I want to display with the type
uint8_t which is an unsigned 8-bit integer. We then defined a bunch of helper
functions such as set and get cells, drawing individual cells, as well as drawing the complete state. The set and get
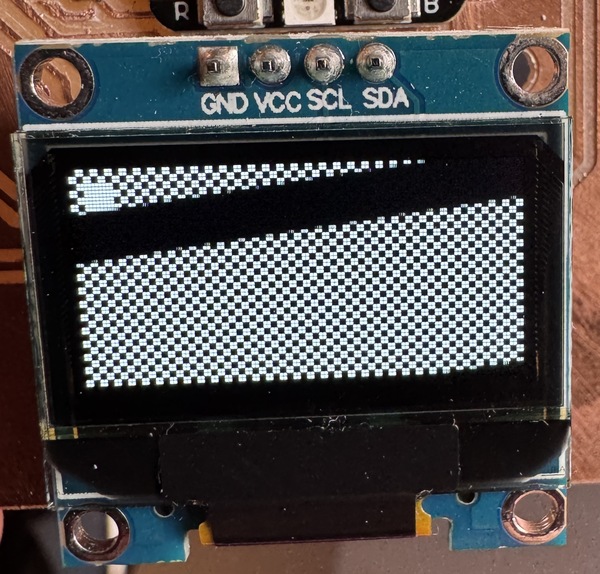
functions work by indexing into the array initiated earlier. The goal of this file was to be able to construct a storage
system for each pixels value. It was a success and displayed a checkerboard pattern as well as a 4x4 block in the top
left to test the cell size.
Once I got those main parts of the code figured out, I broke away from ChatGPT and began writing the underlying logic of the game.
I worked on this in a new file named NextStateTesting. This code when run starts with a randomly assigned screen layout and then
steps forward using the rules of the game!
Now that I had the functionality of the game complete, I wanted to make it so the game could be controled using the buttons on the device itself. For this, I didn't know how to implement a UI into the screen so I went back to Chat. I used Chat to simplify Quentin's code so that it only reported if the button was pressed or not. Once that was working, I used it to implement a pause/resume feature to the game.
Once the pause/play feature was working, I prompted it to write some code to develop a menu that the user could go through. We eventually got to a place where the menu includes resume, random seed, set FPS, and set fill options. This is all accessed and used using the buttons built into the pcb. When changing the fill and FPS options, however, it prompts the user to use serial to input the new values. All of the code used to do this can be found in the file named, finalLife. It works by testing for user input each time through the loop, based on whether or not it has gotten input and what that might be, it changes the mode of the game using UiMode variables that were created. Then depending on the mode at that time, different things are displayed. There are three different UI's: Game, Menu, and Prompt. The Game mode shows the game progressing. The Menu mode shows the menu and allows the user to select different options. The Prompt mode enables users to input new frame rates or fill percentages through Serial. Here is a video showing all of that functionality:
Group Assignment
The group assignment for the week was to "demonstrate and compare the toolchains and development workflows for available embedded architectures." The architecture group's work for this assignment can be found here.
Thoughts and Reflection
This week was a bit of a mess. I found myself focusing on the development of my website and I let the embedded programming has fall to the way side. On Thursday, I did the soldering training where I chose to use the Xiao RP2040 becasue I was in a bit of a rush and couldn't stay very long to solder all the components on the more complicated models. I soldered everything on to the PCB and tested the programs before I left and they all worked!
I spent a ton of time revamping my website this week like I said as I thought that the embedded programing portion of the project would be easier and so I left myself with less time. Late Monday night, I found that my pcb stopped working and I didn't have something to program on. Specifically, I was able to upload the first test code, the blinking led and it worked. Then I tried to test the screen and saw nothing pop up. After that, I was unable to continue uploading to the processor as my computer could no longer find it in the ports. I tested other arduinos and was able to find them and so I determined the problem was the Xiao itself. I texted out in the slack and while waiting, I tried to use a raspberry pi 4 and a 3.5" screen that I found laying around my room.
I spent a fair amount of time trying to get the raspberry pi to work but was unable to write any code for it as I couldn't connect to the board itself. I tried connecting to the board through a network connection but was unable to. I think the error was that it was running into problems with connecting to the school's wifi. I went to see Anthony and he was able to help me solve my problem. Fortunatley it was an easy fix, all we had to do was press the bootloader button before plugging in the processor to my computer and it was able to read it from the port. I feel kind of stupid but it is what it is and I just had to keep moving forward.
In the end, I was able to achieve my goal for the project! I used a fair amount of ChatGPT in order to achieve aspects of it which I don't feel great about but I also know that I wouldn't have been able to achieve anything close to this without it. I was very intentional about understanding what exactly the code was doing and not just blindly copying and pasting what it spit out. With that, I think I am still able to feel proud of the work and I definitley learned alot about c programming along the way.
Overall, its been quite the week. I definitley learned a lot about project and time management. I was right in my estimation that the actual embedded programming wouldn't take a ton of my time. I was wrong in assuming that just because I was ready to begin working on that portion of the project, it was ready to be worked on. I should have done some initial testing myself much earlier in the week to make sure all my hardware was working. I fell into the trap of working in series not in parallel. I am super proud of the result though.
Project Files
- ⬇ Individual Pixel Test
- ⬇ Random Pixel Test
- ⬇ Cell Assignment Test
- ⬇ Simple Game Loop
- ⬇ Test for Touch
- ⬇ Final Game